2022 HYUNDAI VELOSTER N climate control
[x] Cancel search: climate controlPage 170 of 446

3-92
Convenient features of your vehicle
Automatic Temperature
Control Mode
The Automatic Climate Control
System is controlled by setting the
desired temperature.
1. Press the AUTO button (3).
The modes, fan speeds, air intake
and air-conditioning will be con-
trolled automatically by the tem-
perature setting you select.
2. Turn the temperature control knob
(1) to the desired temperature. If
the temperature is set to the low-
est setting (Lo), the air condition-
ing system will operate continu-
ously. After the interior has cooled
sufficiently, adjust the knob to a
higher temperature set point
whenever possible.
To turn the automatic operation off,
select any button of the following:
- Mode selection button
- Front windshield defroster button
(Press the button one more time
to deselect the front windshield
defroster function. The 'AUTO'
sign will illuminate on the infor-
mation display once again.)
- Fan speed control buttonThe selected function will be con-
trolled manually while other functions
operate automatically.
For your convenience and to improve
the efficiency of the climate control,
use the AUTO button and set the
temperature to 72°F (22°C).
To change the temperature unit from
°F to °C or °C to °F:
- Press and hold the AUTO and OFF
buttons on the climate control unit
for 3 seconds.
Never place anything near the
ambient light/solar sensor to
ensure better control of the heat-
ing and cooling system.
NOTICE
OBU048039N
Page 175 of 446
3-97
Convenient features of your vehicle
3
Air conditioning (4)
Push the A/C button to manually turn
the system on (indicator light will illu-
minate) and off.
OFF mode (5)
Push the OFF button to turn the cli-
mate control system off. You can still
operate the mode and air intake but-
tons as long as the ignition switch is
in the ON position.
System Operation
Cooling / Ventilation
1. Select the Face Level mode.
2. Set the air intake control to fresh
mode.
3. Set the temperature control to the
desired position.
4. Set the fan speed control to the
desired speed.
Heating
1. Select the Floor Level mode.
2. Set the air intake control to fresh
mode.
3. Set the temperature control to the
desired position.
4. Set the fan speed control to the
desired speed.
5. If desired, turn the air conditioning
ON with the temperature control
knob set to heat in order to dehu-
midify the air before it enters into
the cabin.
If the windshield fogs up, select the
Floor & Defrost mode or press
the Front Defrost mode.
•Continued use of the climate
control system operation in
Recirculation mode for a pro-
longed period of time may
cause drowsiness to the
occupants in the cabin. This
may lead to loss of vehicle
control which may lead to an
accident.
•Continued use of the climate
control system operation in
Recirculation mode with the
A/C OFF may allow humidity
to increase inside the cabin.
This may cause condensation
to accumulate on the wind-
shield and obscure visibility.
•Do not sleep in your vehicle or
remain parked in your vehicle
with the windows up and
either the heater or the air
conditioning ON for pro-
longed periods of time. Doing
so may increase the levels of
carbon dioxide in the cabin
which may lead to serious
injury or death.
WARNING
Page 177 of 446
3-99
Convenient features of your vehicle
3
• To help reduce moisture inside of
the windows on rainy or humid
days, decrease the humidity inside
the vehicle by operating the air
conditioning system with the win-
dows closed.
• Use the air conditioning system
every month only for a few minutes
to ensure maximum system per-
formance.
• If you operate air conditioner
excessively, the difference between
the temperature of the outside air
and that of the windshield could
cause the outer surface of the
windshield to fog up, causing loss
of visibility. In this case, set the
mode selection knob or button to
the position and fan speed
control to the lower speed.System Maintenance
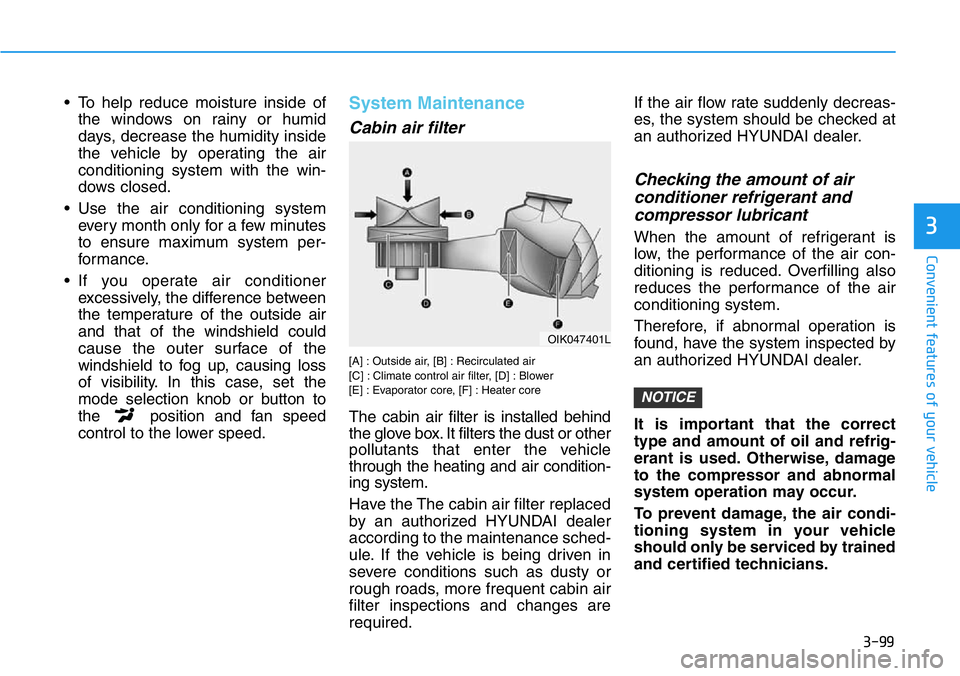
Cabin air filter
[A] : Outside air, [B] : Recirculated air
[C] : Climate control air filter, [D] : Blower
[E] : Evaporator core, [F] : Heater core
The cabin air filter is installed behind
the glove box. It filters the dust or other
pollutants that enter the vehicle
through the heating and air condition-
ing system.
Have the The cabin air filter replaced
by an authorized HYUNDAI dealer
according to the maintenance sched-
ule. If the vehicle is being driven in
severe conditions such as dusty or
rough roads, more frequent cabin air
filter inspections and changes are
required.If the air flow rate suddenly decreas-
es, the system should be checked at
an authorized HYUNDAI dealer.
Checking the amount of air
conditioner refrigerant and
compressor lubricant
When the amount of refrigerant is
low, the performance of the air con-
ditioning is reduced. Overfilling also
reduces the performance of the air
conditioning system.
Therefore, if abnormal operation is
found, have the system inspected by
an authorized HYUNDAI dealer.
It is important that the correct
type and amount of oil and refrig-
erant is used. Otherwise, damage
to the compressor and abnormal
system operation may occur.
To prevent damage, the air condi-
tioning system in your vehicle
should only be serviced by trained
and certified technicians.
NOTICE
OIK047401L
Page 179 of 446
3-101
Convenient features of your vehicle
3
• For maximum defrost perform-
ance, set the temperature control
knob to the highest temperature
setting (rotated all the way to the
right) and the fan speed control to
the highest setting.
• If warm air to the floor is desired
while defrosting or defogging, set the
mode to the floor-defrost position.
• Before driving, clear all snow and
ice from the windshield, rear win-
dow, side view mirrors, and all side
windows.
• Clear all snow and ice from the
hood and air inlet in the cowl grill to
improve heater and defroster effi-
ciency and to reduce the probability
of fogging up the inside of the wind-
shield.
If the engine temperature is still
cold after starting, then a brief
engine warm up period may be
required for the vented air flow to
become warm or hot.Manual Climate Control System
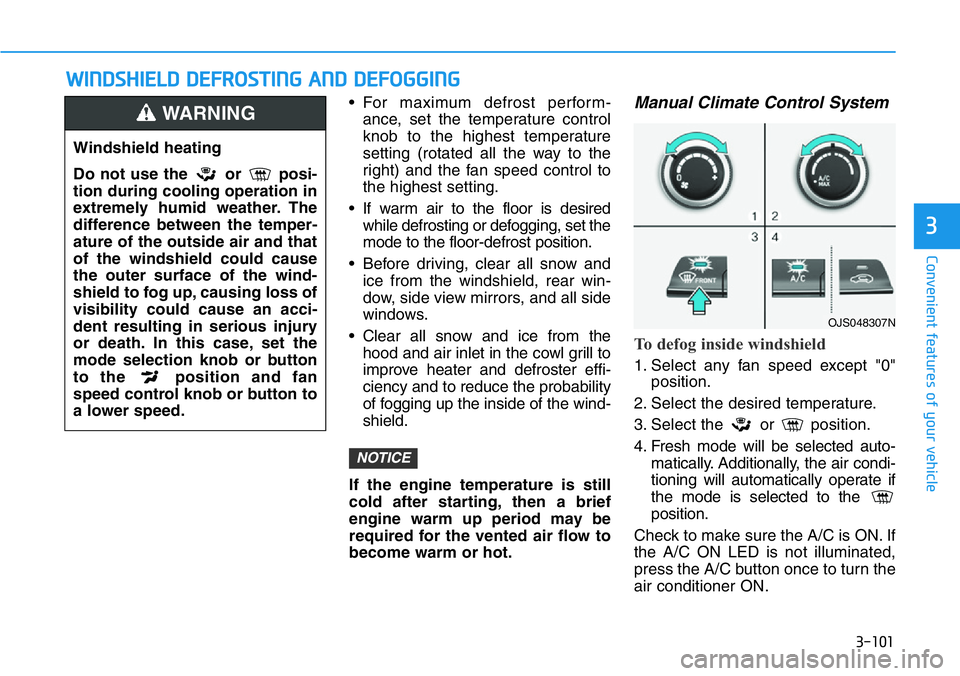
To defog inside windshield
1. Select any fan speed except "0"
position.
2. Select the desired temperature.
3. Select the or position.
4. Fresh mode will be selected auto-
matically. Additionally, the air condi-
tioning will automatically operate if
the mode is selected to the
position.
Check to make sure the A/C is ON. If
the A/C ON LED is not illuminated,
press the A/C button once to turn the
air conditioner ON.
NOTICE
WWINDSHIELD DEFROSTING AND DEFOGGING
Windshield heating
Do not use the or posi-
tion during cooling operation in
extremely humid weather. The
difference between the temper-
ature of the outside air and that
of the windshield could cause
the outer surface of the wind-
shield to fog up, causing loss of
visibility could cause an acci-
dent resulting in serious injury
or death. In this case, set the
mode selection knob or button
to the position and fan
speed control knob or button to
a lower speed.
WARNING
OJS048307N
Page 181 of 446
3-103
Convenient features of your vehicle
3
Defogging logic
To reduce the probability of fogging
up the inside of the windshield, the
air intake or air conditioning are con-
trolled automatically according to
certain conditions such as or
positions. To cancel or reset the
defogging logic, do the following.
Manual climate control system
1. Turn the ignition switch to the ON
position.
2. Press the defroster button ( ).
3. Press the air intake control button
at least 5 times within 3 seconds.
The LED indicator on the A/C ON
button will blink 3 times to indicate
that the defogging logic has been
disabled.
Repeat the steps again to re-enable
the defogging logic.
If the battery has been discharged or
disconnected, it resets to the defog
logic status.
Automatic climate control system
1. Turn the ignition switch to the ON
position.
2. Press the defroster button ( ).
3. While pressing the air conditioning
button (A/C), press the air intake
control button at least 5 times with-
in 3 seconds.
The Automatic Temperature Control
information screen will blink 3 times
to indicate that the defogging logic
has been disabled.
Repeat the steps again to re-enable
the defogging logic.
If the battery has been discharged or
disconnected, it resets to the defog
logic status.
Rear Window Defroster
To prevent damage to the rear
window defroster conducting ele-
ments bonded to the inside sur-
face of the rear window, never use
sharp instruments or window
cleaners containing abrasives to
clean the window.
If you want to defrost and defog
the front windshield, refer to the
"Windshield Defrosting and
Defogging" section in this chapter.
NOTICE
Page 182 of 446
3-104
Convenient features of your vehicle
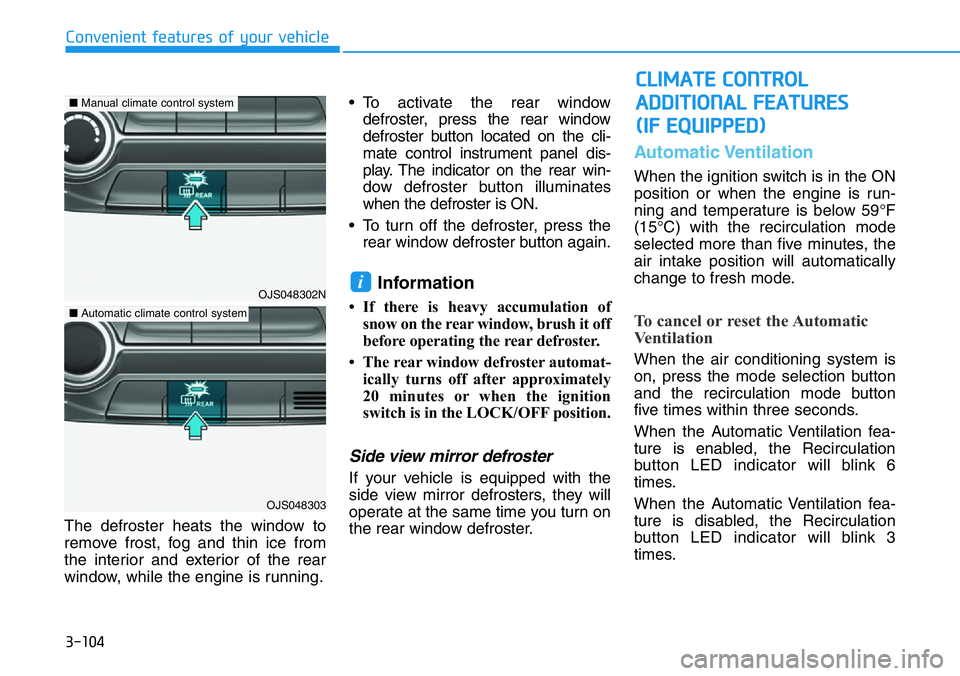
The defroster heats the window to
remove frost, fog and thin ice from
the interior and exterior of the rear
window, while the engine is running.• To activate the rear window
defroster, press the rear window
defroster button located on the cli-
mate control instrument panel dis-
play. The indicator on the rear win-
dow defroster button illuminates
when the defroster is ON.
• To turn off the defroster, press the
rear window defroster button again.
Information
• If there is heavy accumulation of
snow on the rear window, brush it off
before operating the rear defroster.
• The rear window defroster automat-
ically turns off after approximately
20 minutes or when the ignition
switch is in the LOCK/OFF position.
Side view mirror defroster
If your vehicle is equipped with the
side view mirror defrosters, they will
operate at the same time you turn on
the rear window defroster.
Automatic Ventilation
When the ignition switch is in the ON
position or when the engine is run-
ning and temperature is below 59°F
(15°C) with the recirculation mode
selected more than five minutes, the
air intake position will automatically
change to fresh mode.
To cancel or reset the Automatic
Ventilation
When the air conditioning system is
on, press the mode selection button
and the recirculation mode button
five times within three seconds.
When the Automatic Ventilation fea-
ture is enabled, the Recirculation
button LED indicator will blink 6
times.
When the Automatic Ventilation fea-
ture is disabled, the Recirculation
button LED indicator will blink 3
times.
i
CLIMATE CONTROL
ADDITIONAL FEATURES
(IF EQUIPPED)
OJS048302N
OJS048303
■Manual climate control system
■Automatic climate control system
Page 353 of 446
7
Maintenance
7
Maintenance
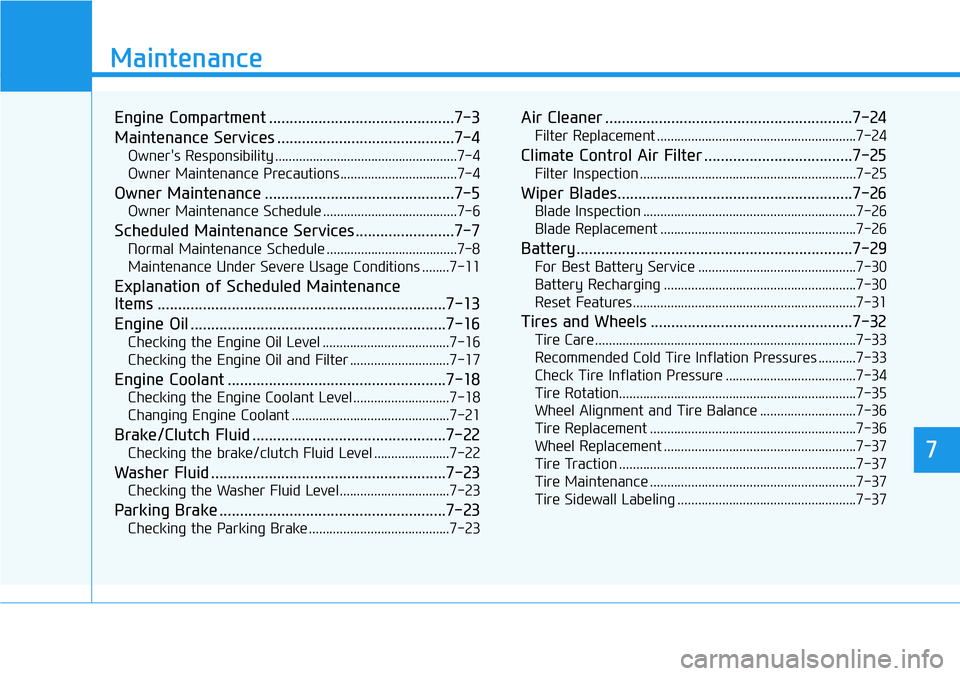
Engine Compartment .............................................7-3
Maintenance Services ...........................................7-4
Owner's Responsibility .....................................................7-4
Owner Maintenance Precautions..................................7-4
Owner Maintenance ..............................................7-5
Owner Maintenance Schedule .......................................7-6
Scheduled Maintenance Services........................7-7
Normal Maintenance Schedule ......................................7-8
Maintenance Under Severe Usage Conditions ........7-11
Explanation of Scheduled Maintenance
Items ......................................................................7-13
Engine Oil ..............................................................7-16
Checking the Engine Oil Level .....................................7-16
Checking the Engine Oil and Filter .............................7-17
Engine Coolant .....................................................7-18
Checking the Engine Coolant Level ............................7-18
Changing Engine Coolant ..............................................7-21
Brake/Clutch Fluid ...............................................7-22
Checking the brake/clutch Fluid Level ......................7-22
Washer Fluid .........................................................7-23
Checking the Washer Fluid Level................................7-23
Parking Brake .......................................................7-23
Checking the Parking Brake .........................................7-23
Air Cleaner ............................................................7-24
Filter Replacement ..........................................................7-24
Climate Control Air Filter ....................................7-25
Filter Inspection ...............................................................7-25
Wiper Blades.........................................................7-26
Blade Inspection ..............................................................7-26
Blade Replacement .........................................................7-26
Battery...................................................................7-29
For Best Battery Service ..............................................7-30
Battery Recharging ........................................................7-30
Reset Features.................................................................7-31
Tires and Wheels .................................................7-32
Tire Care ............................................................................7-33
Recommended Cold Tire Inflation Pressures ...........7-33
Check Tire Inflation Pressure ......................................7-34
Tire Rotation.....................................................................7-35
Wheel Alignment and Tire Balance ............................7-36
Tire Replacement ............................................................7-36
Wheel Replacement ........................................................7-37
Tire Traction .....................................................................7-37
Tire Maintenance ............................................................7-37
Tire Sidewall Labeling ....................................................7-37
7
Page 360 of 446
7-8
Maintenance
I : Inspect and if necessary, adjust, correct, clean or replace.
R : Replace or change.
*
1: If TOP TIER Detergent Gasoline is not available, one bottle of additive is recommended. Additives are available from your
authorized HYUNDAI dealer along with information on how to use them. Do not mix other additives.
*
2: The drive belt should be replaced when cracks occur or tension is reduced.
*3: Inspect for excessive valve noise and/or engine vibration and adjust if necessary. Have an authorized HYUNDAI dealer perform
the operation.
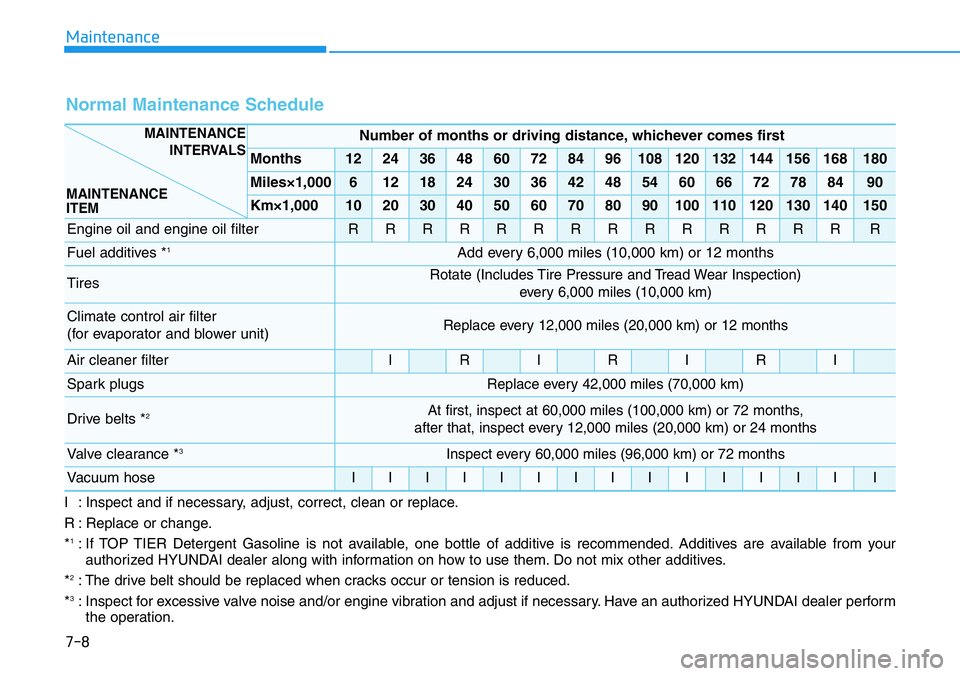
Normal Maintenance Schedule
Number of months or driving distance, whichever comes first
Months1224364860728496108120132144156168180
Miles×1,00061218243036424854606672788490
Km×1,000102030405060708090100110120130140150
Engine oil and engine oil filterRRRRRRRRRRRRRRR
Fuel additives *1Add every 6,000 miles (10,000 km) or 12 months
TiresRotate (Includes Tire Pressure and Tread Wear Inspection)
every 6,000 miles (10,000 km)
Climate control air filter
(for evaporator and blower unit)Replace every 12,000 miles (20,000 km) or 12 months
Air cleaner filterIRIRIRI
Spark plugsReplace every 42,000 miles (70,000 km)
Drive belts *2At first, inspect at 60,000 miles (100,000 km) or 72 months,
after that, inspect every 12,000 miles (20,000 km) or 24 months
Valve clearance *3Inspect every 60,000 miles (96,000 km) or 72 months
Vacuum hoseIIIIIIIIIIIIIII
MAINTENANCE
INTERVALS
MAINTENANCE
ITEM