2022 HYUNDAI VELOSTER N brakes
[x] Cancel search: brakesPage 9 of 446
F9
Introduction
For customers who do not use TOP
Tier Detergent Gasoline regularly,
and have problems starting or the
engine does not run smoothly, deter-
gent-based fuel additives that you
can purchase separately may be
added to the gasoline. If TOP TIER
Detergent Gasoline is not available,
one bottle of additive added to the
fuel tank according to the mainte-
nance schedule is recommended
(refer to the Maintenance Schedule
in chapter 7).
Additives are available from your
authorized HYUNDAI dealer along
with information on how to use them.
Do not mix other additives.
Operation in foreign countries
If you are going to drive your vehicle
in another country, be sure to:
• Observe all regulations regarding
registration and insurance.
• Determine that acceptable fuel is
available.• This vehicle should not be modi-
fied. Modification of your vehicle
could affect its performance, safety
or durability and may even violate
governmental safety and emis-
sions regulations.
In addition, damage or perform-
ance problems resulting from any
modification may not be covered
under warranty.
• If you use unauthorized electronic
devices, it may cause the vehicle to
operate abnormally, wire damage,
battery discharge and fire. For your
safety, do not use unauthorized
electronic devices.By following a few simple precautions
for the first 600 miles (1,000 km) you
may add to the performance, econo-
my and life of your vehicle.
• Do not race the engine.
• While driving, keep your engine
speed (rpm, or revolutions per
minute) between 2,000 rpm and
4,000 rpm.
• Do not maintain a single speed for
long periods of time, either fast or
slow. Varying engine speed is need-
ed to properly break-in the engine.
• Avoid hard stops, except in emer-
gencies, to allow the brakes to seat
properly.
• Do not use Launch Control during
the break-in process.
• Fuel economy and engine perform-
ance, engine oil consumption may
vary depending on vehicle break-in
process and be stabilized after
driving about 4,000 miles. New
engines may consume more oil
during the vehicle break-in period.
• Do not tow a trailer during the first
1,200 miles of operation.
VEHICLE BREAK-IN PROCESS
VEHICLE MODIFICATIONS
Page 117 of 446
3-39
Convenient features of your vehicle
3
If the brake fluid level in the reser-
voir is low:
1. Drive carefully to the nearest safe
location and stop your vehicle.
2. With the engine stopped, check the
brake fluid level immediately and
add fluid as required (For more
details, refer to "Brake Fluid" in
chapter 7). After adding brake
fluid, check all brake components
for fluid leaks. If a brake fluid leak is
found, or if the warning light
remains on, or if the brakes do not
operate properly, do not drive the
vehicle. Have the vehicle inspected
by an authorized HYUNDAI dealer.
Dual-diagonal braking system
Your vehicle is equipped with dual-
diagonal braking systems. This
means you still have braking on two
wheels even if one of the dual sys-
tems should fail.
With only one of the dual systems
working, more than normal pedal
travel and greater pedal pressure is
required to stop the vehicle.Also, the vehicle will not stop in as
short a distance with only a portion
of the brake system working.
If the brakes fail while you are driv-
ing, shift to a lower gear for addition-
al engine braking and stop the vehi-
cle as soon as it is safe to do so.
Anti-lock Brake System
(ABS) Warning Light
This warning light illuminates:
• When you place the ignition switch
to the ON position.
- The ABS warning light illuminates
for about 3 seconds and then
turns off.
• Whenever there is a malfunction
with the ABS.
Note that the hydraulic braking
system will still be operational even
if there is a malfunction with the
ABS.
Parking Brake & Brake Fluid
Warning Light
Driving the vehicle with a warn-
ing light ON is dangerous. If the
Parking Brake & Brake Fluid
Warning Light illuminates with
the parking brake released, it
indicates that the brake fluid
level is low.
In this case, have the vehicle
inspected by an authorized
HYUNDAI dealer.
WARNING
Page 121 of 446
3-43
Convenient features of your vehicle
3
Low Tire Pressure
Warning Light
This warning light illuminates:
• When you place the ignition switch
ON position.
- It illuminates for approximately 3
seconds and then goes off.
• When one or more of your tires are
significantly underinflated. (The
location of the underinflated tires
are displayed on the LCD display.)
For more details, refer to "Tire
Pressure Monitoring System
(TPMS)" in chapter 6.
This warning light remains ON
after blinking for approximately 60
seconds, or repeatedly blinks ON
and OFF in 3 second intervals:
• When there is a malfunction with
the TPMS.
In this case, have the vehicle inspect-
ed by an authorized HYUNDAI deal-
er as soon as possible.
For more details, refer to "Tire
Pressure Monitoring System
(TPMS)" in chapter 6.
Electronic Stability
Control (ESC) Indicator
Light
This indicator light illuminates:
• When you place the ignition switch
to the ON position.
- The Electronic Stability Control
indicator light illuminates for
about 3 seconds and then goes
off.
• Whenever there is a malfunction
with the ESC system.
If this occurs, have the vehicle
inspected by an authorized
HYUNDAI dealer.
This indicator light blinks:
• While the ESC is operating.
For more details, refer to
"Electronic Stability Control (ESC)"
in chapter 5. Safe Stopping
•The TPMS cannot alert you to
severe and sudden tire dam-
age caused by external fac-
tors.
•If you notice any vehicle insta-
bility, immediately take your
foot off the accelerator pedal,
apply the brakes gradually
with light force, and slowly
move to a safe position off the
road.
WARNING
Page 195 of 446
Driving your vehicle
5
Before driving .......................................................5-4
Before Entering the Vehicle ...........................................5-4
Before Starting ..................................................................5-4
Engine Start/Stop Button................................................5-6
Ignition switch .......................................................5-6
Manual transmission ..........................................5-12
Manual Transmission Operation .................................5-12
Good Driving Practices .................................................5-14
Rev matching....................................................................5-15
Dual clutch transmission ...................................5-19
Dual clutch transmission operation ...........................5-19
DCT warning messages..................................................5-21
Parking ...............................................................................5-29
Good driving practices ..................................................5-29
Braking system ...................................................5-31
Power Brakes ...................................................................5-31
High Performance Brake...............................................5-32
Disc Brakes Wear Indicator ..........................................5-32
Parking Brake .................................................................5-33
Anti-lock Brake System (ABS) ....................................5-34
Electronic Stability Control (ESC)................................5-36
Vehicle Stability Management (VSM).........................5-42
Hill-Start Assist Control (HAC) ....................................5-44
Good Braking Practices ................................................5-44
Electronic control suspension (ECS).................5-46
Electronic limited slip differential ....................5-47
Warning messages ..........................................................5-48
Drive Mode Integrated Control System ............5-49
DRIVE MODE button .......................................................5-49
N button.............................................................................5-51
NGS (N Grin Shift) .........................................................5-52
Vehicle characteristic .....................................................5-54
Performance option.............................................5-56
Performance option settings .......................................5-56
Launch Control.................................................................5-56
Shift Indicator ..................................................................5-60
N Track Sense Shift
(For Dual Clutch Transmission) ..................................5-61
N Power Shift (For Dual Clutch Transmission) ........5-62
Declaration of conformity ..................................5-63
Forward Collision-Avoidance Assist (FCA)
(Front view camera only) ...................................5-64
System settings ...............................................................5-65
System operation ............................................................5-67
System malfunction and limitations ...........................5-70
Lane Keeping Assist (LKA) .................................5-77
System settings ..............................................................5-77
System operation ............................................................5-79
System malfunction and limitations ...........................5-81
Page 207 of 446
5-13
Driving your vehicle
5
Using the clutch
The clutch pedal should be
depressed all the way before:
- Starting the engine
The engine will not start without
depressing the clutch pedal.
- Shifting into gear, up shifting to the
next higher gear, or down shifting
to the next lower gear.
When releasing the clutch pedal,
release it slowly. The clutch pedal
should always be fully released while
driving.To prevent unnecessary wear or
damage to the clutch:
• Do not rest your foot on the
clutch pedal while driving.
• Do not hold the vehicle with the
clutch on an incline, while wait-
ing for the traffic light, etc.
• Always depress the clutch pedal
down fully to prevent noise or
damage.
• Do not depress the clutch pedal
again until it is fully released.
• Do not start with the 2
ndgear
engaged except when you start
on a slippery road.
• Do not drive with cargo loaded
more than required loading
capacity.
Downshifting
Down shift to a lower gear when
slowing down in heavy traffic or driv-
ing up a steep hill to prevent high
engine loads.
Also, downshifting reduces the
chance of stalling and helps reaccel-
erate the vehicle when you need to
increase your speed.
When the vehicle is going downhill,
downshifting helps maintain safe
speed by providing engine braking
(brake power from the engine) and
results in less wear on the brakes.
NOTICE
Page 208 of 446
5-14
Driving your vehicle
To prevent damage to the engine,
clutch and transmission:
• When downshifting from 5
th
gear to 4thgear, be careful not to
inadvertently push the shift
lever sideways engaging the 2
nd
gear. A drastic downshift may
cause the engine speed to
increase to the point the
tachometer will enter the red-
zone and may cause engine,
clutch and the transmission
damage.
• Do not downshift more than two
gear at a time or downshift the
gear when the engine is running
at high speed (5,000 RPM or
higher).
Such down shifting may damage
the engine, clutch and the trans-
mission.
Good Driving Practices
• Never take the vehicle out of gear
and coast down a hill. This is
extremely dangerous.
• Don't "ride" the brakes. This can
cause the brakes and related parts
to overheat and malfunction.
When you are driving down a long
hill, slow down and shift to a lower
gear. Engine braking will help slow
down the vehicle.
• Slow down before shifting to a
lower gear. This will help avoid
over-revving the engine, which can
cause damage.
• Slow down when you encounter
cross winds. This gives you much
better control of your vehicle.
• Be sure the vehicle is completely
stopped before you shift into R
(Reverse) to prevent damage to
the transmission.• Exercise extreme caution when
driving on a slippery surface. Be
especially careful when braking,
accelerating or shifting gears. On a
slippery surface, an abrupt change
in vehicle speed can cause the
drive wheels to lose traction and
may cause loss of vehicle control
resulting in an accident.
NOTICE
Do not use aggressive engine
braking (shifting from a higher
gear to a lower gear) on slip-
pery roads. This could cause
the tires to slip and may result
in an accident.
WARNING
Page 216 of 446
5-22
Driving your vehicle
Transmission high temperature
• Under certain conditions, such as
repeated stop-and-go launches on
steep grades, sudden take off or
acceleration, or other harsh driving
conditions, the transmission clutch
temperatures will increase exces-
sively. Finally the clutch in trans-
mission could be overheated.
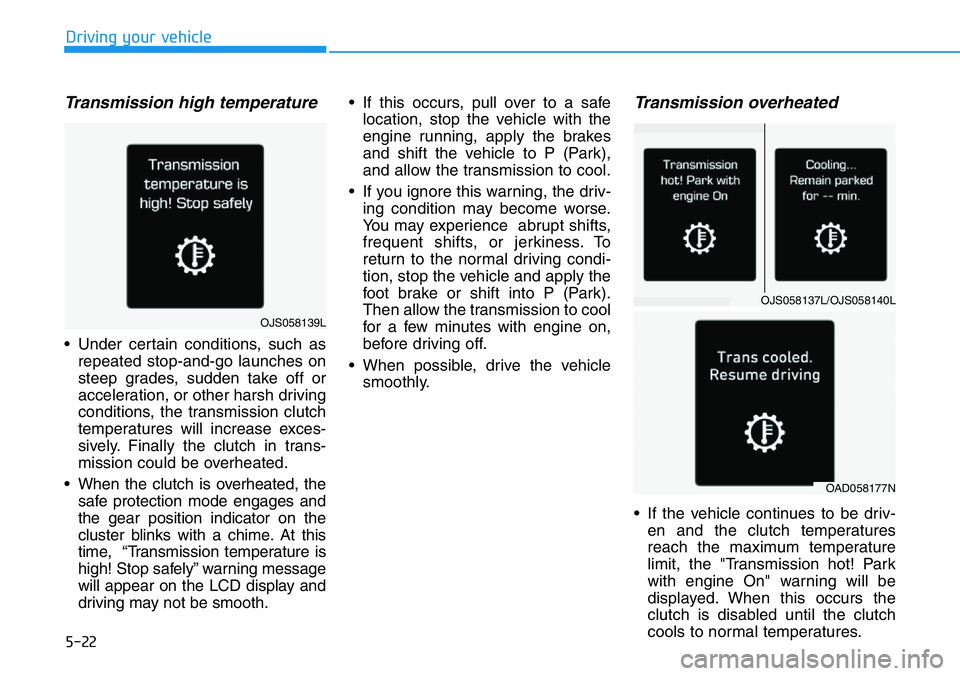
• When the clutch is overheated, the
safe protection mode engages and
the gear position indicator on the
cluster blinks with a chime. At this
time, “Transmission temperature is
high! Stop safely” warning message
will appear on the LCD display and
driving may not be smooth.• If this occurs, pull over to a safe
location, stop the vehicle with the
engine running, apply the brakes
and shift the vehicle to P (Park),
and allow the transmission to cool.
• If you ignore this warning, the driv-
ing condition may become worse.
You may experience abrupt shifts,
frequent shifts, or jerkiness. To
return to the normal driving condi-
tion, stop the vehicle and apply the
foot brake or shift into P (Park).
Then allow the transmission to cool
for a few minutes with engine on,
before driving off.
• When possible, drive the vehicle
smoothly.
Transmission overheated
• If the vehicle continues to be driv-
en and the clutch temperatures
reach the maximum temperature
limit, the "Transmission hot! Park
with engine On" warning will be
displayed. When this occurs the
clutch is disabled until the clutch
cools to normal temperatures.
OJS058137L/OJS058140L
OAD058177N
OJS058139L
Page 217 of 446
5-23
Driving your vehicle
5
• The warning will display a time to
wait for the transmission to cool.
• If this occurs, pull over to a safe
location, stop the vehicle with the
engine running, apply the brakes
and shift the vehicle to P (Park),
and allow the transmission to cool.
• When the message "Transmission
cooled down. Resume driving"
appears you can continue to drive
your vehicle.
• When possible, drive the vehicle
smoothly.
If any of the warning messages in
the LCD display continue to blink, for
your safety, we recommend you con-
tact an authorized HYUNDAI dealer
and have the system checked.Transmission ranges
The indicator in the instrument clus-
ter displays the shift lever position
when the ignition switch is in the ON
position.
P (Park)
Always come to a complete stop
before shifting into P (Park).
To shift from P (Park), you must
depress firmly on the brake pedal
and make sure your foot is off the
accelerator pedal.
If you have done all of the above
and still cannot shift the lever out
of P (Park), see "Shift-Lock
Release" in this chapter.
The shift lever must be in P (Park)
before turning the engine off.
•Shifting into P (Park) while the
vehicle is in motion may
cause you to lose control of
the vehicle.
•After the vehicle has stopped,
always make sure the shift
lever is in P (Park), apply the
parking brake, and turn the
engine off.
•When parking on an incline,
block the wheels to prevent
the vehicle from rolling down.
•For safety, always engage the
parking brake with the shift
lever in the P (Park) position
except for the case of emer-
gency parking.
•Do not use the P (Park) posi-
tion in place of the parking
brake.
WARNING