2022 HYUNDAI TUCSON Radio
[x] Cancel search: RadioPage 190 of 638
Convenient features
5-46
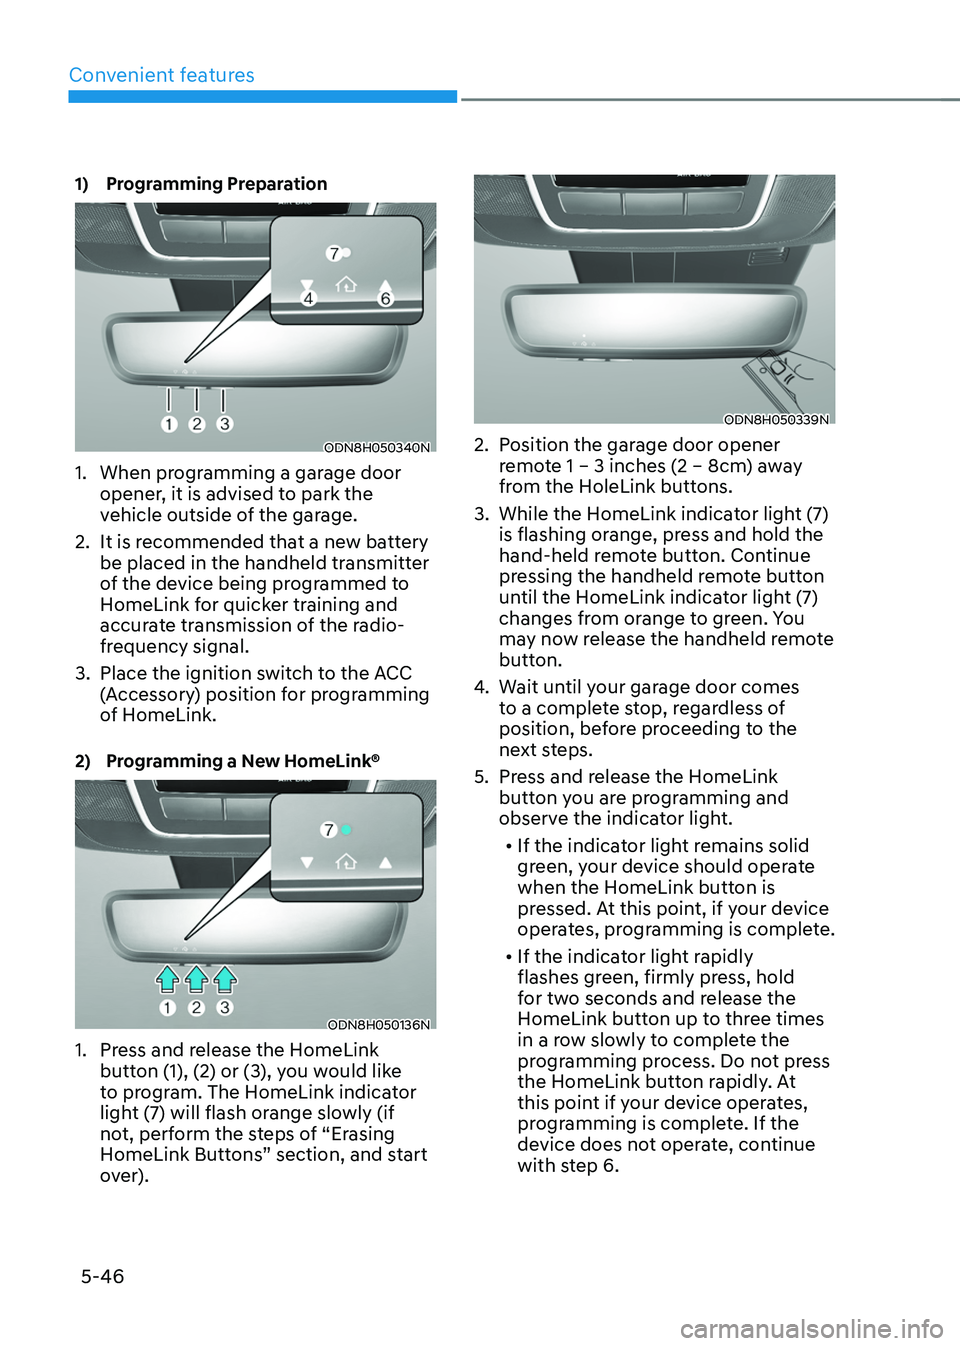
1) Programming Preparation
ODN8H050340N
1. When programming a garage door
opener, it is advised to park the
vehicle outside of the garage.
2. It is recommended that a new battery
be placed in the handheld transmitter
of the device being programmed to
HomeLink for quicker training and
accurate transmission of the radio-
frequency signal.
3. Place the ignition switch to the ACC
(Accessory) position for programming
of HomeLink.
2) Programming a New HomeLink®
ODN8H050136N
1. Press and release the HomeLink
button (1), (2) or (3), you would like
to program. The HomeLink indicator
light (7) will flash orange slowly (if
not, perform the steps of “Erasing
HomeLink Buttons” section, and start
over).
ODN8H050339N
2. Position the garage door opener
remote 1 – 3 inches (2 – 8cm) away
from the HoleLink buttons.
3. While the HomeLink indicator light (7)
is flashing orange, press and hold the
hand-held remote button. Continue
pressing the handheld remote button
until the HomeLink indicator light (7)
changes from orange to green. You
may now release the handheld remote
button.
4. Wait until your garage door comes
to a complete stop, regardless of
position, before proceeding to the
next steps.
5. Press and release the HomeLink
button you are programming and
observe the indicator light.• If the indicator light remains solid
green, your device should operate
when the HomeLink button is
pressed. At this point, if your device
operates, programming is complete.
• If the indicator light rapidly
flashes green, firmly press, hold
for two seconds and release the
HomeLink button up to three times
in a row slowly to complete the
programming process. Do not press
the HomeLink button rapidly. At
this point if your device operates,
programming is complete. If the
device does not operate, continue
with step 6.
Page 192 of 638
Convenient features
5-48
2. On your garage door opener in your
garage, locate the “Learn” button
(usually near where the hanging
antenna wire is attached to the garage
door opener). If there is difficulty
locating this button, reference the
device’s owner’s manual.
3. Press and release the “Learn” button.
4. A light on your garage door opener
may flash, and your Two-Way
Communication indicators (4), (6) in
your vehicle may flash, confirming
completion of the process.
5. Return to the vehicle and firmly
press and release the programmed
HomeLink button to activate
your garage door. The Two-Way
Communication indicators (4), (6)
flash in orange when the door is
moving. Do not make any additional
button presses until AFTER the garage
door has come to a complete stop.
6. Your Two-Way Communication
programming is now complete.
Information
If your garage door opener has Two-
Way Communication functionality,
it is possible for HomeLink to stop
functioning the garage door shortly
after initial programming, IF the Two-
Way Communication Programming
wasn’t properly completed. This
usually happens after the first 10 times
a programmed HomeLink button is
pressed. If you experience this, completing
the “Programming a New HomeLink
Button” and “Two-Way Communication
Programming” will restore door
operation.
4) Canadian Programming
Canadian radio-frequency laws require
transmitter remote signals to “time-
out” (or quit) after a couple seconds of
transmission, which may not be long
enough for HomeLink to pick up the signal
during programming.
If you live in Canada or you are having
difficulties programming a gate operator
or garage door opener by using the
programming procedures, replace
“Programming a New HomeLink Button”
step 3 with the following:
While the HomeLink indicator light (7) is
flashing orange, press and release (“cycle”)
your device’s handheld remote every two
seconds until the HomeLink indicator light
(7) changes from orange to green. You may
now release the hand-held remote button.
Then proceed with “Programming a New
HomeLink Button” step 4.
Page 219 of 638
05
5-75
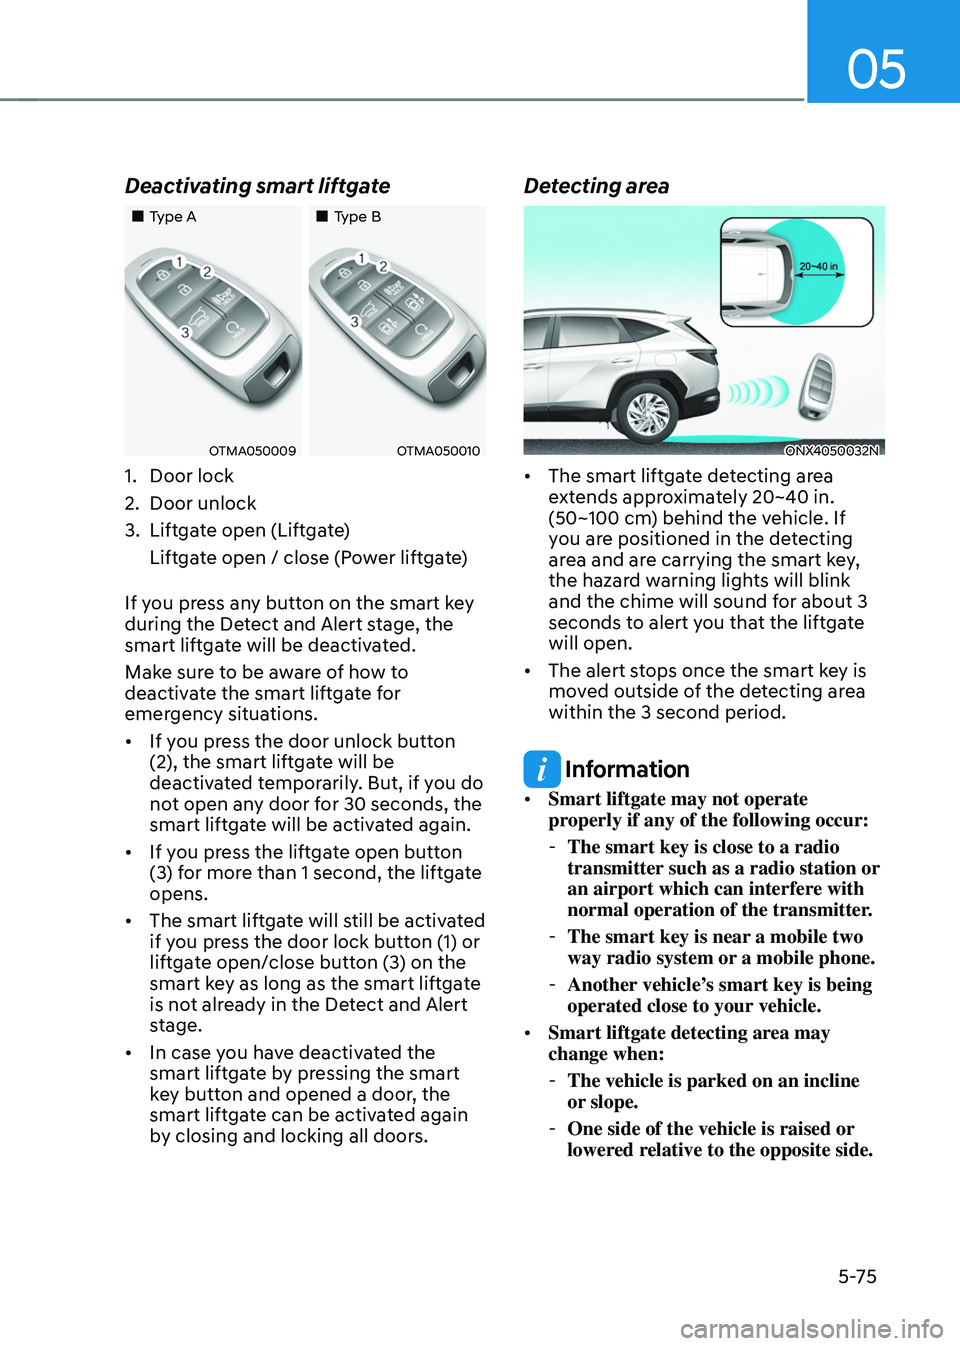
Deactivating smart liftgate
„„Type A„„Type B
OTMA050009OTMA050010
1. Door lock
2. Door unlock
3. Liftgate open (Liftgate)
Liftgate open / close (Power liftgate)
If you press any button on the smart key
during the Detect and Alert stage, the
smart liftgate will be deactivated.
Make sure to be aware of how to
deactivate the smart liftgate for
emergency situations.
• If you press the door unlock button
(2), the smart liftgate will be
deactivated temporarily. But, if you do
not open any door for 30 seconds, the
smart liftgate will be activated again.
• If you press the liftgate open button
(3) for more than 1 second, the liftgate
opens.
• The smart liftgate will still be activated
if you press the door lock button (1) or
liftgate open/close button (3) on the
smart key as long as the smart liftgate
is not already in the Detect and Alert
stage.
• In case you have deactivated the
smart liftgate by pressing the smart
key button and opened a door, the
smart liftgate can be activated again
by closing and locking all doors.
Detecting area
ONX4050032N
• The smart liftgate detecting area
extends approximately 20~40 in.
(50~100 cm) behind the vehicle. If
you are positioned in the detecting
area and are carrying the smart key,
the hazard warning lights will blink
and the chime will sound for about 3
seconds to alert you that the liftgate
will open.
• The alert stops once the smart key is
moved outside of the detecting area
within the 3 second period.
Information
• Smart liftgate may not operate
properly if any of the following occur:
-The smart key is close to a radio
transmitter such as a radio station or
an airport which can interfere with
normal operation of the transmitter.
-The smart key is near a mobile two
way radio system or a mobile phone.
-Another vehicle’s smart key is being
operated close to your vehicle.
• Smart liftgate detecting area may
change when:
-The vehicle is parked on an incline
or slope.
-One side of the vehicle is raised or
lowered relative to the opposite side.
Page 281 of 638
05
5-137
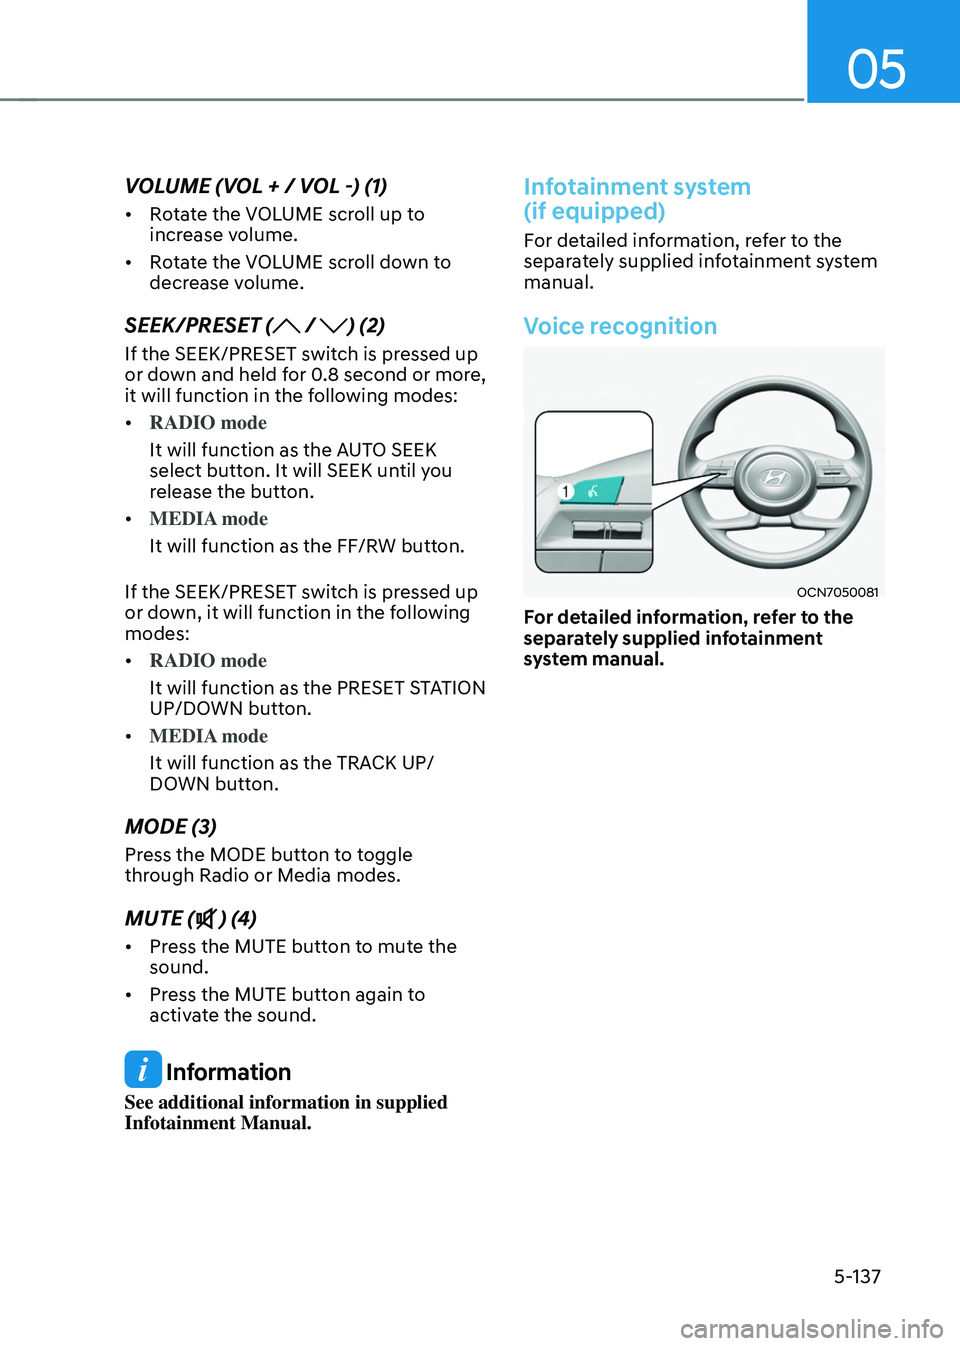
VOLUME (VOL + / VOL -) (1)
• Rotate the VOLUME scroll up to
increase volume.
• Rotate the VOLUME scroll down to
decrease volume.
SEEK/PRESET ( / ) (2)
If the SEEK/PRESET switch is pressed up
or down and held for 0.8 second or more,
it will function in the following modes:
• RADIO mode
It will function as the AUTO SEEK
select button. It will SEEK until you
release the button.
• MEDIA mode
It will function as the FF/RW button.
If the SEEK/PRESET switch is pressed up
or down, it will function in the following
modes:
• RADIO mode
It will function as the PRESET STATION
UP/DOWN button.
• MEDIA mode
It will function as the TRACK UP/
DOWN button.
MODE (3)
Press the MODE button to toggle
through Radio or Media modes.
MUTE () (4)
• Press the MUTE button to mute the
sound.
• Press the MUTE button again to
activate the sound.
Information
See additional information in supplied
Infotainment Manual.
Infotainment system
(if equipped)
For detailed information, refer to the
separately supplied infotainment system
manual.
Voice recognition
OCN7050081
For detailed information, refer to the
separately supplied infotainment
system manual.
Page 282 of 638
Convenient features
5-138
Bluetooth® Wireless Technology
ONX4050062
ONX4E050174
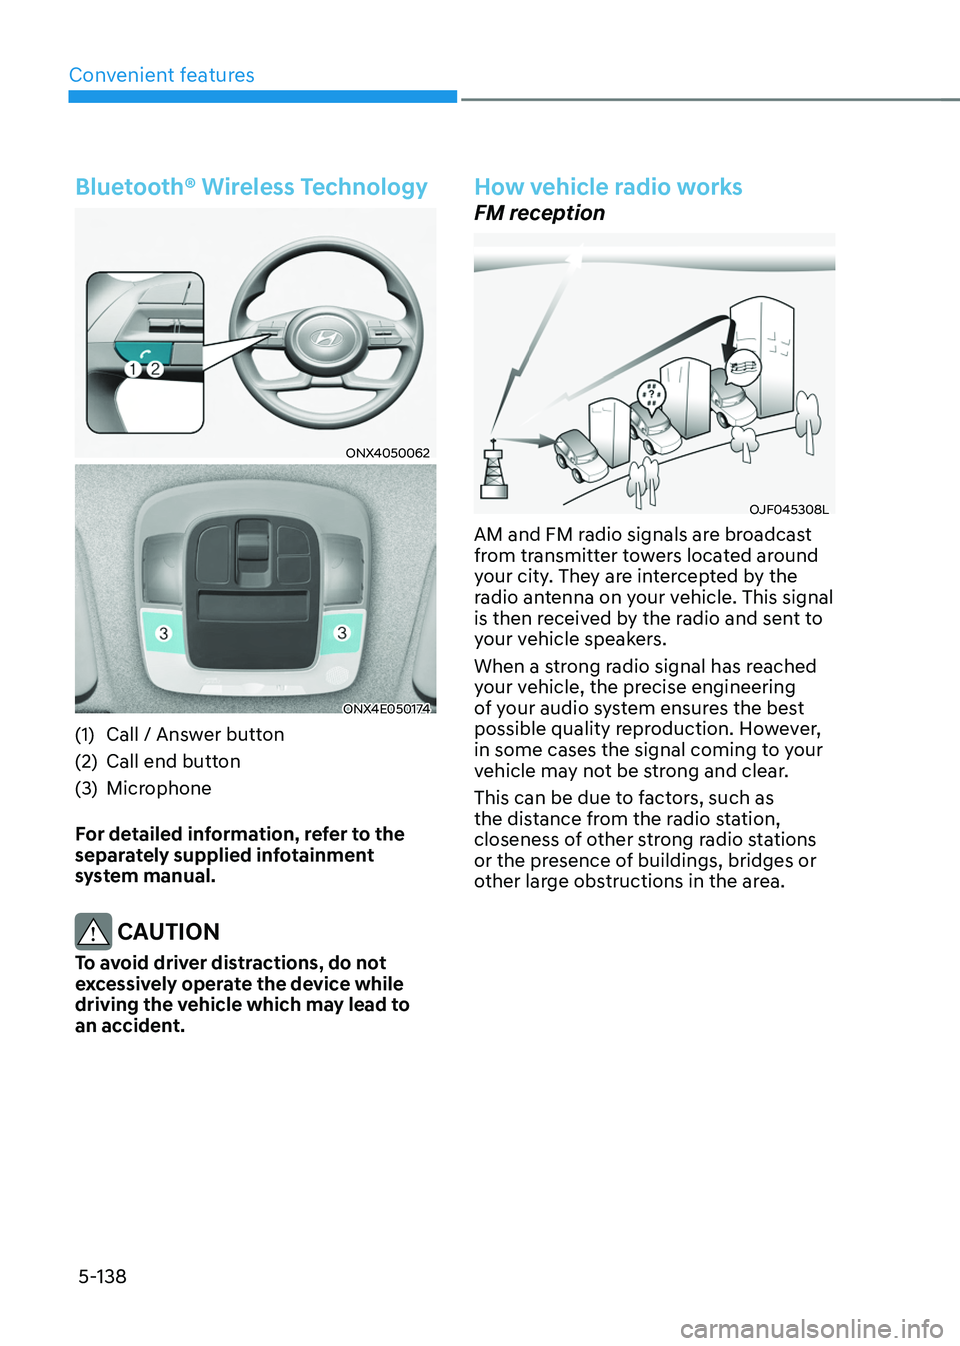
(1) Call / Answer button
(2) Call end button
(3) Microphone
For detailed information, refer to the
separately supplied infotainment
system manual.
CAUTION
To avoid driver distractions, do not
excessively operate the device while
driving the vehicle which may lead to
an accident.
How vehicle radio works
FM reception
OJF045308L
AM and FM radio signals are broadcast
from transmitter towers located around
your city. They are intercepted by the
radio antenna on your vehicle. This signal
is then received by the radio and sent to
your vehicle speakers.
When a strong radio signal has reached
your vehicle, the precise engineering
of your audio system ensures the best
possible quality reproduction. However,
in some cases the signal coming to your
vehicle may not be strong and clear.
This can be due to factors, such as
the distance from the radio station,
closeness of other strong radio stations
or the presence of buildings, bridges or
other large obstructions in the area.
Page 283 of 638
05
5-139
AM (MW, LW) reception
OJF045309L
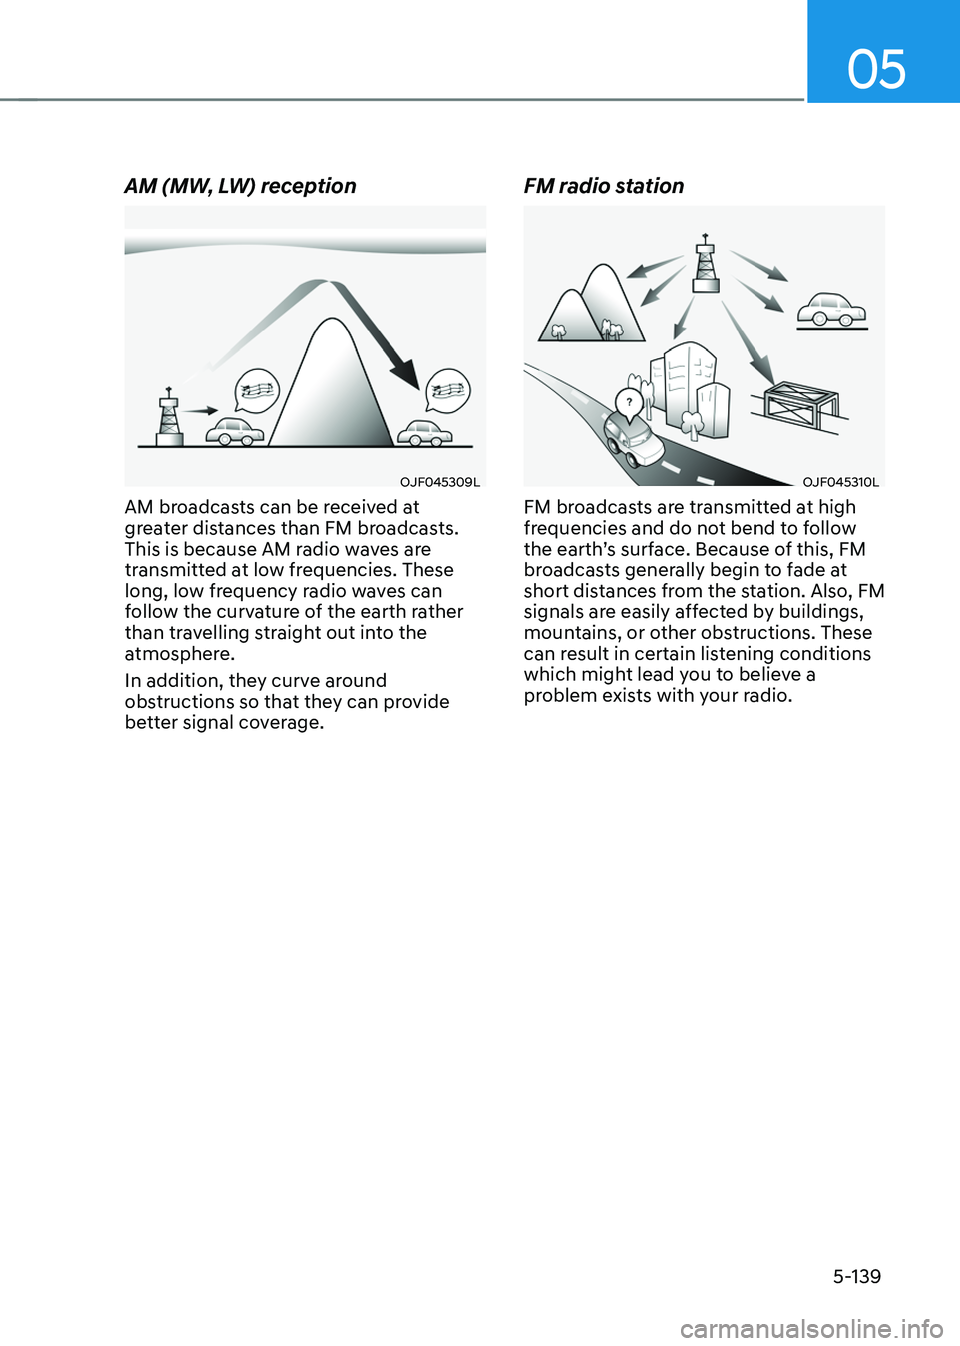
AM broadcasts can be received at
greater distances than FM broadcasts.
This is because AM radio waves are
transmitted at low frequencies. These
long, low frequency radio waves can
follow the curvature of the earth rather
than travelling straight out into the
atmosphere.
In addition, they curve around
obstructions so that they can provide
better signal coverage.
FM radio station
OJF045310L
FM broadcasts are transmitted at high
frequencies and do not bend to follow
the earth’s surface. Because of this, FM
broadcasts generally begin to fade at
short distances from the station. Also, FM
signals are easily affected by buildings,
mountains, or other obstructions. These
can result in certain listening conditions
which might lead you to believe a
problem exists with your radio.
Page 284 of 638
Convenient features
5-140
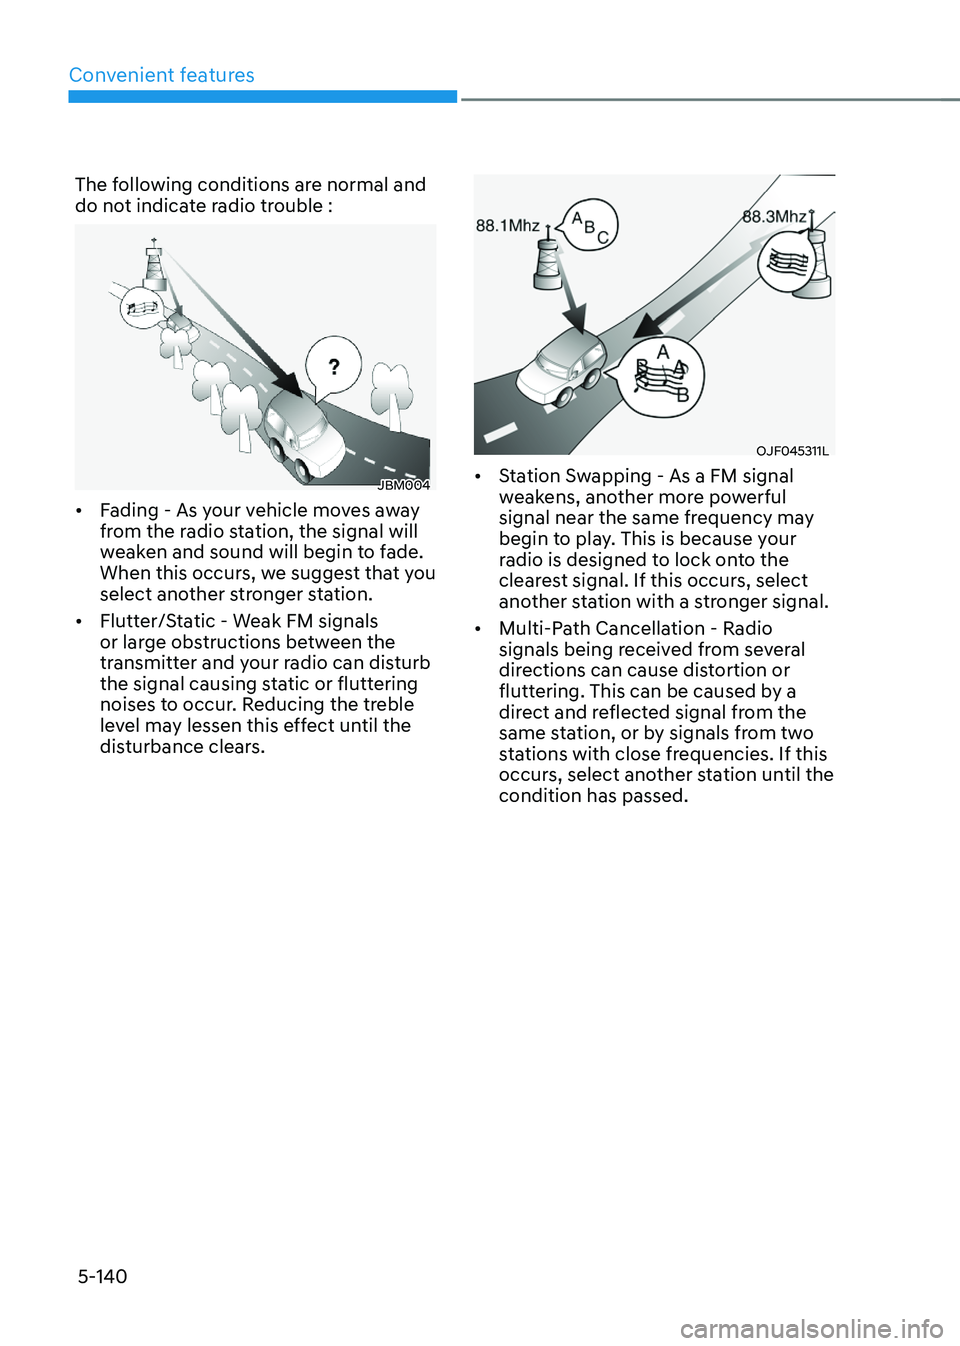
The following conditions are normal and
do not indicate radio trouble :
JBM004
• Fading - As your vehicle moves away
from the radio station, the signal will
weaken and sound will begin to fade.
When this occurs, we suggest that you
select another stronger station.
• Flutter/Static - Weak FM signals
or large obstructions between the
transmitter and your radio can disturb
the signal causing static or fluttering
noises to occur. Reducing the treble
level may lessen this effect until the
disturbance clears.
OJF045311L
• Station Swapping - As a FM signal
weakens, another more powerful
signal near the same frequency may
begin to play. This is because your
radio is designed to lock onto the
clearest signal. If this occurs, select
another station with a stronger signal.
• Multi-Path Cancellation - Radio
signals being received from several
directions can cause distortion or
fluttering. This can be caused by a
direct and reflected signal from the
same station, or by signals from two
stations with close frequencies. If this
occurs, select another station until the
condition has passed.
Page 285 of 638
05
5-141
Using a cellular phone or a twoway
radio
When a cellular phone is used inside
the vehicle, noise may be produced
from the audio system. This does not
mean that something is wrong with the
audio equipment. In such a case, use
the cellular phone at a place as far as
possible from the audio equipment.
NOTICE
When using a communication system
such as a cellular phone or a radio set
inside the vehicle, a separate external
antenna must be fitted. When a cellular
phone or a radio set is used with an
internal antenna alone, it may interfere
with the vehicle’s electrical system and
adversely affect safe operation of the
vehicle.
WARNING
Do not use a cellular phone while
driving. Stop at a safe location to use a
cellular phone.