2022 HYUNDAI SONATA HYBRID fuel
[x] Cancel search: fuelPage 144 of 527
Instrument Cluster
4-40
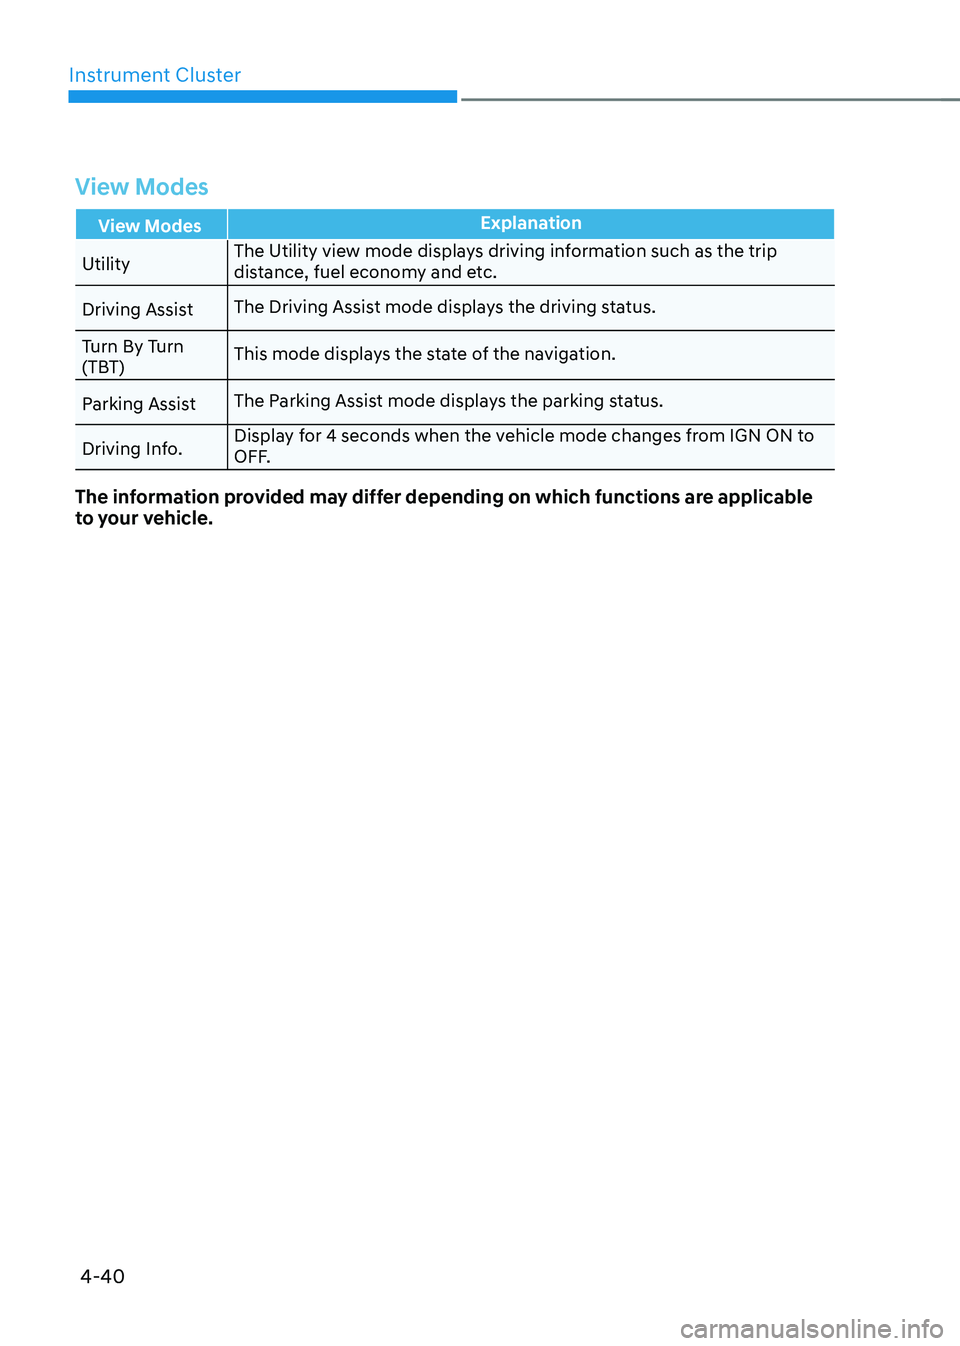
View Modes
View ModesExplanation
Utility The Utility view mode displays driving information such as the trip
distance, fuel economy and etc.
Driving Assist The Driving Assist mode displays the driving status.
Turn By Turn
(TBT) This mode displays the state of the navigation.
Parking Assist The Parking Assist mode displays the parking status.
Driving Info. Display for 4 seconds when the vehicle mode changes from IGN ON to
OFF.
The information provided may differ depending on which functions are applicable
to your vehicle.
Page 145 of 527
04
4-41
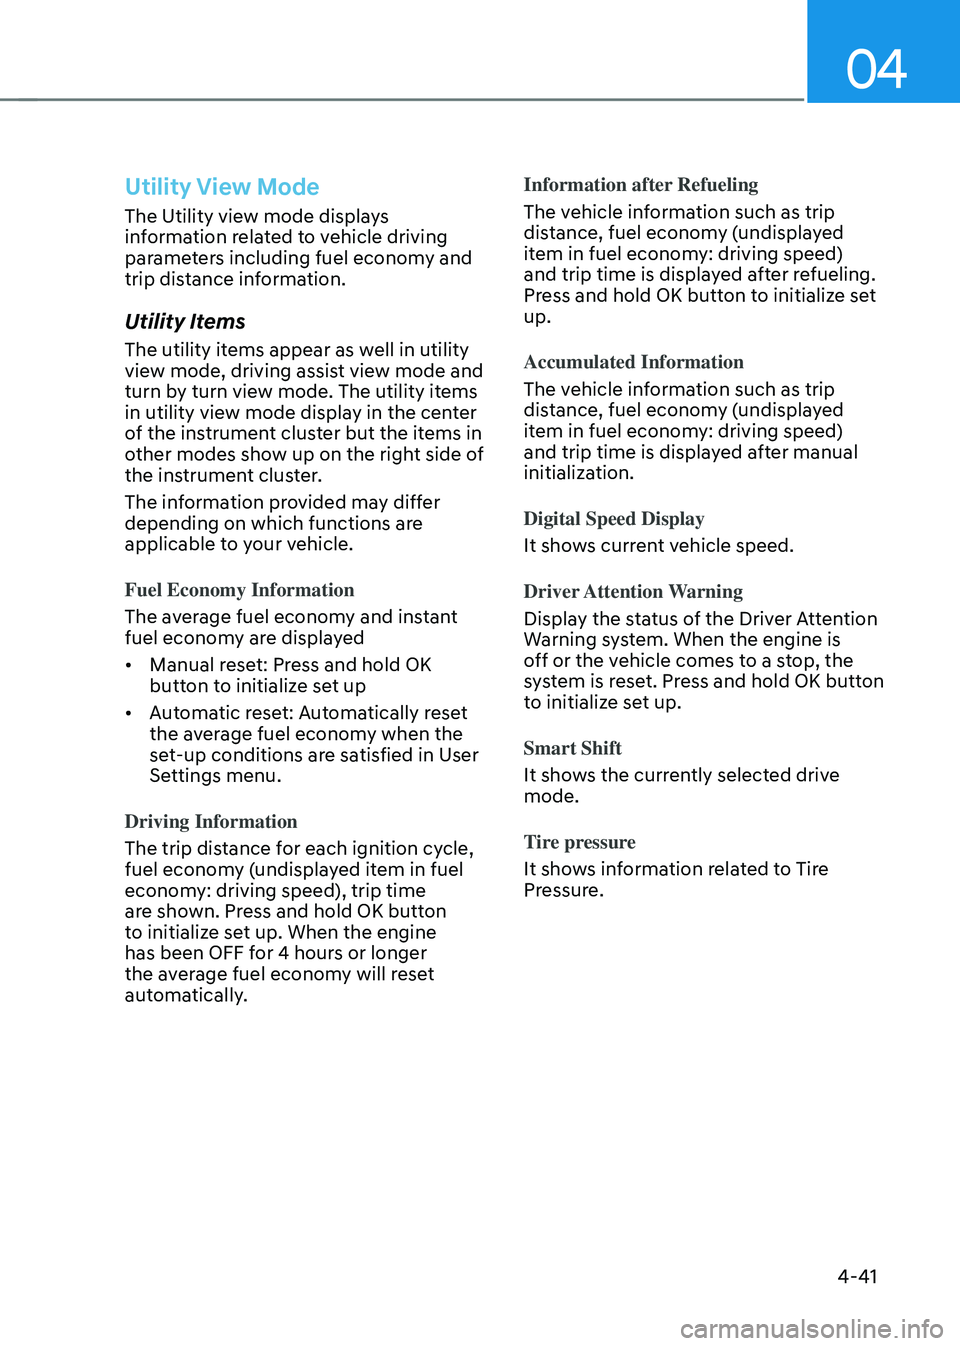
Utility View Mode
The Utility view mode displays
information related to vehicle driving
parameters including fuel economy and
trip distance information.
Utility Items
The utility items appear as well in utility
view mode, driving assist view mode and
turn by turn view mode. The utility items
in utility view mode display in the center
of the instrument cluster but the items in
other modes show up on the right side of
the instrument cluster.
The information provided may differ
depending on which functions are
applicable to your vehicle.
Fuel Economy Information
The average fuel economy and instant
fuel economy are displayed
• Manual reset: Press and hold OK
button to initialize set up
• Automatic reset: Automatically reset
the average fuel economy when the
set-up conditions are satisfied in User
Settings menu.
Driving Information
The trip distance for each ignition cycle,
fuel economy (undisplayed item in fuel
economy: driving speed), trip time
are shown. Press and hold OK button
to initialize set up. When the engine
has been OFF for 4 hours or longer
the average fuel economy will reset
automatically. Information after Refueling
The vehicle information such as trip
distance, fuel economy (undisplayed
item in fuel economy: driving speed)
and trip time is displayed after refueling.
Press and hold OK button to initialize set
up.
Accumulated Information
The vehicle information such as trip
distance, fuel economy (undisplayed
item in fuel economy: driving speed)
and trip time is displayed after manual
initialization.
Digital Speed Display
It shows current vehicle speed.
Driver Attention Warning
Display the status of the Driver Attention
Warning system. When the engine is
off or the vehicle comes to a stop, the
system is reset. Press and hold OK button
to initialize set up.
Smart Shift
It shows the currently selected drive
mode.
Tire pressure
It shows information related to Tire
Pressure.
Page 150 of 527

5
Closing the Sunroof ........................................................................\
...........................5-57
Resetting the Sunroof ........................................................................\
........................5-58
Sunroof Open Warning ........................................................................\
......................5-58
Solar Roof ........................................................................\
................................5-59How to Use ........................................................................\
.........................................5-59
Battery Charging Amount ........................................................................\
..................5-59
Solar Roof Operation Lamp ........................................................................\
...............5-59
Check Solar Roof Operation ........................................................................\
..............5-59
Consume and Generating amount up to environmental condition ......................5-60
System Malfunction ........................................................................\
...........................5-61
Exterior Features ........................................................................\
.....................5-62Hood ........................................................................\
....................................................5-62
Trunk ........................................................................\
....................................................5-63
Emergency Trunk Safety Release ........................................................................\
.....5-64
Fuel Filler Door ........................................................................\
..................................5-68
Head Up Display (HUD) ........................................................................\
..........5-70
Lighting
........................................................................\
.....................................5-72Exterior Lights ........................................................................\
....................................5-72
Interior Lights ........................................................................\
.....................................5-78
Welcome System ........................................................................\
................................5-81
Wipers and Washers ........................................................................\
...............5-82Windshield Wipers ........................................................................\
.............................5-82
Windshield Washers ........................................................................\
...........................5-83
Rear View Monitor (RVM) ........................................................................\
.......5-84Rear View Monitor with Parking Guidance ..............................................................5-84
Rear View Monitor - Top View ........................................................................\
..........5-84
Surround View Monitor (SVM) .......................................................................5-86
Reverse Parking Distance Warning (PDW)
....................................................5-87Operation of Reverse Parking Distance Warning System ........................................5-87
To Turn off Reverse Parking Distance Warning System ..........................................5-89
Non-Operational Conditions of Reverse Parking Distance Warning System ........5-89
Reverse Parking Distance Warning System Precautions ........................................5-90
Page 159 of 527
05
5-11
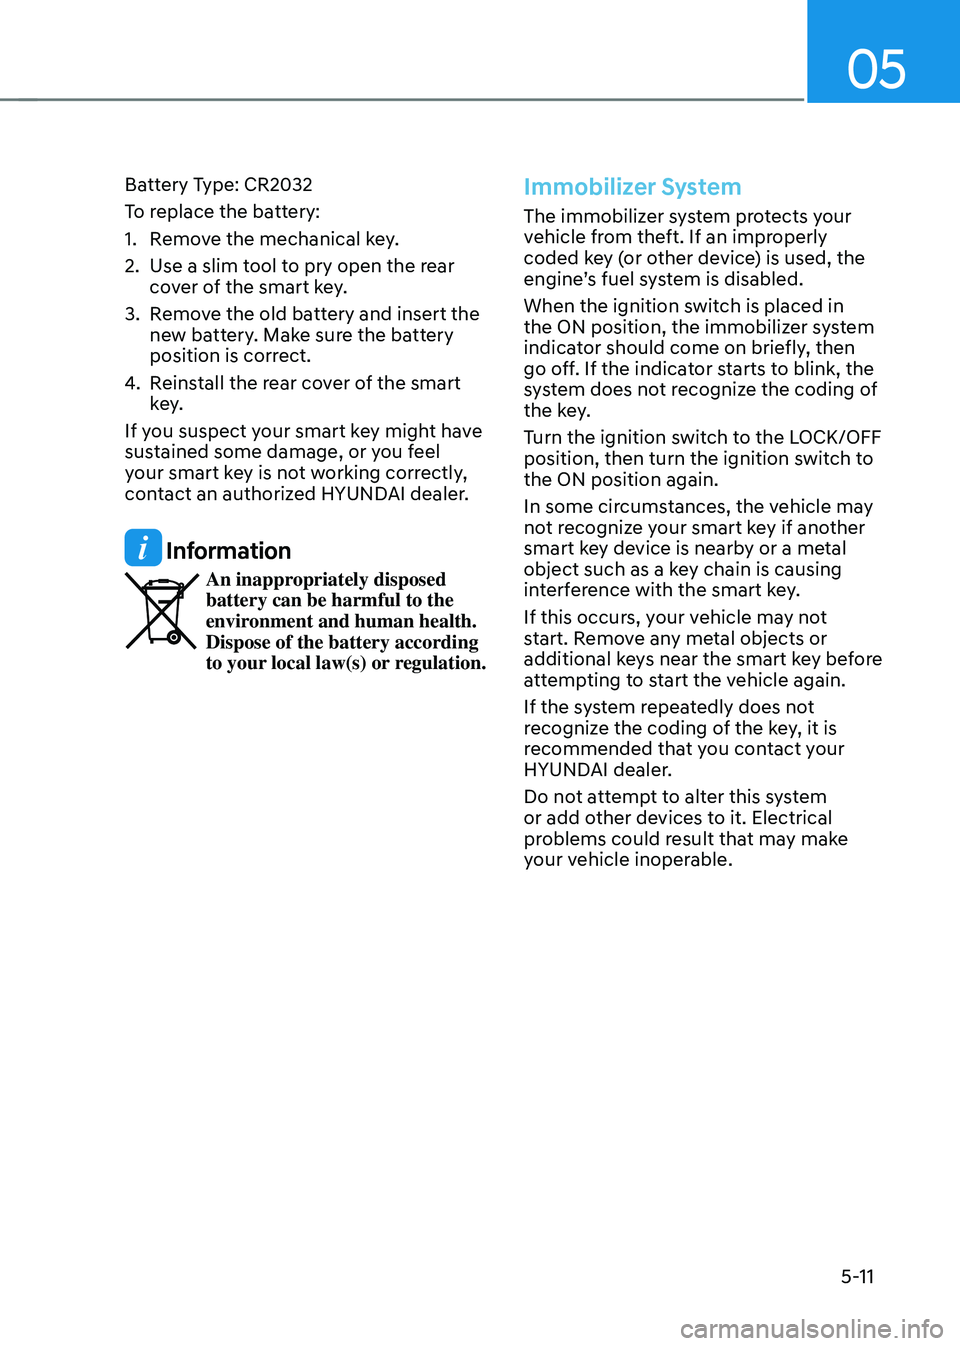
Battery Type: CR2032
To replace the battery:
1. Remove the mechanical key.
2. Use a slim tool to pry open the rear
cover of the smart key.
3. Remove the old battery and insert the
new battery. Make sure the battery
position is correct.
4. Reinstall the rear cover of the smart
key.
If you suspect your smart key might have
sustained some damage, or you feel
your smart key is not working correctly,
contact an authorized HYUNDAI dealer.
Information
An inappropriately disposed battery can be harmful to the
environment and human health.
Dispose of the battery according
to your local law(s) or regulation.
Immobilizer System
The immobilizer system protects your
vehicle from theft. If an improperly
coded key (or other device) is used, the
engine’s fuel system is disabled.
When the ignition switch is placed in
the ON position, the immobilizer system
indicator should come on briefly, then
go off. If the indicator starts to blink, the
system does not recognize the coding of
the key.
Turn the ignition switch to the LOCK/OFF
position, then turn the ignition switch to
the ON position again.
In some circumstances, the vehicle may
not recognize your smart key if another
smart key device is nearby or a metal
object such as a key chain is causing
interference with the smart key.
If this occurs, your vehicle may not
start. Remove any metal objects or
additional keys near the smart key before
attempting to start the vehicle again.
If the system repeatedly does not
recognize the coding of the key, it is
recommended that you contact your
HYUNDAI dealer.
Do not attempt to alter this system
or add other devices to it. Electrical
problems could result that may make
your vehicle inoperable.
Page 166 of 527

Convenient Features
5-18
CAUTION
• If metallic window tint was applied
to your vehicle, it may cause
bad Bluetooth connection or
performance degradation of the
digital key.
• If multiple users operate the remote
control function simultaneously, the
connection between the digital key
and the vehicle might result in failed
commands. Please connect and
operate the remote control function
only the necessary user.
• When using the remote control
operation, the driver (the remote
control user) should leave the vehicle
after confirming the door lock (the
chime sounds once and the hazard
warning lights blink).
• The remote functions of the Digital
Key app enables the vehicle to be
controlled from a set distance. If
the digital key or the vehicle goes
beyond the operable distance, the
remote control function might be
disconnected or cancelled.
• If the digital key (smartphone) is
connected with the vehicle for the
remote control, the driver with the
key goes far away from the vehicle,
the function might not work.
• If the remote control operation
is executed where the mobile
connection is weak, Bluetooth
connection is poor due to several
Bluetooth devices or there is an
object such as metal or concrete, it
might be delayed or the operable
distance might decrease. You should
not cover the smartphone with your
hand or place other devices which
can cause frequency interference. It
may result in poor performance.
• If the remote control function is not
available, please use NFC function to
lock or unlock the doors. Remote Start with Digital Key
•
When the shift button of your vehicle
is in P (Park) and all of the doors
including trunk and hood is locked
and the vehicle is off, press the Door
Lock button in the Hyundai Digital
Key app then press the Remote Start
button within 4 seconds.
You can confirm the engine is on if the
hazard warning lights blinks two times
and the chime sounds.
• If you want to turn off the engine,
press Remote Engine Stop. Air
Conditioner / Heating system
maintains the same status as when
you last used the vehicle.
• Unless you put the registered digital
key(smartphone) on the interior
authentication pad (wireless charger)
when the remote start function is on,
the engine will turn off.
• If you do not get on the vehicle within
10 minutes after the engine turns on,
the vehicle will turn off.
For more information, refer to the Engine
Start/Stop button in chapter 6.
Vehicle information Display
The digital key application displays
the vehicle information such as
driving or door conditions through the
communication with the vehicle.
• How to check : Select the vehicle
what you want to check and touch
the vehicle image, then vehicle
information display page will be
shown.
• Contents : accumulated odometer,
latest fuel economy, driving range,
fuel remaining, tire pressure, doors
lock/unlock status and last data
updated time.
ÃThe information displayed may differ
from the actual vehicle status.
ÃFor more information, please refer to
the ‘Tutorial’ on your Digital key app.
Page 216 of 527
Convenient Features
5-68
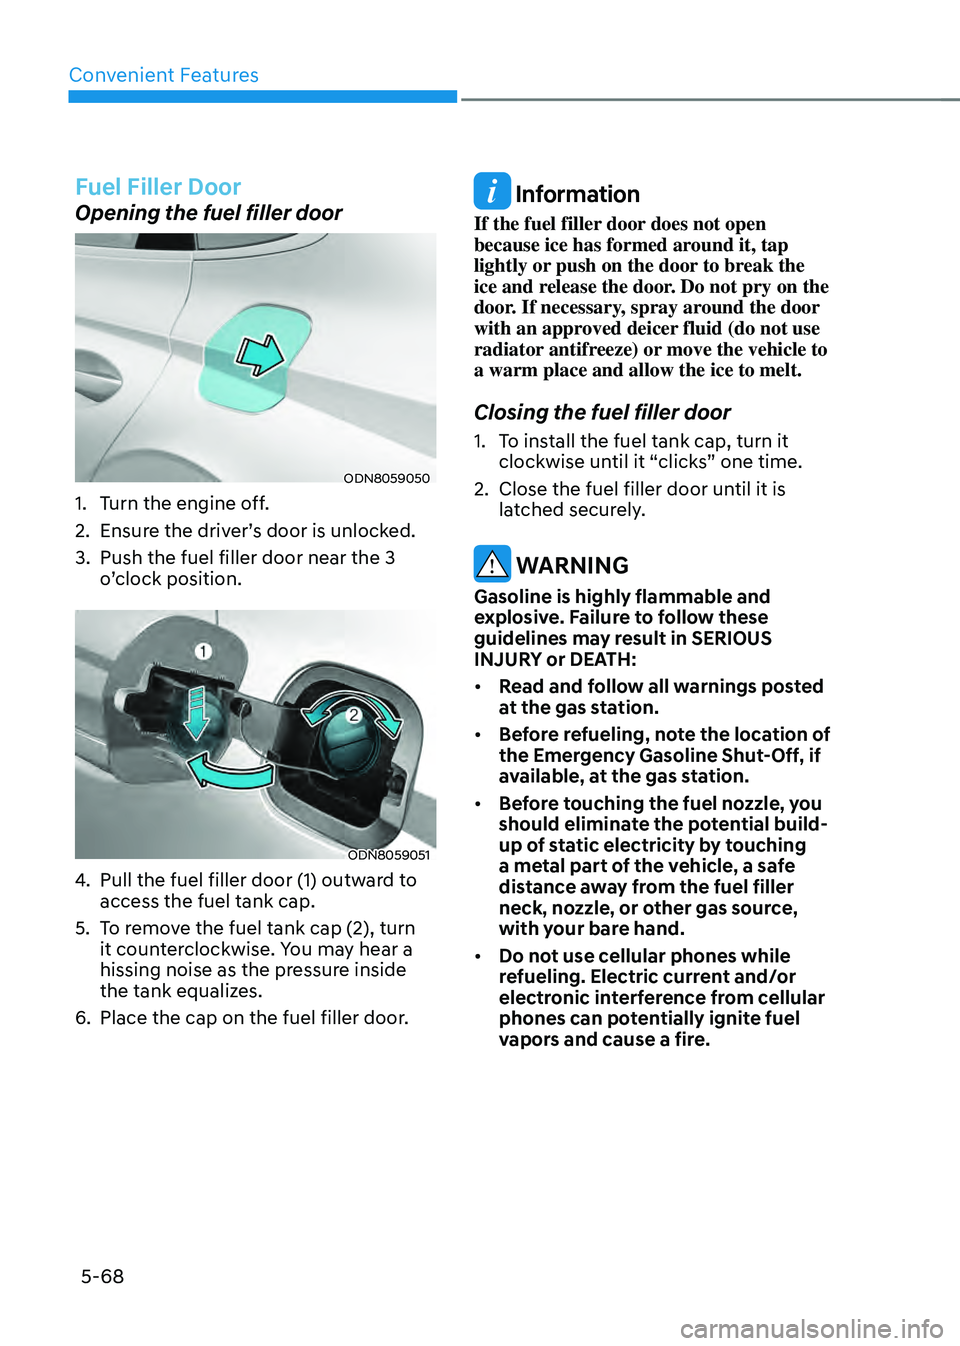
Fuel Filler Door
Opening the fuel filler door
ODN8059050
1. Turn the engine off.
2. Ensure the driver’s door is unlocked.
3. Push the fuel filler door near the 3
o’clock position.
ODN8059051
4. Pull the fuel filler door (1) outward to
access the fuel tank cap.
5. To remove the fuel tank cap (2), turn
it counterclockwise. You may hear a
hissing noise as the pressure inside
the tank equalizes.
6. Place the cap on the fuel filler door.
Information
If the fuel filler door does not open
because ice has formed around it, tap
lightly or push on the door to break the
ice and release the door. Do not pry on the
door. If necessary, spray around the door
with an approved deicer fluid (do not use
radiator antifreeze) or move the vehicle to
a warm place and allow the ice to melt.
Closing the fuel filler door
1. To install the fuel tank cap, turn it
clockwise until it “clicks” one time.
2. Close the fuel filler door until it is
latched securely.
WARNING
Gasoline is highly flammable and
explosive. Failure to follow these
guidelines may result in SERIOUS
INJURY or DEATH:
• Read and follow all warnings posted
at the gas station.
• Before refueling, note the location of
the Emergency Gasoline Shut-Off, if
available, at the gas station.
• Before touching the fuel nozzle, you
should eliminate the potential build-
up of static electricity by touching
a metal part of the vehicle, a safe
distance away from the fuel filler
neck, nozzle, or other gas source,
with your bare hand.
• Do not use cellular phones while
refueling. Electric current and/or
electronic interference from cellular
phones can potentially ignite fuel
vapors and cause a fire.
Page 217 of 527
05
5-69
• Do not get back into a vehicle
once you have begun refueling.
You can generate a buildup of
static electricity by touching,
rubbing or sliding against any item
or fabric capable of producing
static electricity. Static electricity
discharge can ignite fuel vapors
causing a fire. If you must re-enter
the vehicle, you should once again
eliminate potentially dangerous
static electricity discharge by
touching a metal part of the vehicle,
away from the fuel filler neck, nozzle
or other gasoline source, with your
bare hand.
• When using an approved portable
fuel container, be sure to place the
container on the ground prior to
refueling. Static electricity discharge
from the container can ignite fuel
vapors causing a fire.
Once refueling has begun, contact
between your bare hand and the
vehicle should be maintained until
the filling is complete.
• Use only approved portable plastic
fuel containers designed to carry and
store gasoline.
• When refueling, always move the
shift button to the P (Park) position,
set the parking brake, and place
the ignition switch to the LOCK/
OFF position. Sparks produced by
electrical components related to the
engine can ignite fuel vapors causing
a fire.
• Do not use matches or a lighter and
do not smoke or leave a lit cigarette
in your vehicle while at a gas station,
especially during refueling.
• Do not over-fill or top-off your
vehicle tank, which can cause
gasoline spillage.• If a fire breaks out during refueling,
leave the vicinity of the vehicle, and
immediately contact the manager
of the gas station and then contact
the local fire department. Follow any
safety instructions they provide.
• If pressurized fuel sprays out, it can
cover your clothes or skin and thus
subject you to the risk of fire and
burns. Always remove the fuel cap
carefully and slowly. If the cap is
venting fuel or if you hear a hissing
sound, wait until the condition stops
before completely removing the cap.
• Always check that the fuel cap is
installed securely to prevent fuel
spillage in the event of an accident.
Information
Make sure to refuel your vehicle according
to the “Fuel Requirements” suggested in
the Introduction chapter.
NOTICE
• Do not spill fuel on the exterior
surfaces of the vehicle. Any type of
fuel spilled on painted surfaces may
damage the paint.
• If the fuel filler cap requires
replacement, use only a genuine
HYUNDAI cap or the equivalent
specified for your vehicle. An
incorrect fuel filler cap can result
in a serious malfunction of the fuel
system or emission control system.
Page 288 of 527
While Driving
6-12
D (Drive)
This is the normal driving position. The
transmission will automatically shift
through a 6-gear sequence, providing
the best fuel economy and power.
To start the vehicle forward, push the D
(Drive) button by depressing the brake
pedal with the engine ON. Then depress
the accelerator pedal smoothly.
For extra power when passing another
vehicle or driving uphill, depress the
accelerator fully. The transmission will
automatically downshift to the next
lower gear (or gears, as appropriate).
When the vehicle is stopped in D (Drive)
position, if you open the driver's door
with the seat belt unfastened, the gear is
shifted to P (Park) position automatically.
However when the vehicle moves in D
(Drive) position, if you open the driver's
door with the seat belt unfastened, the
gear may not shift to P (Park) position
automatically to protect the automatic
transmission.
Shift-lock system
For your safety, the automatic
transmission has a shift-lock system
which prevents shifting the gear from
P (Park) or N (Neutral) to R (Reverse)
or D (Drive) unless the brake pedal is
depressed.
To shift the gear from P (Park) or N
(Neutral) to R (Reverse) or D (Drive):
1. Depress and hold the brake pedal.
2. Start the engine.
3. Depress the brake pedal and push the
R (Reverse) or D (Drive) button.
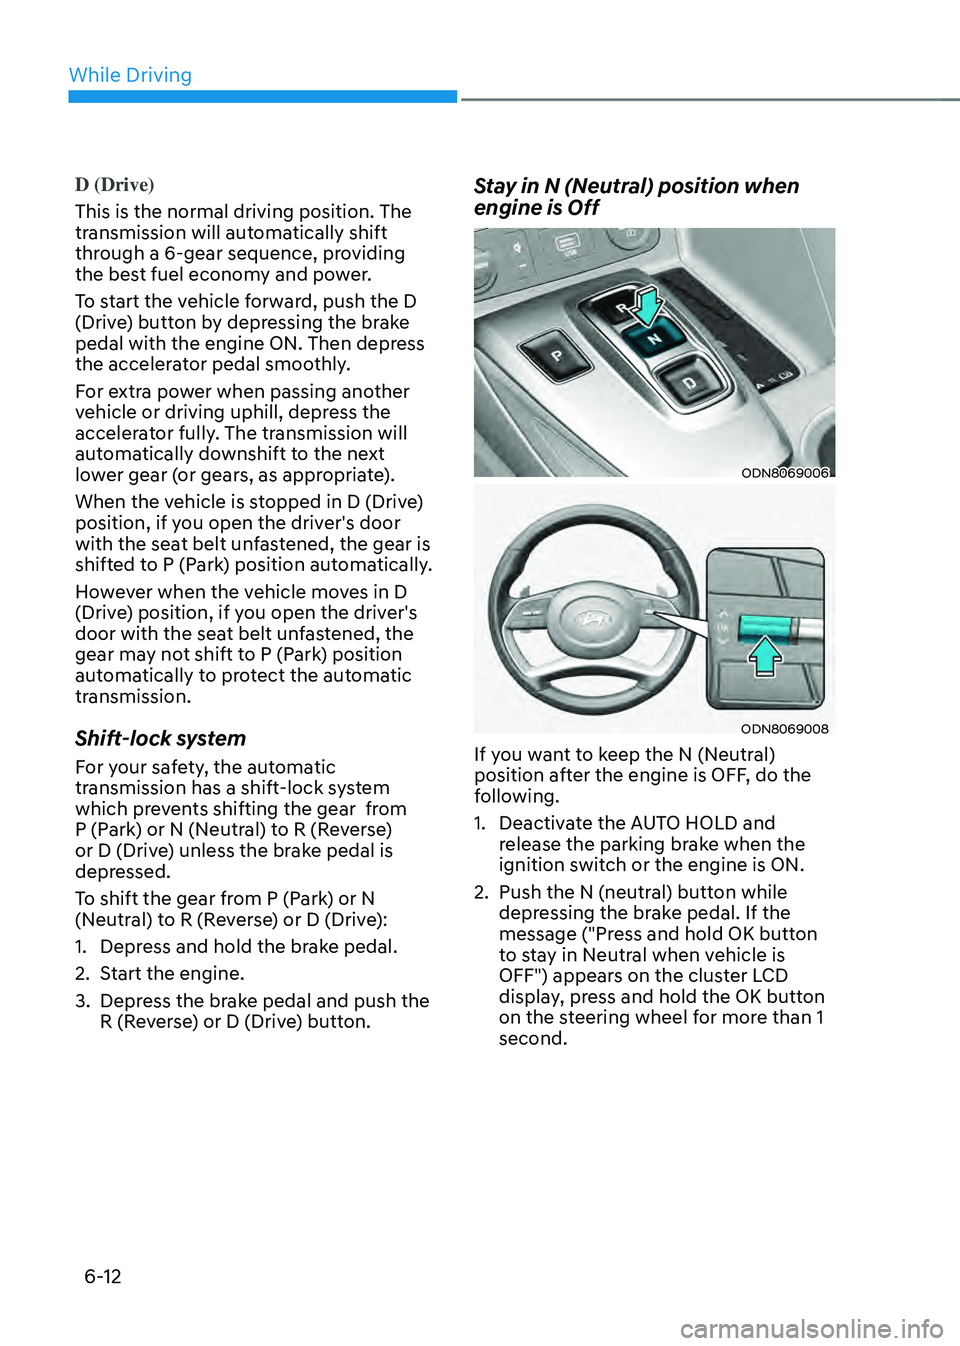
Stay in N (Neutral) position when
engine is Off
ODN8069006
ODN8069008
If you want to keep the N (Neutral)
position after the engine is OFF, do the
following.
1. Deactivate the AUTO HOLD and
release the parking brake when the
ignition switch or the engine is ON.
2. Push the N (neutral) button while
depressing the brake pedal. If the
message ("Press and hold OK button
to stay in Neutral when vehicle is
OFF") appears on the cluster LCD
display, press and hold the OK button
on the steering wheel for more than 1
second.