Page 126 of 527

Instrument Cluster
4-22
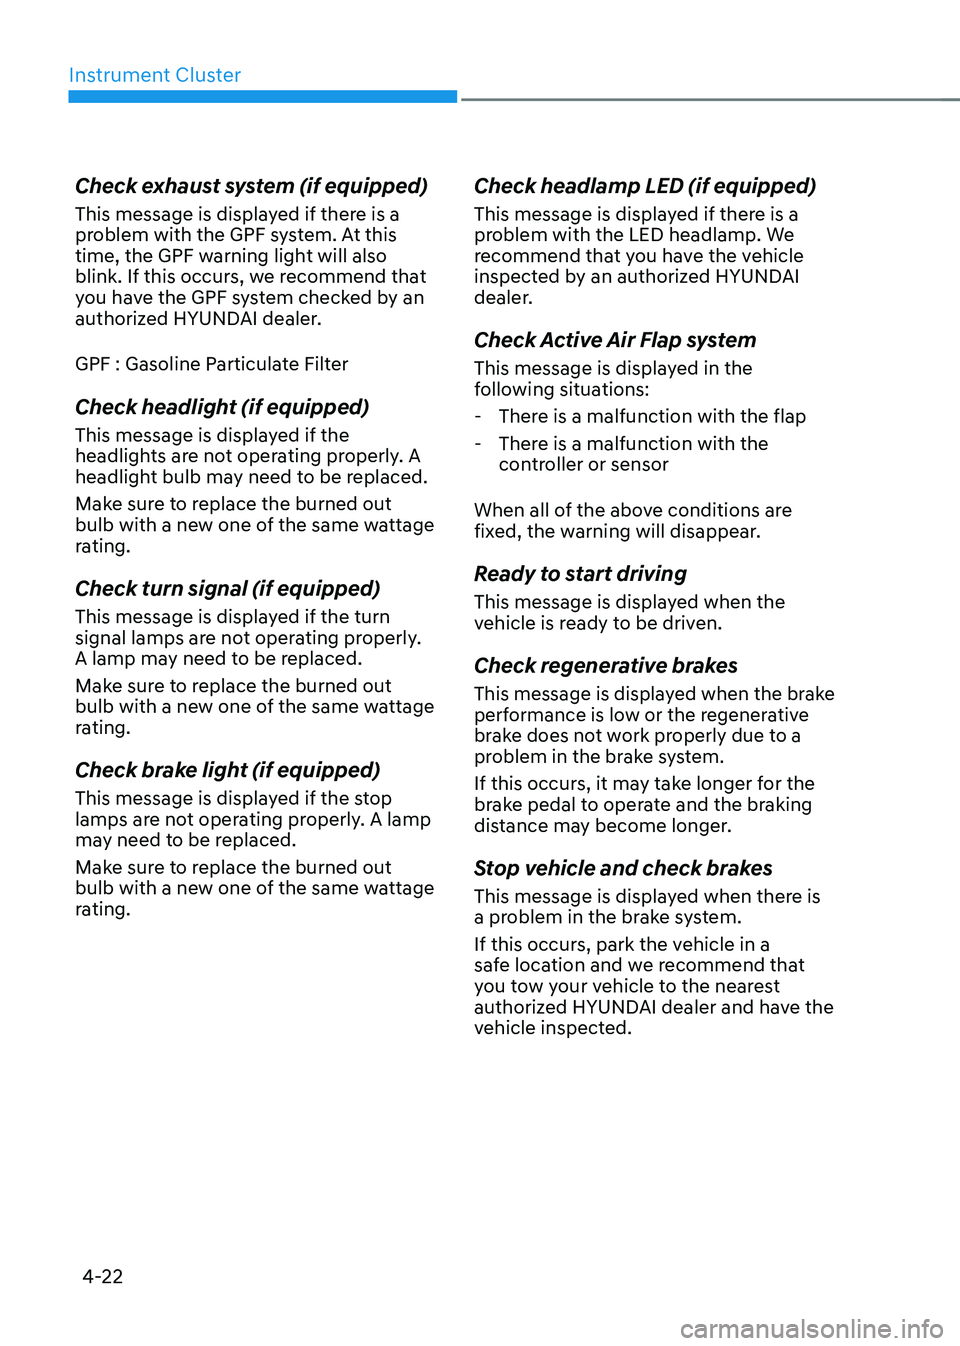
Check exhaust system (if equipped)
This message is displayed if there is a
problem with the GPF system. At this
time, the GPF warning light will also
blink. If this occurs, we recommend that
you have the GPF system checked by an
authorized HYUNDAI dealer.
GPF : Gasoline Particulate Filter
Check headlight (if equipped)
This message is displayed if the
headlights are not operating properly. A
headlight bulb may need to be replaced.
Make sure to replace the burned out
bulb with a new one of the same wattage
rating.
Check turn signal (if equipped)
This message is displayed if the turn
signal lamps are not operating properly.
A lamp may need to be replaced.
Make sure to replace the burned out
bulb with a new one of the same wattage
rating.
Check brake light (if equipped)
This message is displayed if the stop
lamps are not operating properly. A lamp
may need to be replaced.
Make sure to replace the burned out
bulb with a new one of the same wattage
rating.
Check headlamp LED (if equipped)
This message is displayed if there is a
problem with the LED headlamp. We
recommend that you have the vehicle
inspected by an authorized HYUNDAI
dealer.
Check Active Air Flap system
This message is displayed in the
following situations:
-There is a malfunction with the flap
-There is a malfunction with the
controller or sensor
When all of the above conditions are
fixed, the warning will disappear.
Ready to start driving
This message is displayed when the
vehicle is ready to be driven.
Check regenerative brakes
This message is displayed when the brake
performance is low or the regenerative
brake does not work properly due to a
problem in the brake system.
If this occurs, it may take longer for the
brake pedal to operate and the braking
distance may become longer.
Stop vehicle and check brakes
This message is displayed when there is
a problem in the brake system.
If this occurs, park the vehicle in a
safe location and we recommend that
you tow your vehicle to the nearest
authorized HYUNDAI dealer and have the
vehicle inspected.
Page 128 of 527
4-24
Instrument Cluster
LCD DISPLAY (TYPE A, B)LCD Display Control
ODN8A069203
The LCD display modes can be changed by using the control buttons.
1. : MODE button for changing modes
2. , : MOVE switch for changing items
3. OK : Push the SELECT/RESET button for setting or resetting the selected item
Page 130 of 527
Instrument Cluster
4-26
Trip computer mode
OIK047124N
The trip computer mode displays
information related to vehicle driving
parameters including fuel economy, trip
meter information and vehicle speed.
For more information, refer to "Trip
Computer" in this chapter.
Turn By Turn (TBT) mode
OIK047147N
This mode displays the state of the
navigation.
Driving Assist mode
ODN8A049021
SCC/LFA/LKA, DAW
This mode displays the state of Smart
Cruise Control system, Lane Following
Assist system, Lane Keeping Assist
system and Driver Attention Warning
system.
For more information, refer to each
system information in chapter 6.
ODN8049019L
Tire Pressure
This mode displays information related to
Tire Pressure.
For more information, refer to "Tire
Pressure Monitoring System (TPMS)" in
chapter 7.
Page 131 of 527

04
4-27
Master warning mode
OIK047173L
This warning light informs the driver the
following situations.
-Forward Collision-Avoidance Assist
system malfunction (if equipped)
-Forward Collision-Avoidance Assist
radar blocked (if equipped)
-Blind-Spot Collision Warning system
malfunction (if equipped)
-Blind-Spot Collision Warning radar
blocked (if equipped)
-Lamp malfunction (if equipped)
-LED headlamp malfunction (if
equipped)
-High Beam Assist malfunction (if
equipped)
-Smart Cruise Control malfunction (if
equipped)
-Smart Cruise Control system radar
blocked (if equipped)
-Tire Pressure Monitoring System
(TPMS) malfunction (if equipped)
The Master Warning Light illuminates
if one or more of the above warning
situations occur. At this time, a Master
Warning icon (
) will appear beside
the User Settings icon (), on the LCD
display.
If the warning situation is solved, the
master warning light will be turned
off and the Master Warning icon will
disappear.
User settings mode
ODN8H040051N
In this mode, you can change the
settings of the instrument cluster, doors,
lamps, etc.
1. Head-Up Display
2. Driver Assistance
3. Door
4. Lights
5. Sound
6. Convenience
7. Service interval
8. Other
9. ECO vehicle
10. Language
11. Reset
The information provided may differ
depending on which functions are
applicable to your vehicle.
Page 132 of 527
Instrument Cluster
4-28
OOSEV048172L
Shift to P to edit settings
This warning message appears if you try
to adjust the User Settings while driving.
For your safety, change the User Settings
after parking the vehicle, applying the
parking brake and shifting to P (Park).
Quick guide help
This mode provides quick guides for the
systems in the User Settings mode.
Select an item, press and hold the OK
button.
For more information, about each
system, refer to this Owner's Manual.
Page 134 of 527

Instrument Cluster
4-30
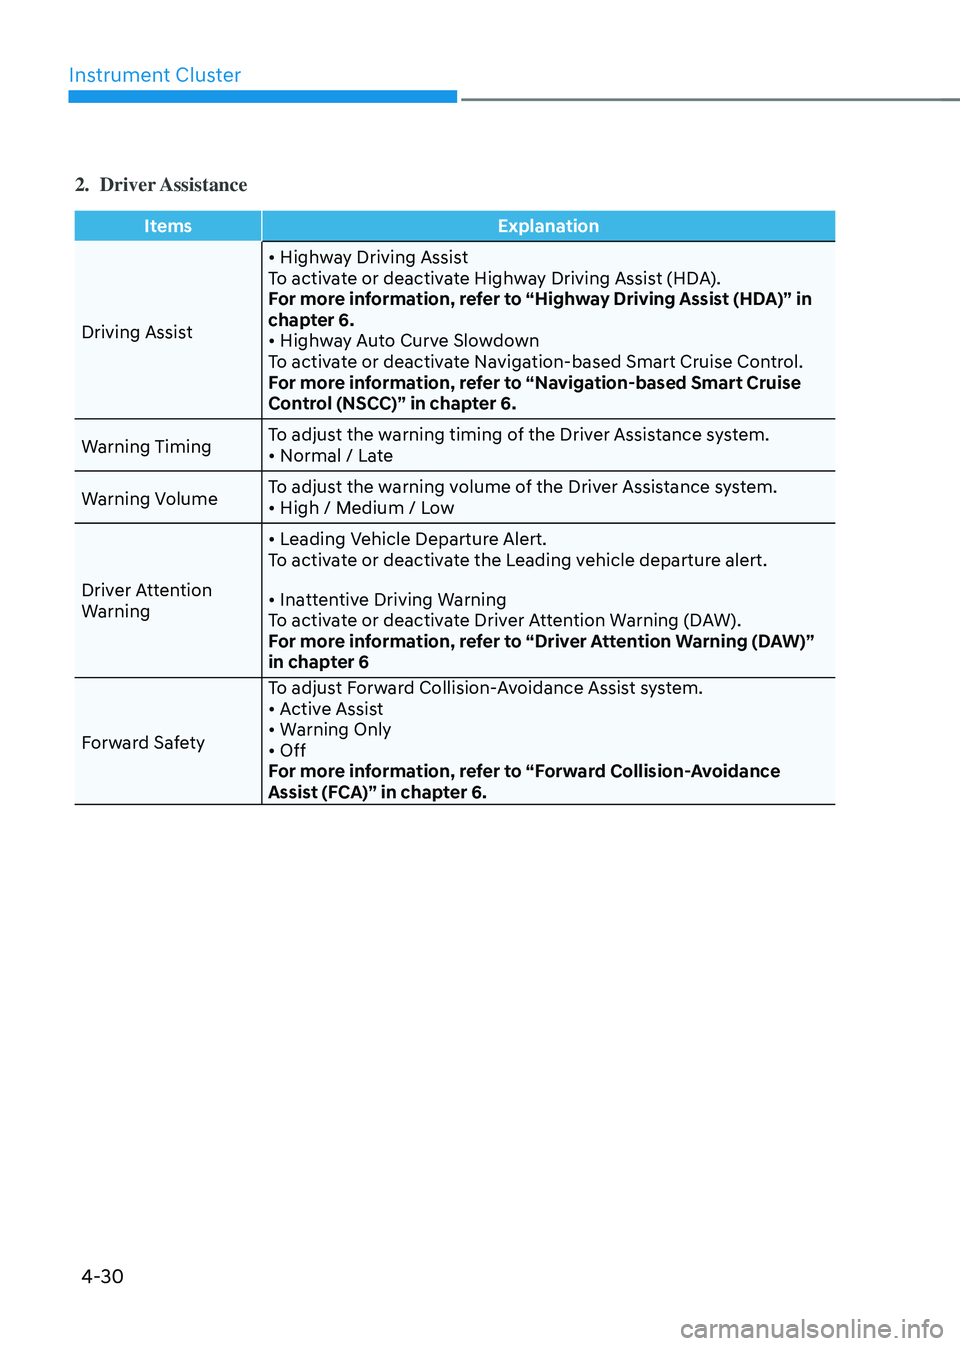
2. Driver Assistance
ItemsExplanation
Driving Assist
• Highway Driving AssistTo activate or deactivate Highway Driving Assist (HDA).
For more information, refer to “Highway Driving Assist (HDA)” in
chapter 6.
• Highway Auto Curve SlowdownTo activate or deactivate Navigation-based Smart Cruise Control.
For more information, refer to “Navigation-based Smart Cruise
Control (NSCC)” in chapter 6.
Warning Timing To adjust the warning timing of the Driver Assistance system.
• Normal / Late
Warning VolumeTo adjust the warning volume of the Driver Assistance system.• High / Medium / Low
Driver Attention
Warning
• Leading Vehicle Departure Alert.To activate or deactivate the Leading vehicle departure alert.
• Inattentive Driving WarningTo activate or deactivate Driver Attention Warning (DAW).
For more information, refer to “Driver Attention Warning (DAW)”
in chapter 6
Forward Safety To adjust Forward Collision-Avoidance Assist system.
• Active Assist• Warning Only• OffFor more information, refer to “Forward Collision-Avoidance
Assist (FCA)” in chapter 6.
Page 136 of 527

Instrument Cluster
4-32
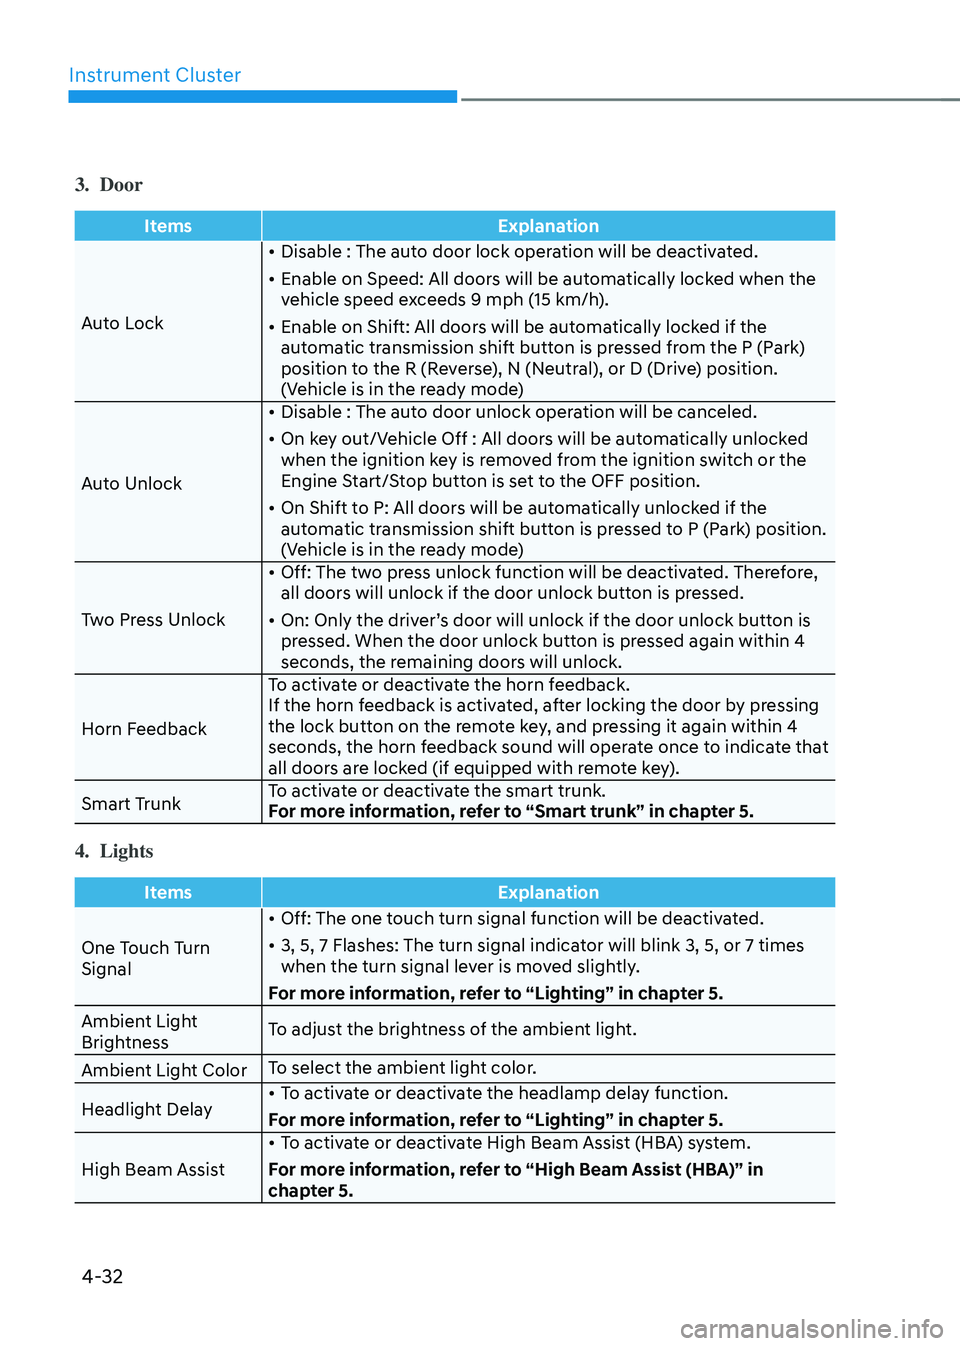
3. Door
ItemsExplanation
Auto Lock •
Disable : The auto door lock operation will be deactivated.
• Enable on Speed: All doors will be automatically locked when the
vehicle speed exceeds 9 mph (15 km/h).
• Enable on Shift: All doors will be automatically locked if the
automatic transmission shift button is pressed from the P (Park)
position to the R (Reverse), N (Neutral), or D (Drive) position.
(Vehicle is in the ready mode)
Auto Unlock •
Disable : The auto door unlock operation will be canceled.
• On key out/Vehicle Off : All doors will be automatically unlocked
when the ignition key is removed from the ignition switch or the
Engine Start/Stop button is set to the OFF position.
• On Shift to P: All doors will be automatically unlocked if the
automatic transmission shift button is pressed to P (Park) position.
(Vehicle is in the ready mode)
Two Press Unlock •
Off: The two press unlock function will be deactivated. Therefore,
all doors will unlock if the door unlock button is pressed.
• On: Only the driver’s door will unlock if the door unlock button is
pressed. When the door unlock button is pressed again within 4
seconds, the remaining doors will unlock.
Horn Feedback To activate or deactivate the horn feedback.
If the horn feedback is activated, after locking the door by pressing
the lock button on the remote key, and pressing it again within 4
seconds, the horn feedback sound will operate once to indicate that
all doors are locked (if equipped with remote key).
Smart Trunk To activate or deactivate the smart trunk.
For more information, refer to “Smart trunk” in chapter 5.
4. Lights
Items
Explanation
One Touch Turn
Signal •
Off: The one touch turn signal function will be deactivated.
• 3, 5, 7 Flashes: The turn signal indicator will blink 3, 5, or 7 times
when the turn signal lever is moved slightly.
For more information, refer to “Lighting” in chapter 5.
Ambient Light
Brightness To adjust the brightness of the ambient light.
Ambient Light Color To select the ambient light color.
Headlight Delay •
To activate or deactivate the headlamp delay function.
For more information, refer to “Lighting” in chapter 5.
High Beam Assist •
To activate or deactivate High Beam Assist (HBA) system.
For more information, refer to “High Beam Assist (HBA)” in
chapter 5.
Page 138 of 527
Instrument Cluster
4-34
7. Service interval
ItemsExplanation
Enable Service
Interval To activate or deactivate the service interval function.
Information
To use the service interval menu, consult an authorized HYUNDAI dealer.
If the service interval is activated and the time and distance is adjusted, messages are
displayed in the following situations each time the vehicle is turned on.
-
Service in
: Displayed to inform the driver the remaining mileage and days to service.
-Service required
: Displayed when the mileage and days to service has been reached or passed.
Information
If any of the following conditions occur, the mileage and number of days to service may be
incorrect.
-The battery cable is disconnected.
-The fuse switch is turned off.
-The battery is discharged.