2022 HYUNDAI SANTA CRUZ Radio indicator
[x] Cancel search: Radio indicatorPage 82 of 598
Seats & Safety System
3-52
Main components of the Occupant
Classification System
• A detection device located within the
front passenger seat cushion.
• Electronic system to help determine
whether the passenger air bag
systems should be activated or
deactivated.
• An indicator light located on the
instrument panel which illuminates
the words “PASSENGER AIR BAG OFF”
indicating the front passenger air bag
system is deactivated.
• The instrument panel air bag indicator
light is interconnected with the OCS.
The OCS is designed to help detect
the presence of a properly-seated
front passenger and determine if the
passenger’s front air bag should be
enabled (may inflate) or not.
The purpose is to help reduce the risk
of injury or death from an inflating air
bag to certain front passenger seat
occupants, such as children, by requiring
the air bag to be automatically turned
OFF.
For example, if a child restraint of the
type specified in the regulations is on the
seat, the occupant classification sensor
can detect it and cause the air bag to
turn OFF.
Front passenger seat adult occupants
who are properly seated and wearing the
seat belt properly, should not cause the
passenger air bag to be automatically
turned OFF. For smaller adults it may turn
OFF, however, if the occupant does not
sit in the seat properly (for example, by
not sitting upright, by sitting on the edge
of the seat, or by otherwise being out of
position), this could cause the sensor to
turn the air bag OFF.You will find the “PASSENGER AIR BAG
OFF” indicator on the overhead console
panel. This system detects the conditions
1-4 in the following table and activates or
deactivates the front passenger air bag
based on these conditions.
Always be sure that you and all vehicle
occupants are seated properly and
wearing the seat belt properly for the
most effective protection by the air bag
and the seat belt.
The OCS may not function properly if the
passenger takes actions which can affect
the classification system. These include:
• Failing to sit in an upright position.
• Leaning against the door or center
console.
• Sitting towards the sides of the front
of the seat.
• Putting their legs on the dashboard or
resting them on other locations which
reduce the passenger weight on the
front seat.
• Wearing the seat belt improperly.
• Reclining the seatback.
• Wearing thick clothes like ski wear or
hip protection wear.
• Putting an additional thick cushion on
the seat.
• Putting electrical devices (for
example, notebook, satellite radio) on
the seat with inverter charging.
Page 179 of 598
05
5-43
Electrochromic Mirror with
Homelink System (if equipped)
Your vehicle may be equipped with
a Gentex Automatic-Dimming Mirror
with an Integrated HomeLink® Wireless
Control System.
During nighttime driving, this feature
will automatically detect and reduce
rearview mirror glare. The HomeLink®
Universal Transceiver allows you to
activate your garage door(s), electric
gate, home lighting, etc.
ODN8A059135ODN8A059135
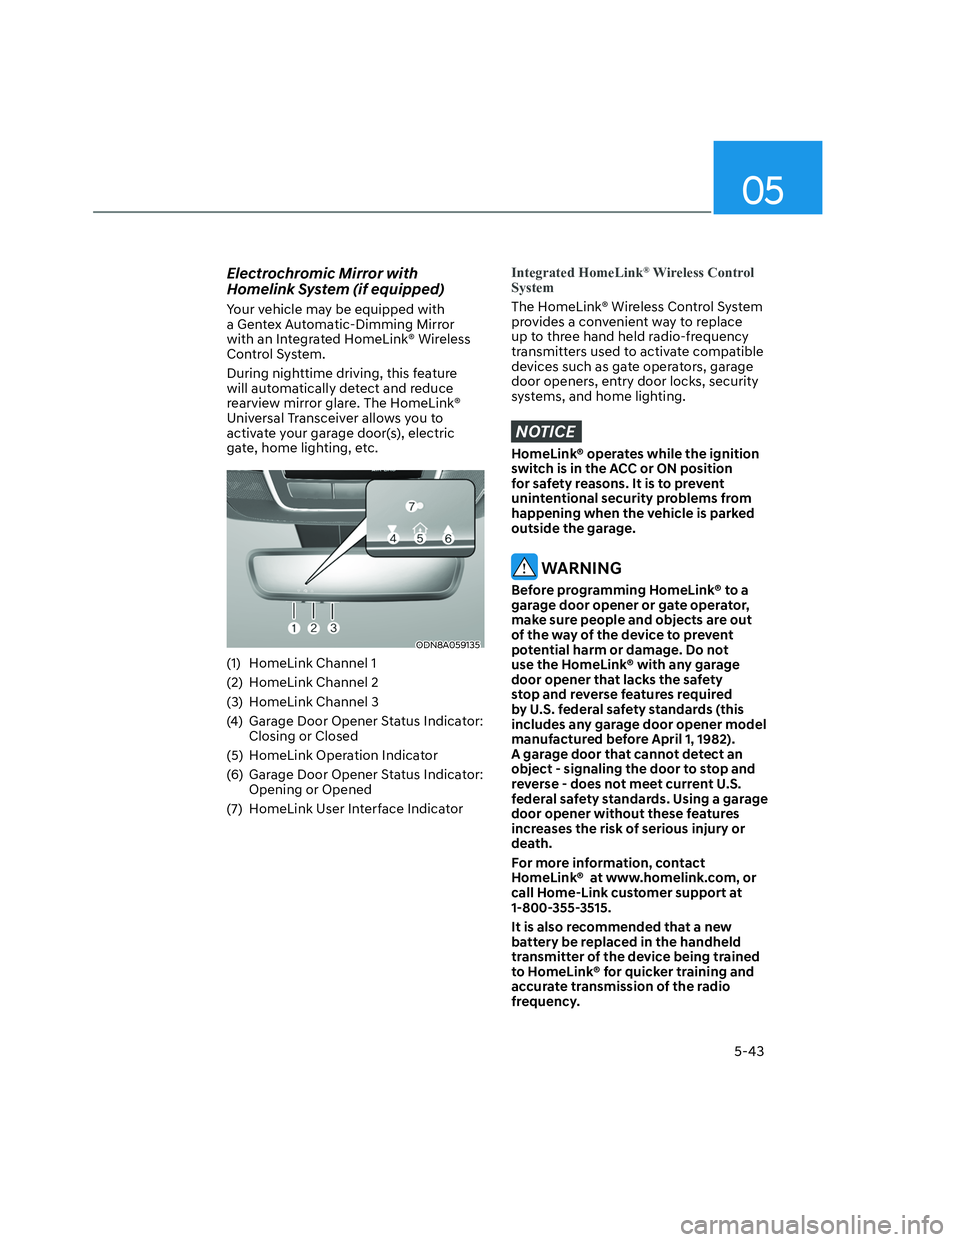
(1) HomeLink Channel 1
(2) HomeLink Channel 2
(3) HomeLink Channel 3
(4) Garage Door Opener Status Indicator:
Closing or Closed
(5) HomeLink Operation Indicator
(6) Garage Door Opener Status Indicator:
Opening or Opened
(7) HomeLink User Interface Indicator
Integrated HomeLink® Wireless Control
System
The HomeLink® Wireless Control System
provides a convenient way to replace
up to three hand held radio-frequency
transmitters used to activate compatible
devices such as gate operators, garage
door openers, entry door locks, security
systems, and home lighting.
NOTICE
HomeLink® operates while the ignition
switch is in the ACC or ON position
for safety reasons. It is to prevent
unintentional security problems from
happening when the vehicle is parked
outside the garage.
WARNING
Before programming HomeLink® to a
garage door opener or gate operator,
make sure people and objects are out
of the way of the device to prevent
potential harm or damage. Do not
use the HomeLink® with any garage
door opener that lacks the safety
stop and reverse features required
by U.S. federal safety standards (this
includes any garage door opener model
manufactured before April 1, 1982).
A garage door that cannot detect an
object - signaling the door to stop and
reverse - does not meet current U.S.
federal safety standards. Using a garage
door opener without these features
increases the risk of serious injury or
death.
For more information, contact
HomeLink® at www.homelink.com, or
call Home-Link customer support at
1-800-355-3515.
It is also recommended that a new
battery be replaced in the handheld
transmitter of the device being trained
to HomeLink® for quicker training and
accurate transmission of the radio
frequency.
Page 183 of 598
05
5-47
2. On your garage door opener in your
garage, locate the “Learn” button
(usually near where the hanging
antenna wire is attached to the garage
door opener). If there is difficulty
locating this button, reference the
device’s owner’s manual.
3. Press and release the “Learn” button.
4. A light on your garage door opener
may flash, and your Two-Way
Communication indicators (4), (6) in
your vehicle may flash, confirming
completion of the process.
5. Return to the vehicle and firmly
press and release the programmed
HomeLink button to activate
your garage door. The Two-Way
Communication indicators (4), (6)
flash in orange when the door is
moving. Do not make any additional
button presses until AFTER the garage
door has come to a complete stop.
6. Your Two-Way Communication
programming is now complete.
Information
If your garage door opener has Two-
Way Communication functionality,
it is possible for HomeLink to stop
functioning the garage door shortly
after initial programming, IF the Two-
Way Communication Programming
wasn’t properly completed. This
usually happens after the first 10 times
a programmed HomeLink button is
pressed. If you experience this, completing
the “Programming a New HomeLink
Button” and “Two-Way Communication
Programming” will restore door
operation.
4) Canadian Programming
Canadian radio-frequency laws require
transmitter remote signals to “time-
out” (or quit) after a couple seconds of
transmission, which may not be long
enough for HomeLink to pick up the signal
during programming.
If you live in Canada or you are having
difficulties programming a gate operator
or garage door opener by using the
programming procedures, replace
“Programming a New HomeLink Button”
step 3 with the following:
While the HomeLink indicator light (7) is
flashing orange, press and release (“cycle”)
your device’s handheld remote every two
seconds until the HomeLink indicator light
(7) changes from orange to green. You may
now release the hand-held remote button.
Then proceed with “Programming a New
HomeLink Button” step 4.
Page 496 of 598
Emergency Situations
8-12
TPMS Malfunction
Indicator
The TPMS Malfunction Indicator
will illuminate after it blinks for
approximately one minute when there
is a problem with the Tire Pressure
Monitoring System.
Have the system checked by an
authorized HYUNDAI dealer as soon as
possible.
NOTICE
If there is a malfunction with the
TPMS, the individual tire pressures
in the cluster LCD display will not be
available. Have the system checked by
an authorized HYUNDAI dealer as soon
as possible.
NOTICE
The TPMS Malfunction Indicator may
illuminate after blinking for one minute
if the vehicle is near electric power
supply cables or radio transmitters
such as police stations, government
and public offices, broadcasting
stations, military installations, airports,
transmitting towers, etc.
Additionally, the TPMS Malfunction
Indicator may illuminate if snow chains
are used or electronic devices such as
computers, chargers, remote starters,
navigation, etc. This may interfere with
normal operation of the TPMS.
Changing a Tire with TPMS
If you have a flat tire, the Low Tire
Pressure and Position telltales will come
on. Have the flat tire repaired by an
authorized HYUNDAI dealer as soon as
possible or replace the flat tire with the
spare tire.
NOTICE
It is recommended that you do not
use a puncture-repairing agent not
approved by HYUNDAI dealer or the
equivalent specified for your vehicle to
repair and/or inflate a low pressure tire.
Tire sealant not approved by HYUNDAI
dealer or the equivalent specified for
your vehicle may damage the tire
pressure sensor.
The spare tire (if equipped) does not
come with a tire pressure monitoring
sensor. When the low pressure tire or
the flat tire is replaced with the spare
tire, the Low Tire Pressure Telltale will
remain on. Also, the TPMS Malfunction
Indicator will illuminate after blinking
for one minute if the vehicle is driven
at speed above 15.5 mph (25 km/h) for
approximately 10 minutes.
Once the original wheel equipped with
a tire pressure monitoring sensor is
reinflated to the recommended pressure
and reinstalled on the vehicle, the
Low Tire Pressure Telltale and TPMS
Malfunction Indicator will go off within a
few minutes of driving.
Page 591 of 598
I
I-7
Infotainment System .......................................................................................... 5-132
Antenna .......................................................................................................... 5-132
Bluetooth
®Wireless Technology .................................................................... 5-134
How Vehicle Radio Works ............................................................................. 5-135
Infotainment System ..................................................................................... 5-134
Steering Wheel Remote Controls ................................................................... 5-133
USB Port ........................................................................................................ 5-132
Voice Recognition .......................................................................................... 5-134
Infotainment System Vehicle Settings ................................................................. 4-42
Setting Your Vehicle ........................................................................................ 4-42
Instrument cluster .................................................................................................. 4-4
Gauges and Meters ............................................................................................. 4-5
Instrument Cluster Control ................................................................................. 4-5
LCD Display Messages for Vehicles Equipped with Smart Key ..................... 4-22
Transmission Shift Indicator .............................................................................. 4-9
Warning and Indicator Lights ............................................................................. 4-9
Instrument Panel Overview (I) .............................................................................. 2-5
Instrument Panel Overview (II) ............................................................................. 2-6
Intelligent speed limit assist (ISLA) ................................................................... 7-59
Intelligent Speed Limit Assist Malfunction and Limitations ........................... 7-62
Intelligent Speed Limit Assist Operation ......................................................... 7-60
Intelligent Speed Limit Assist Settings ............................................................ 7-59
Interior Features................................................................................................. 5-124
Clock .............................................................................................................. 5-129
Coat Hook ...................................................................................................... 5-130
Cup Holder ..................................................................................................... 5-124
Floor Mat Anchor(s) ....................................................................................... 5-130
Power Outlet................................................................................................... 5-125
Sunvisor.......................................................................................................... 5-125
USB Charger .................................................................................................. 5-126
Wireless Smart Phone Charging System ........................................................ 5-127
Interior Lights ...................................................................................................... 5-78
Front Lamps ..................................................................................................... 5-78
Glove Box Lamp .............................................................................................. 5-80
Interior Lamp AUTO OFF ............................................................................... 5-78
Rear Lamps ..................................................................................................... 5-79
Vanity Mirror Lamp ........................................................................................ 5-79
Welcome System ............................................................................................. 5-80
Interior Overview .................................................................................................. 2-4