2022 HYUNDAI SANTA CRUZ running light
[x] Cancel search: running lightPage 303 of 598
06
6-29
BRAKING SYSTEM
Power-assist Brakes
Your vehicle has power-assisted brakes
that adjust automatically through normal
usage.
If the engine is not running or is turned
off while driving, the power assist for
the brakes will not work. You can still
stop your vehicle by applying greater
force to the brake pedal than typical.
The stopping distance, however, will be
longer than with power brakes.
When the engine is not running, the
reserve brake power is partially depleted
each time the brake pedal is applied.
Do not pump the brake pedal when the
power assist has been interrupted.
WARNING
Take the following precautions:
• Do not drive with your foot resting
on the brake pedal. This will create
abnormal high brake temperatures,
excessive brake lining and pad wear,
and increased stopping distances.
• When descending down a long or
steep hill, use the paddle shifter
and manually downshift to a
lower gear in order to control your
speed without using the brake
pedal excessively. Applying the
brakes continuously will cause
the brakes to overheat and could
result in a temporary loss of braking
performance.
• Wet brakes may impair the vehicle's
ability to safely slow down; the
vehicle may also pull to one side
when the brakes are applied.
Applying the brakes lightly will
indicate whether they have been
affected in this way. Always test your
brakes in this fashion after driving
through deep water. To dry the
brakes, lightly tap the brake pedal to
heat up the brakes while maintaining
a safe forward speed until brake
performance returns to normal.
Avoid driving at high speeds until the
brakes function correctly.
Disc Brakes Wear Indicator
When your brake pads are worn and new
pads are required, you will hear a high
pitched warning sound from your front
or rear brakes. You may hear this sound
come and go or it may occur whenever
you depress the brake pedal.
Note that some driving conditions or
climates may cause a brake squeal
when you first apply (or lightly apply)
the brakes. This is normal and does not
indicate a problem with your brakes.
NOTICE
To avoid costly brake repairs, do not
continue to drive with worn brake pads.
Information
Always replace brake pads as complete
front or rear axle sets.
Page 305 of 598
06
6-31
Releasing the parking brake
ONX4E060025ONX4E060025
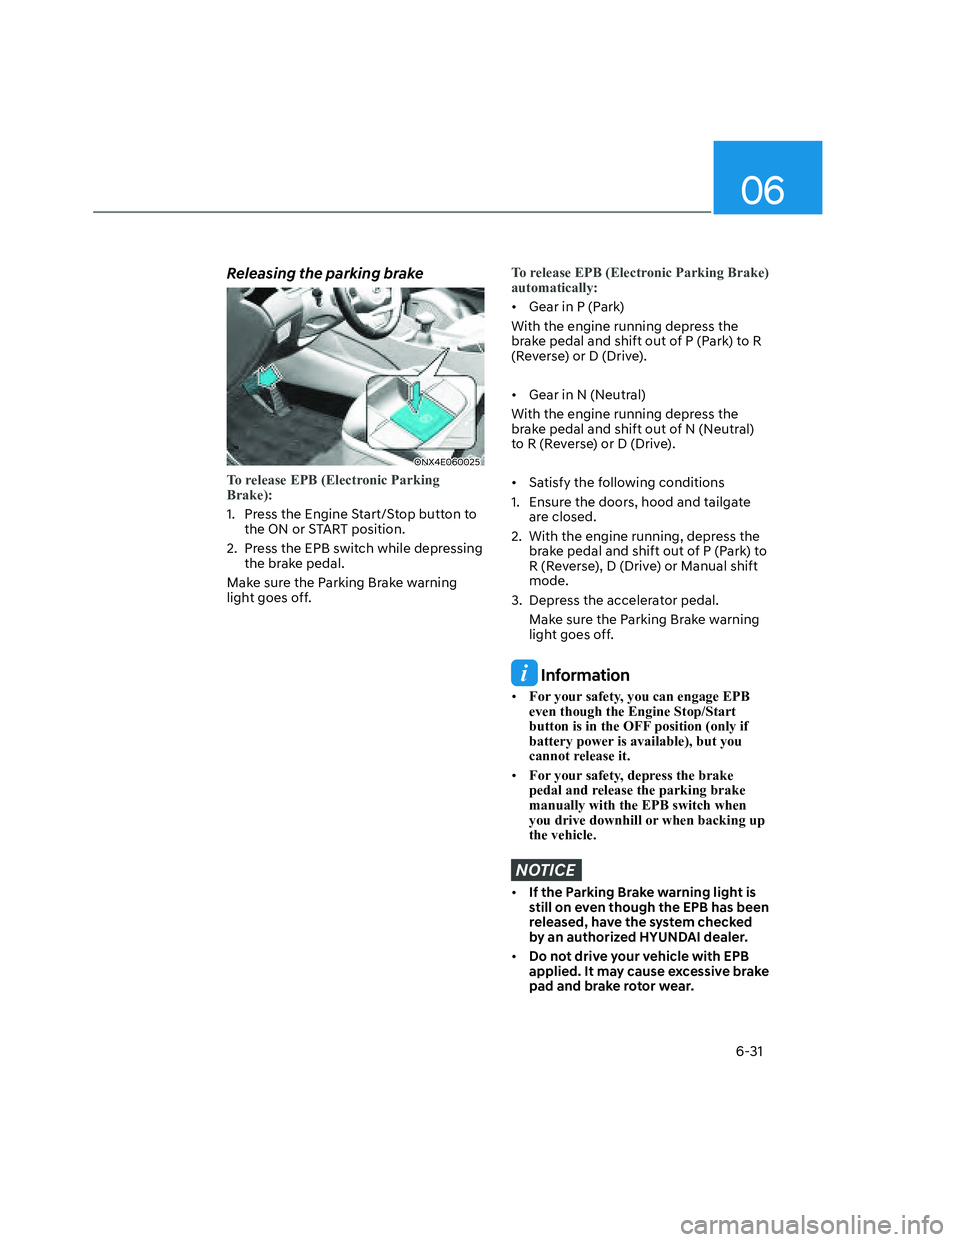
To release EPB (Electronic Parking
Brake):
1. Press the Engine Start/Stop button to
the ON or START position.
2. Press the EPB switch while depressing
the brake pedal.
Make sure the Parking Brake warning
light goes off.
To release EPB (Electronic Parking Brake)
automatically:
• Gear in P (Park)
With the engine running depress the
brake pedal and shift out of P (Park) to R
(Reverse) or D (Drive).
• Gear in N (Neutral)
With the engine running depress the
brake pedal and shift out of N (Neutral)
to R (Reverse) or D (Drive).
• Satisfy the following conditions
1. Ensure the doors, hood and tailgate
are closed.
2. With the engine running, depress the
brake pedal and shift out of P (Park) to
R (Reverse), D (Drive) or Manual shift
mode.
3. Depress the accelerator pedal.
Make sure the Parking Brake warning
light goes off.
Information
• For your safety, you can engage EPB
even though the Engine Stop/Start
button is in the OFF position (only if
battery power is available), but you
cannot release it.
• For your safety, depress the brake
pedal and release the parking brake
manually with the EPB switch when
you drive downhill or when backing up
the vehicle.
NOTICE
• If the Parking Brake warning light is
still on even though the EPB has been
released, have the system checked
by an authorized HYUNDAI dealer.
• Do not drive your vehicle with EPB
applied. It may cause excessive brake
pad and brake rotor wear.
Page 308 of 598
Driving Your Vehicle
6-34
Parking brake warning light
Check the Parking Brake
warning light by pressing the
Engine Stop/Start button to the
ON position.
This light will be illuminated when the
parking brake is applied with the ignition
switch in the START or ON position.
Before driving, be sure the parking
brake is released and the Parking Brake
warning light is OFF.
If the Parking Brake warning light
remains on after the parking brake is
released while the engine is running,
there may be a malfunction in the
brake system. Immediate attention is
necessary.
If at all possible, cease driving the vehicle
immediately. If that is not possible,
use extreme caution while operating
the vehicle and only continue to drive
the vehicle until you can reach a safe
location.
Electronic Parking Brake (EPB)
Malfunction
If the Electronic Parking Brake (EPB) does
not release normally, DO NOT DRIVE THE
VEHICLE. Have your vehicle inspected at
an authorized HYUNDAI dealer.
It is recommended to have your vehicle
towed on a flatbed tow truck if the EPB
malfunction occurs.
Auto Hold
Auto Hold maintains the vehicle in a
standstill even though the brake pedal is
not depressed after the driver brings the
vehicle to a complete stop by depressing
the brake pedal.
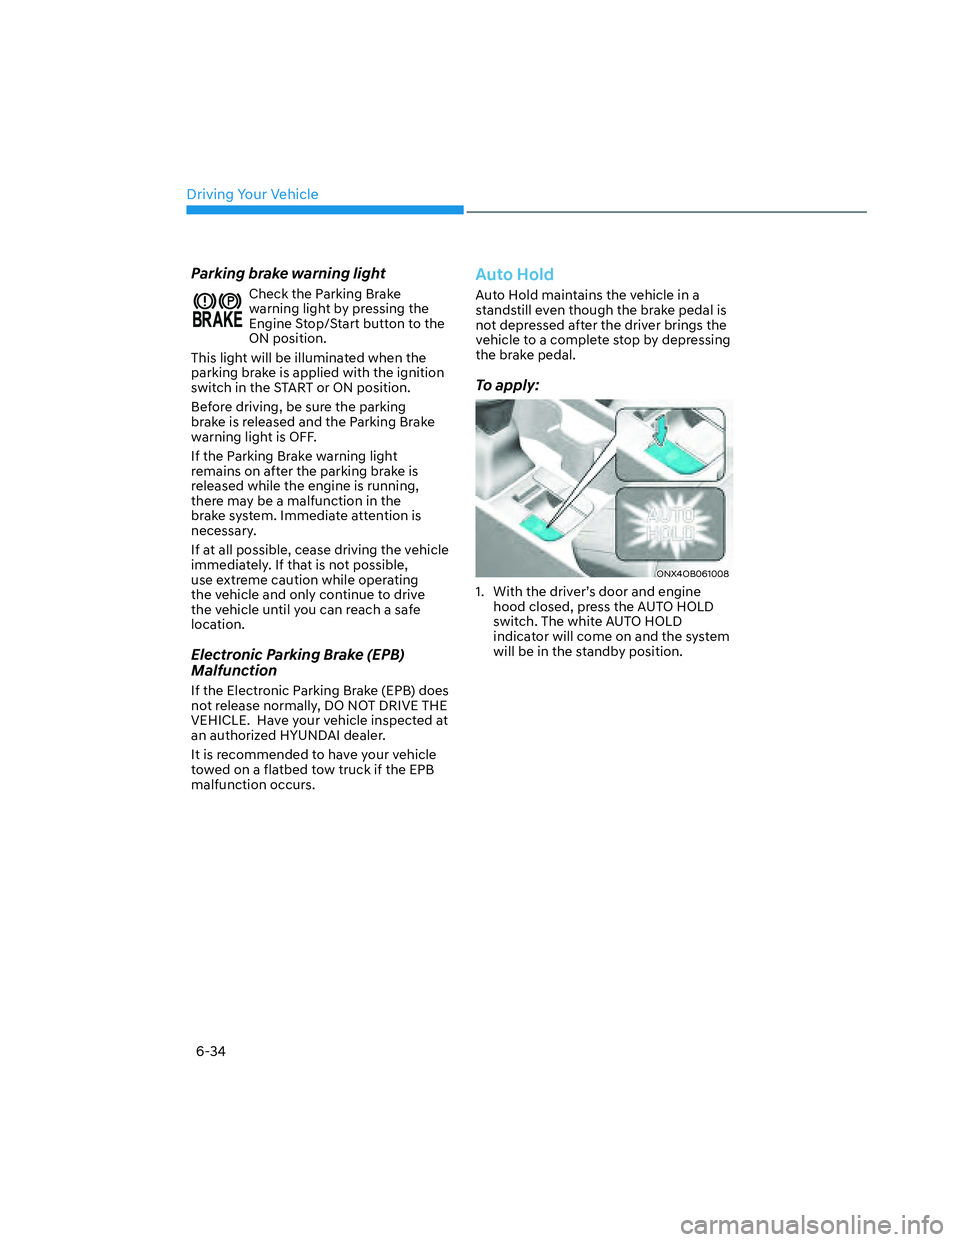
To apply:
ONX4OB061008ONX4OB061008
1. With the driver’s door and engine
hood closed, press the AUTO HOLD
switch. The white AUTO HOLD
indicator will come on and the system
will be in the standby position.
Page 327 of 598
06
6-53
WARNING
If AWD warning light () stays on
the instrument cluster, your vehicle
may have a malfunction with the
AWD system. When the AWD warning
light (
) illuminates have the vehicle
checked by an authorized HYUNDAI
dealer as soon as possible.
NOTICE
• Maintain AWD Auto mode when
driving on roads in normal
conditions.
• When driving under normal road
conditions (especially when
cornering) in AWD Lock mode, a
driver may find minor mechanical
vibration or noise, which is extremely
normal phenomenon, not a
malfunction. When AWD Lock mode
is released, such noise or vibration
will be immediately gone.
CAUTION
When driving on normal roads,
deactivate the AWD LOCK mode by
pushing the AWD LOCK button (AWD
LOCK indicator light goes off). Driving
on normal roads with the AWD LOCK
mode, especially, when cornering
may cause mechanical noise or
vibration. The noise and vibration will
disappear when the AWD LOCK mode
is deactivated. Prolong driving with the
noise and vibration may damage some
parts of the power train.
NOTICE
When the AWD LOCK mode is
deactivated, a sensation may be felt as
the driving power is delivered entirely
to the front wheels.
For safe AWD operation
Before driving
• Make sure all passengers are wearing
seat belts.
• Sit upright and closer to the steering
wheel than usual. Adjust the steering
wheel to a position comfortable for
you to drive.
Driving on snow-covered or icy roads
• Start off slowly by applying the
accelerator pedal gently.
• Use snow tires or tire chains.
• Keep sufficient distance between your
vehicle and the vehicle in front of you.
• Use engine braking during
deceleration.
• Avoid speeding, rapid acceleration,
sudden brake applications, and sharp
turns to prevent skids.
Driving in sand or mud
• Maintain slow and constant speed.
• Use tire chains driving in mud if
necessary.
• Keep sufficient distance between your
vehicle and the vehicle in front of you.
• Reduce vehicle speed and always
check the road condition.
• Avoid speeding, rapid acceleration,
sudden brake applications, and sharp
turns to prevent getting stuck.
CAUTION
When the vehicle is stuck in snow, sand
or mud, place a non-slip material under
the drive wheels to provide traction
OR Slowly spin the wheels in forward
and reverse directions which causes
a rocking motion that may free the
vehicle. However, avoid running the
engine continuously at high RPM. Doing
so may damage the AWD system.
Page 486 of 598
Emergency Situations
8-2
HAZARD WARNING
FLASHER
ONX4080001ONX4080001
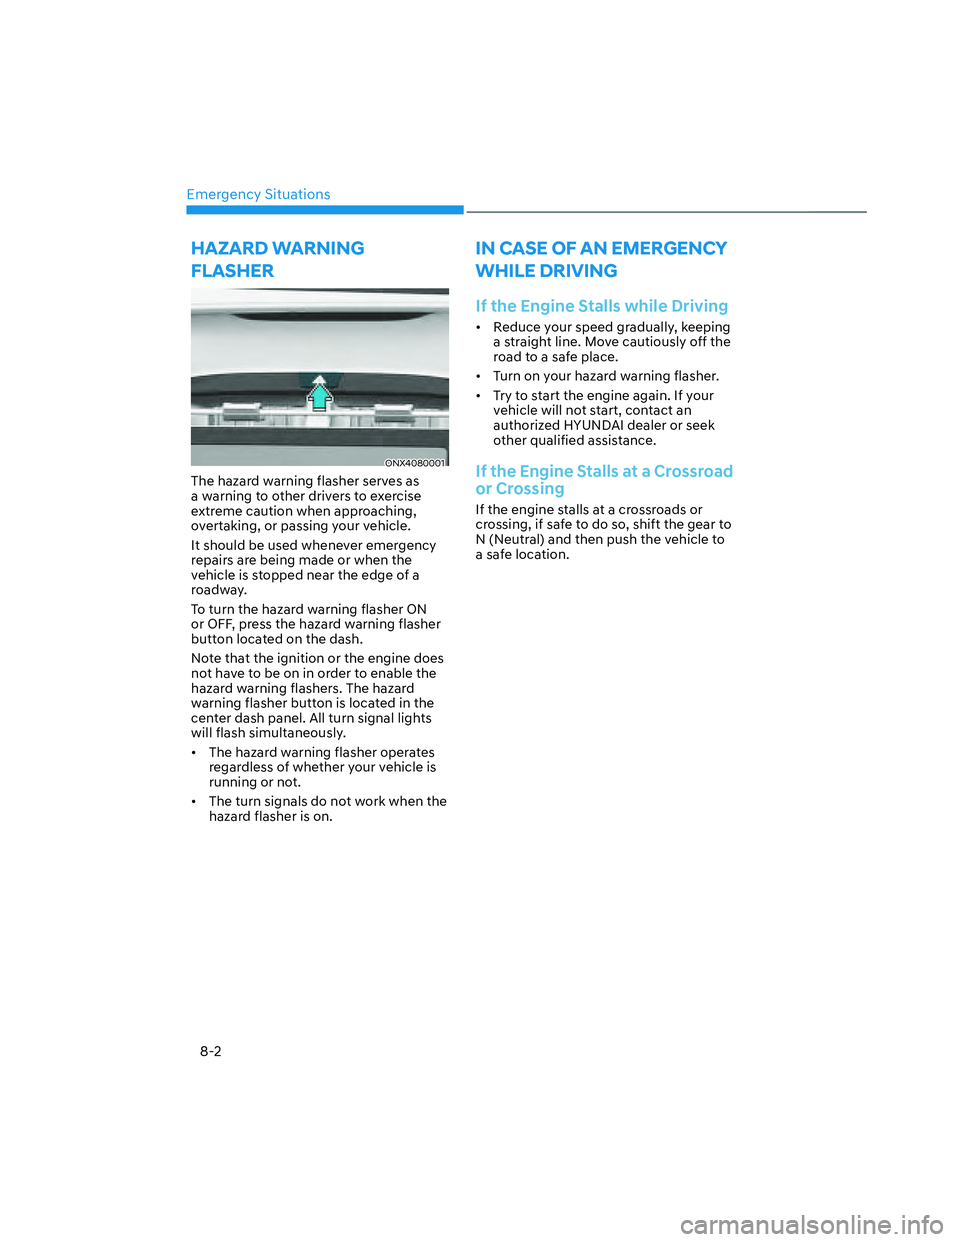
The hazard warning flasher serves as
a warning to other drivers to exercise
extreme caution when approaching,
overtaking, or passing your vehicle.
It should be used whenever emergency
repairs are being made or when the
vehicle is stopped near the edge of a
roadway.
To turn the hazard warning flasher ON
or OFF, press the hazard warning flasher
button located on the dash.
Note that the ignition or the engine does
not have to be on in order to enable the
hazard warning flashers. The hazard
warning flasher button is located in the
center dash panel. All turn signal lights
will flash simultaneously.
• The hazard warning flasher operates
regardless of whether your vehicle is
running or not.
• The turn signals do not work when the
hazard flasher is on.
IN CASE OF AN EMERGENCY
WHILE DRIVING
If the Engine Stalls while Driving
• Reduce your speed gradually, keeping
a straight line. Move cautiously off the
road to a safe place.
• Turn on your hazard warning flasher.
• Try to start the engine again. If your
vehicle will not start, contact an
authorized HYUNDAI dealer or seek
other qualified assistance.
If the Engine Stalls at a Crossroad
or Crossing
If the engine stalls at a crossroads or
crossing, if safe to do so, shift the gear to
N (Neutral) and then push the vehicle to
a safe location.
Page 510 of 598
9
Tires and Wheels ............................................................................................. 9-35Tire Care ......................................................................................................................9-35
Recommended Cold Tire Inflation Pressures ...........................................................9-35
Check Tire Inflation Pressure .....................................................................................9-36
Tire Rotation ............................................................................................................... 9-37
Wheel Alignment and Tire Balance .......................................................................... 9-38
Tire Replacement ...................................................................................................... 9-38
Wheel Replacement ...................................................................................................9-39
Tire Traction ................................................................................................................9-39
Tire Maintenance........................................................................................................9-39
Tire Sidewall Labeling ............................................................................................... 9-40
Tire Terminology and Definitions ............................................................................. 9-43
All Season Tires .......................................................................................................... 9-46
Summer Tires ............................................................................................................ 9-46
Low Aspect Ratio Tires ...............................................................................................9-47
Fuses ................................................................................................................9-48Instrument Panel Fuse Replacement ....................................................................... 9-49
Engine Compartment Panel Fuse Replacement ..................................................... 9-50
Fuse/Relay Panel Description.................................................................................... 9-51
Light Bulbs ....................................................................................................... 9-57Headlamp, Position Lamp, Turn Signal Lamp, Daytime Running Light (DRL)
Replacement ............................................................................................................. 9-58
Side Repeater Lamp Replacement .......................................................................... 9-60
Rear Combination Lamp Replacement ................................................................... 9-60
High Mounted Stop Lamp and Top Mounted Bed Lamp /
Side Mounted Bed Lamp Replacement .................................................................. 9-62
License Plate Lamp Replacement ............................................................................ 9-63
Interior light replacement ......................................................................................... 9-63
Appearance Care ............................................................................................ 9-65
Exterior Care .............................................................................................................. 9-65
Interior Care ................................................................................................................9-7 0
Emission Control System ................................................................................ 9-73
California Perchlorate Notice ......................................................................... 9-76
Page 566 of 598
Maintenance
9-58
Information
• A normally functioning lamp may
flicker momentarily to stabilize the
vehicle’s electrical control system.
However, if the lamp goes out after
flickering momentarily, or continues to
flicker, have the system checked by an
authorized HYUNDAI dealer.
• The position lamp may not turn on
when the position lamp switch is turned
on, but the position lamp and headlamp
switch may turn on when the headlamp
switch is turned on. This may be caused
by network failure or vehicle electrical
control system malfunction. If this
occurs, have the system checked by an
authorized HYUNDAI dealer.
Information
The headlamp aiming should be adjusted
after an accident or after the headlamp
assembly is reinstalled.
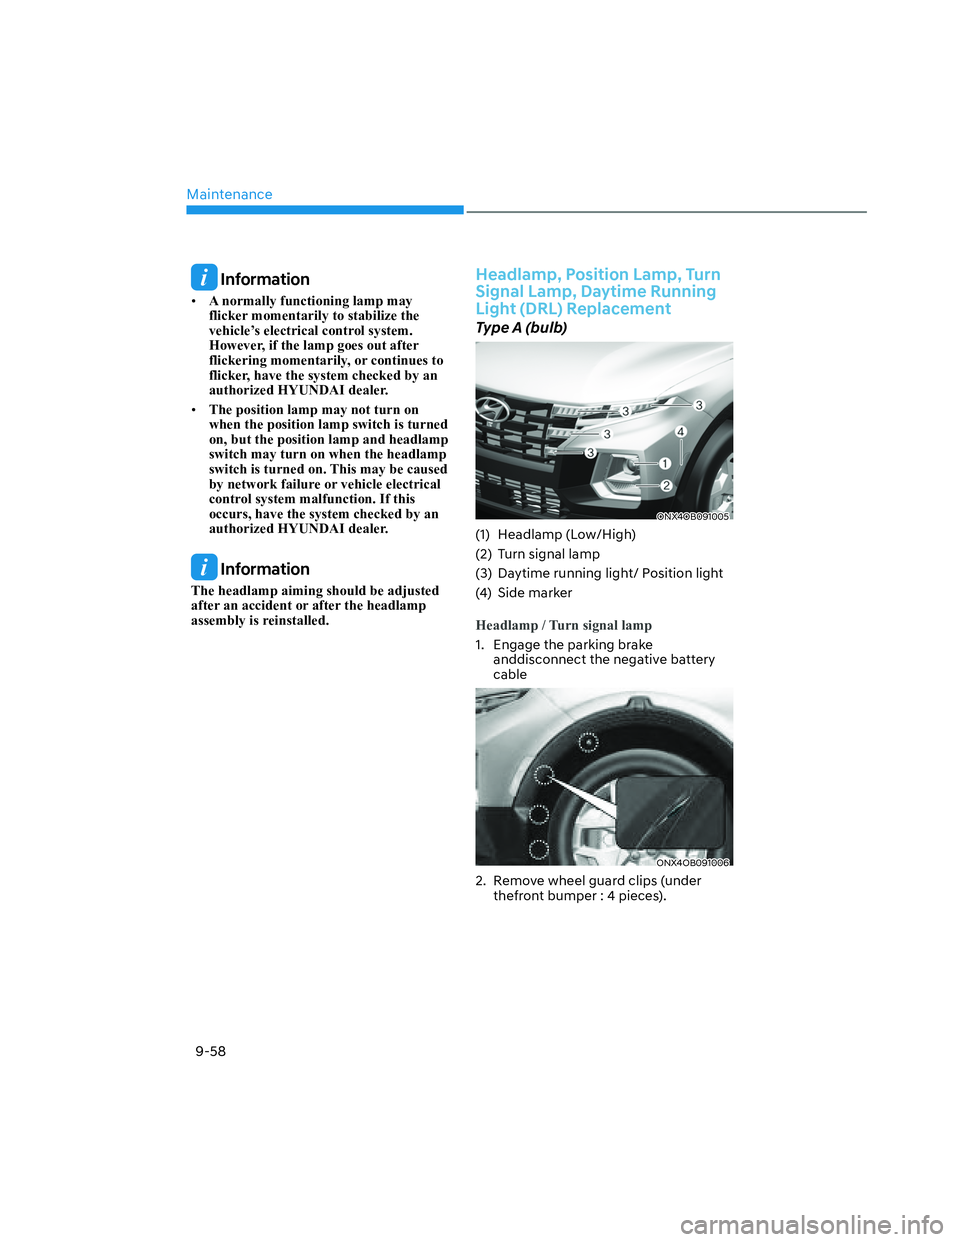
Headlamp, Position Lamp, Turn
Signal Lamp, Daytime Running
Light (DRL) Replacement
Type A (bulb)
ONX4OB091005 ONX4OB091005
(1) Headlamp (Low/High)
(2) Turn signal lamp
(3) Daytime running light/ Position light
(4) Side marker
Headlamp / Turn signal lamp
1. Engage the parking brake
anddisconnect the negative battery
cable
ONX4OB091006ONX4OB091006
2. Remove wheel guard clips (under
thefront bumper : 4 pieces).
Page 567 of 598
09
9-59
ONX4OB091014ONX4OB091014
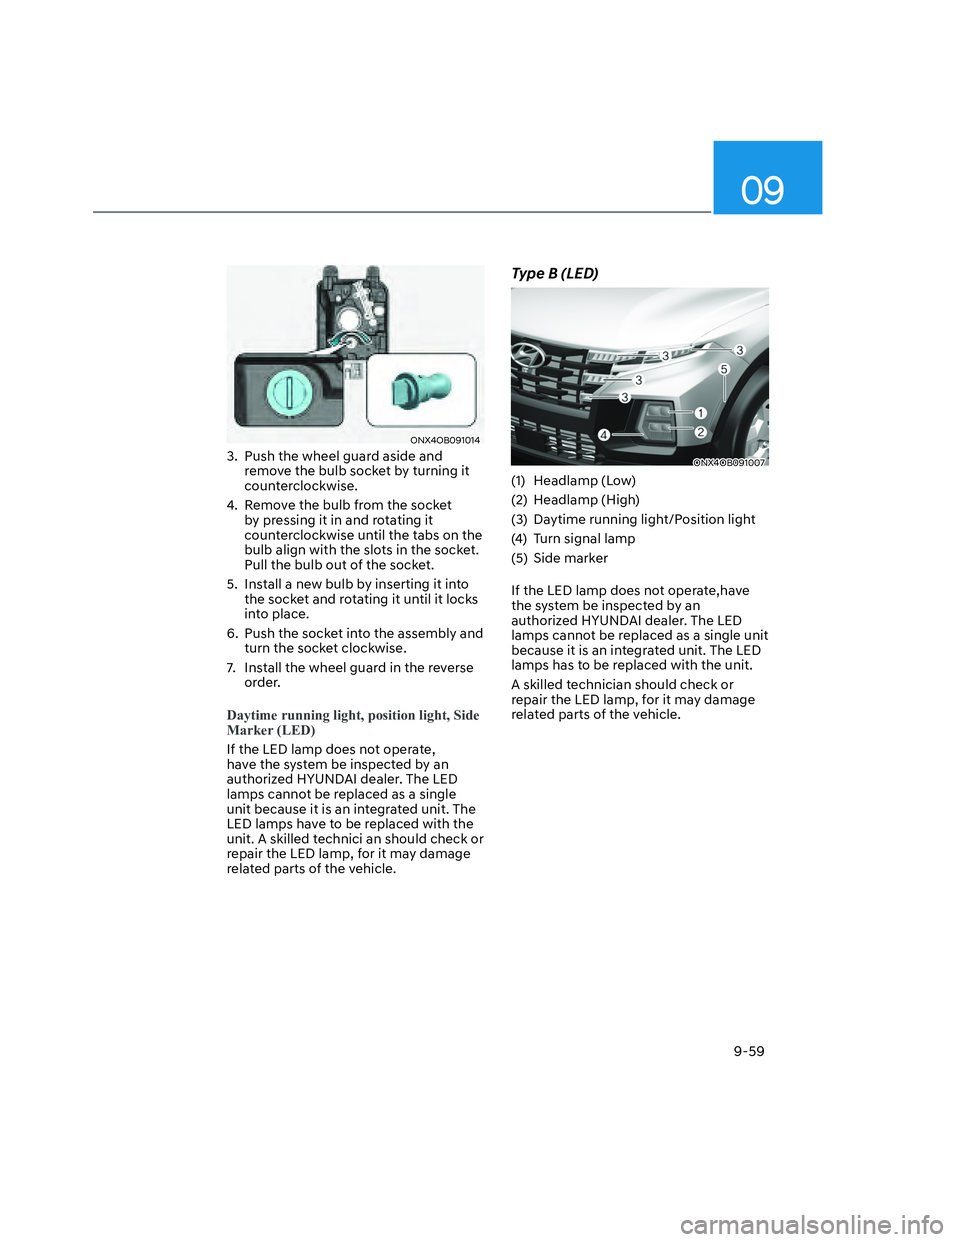
3. Push the wheel guard aside and
remove the bulb socket by turning it
counterclockwise.
4. Remove the bulb from the socket
by pressing it in and rotating it
counterclockwise until the tabs on the
bulb align with the slots in the socket.
Pull the bulb out of the socket.
5. Install a new bulb by inserting it into
the socket and rotating it until it locks
into place.
6. Push the socket into the assembly and
turn the socket clockwise.
7. Install the wheel guard in the reverse
order.
Daytime running light, position light, Side
Marker (LED)
If the LED lamp does not operate,
have the system be inspected by an
authorized HYUNDAI dealer. The LED
lamps cannot be replaced as a single
unit because it is an integrated unit. The
LED lamps have to be replaced with the
unit. A skilled technici an should check or
repair the LED lamp, for it may damage
related parts of the vehicle.
Type B (LED)
ONX4OB091007ONX4OB091007
(1) Headlamp (Low)
(2) Headlamp (High)
(3) Daytime running light/Position light
(4) Turn signal lamp
(5) Side marker
If the LED lamp does not operate,have
the system be inspected by an
authorized HYUNDAI dealer. The LED
lamps cannot be replaced as a single unit
because it is an integrated unit. The LED
lamps has to be replaced with the unit.
A skilled technician should check or
repair the LED lamp, for it may damage
related parts of the vehicle.