Page 167 of 598
05
5-31
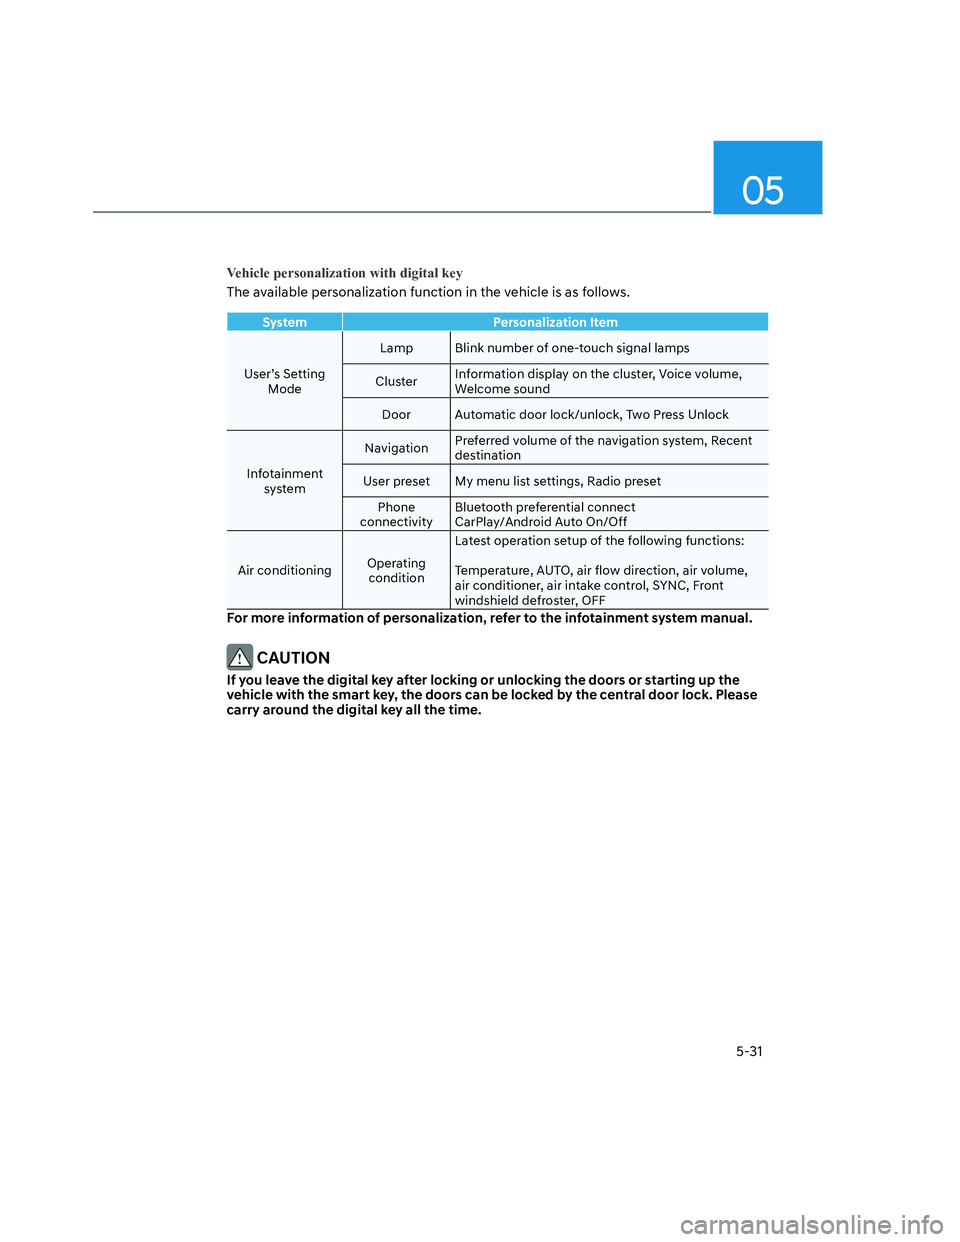
Vehicle personalization with digital key
The available personalization function in the vehicle is as follows.
System Personalization Item
User’s Setting
ModeLamp Blink number of one-touch signal lamps
ClusterInformation display on the cluster, Voice volume,
Welcome sound
Door Automatic door lock/unlock, Two Press Unlock
Infotainment
systemNavigationPreferred volume of the navigation system, Recent
destination
User preset My menu list settings, Radio preset
Phone
connectivityBluetooth preferential connect
CarPlay/Android Auto On/Off
Air conditioningOperating
conditionLatest operation setup of the following functions:
Temperature, AUTO, air flow direction, air volume,
air conditioner, air intake control, SYNC, Front
windshield defroster, OFF
For more information of personalization, refer to the infotainment system manual.
CAUTION
If you leave the digital key after locking or unlocking the doors or starting up the
vehicle with the smart key, the doors can be locked by the central door lock. Please
carry around the digital key all the time.
Page 230 of 598
Convenient Features
5-94
Automatic Heating and Air
Conditioning
The Automatic Climate Control System
is controlled by setting the desired
temperature.
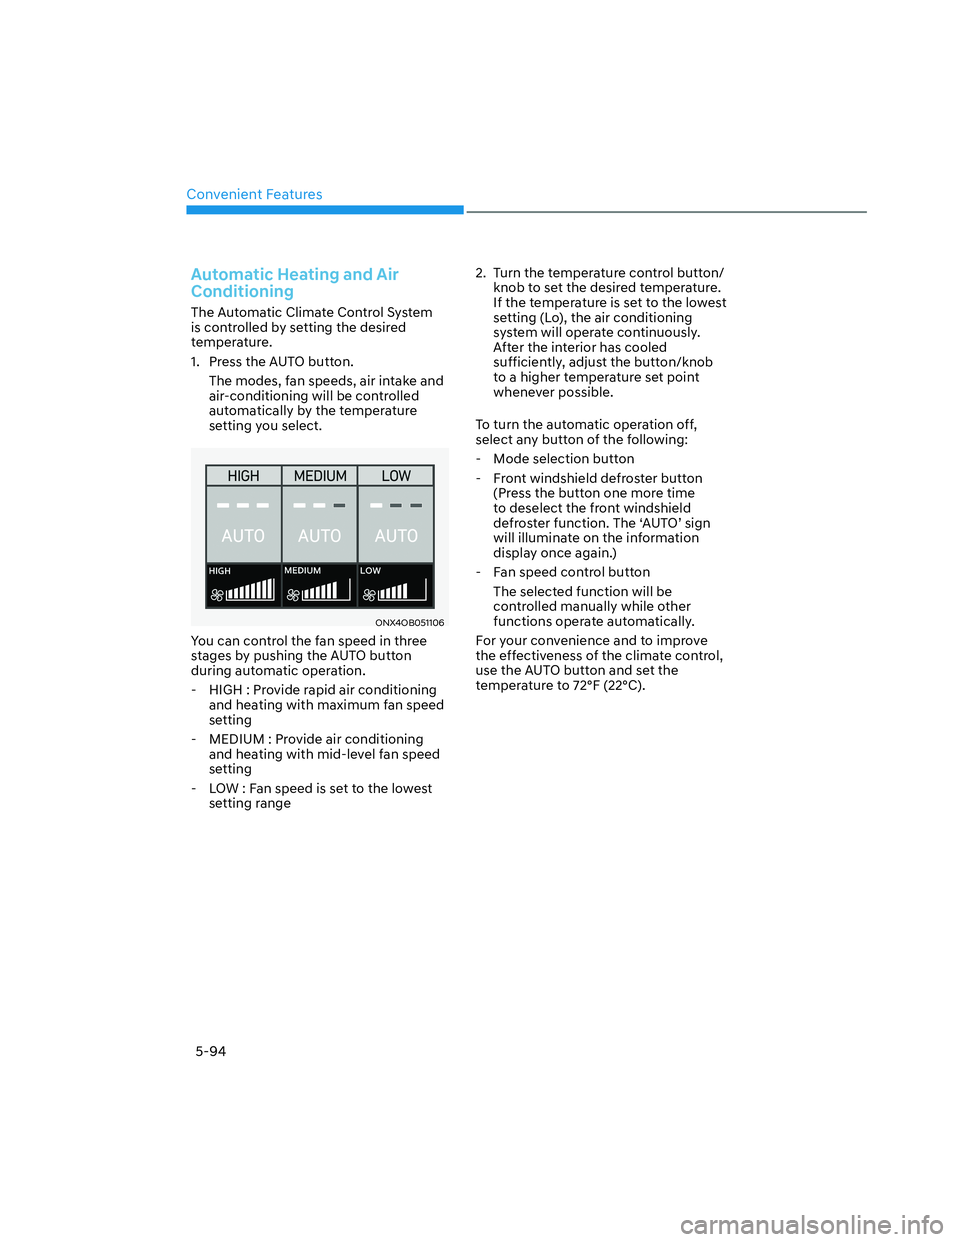
1. Press the AUTO button.
The modes, fan speeds, air intake and
air-conditioning will be controlled
automatically by the temperature
setting you select.
ONX4OB051106ONX4OB051106
You can control the fan speed in three
stages by pushing the AUTO button
during automatic operation.
- HIGH : Provide rapid air conditioning
and heating with maximum fan speed
setting
- MEDIUM : Provide air conditioning
and heating with mid-level fan speed
setting
- LOW : Fan speed is set to the lowest
setting range 2. Turn the temperature control button/
knob to set the desired temperature.
If the temperature is set to the lowest
setting (Lo), the air conditioning
system will operate continuously.
After the interior has cooled
sufficiently, adjust the button/knob
to a higher temperature set point
whenever possible.
To turn the automatic operation off,
select any button of the following:
- Mode selection button
- Front windshield defroster button
(Press the button one more time
to deselect the front windshield
defroster function. The ‘AUTO’ sign
will illuminate on the information
display once again.)
- Fan speed control button
The selected function will be
controlled manually while other
functions operate automatically.
For your convenience and to improve
the effectiveness of the climate control,
use the AUTO button and set the
temperature to 72°F (22°C).
Page 231 of 598
05
5-95
ONX4OB051044ONX4OB051044
Information
Never place anything near the sensor to
ensure better control of the heating and
cooling system.
Manual Heating and Air
Conditioning
1. Start the engine.
2. Set the mode to the desired position.
For improving the effectiveness of
heating and cooling, select:
- Heating:
- Cooling:
3. Set the temperature control to the
desired position.
4. Set the air intake control to the
outside (fresh) air position.
5. Set the fan speed control to the
desired speed.
6. If air conditioning is desired, turn the
air conditioning system on.
7. Press the AUTO button to convert to
full automatic control of the system.
Page 242 of 598
Convenient Features
5-106
WARNING
Windshield heating
Do not use the
position during
cooling operation in extremely humid
weather. The difference between the
temperature of the outside air and that
of the windshield could cause the outer
surface of the windshield to fog up,
causing loss of visibility could cause
an accident resulting in serious injury
or death. In this case, set the mode
selection button to the
position
and fan speed control knob to a lower
speed.
• For maximum defrost performance,
set the temperature control to the
highest temperature setting and
the fan speed control to the highest
setting.
• If warm air to the floor is desired while
defrosting or defogging, set the mode
to the floor-defrost position.
• Before driving, clear all snow and ice
from the windshield, rear window,
side view mirrors, and all side
windows.
• Clear all snow and ice from the
hood and air inlet in the cowl grill
to improve heater and defroster
efficiency and to reduce the
probability of fogging up the inside of
the windshield.
NOTICE
If the engine temperature is still cold
after starting, then a brief engine warm
up period may be required for the
vented air flow to become warm or hot.
Manual Climate Control System
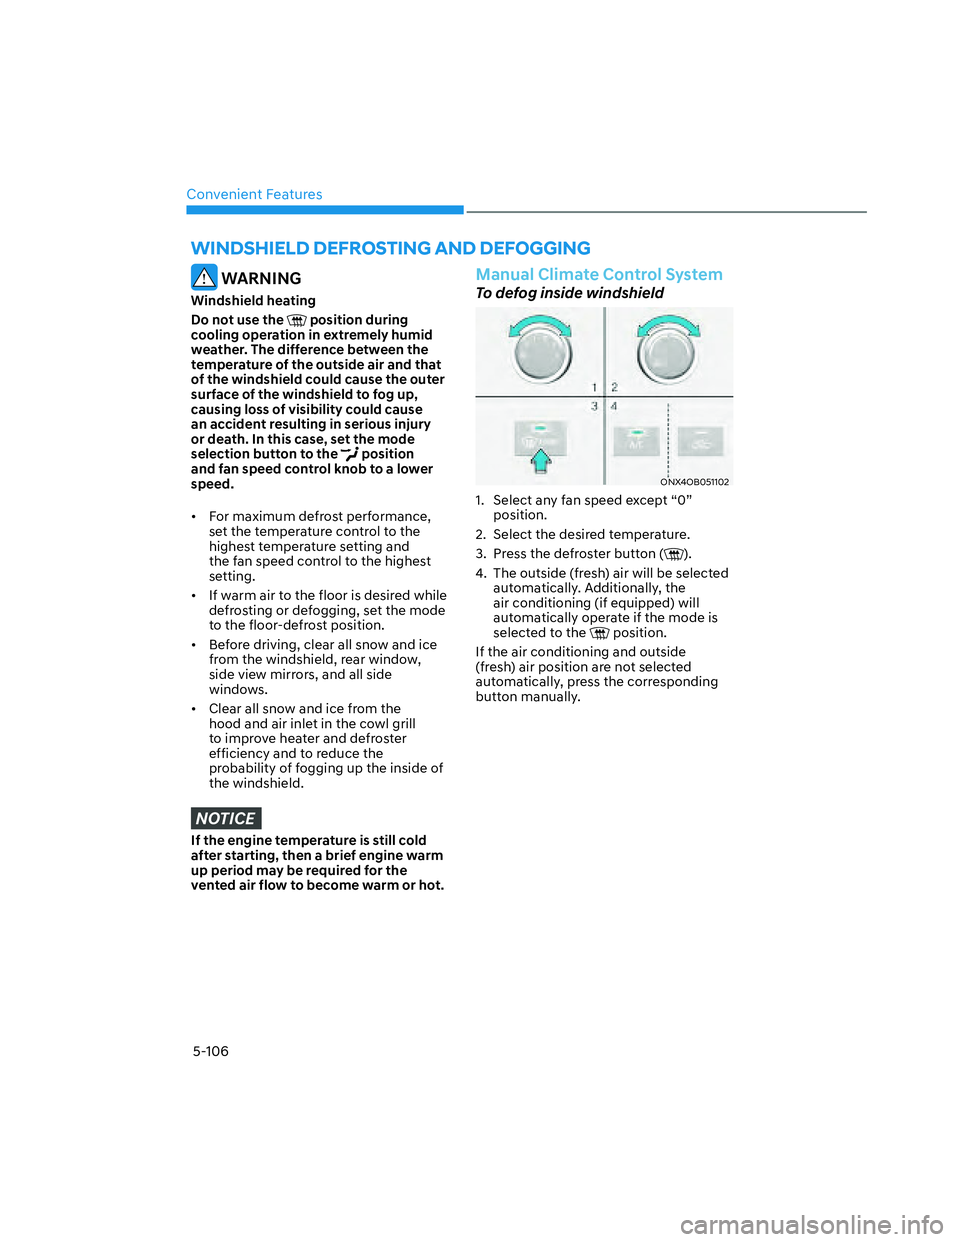
To defog inside windshield
ONX4OB051102ONX4OB051102
1. Select any fan speed except “0”
position.
2. Select the desired temperature.
3. Press the defroster button (
).
4. The outside (fresh) air will be selected
automatically. Additionally, the
air conditioning (if equipped) will
automatically operate if the mode is
selected to the
position.
If the air conditioning and outside
(fresh) air position are not selected
automatically, press the corresponding
button manually.
WINDSHIELD DEFROSTING AND DEFOGGING
Page 245 of 598
05
5-109
Auto Defogging System
on Models with Automatic
Temperature Control (if
equipped)
ONX4OB051045ONX4OB051045
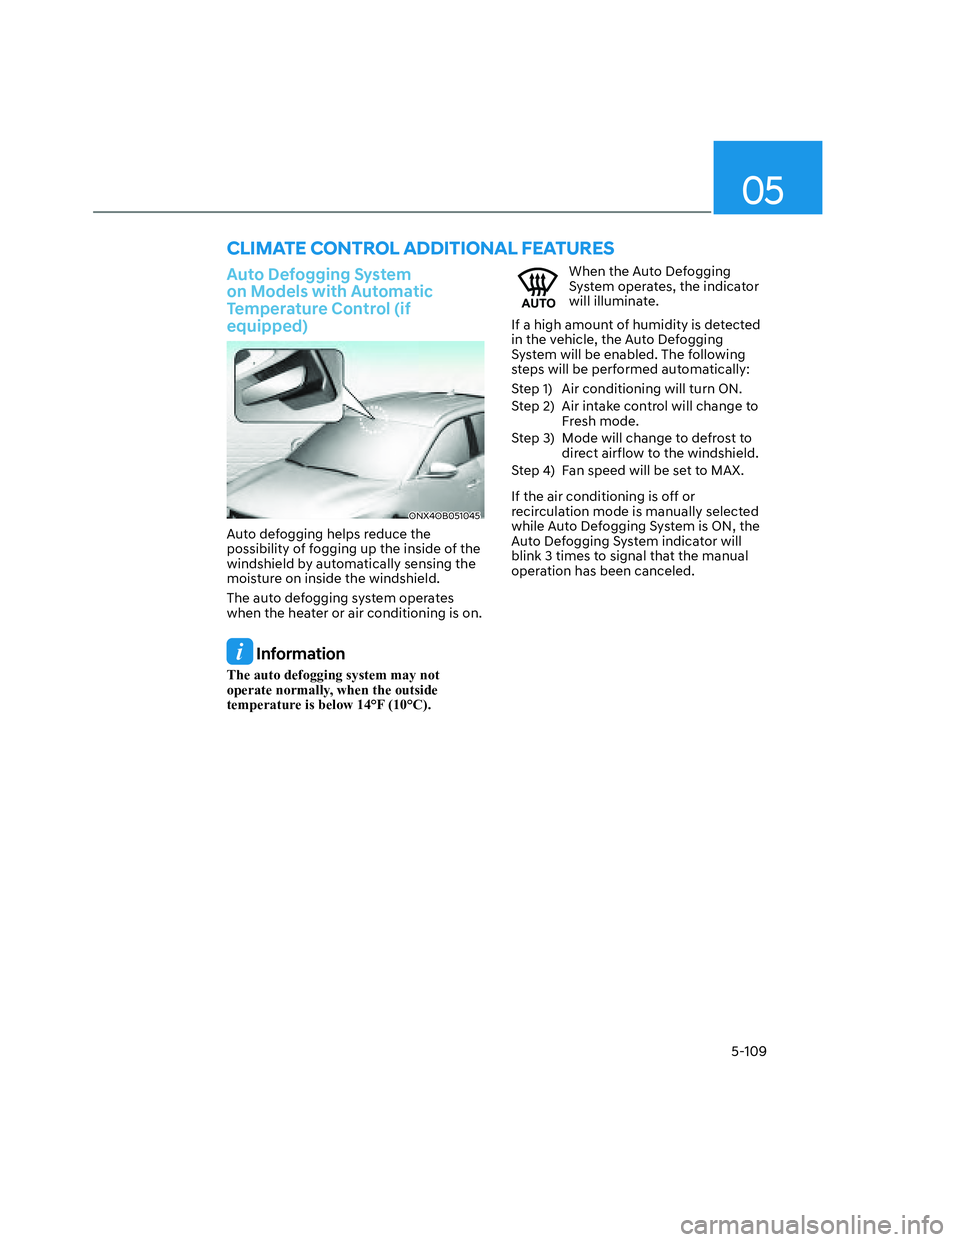
Auto defogging helps reduce the
possibility of fogging up the inside of the
windshield by automatically sensing the
moisture on inside the windshield.
The auto defogging system operates
when the heater or air conditioning is on.
Information
The auto defogging system may not
operate normally, when the outside
temperature is below 14°F (10°C).
When the Auto Defogging
System operates, the indicator
will illuminate.
If a high amount of humidity is detected
in the vehicle, the Auto Defogging
System will be enabled. The following
steps will be performed automatically:
Step 1) Air conditioning will turn ON.
Step 2) Air intake control will change to
Fresh mode.
Step 3) Mode will change to defrost to
direct airflow to the windshield.
Step 4) Fan speed will be set to MAX.
If the air conditioning is off or
recirculation mode is manually selected
while Auto Defogging System is ON, the
Auto Defogging System indicator will
blink 3 times to signal that the manual
operation has been canceled.
CLIMATE CONTROL ADDITIONAL FEATURES
Page 269 of 598
05
5-133
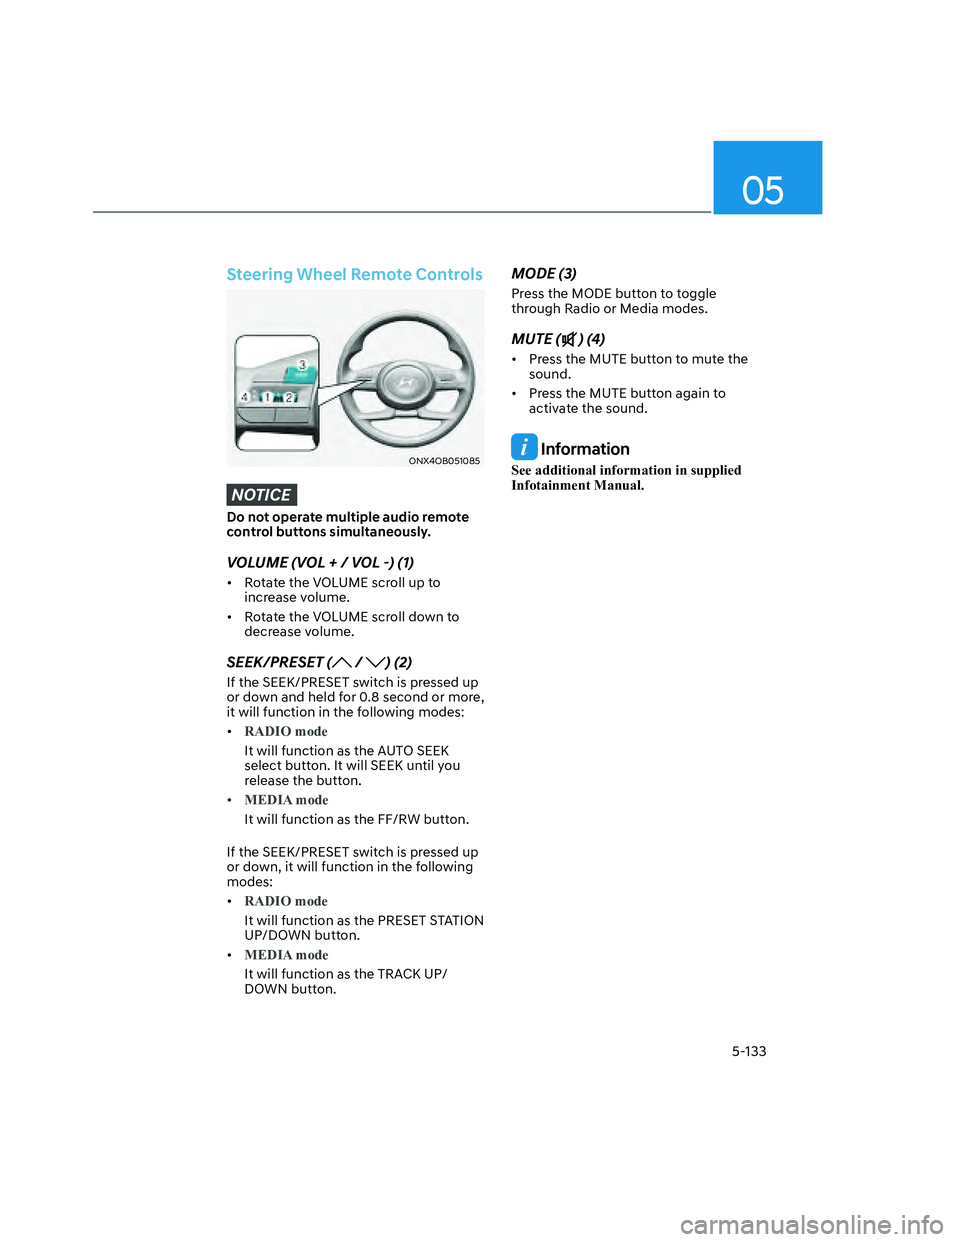
Steering Wheel Remote Controls
ONX4OB051085ONX4OB051085
NOTICE
Do not operate multiple audio remote
control buttons simultaneously.
VOLUME (VOL + / VOL -) (1)
• Rotate the VOLUME scroll up to
increase volume.
• Rotate the VOLUME scroll down to
decrease volume.
SEEK/PRESET ( / ) (2)
If the SEEK/PRESET switch is pressed up
or down and held for 0.8 second or more,
it will function in the following modes:
•
RADIO mode
It will function as the AUTO SEEK
select button. It will SEEK until you
release the button.
•
MEDIA mode
It will function as the FF/RW button.
If the SEEK/PRESET switch is pressed up
or down, it will function in the following
modes:
•
RADIO mode
It will function as the PRESET STATION
UP/DOWN button.
•
MEDIA mode
It will function as the TRACK UP/
DOWN button.
MODE (3)
Press the MODE button to toggle
through Radio or Media modes.
MUTE () (4)
• Press the MUTE button to mute the
sound.
• Press the MUTE button again to
activate the sound.
Information
See additional information in supplied
Infotainment Manual.
Page 288 of 598
Driving Your Vehicle
6-14
ONX4E060039ONX4E060039
[A] : Shift lever, [B] : Shift release button, [C] : Manual shift mode
Depress the brake pedal and press the Shift release button while moving the shift lever.
Press the Shift release button while moving the shift lever.
The shift lever can freely operate.
Automatic Transmission Operation
The automatic transmission has eight forward speeds and one reverse speed.
The individual speeds are selected automatically in the D (Drive) position.
AUTOMATIC TRANSMISSION
Page 289 of 598
06
6-15
The indicator in the instrument cluster
displays the shift lever position when the
ignition switch is in the ON position.
WARNING
To reduce the risk of serious injury or
death:
• ALWAYS check the surrounding
areas near your vehicle for people,
especially children, before shifting a
vehicle into D (Drive) or R (Reverse).
• Before leaving the driver’s seat,
always make sure the shift lever
is in the P (Park) position, then set
the parking brake, and place the
ignition switch in the LOCK/OFF
position. Unexpected and sudden
vehicle movement can occur if these
precautions are not followed.
• When using the paddle shifter
(manual shift mode), do not use
engine braking (shifting from a
high gear to lower gear) rapidly on
slippery roads. The vehicle may slip
causing an accident.
P (Park)
Always come to a complete stop before
shifting into P (Park).
To shift the vehicle from P (Park), make
sure to depress firmly on the brake
pedal and also make sure your foot is
completely off the accelerator pedal.
If you have done all of the above and
still cannot shift the lever out of P
(Park), see "Shift-Lock Release" in this
chapter.
The shift lever must be in P (Park) before
turning the engine off.
WARNING
• Shifting into P (Park) while the
vehicle is in motion may cause you to
lose control of the vehicle.
• After the vehicle has stopped, always
make sure the shift lever is in P
(Park), apply the parking brake, and
turn the engine off.
• When parking on an incline, shift
the gear to P (Park) and apply the
parking brake to prevent the vehicle
from rolling downhill.
• Do not use the P (Park) position in
place of the parking brake.
R (Reverse)
Use this position to drive the vehicle
backward.
NOTICE
Always come to a complete stop before
shifting into or out of R (Reverse); you
may damage the transmission if you
shift into R (Reverse) while the vehicle is
in motion.
Also note that when the vehicle is in D
(Drive) or R (Reverse) and you open the
driver's door, a warning will chime and
a warning message "Shift to Park" will
appear in the LCD cluster display.