Page 471 of 579
08
8-21
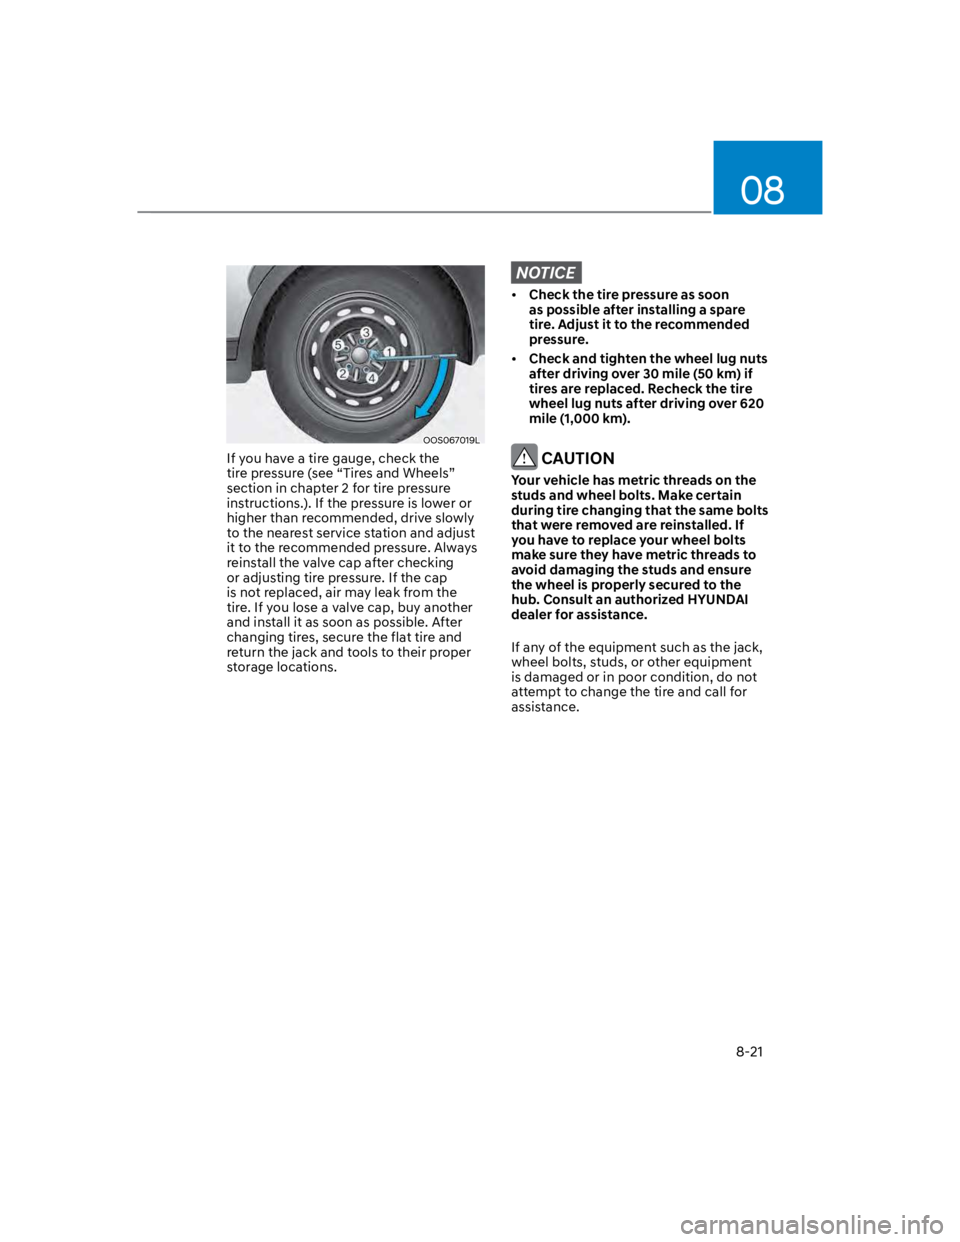
OOS067019L
If you have a tire gauge, check the
tire pressure (see “Tires and Wheels”
section in chapter 2 for tire pressure
instructions.). If the pressure is lower or
higher than recommended, drive slowly
to the nearest service station and adjust
it to the recommended pressure. Always
reinstall the valve cap after checking
or adjusting tire pressure. If the cap
is not replaced, air may leak from the
tire. If you lose a valve cap, buy another
and install it as soon as possible. After
changing tires, secure the flat tire and
return the jack and tools to their proper
storage locations.
NOTICE
Check the tire pressure as soon
as possible after installing a spare
tire. Adjust it to the recommended
pressure.
Check and tighten the wheel lug nuts
after driving over 30 mile (50 km) if
tires are replaced. Recheck the tire
wheel lug nuts after driving over 620
mile (1,000 km).
CAUTION
Your vehicle has metric threads on the
studs and wheel bolts. Make certain
during tire changing that the same bolts
that were removed are reinstalled. If
you have to replace your wheel bolts
make sure they have metric threads to
avoid damaging the studs and ensure
the wheel is properly secured to the
hub. Consult an authorized HYUNDAI
dealer for assistance.
If any of the equipment such as the jack,
wheel bolts, studs, or other equipment
is damaged or in poor condition, do not
attempt to change the tire and call for
assistance.
Page 478 of 579
Emergency situations
8-28
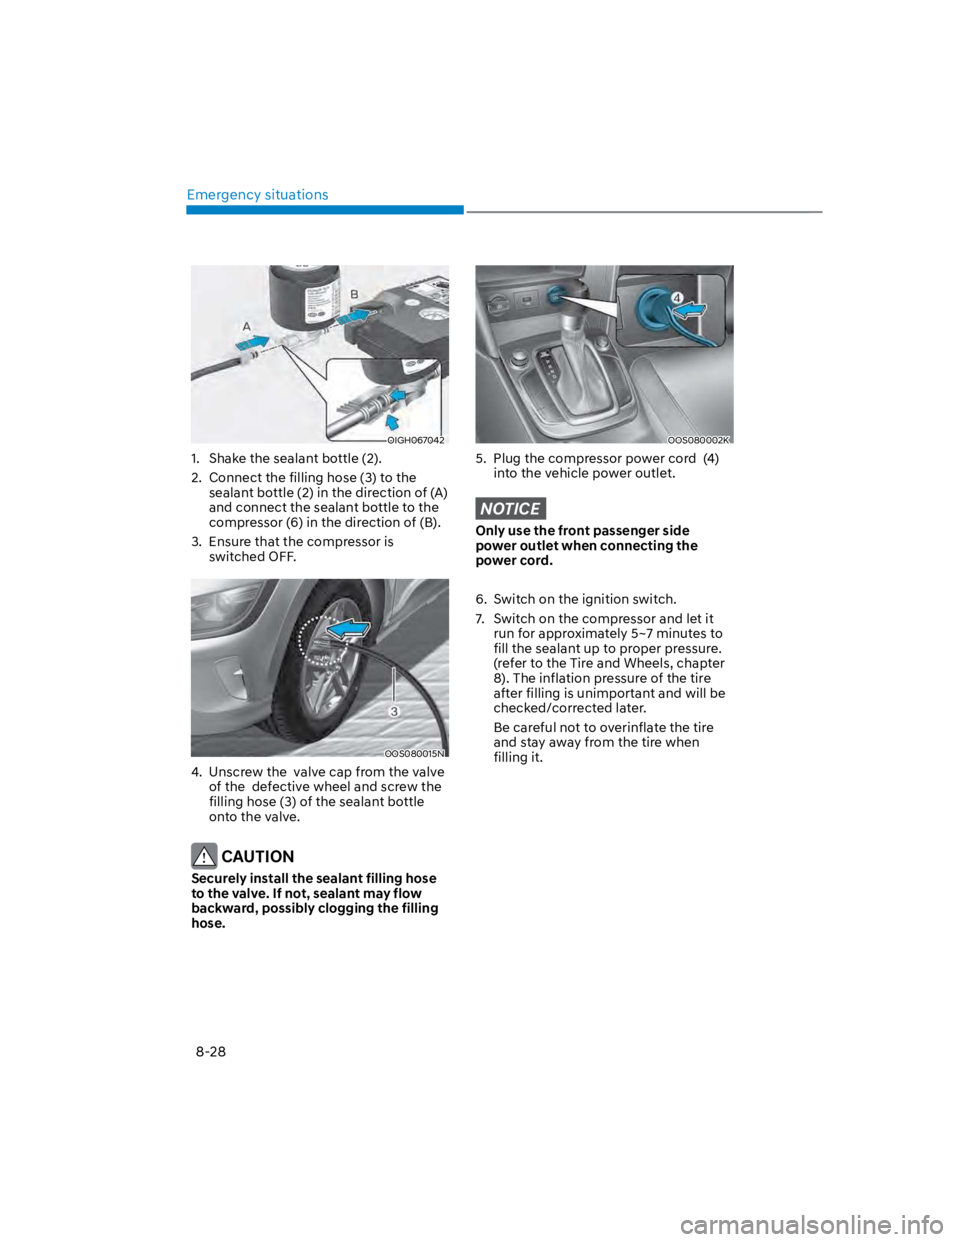
OIGH067042
1. Shake the sealant bottle (2).
2. Connect the filling hose (3) to the
sealant bottle (2) in the direction of (A)
and connect the sealant bottle to the
compressor (6) in the direction of (B).
3. Ensure that the compressor is
switched OFF.
OOS080015N
4. Unscrew the valve cap from the valve
of the defective wheel and screw the
filling hose (3) of the sealant bottle
onto the valve.
CAUTION
Securely install the sealant filling hose
to the valve. If not, sealant may flow
backward, possibly clogging the filling
hose.
OOS080002K
5. Plug the compressor power cord (4)
into the vehicle power outlet.
NOTICE
Only use the front passenger side
power outlet when connecting the
power cord.
6. Switch on the ignition switch.
7. Switch on the compressor and let it
run for approximately 5~7 minutes to
fill the sealant up to proper pressure.
(refer to the Tire and Wheels, chapter
8). The inflation pressure of the tire
after filling is unimportant and will be
checked/corrected later.
Be careful not to overinflate the tire
and stay away from the tire when
filling it.
Page 481 of 579
08
8-31
Information
CAUTION
If the inflation pressure is not
maintained, drive the vehicle a second
time, refer to Distributing the sealant.
Then repeat steps 1 to 4.
Use of the TMK may be ineffectual for
tire damage larger than approximately
0.16 inch (4 mm).
Contact an authorized HYUNDAI dealer
if the tire cannot be made roadworthy
with the Tire Mobility Kit.
WARNING
The tire inflation pressure must be
inflated to the proper pressure (Refer to
“Tire and Wheels” section in chapter 2).
If it is not, do not continue driving.
Call for road side service or towing.
CAUTION
Tire pressure sensor
The sealant on the tire pressure sensor
and wheel should be removed when
you replace the tire with a new one and
inspect the tire pressure sensors. We
recommend that you get this done at an
authorized dealer.
Information
Page 490 of 579
Maintenance
9-4
You should exercise the utmost care
to prevent damage to your vehicle and
injury to yourself whenever performing
any maintenance or inspection
procedures.
Have your vehicle maintained and
repaired by an authorized HYUNDAI
dealer. An authorized HYUNDAI dealer
meets HYUNDAI’s high service quality
standards and receives technical support
from HYUNDAI in order to provide you
with a high level of service satisfaction.
Owner’s responsibility
Maintenance service and record
retention are the owner’s responsibility.
You should retain documents that show
proper maintenance has been performed
on your vehicle in accordance with
the scheduled maintenance service
charts shown on the following pages.
You need this information to establish
your compliance with the servicing
and maintenance requirements of your
vehicle warranties.
Detailed warranty information is
provided in your Owner’s Handbook &
Warranty Information booklet.
Repairs and adjustments required as a
result of improper maintenance or a lack
of required maintenance are not covered.
Owner maintenance precautions
Inadequate, incomplete or insufficient
servicing may result in operational
problems with your vehicle that could
lead to vehicle damage, an accident, or
personal injury. This chapter provides
instructions only for the maintenance
items that are easy to perform.
Your vehicle should not be modified
in any way. Such modifications may
adversely affect the performance, safety
or durability of your vehicle and may, in
addition, violate conditions of the limited
warranties covering the vehicle.
NOTICE
Improper owner maintenance during
the warranty period may affect
warranty coverage. For details, read
the separate Service Passport provided
with the vehicle. If you’re unsure
about any servicing or maintenance
procedure, have the system be serviced
by an authorized HYUNDAI dealer.
MAINTENANCE SERVICES
Page 495 of 579
09
9-9
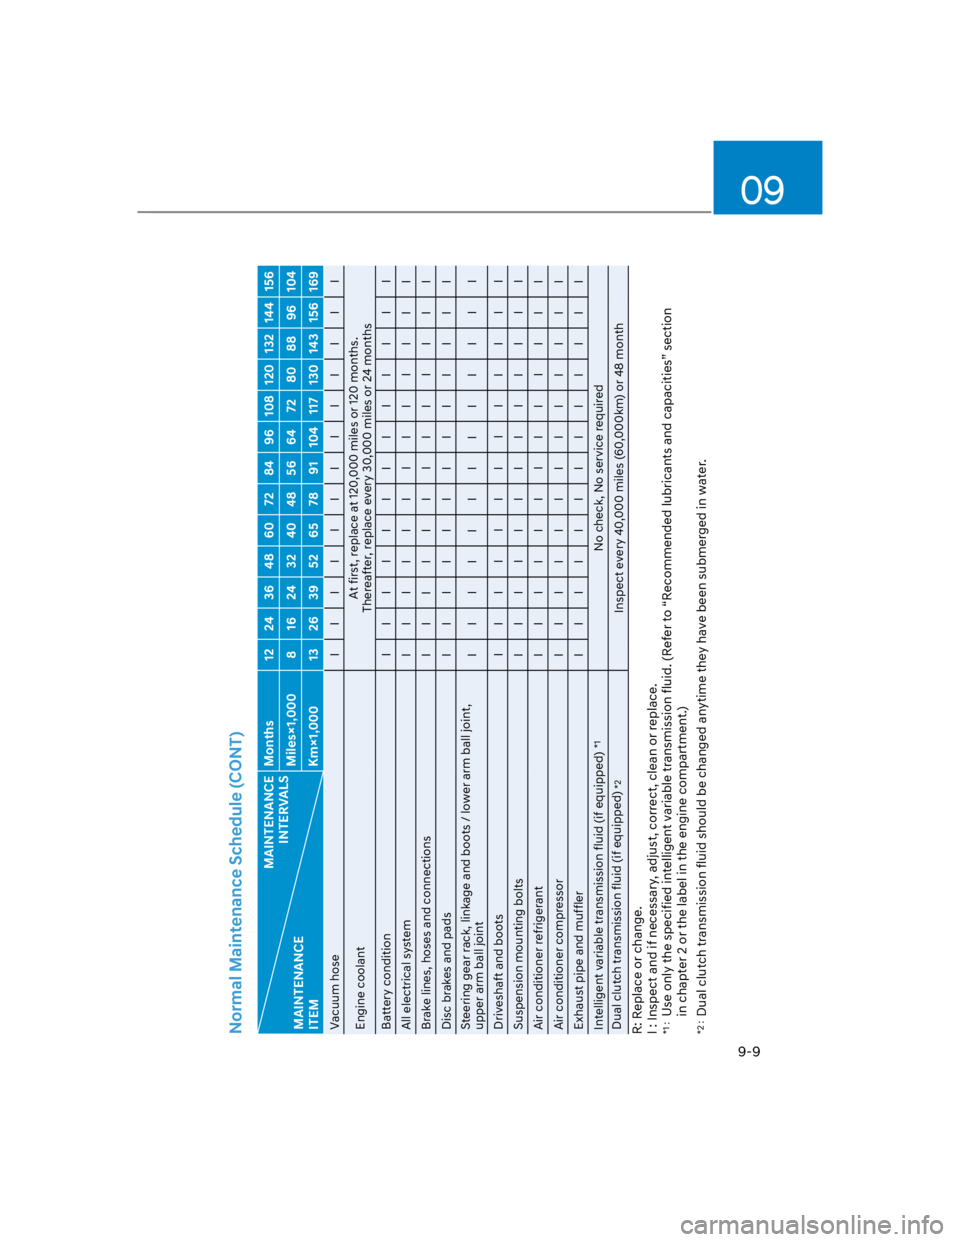
Normal Maintenance Schedule (CONT)
MAINTENANCE
INTERVALS
MAINTENANCE
ITEM
Months 12 24 36 48 60 72 84 96 108 120 132 144 156
Miles×1,000 8 16 24 32 40 48 56 64 72 80 88 96 104
Km×1,000 13 26 39 52 65 78 91 104 117 130 143 156 169
Vacuum hose I I I I I I I I I I I I I
Engine coolant
At first, replace at 120,000 miles or 120 months.
Thereafter, replace every 30,000 miles or 24 months
Battery condition I I I I I I I I I I I I I
All electrical system I I I I I I I I I I I I I
Brake lines, hoses and connections I I I I I I I I I I I I I
Disc brakes and pads I I I I I I I I I I I I I
Steering gear rack, linkage and boots / lower arm ball joint,
upper arm ball joint
I I I I I I I I I I I I I
Driveshaft and boots I I I I I I I I I I I I I
Suspension mounting bolts I I I I I I I I I I I I I
Air conditioner refrigerant I I I I I I I I I I I I I
Air conditioner compressor I I I I I I I I I I I I I
Exhaust pipe and muffler I I I I I I I I I I I I I
Intelligent variable transmission fluid (if equipped)
*1
No check, No service required
Dual clutch transmission fluid (if equipped)
*2
Inspect every 40,000 miles (60,000km) or 48 month
R: Replace or change.
I : Inspect and if necessary, adjust, correct, clean or replace.
*1 :
Use only the specified intelligent variable transmission fluid. (Refer to “Recommended lubricants and capacities” section
in chapter 2 or the label in the engine compartment.)
*2 :
Dual clutch transmission fluid should be changed anytime they have been submerged in water.
Page 502 of 579
Maintenance
9-16
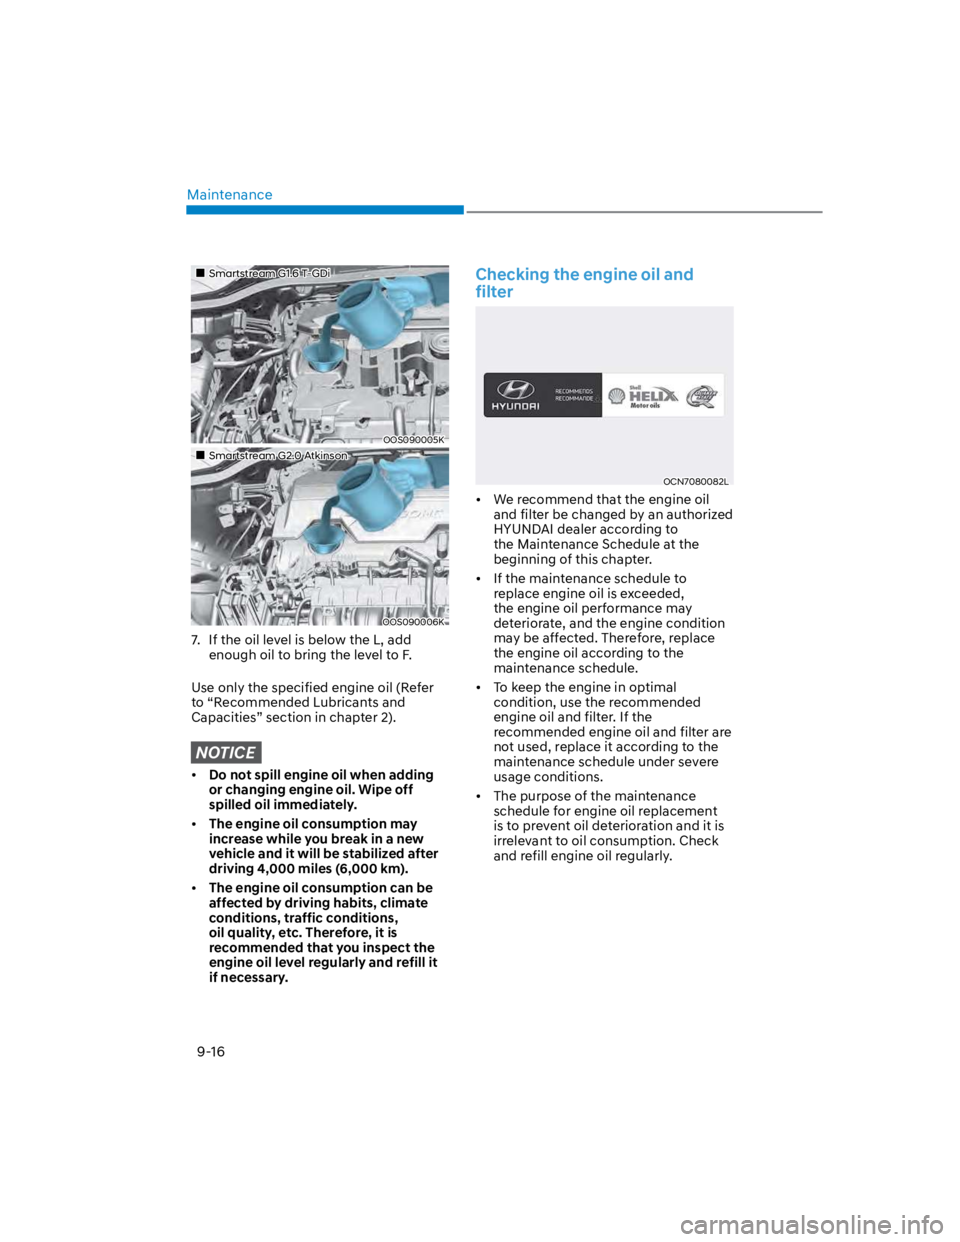
Smartstream G1.6 T-GDi
OOS090005K
Smartstream G2.0 Atkinson
OOS090006K
7. If the oil level is below the L, add
enough oil to bring the level to F.
Use only the specified engine oil (Refer
to “Recommended Lubricants and
Capacities” section in chapter 2).
NOTICE
Do not spill engine oil when adding
or changing engine oil. Wipe off
spilled oil immediately.
The engine oil consumption may
increase while you break in a new
vehicle and it will be stabilized after
driving 4,000 miles (6,000 km).
The engine oil consumption can be
affected by driving habits, climate
conditions, traffic conditions,
oil quality, etc. Therefore, it is
recommended that you inspect the
engine oil level regularly and refill it
if necessary.
Checking the engine oil and
filter
OCN7080082L
We recommend that the engine oil
and filter be changed by an authorized
HYUNDAI dealer according to
the Maintenance Schedule at the
beginning of this chapter.
If the maintenance schedule to
replace engine oil is exceeded,
the engine oil performance may
deteriorate, and the engine condition
may be affected. Therefore, replace
the engine oil according to the
maintenance schedule.
To keep the engine in optimal
condition, use the recommended
engine oil and filter. If the
recommended engine oil and filter are
not used, replace it according to the
maintenance schedule under severe
usage conditions.
The purpose of the maintenance
schedule for engine oil replacement
is to prevent oil deterioration and it is
irrelevant to oil consumption. Check
and refill engine oil regularly.
Page 506 of 579
Maintenance
9-20
Recommended coolant
When adding coolant, use only
deionized water, distilled water or soft
water for your vehicle and never mix
hard water in the coolant filled at the
factory.
An incorrect coolant mixture can
result in severe malfunction or engine
damage.
The engine in your vehicle has
aluminum engine parts and must be
protected by an phosphate-based
ethylene glycol coolant to prevent
corrosion and freezing.
Do not use alcohol or methanol
coolant or mix them with the specified
coolant.
Do not use a solution that contains
more than 60% antifreeze or less than
35% antifreeze, which would reduce
the effectiveness of the solution.
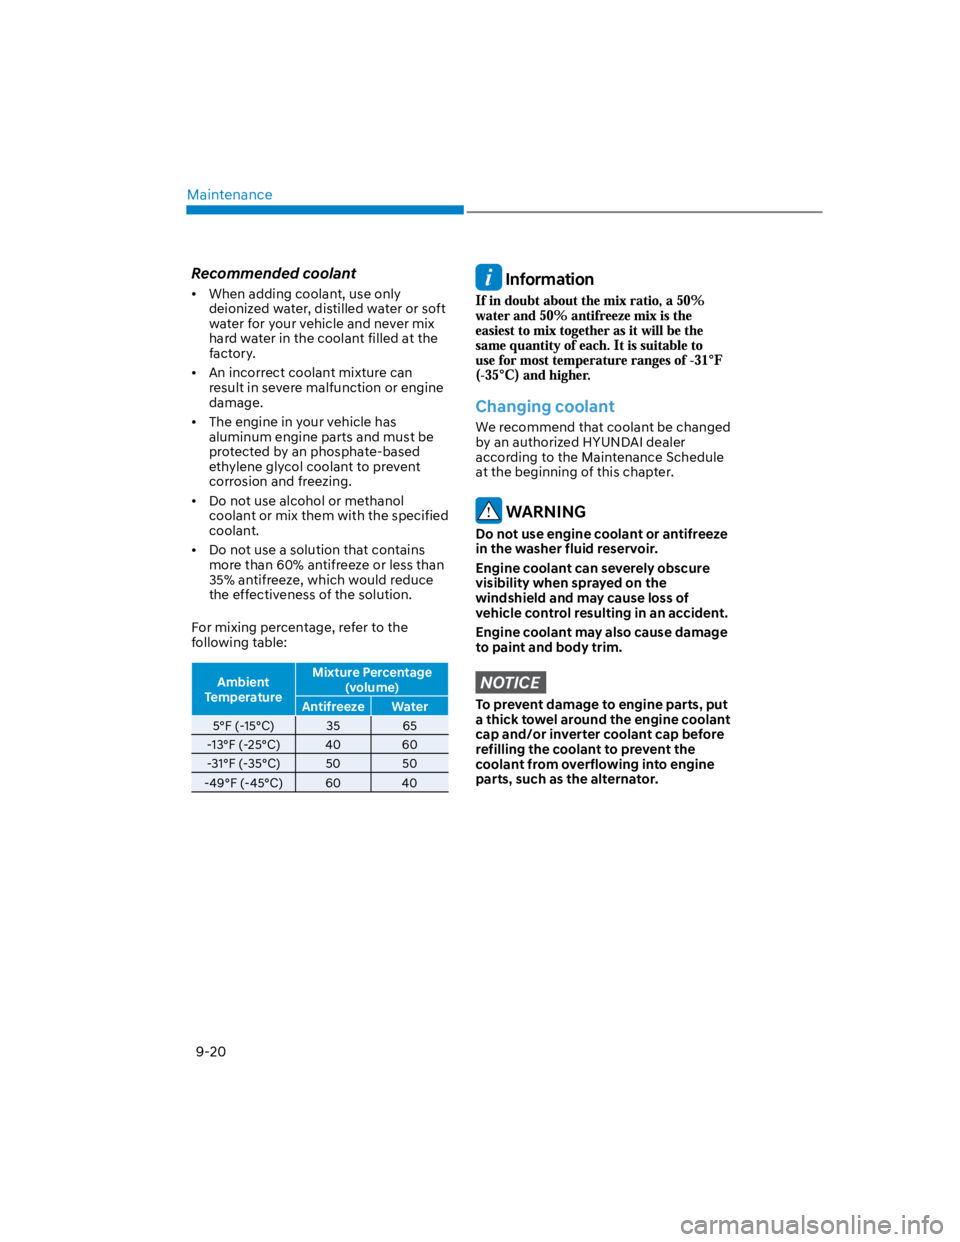
For mixing percentage, refer to the
following table:
Ambient
Temperature
Mixture Percentage
(volume)
Antifreeze Water
5°F (-15°C) 35 65
-13°F (-25°C) 40 60
-31°F (-35°C) 50 50
-49°F (-45°C) 60 40
Information
Changing coolant
We recommend that coolant be changed
by an authorized HYUNDAI dealer
according to the Maintenance Schedule
at the beginning of this chapter.
WARNING
Do not use engine coolant or antifreeze
in the washer fluid reservoir.
Engine coolant can severely obscure
visibility when sprayed on the
windshield and may cause loss of
vehicle control resulting in an accident.
Engine coolant may also cause damage
to paint and body trim.
NOTICE
To prevent damage to engine parts, put
a thick towel around the engine coolant
cap and/or inverter coolant cap before
refilling the coolant to prevent the
coolant from overflowing into engine
parts, such as the alternator.
Page 518 of 579
Maintenance
9-32
By jump starting
After a jump start from a good battery,
drive the vehicle for 20-30 minutes
before it is shutoff. The vehicle may
not restart if you shut it off before the
battery had a chance to adequately
recharge. See “Jump Starting” in chapter
8 for more information on jump starting
procedures.
Information
Reset items
The following items may need to be reset
after the battery has been discharged or
the battery has been disconnected.
Auto up/down window (see chapter 5)
Sunroof (see chapter 5)
Trip computer (see chapter 5)
Climate control system (see chapter 5)
Clock (see chapter 5)
Infotainment system (see
infotainment system manual)