2022 HYUNDAI KONA Wheel lock
[x] Cancel search: Wheel lockPage 470 of 579
Emergency situations
8-20
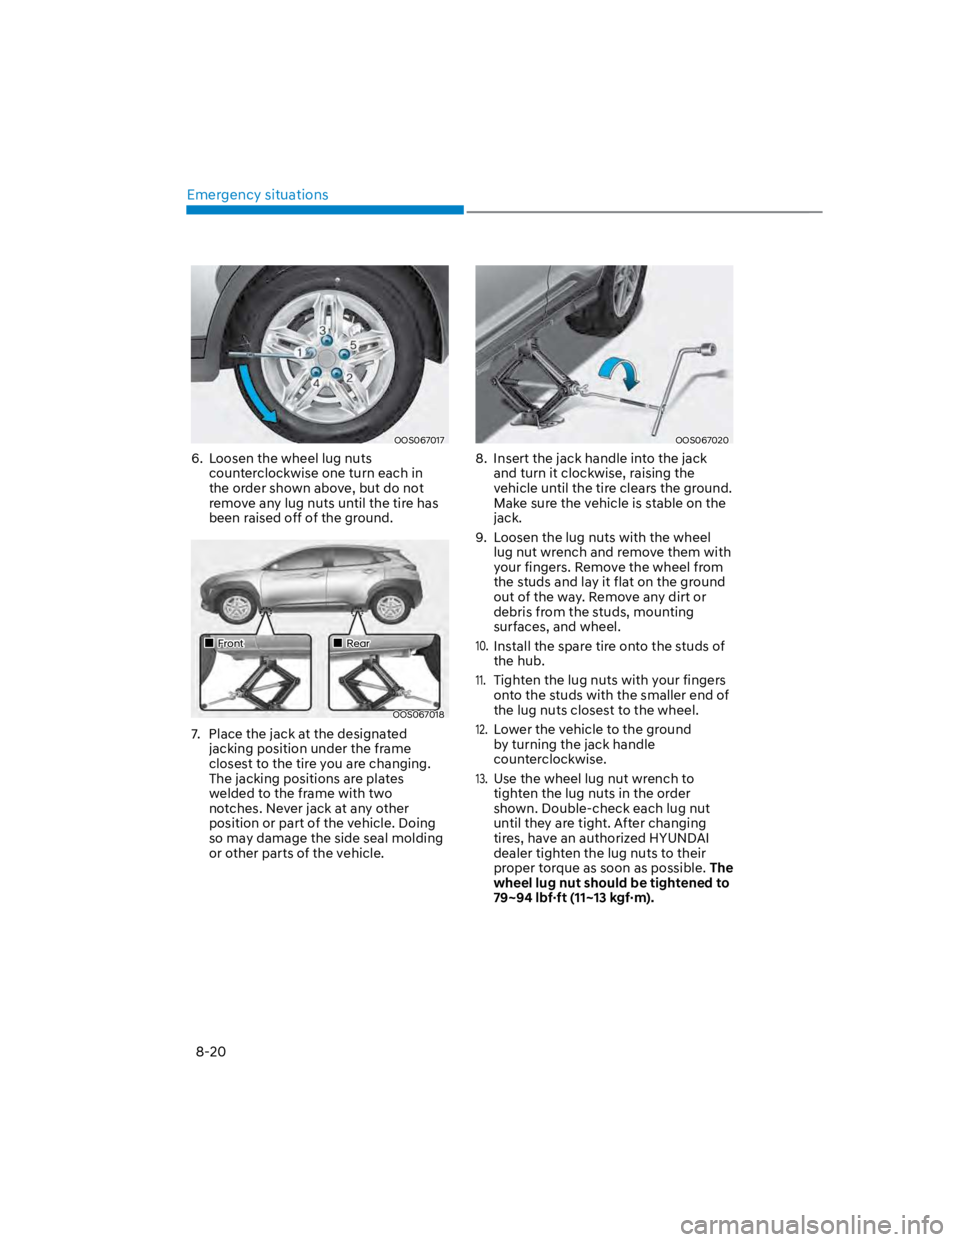
OOS067017
6. Loosen the wheel lug nuts
counterclockwise one turn each in
the order shown above, but do not
remove any lug nuts until the tire has
been raised off of the ground.
OOS067018
FrontRear
7. Place the jack at the designated
jacking position under the frame
closest to the tire you are changing.
The jacking positions are plates
welded to the frame with two
notches. Never jack at any other
position or part of the vehicle. Doing
so may damage the side seal molding
or other parts of the vehicle.
OOS067020
8. Insert the jack handle into the jack
and turn it clockwise, raising the
vehicle until the tire clears the ground.
Make sure the vehicle is stable on the
jack.
9. Loosen the lug nuts with the wheel
lug nut wrench and remove them with
your fingers. Remove the wheel from
the studs and lay it flat on the ground
out of the way. Remove any dirt or
debris from the studs, mounting
surfaces, and wheel.
10.
Install the spare tire onto the studs of
the hub.
11.
Tighten the lug nuts with your fingers
onto the studs with the smaller end of
the lug nuts closest to the wheel.
12.
Lower the vehicle to the ground
by turning the jack handle
counterclockwise.
13.
Use the wheel lug nut wrench to
tighten the lug nuts in the order
shown. Double-check each lug nut
until they are tight. After changing
tires, have an authorized HYUNDAI
dealer tighten the lug nuts to their
proper torque as soon as possible. The
wheel lug nut should be tightened to
79~94 lbf·ft (11~13 kgf·m).
Page 484 of 579
Emergency situations
8-34
WARNING
If your vehicle is equipped with a
rollover sensor, place the ignition
switch in the LOCK/OFF or ACC position
when the vehicle is being towed.
The side impact and curtain air bag
may deploy if the sensor detects the
situation as a rollover.
When towing your vehicle in an
emergency without wheel dollies:
1. Place the ignition switch in the ACC
position.
2. Place the shift lever in N (Neutral).
3. Release the parking brake.
CAUTION
Failure to place the shift lever in N
(Neutral) when being towed with the
front wheels on the ground can cause
internal damage to the transmission.
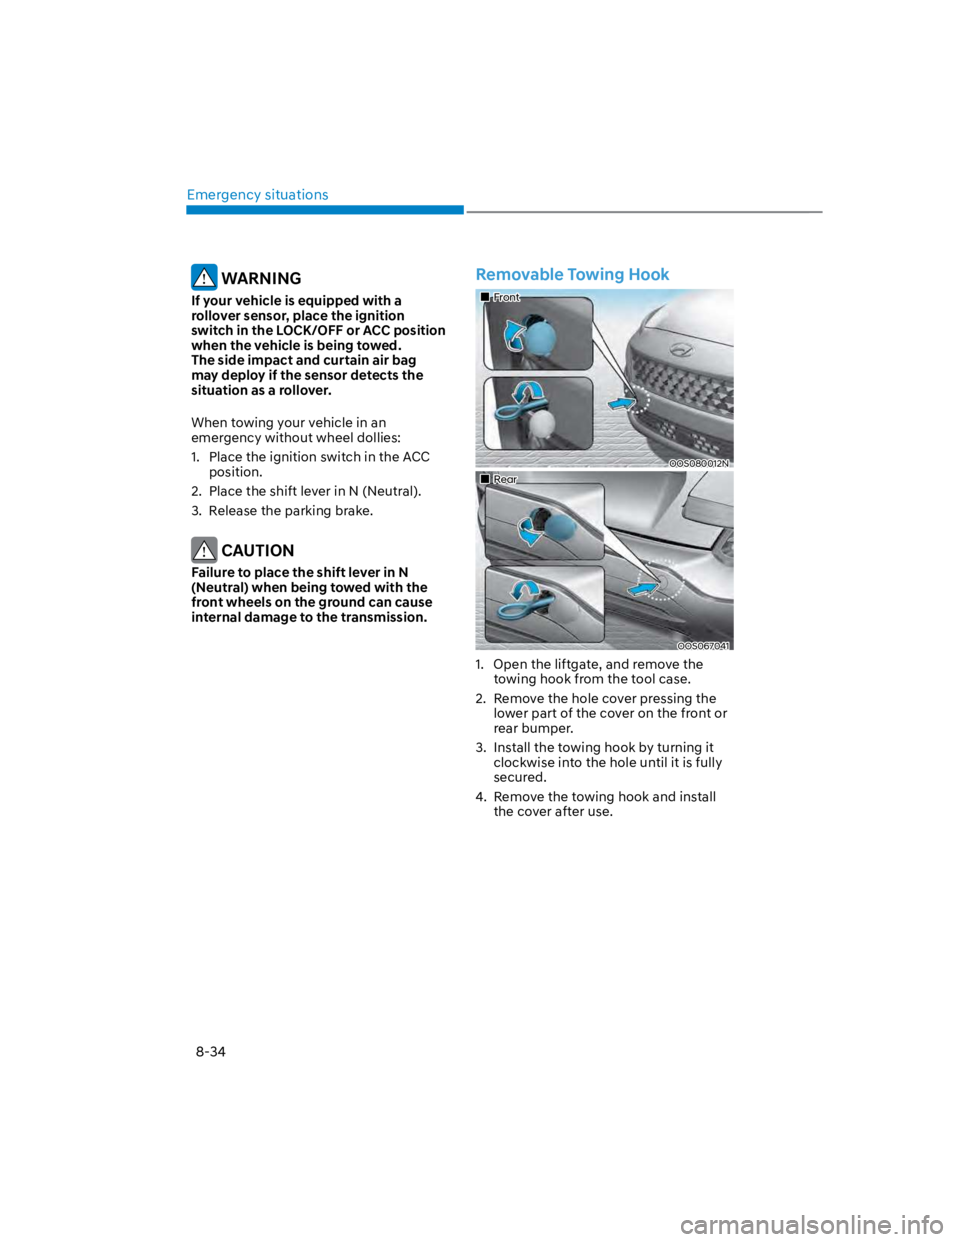
Removable Towing Hook
Front
OOS080012N
Rear
OOS067041
1. Open the liftgate, and remove the
towing hook from the tool case.
2. Remove the hole cover pressing the
lower part of the cover on the front or
rear bumper.
3. Install the towing hook by turning it
clockwise into the hole until it is fully
secured.
4. Remove the towing hook and install
the cover after use.
Page 485 of 579
08
8-35
Emergency Towing
If towing is necessary, we recommend
you have it done by an authorized
HYUNDAI dealer or a commercial tow
truck service.
If a towing service is not available in
an emergency, your vehicle may be
temporarily towed using a cable or chain
secured to the emergency towing hook
at the front (or rear) of the vehicle.
Use extreme caution when towing the
vehicle with a cable or chain. A driver
must be in the vehicle to steer it and
operate the brakes.
Towing in this manner may be done
only on hard-surfaced roads for a short
distance and at low speeds. Also, the
wheels, axles, power train, steering and
brakes must all be in good condition.
CAUTION
The driver must be in the vehicle for
steering and braking operations when
the vehicle is being towed. Passengers
other than the driver must not be in the
vehicle.
Always follow these emergency towing
precautions:
Place the ignition switch in the ACC
position so the steering wheel is not
locked. (if equipped)
Place the shift lever in N (Neutral).
Release the parking brake.
Depress the brake pedal with more
force than normal since you will have
reduced braking performance.
More steering effort will be required
because the power steering system
will be disabled.
Use a vehicle heavier than your own to
tow your vehicle.
The drivers of both vehicles should
communicate with each other
frequently.
Before emergency towing, check that
the hook is not broken or damaged.
Fasten the towing cable or chain
securely to the hook.
Do not jerk the hook. Apply steady
and even force.
Page 492 of 579
Maintenance
9-6
Owner maintenance schedule
When you stop for fuel:
Check the coolant level in the engine
coolant reservoir or the water-cooled
intercooler coolant reservoir.
Check the windshield washer fluid
level.
Check for low or under-inflated tires.
WARNING
Be careful when checking your coolant
level when the engine is hot. This may
result in coolant being blown out of the
opening and cause serious burns and
other injuries.
While operating your vehicle:
Note any changes in the sound of the
exhaust or any smell of exhaust fumes
in the vehicle.
Check for vibrations in the steering
wheel. Notice if there is any increased
steering effort or looseness in the
steering wheel, or change in its
straight-ahead position.
Notice if your vehicle constantly turns
slightly or “pulls” to one side when
traveling on smooth, level road.
When stopping, listen and check for
unusual sounds, pulling to one side,
increased brake pedal travel or “hard-
to-push” brake pedal.
If any slipping or changes in the
operation of your transmission occurs,
check the transmission fluid level.
Check the automatic transmission P
(Park) function.
Check the parking brake.
Check for fluid leaks under your
vehicle (water dripping from the air
conditioning system during or after
use is normal).
At least monthly:
Check coolant level in the engine
coolant reservoir.
Check the operation of all exterior
lights, including the stoplights, turn
signals and hazard warning flashers.
Check the inflation pressures of all
tires including the spare for tires that
are worn, show uneven wear, or are
damaged.
Check for loose wheel lug nuts.
At least twice a year: (i.e., every
Spring and Autumn)
Check radiator, heater and air
conditioning hoses for leaks or
damage.
Check windshield washer spray and
wiper operation. Clean wiper blades
with a clean cloth dampened with
washer fluid.
Check headlamp alignment.
Check muffler, exhaust pipes, shields
and clamps.
Check the seat belts for wear and
function.
At least once a year:
Clean body and door drain holes.
Lubricate door hinges and hood
hinges.
Lubricate door and hood locks and
latches.
Lubricate door rubber weather strips.
Check the air conditioning system.
Inspect and lubricate automatic
transmission linkage and controls.
Clean the battery and terminals.
Check the brake fluid level.
Page 501 of 579
09
9-15
ENGINE OIL
Checking the engine oil level
Engine oil is used for lubricating,
cooling, and operating various hydraulic
components in the engine. Engine oil
consumption while driving is normal,
and it is necessary to check and refill the
engine oil regularly. Also, check and refill
the oil level within the recommended
maintenance schedule to prevent
deterioration of oil performance.
Check the engine oil following the below
procedure.
Gasoline engine
1. Follow all of the oil manufacturer’s
precautions.
2. Be sure the vehicle is on the level
ground in P (Park) with the parking
brake set and the wheels blocked.
3. Turn the engine on and warm
the engine up until the coolant
temperature reaches a constant
normal temperature.
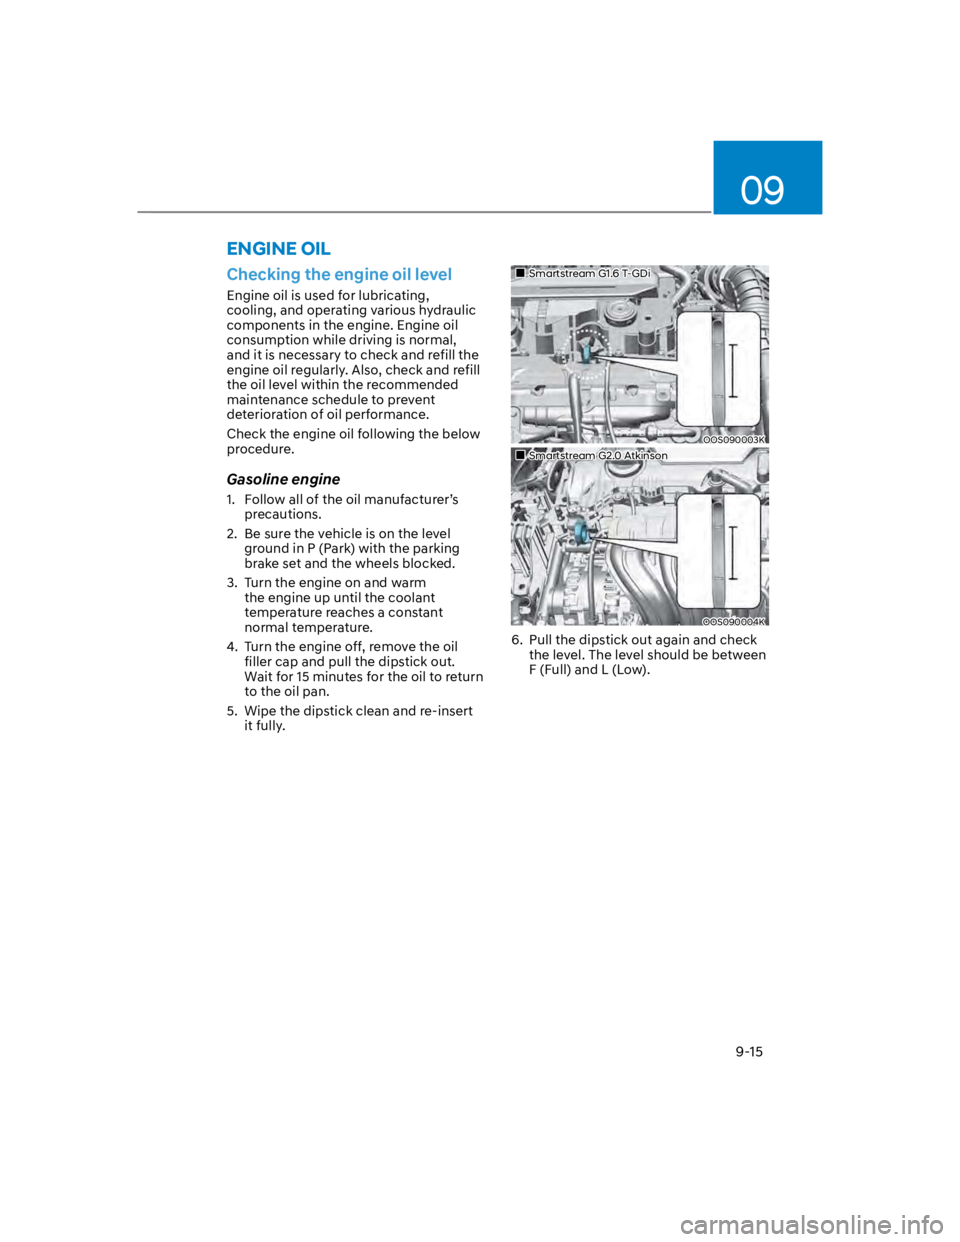
4. Turn the engine off, remove the oil
filler cap and pull the dipstick out.
Wait for 15 minutes for the oil to return
to the oil pan.
5. Wipe the dipstick clean and re-insert
it fully.
Smartstream G1.6 T-GDi
OOS090003K
Smartstream G2.0 Atkinson
OOS090004K
6. Pull the dipstick out again and check
the level. The level should be between
F (Full) and L (Low).
Page 519 of 579
09
9-33
WARNING
Tire failure may cause loss of vehicle
control resulting in an accident. To
reduce risk of SERIOUS INJURY or
DEATH, take the following precautions:
Inspect your tires monthly for proper
inflation as well as wear and damage.
The recommended cold tire pressure
for your vehicle can be found in this
manual and on the tire label located
on the driver’s side center pillar.
Always use a tire pressure gauge to
measure tire pressure. Tires with
too much or too little pressure wear
unevenly causing poor handling.
Check the pressure of the spare
every time you check the pressure of
the other tires on your vehicle.
Replace tires that are worn, show
uneven wear, or are damaged.
Worn tires can cause loss of braking
effectiveness, steering control, or
traction.
ALWAYS replace tires with the
same size, type, construction and
tread pattern as each tire that was
originally supplied with this vehicle.
Using tires and wheels other than
the recommended sizes could cause
unusual handling characteristics,
poor vehicle control, or negatively
affect your vehicle’s Anti-Lock Brake
System (ABS) resulting in a serious
accident.
Tire care
For proper maintenance, safety, and
maximum fuel economy, you must
always maintain recommended tire
inflation pressures and stay within the
load limits and weight distribution
recommended for your vehicle.
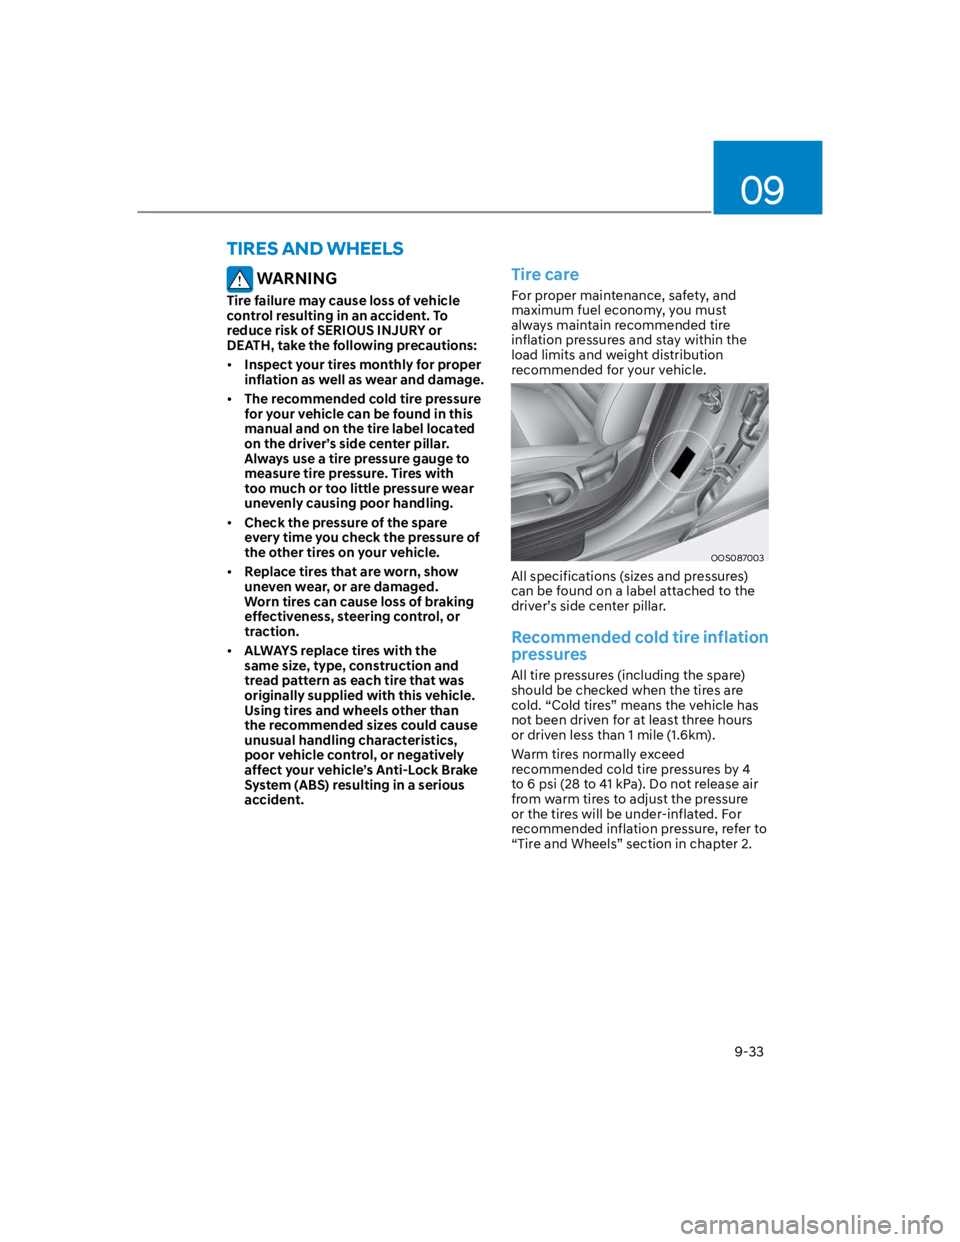
OOS087003
All specifications (sizes and pressures)
can be found on a label attached to the
driver’s side center pillar.
Recommended cold tire inflation
pressures
All tire pressures (including the spare)
should be checked when the tires are
cold. “Cold tires” means the vehicle has
not been driven for at least three hours
or driven less than 1 mile (1.6km).
Warm tires normally exceed
recommended cold tire pressures by 4
to 6 psi (28 to 41 kPa). Do not release air
from warm tires to adjust the pressure
or the tires will be under-inflated. For
recommended inflation pressure, refer to
“Tire and Wheels” section in chapter 2.
TIRES AND WHEELS
Page 522 of 579
Maintenance
9-36
Wheel alignment and tire
balance
The wheels on your vehicle were aligned
and balanced carefully at the factory to
give you the longest tire life and best
overall performance.
In most cases, you will not need to have
your wheels aligned again. However,
if you notice unusual tire wear or your
vehicle pulling one way or the other, the
alignment may need to be reset.
If you notice your vehicle vibrating when
driving on a smooth road, your wheels
may need to be rebalanced.
NOTICE
Incorrect wheel weights can damage
your vehicle’s aluminum wheels. Use
only approved wheel weights.
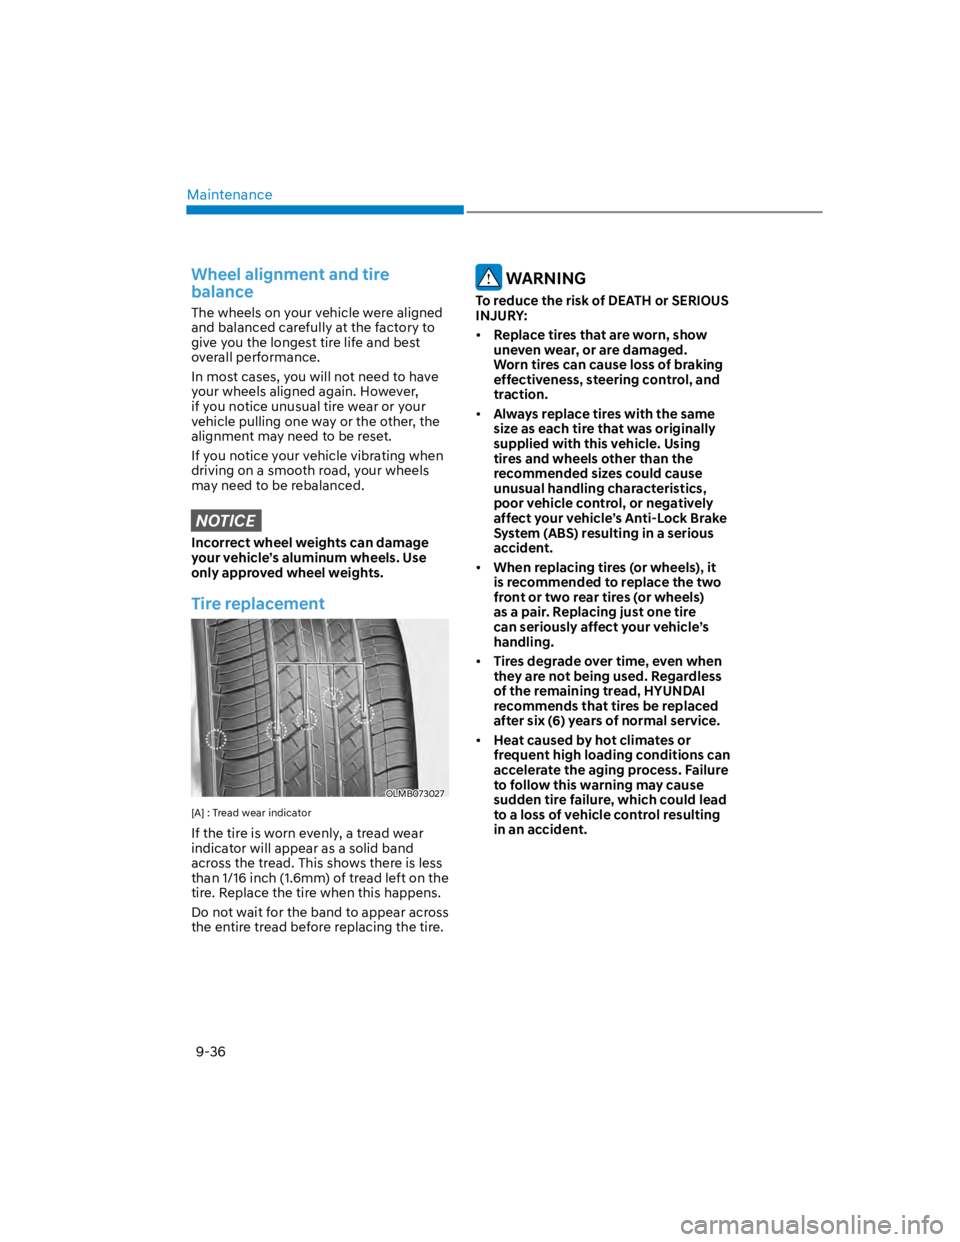
Tire replacement
OLMB073027
[A] : Tread wear indicator
If the tire is worn evenly, a tread wear
indicator will appear as a solid band
across the tread. This shows there is less
than 1/16 inch (1.6mm) of tread left on the
tire. Replace the tire when this happens.
Do not wait for the band to appear across
the entire tread before replacing the tire.
WARNING
To reduce the risk of DEATH or SERIOUS
INJURY:
Replace tires that are worn, show
uneven wear, or are damaged.
Worn tires can cause loss of braking
effectiveness, steering control, and
traction.
Always replace tires with the same
size as each tire that was originally
supplied with this vehicle. Using
tires and wheels other than the
recommended sizes could cause
unusual handling characteristics,
poor vehicle control, or negatively
affect your vehicle’s Anti-Lock Brake
System (ABS) resulting in a serious
accident.
When replacing tires (or wheels), it
is recommended to replace the two
front or two rear tires (or wheels)
as a pair. Replacing just one tire
can seriously affect your vehicle’s
handling.
Tires degrade over time, even when
they are not being used. Regardless
of the remaining tread, HYUNDAI
recommends that tires be replaced
after six (6) years of normal service.
Heat caused by hot climates or
frequent high loading conditions can
accelerate the aging process. Failure
to follow this warning may cause
sudden tire failure, which could lead
to a loss of vehicle control resulting
in an accident.
Page 546 of 579
Maintenance
9-60
WARNING
OLMB073042L
Handle halogen bulbs with care.
Halogen bulbs contain pressurized
gas that will produce flying pieces
of glass that could cause injuries if
broken.
Wear eye protection when changing
a bulb. Allow the bulb to cool down
before handling it.
Always handle them carefully, and
avoid scratches and abrasions. If
the bulbs are lit, avoid contact with
liquids.
Never touch the glass with bare
hands. Residual oil may cause the
bulb to overheat and burst when lit.
A bulb should be operated only when
installed in a headlamp.
If a bulb becomes damaged or
cracked, replace it immediately and
carefully dispose of it.
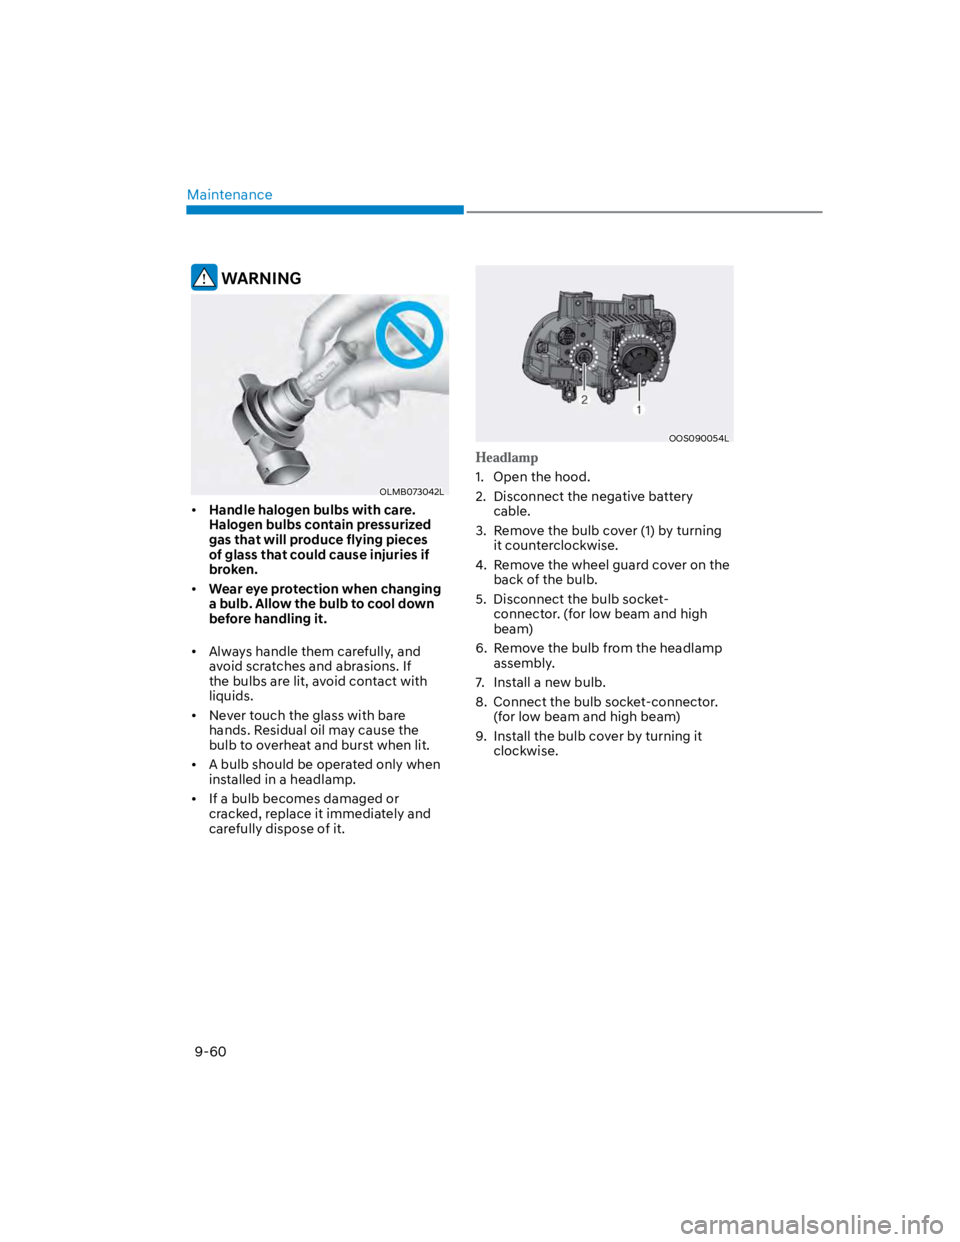
OOS090054L
1. Open the hood.
2. Disconnect the negative battery
cable.
3. Remove the bulb cover (1) by turning
it counterclockwise.
4. Remove the wheel guard cover on the
back of the bulb.
5. Disconnect the bulb socket-
connector. (for low beam and high
beam)
6. Remove the bulb from the headlamp
assembly.
7. Install a new bulb.
8. Connect the bulb socket-connector.
(for low beam and high beam)
9. Install the bulb cover by turning it
clockwise.