Page 530 of 579

Maintenance
9-44
Radial-Ply Tires
Radial-ply tires provide improved tread
life, road hazard resistance and smoother
high speed ride. The radial-ply tires used
on this vehicle are of belted construction,
and are selected to complement the
ride and handling characteristics of your
vehicle.
Radial-ply tires have the same load
carrying capacity, as bias-ply or bias
belted tires of the same size, and use the
same recommended inflation pressure.
Mixing of radial-ply tires with bias-ply or
bias belted tires is not recommended.
Any combinations of radial-ply and bias-
ply or bias belted tires when used on the
same vehicle will seriously deteriorate
vehicle handling. The best rule to follow
is: Identical pairs of radial-ply tires
should always be used as a set for the
front tires and a set for the rear tires.
Longer wearing tires can be more
susceptible to irregular tread wear. It is
very important to follow the tire rotation
interval in this chapter to achieve the
tread life potential of these tires. Cuts
and punctures in radial-ply tires are
repairable only in the tread area, because
of sidewall flexing. Consult your tire
dealer for radial-ply tire repairs.
WARNING
Do not mix bias ply and radial ply tires
under any circumstances. This may
cause unusual handling characteristics
that may cause loss of vehicle control
resulting in an accident.
Low aspect ratio tires
(if equipped)
The aspect ratio is lower than 50 on low
aspect ratio tires.
Because low aspect ratio tires are
optimized for handling and braking, their
sidewall is a little stiffer than a standard
tire. Also low aspect ratio tires tend to be
wider and consequently have a greater
contact patch with the road surface. In
some instances they may generate more
road noise compared with standard tires.
CAUTION
The side wall of a low aspect ratio
tire is shorter than the normal one.
Thus, the low-aspect wheel and tire
are easily damaged. Follow the below
instructions.
When driving on a rough road or
driving off a road, be careful not to
damage the tires and wheels. After
driving, inspect the tires and wheels.
When passing over a pothole, speed
bump, manhole, or curb stone,
drive the vehicle slowly so as not to
damage the tires and wheels.
When there is an impact on a tire,
inspect the tire condition. Or, you
can contact an authorized HYUNDAI
dealer.
Inspect the tire condition and
pressure every 1,800 miles (3,000
km) to prevent tire damage.
It is difficult to recognize a tire
damage only with your eyes. When
there is a slight hint of a tire damage,
check and replace the tire to prevent
the damage caused by air leakage.
When a tire is damaged while
driving on a rough road, off a road,
or over obstacles, such as a pothole,
manhole, or curb stone, your
warranty does not cover the damage.
The tire information is specified on
the tire side wall.
Page 535 of 579
09
9-49
Fuse/relay panel description
Instrument panel fuse panel
OOS070028
Inside the fuse/relay box cover, you can
find the fuse/relay label describing fuse/
relay names and ratings.
Information
OOS090050N
Page 538 of 579
Maintenance
9-52
Engine compartment fuse panel
OOS090034L
Inside the fuse/relay box cover, you can
find the fuse/relay label describing fuse/
relay names and ratings.
Information
OOS090051N
Page 542 of 579
Maintenance
9-56
Fuse NameFuse Rating Circuit Protected
SENSOR210A
PCB Block (A/C Comp Relay), Variable Oil Pump Solenoid,
Purge Control Solenoid Valve, RCV Control Solenoid Valve,
Oil Control Valve #1 (Intake), Oil Control Valve #2 (Exhaust),
Canister Close Valve
ECU210A ECM
ECU120A ECM
INJECTOR15A -
SENSOR115A Oxygen Sensor (Up), Oxygen Sensor (Down)
IGN COIL20A Ignition Coil #1~#4
ECU315A ECM
A/C10A PCB Block (A/C Comp Relay)
ECU510A ECM, CVVD Actuator
SENSOR415A -
ABS310A ESC Module, Multipurpose Check Connector
TCU215A TCM, Transaxle Range Switch
SENSOR310A E/R Junction Block (Fuel Pump Relay)
ECU415A ECM
HORN15A PCB Block (Horn Relay)
Page 543 of 579
09
9-57
Fuse NameFuse Rating Circuit Protected
OOS090046N10A
PCB Block (A/C Comp Relay), E/R Junction Block (Cooling
Fan #2 Relay, Cooling Fan #1 Relay), Purge Control
Solenoid Valve,
Variable Intake Solenoid Valve, Oil Control Valve #1
(Intake), Oil Control Valve #2 (Exhaust), Canister Close
Valve, Oil Pressure Solenoid Valve
ECU210A -
ECU120A PCM
INJECTOR15A Injector #1~#4
SENSOR115A Oxygen Sensor (Up), Oxygen Sensor (Down)
IGN COIL20A Ignition Coil #1~#4
ECU315A PCM
A/C10A PCB Block (A/C Comp Relay)
ECU510A PCM
SENSOR415A Electronic Oil Pump
ABS310A Multipurpose Check Connector, ESC Module
TCU215A Inhibitor Switch
SENSOR310A E/R Junction Block (Fuel Pump Relay)
ECU415A PCM
HORN15A PCB Block (Horn Relay)
Page 544 of 579

Maintenance
9-58
We recommend that you consult an
authorized HYUNDAI dealer to replace
most vehicle light bulbs. It is difficult
to replace vehicle light bulbs because
other parts of the vehicle must be
removed before you can get to the bulb.
This is especially true for removing the
headlamp assembly to get to the bulb(s).
Removing/installing the headlamp
assembly can result in damage to the
vehicle.
WARNING
Prior to working on a light, depress
the foot brake, shift to P (Park), apply
the parking brake, press the Engine
Start/Stop button to the OFF position
and take the key with you when
leaving the vehicle to avoid sudden
movement of the vehicle and to
prevent possible electric shock.
Be aware the bulbs may be hot and
may burn your fingers.
NOTICE
Be sure to replace the burned-out bulb
with one of the same wattage rating.
Otherwise, it may cause damage to the
fuse or electrical wiring system.
NOTICE
To prevent damage, do not clean the
headlamp lens with chemical solvents
or strong detergents.
Information
LIGHT BULBS
Page 551 of 579

09
9-65
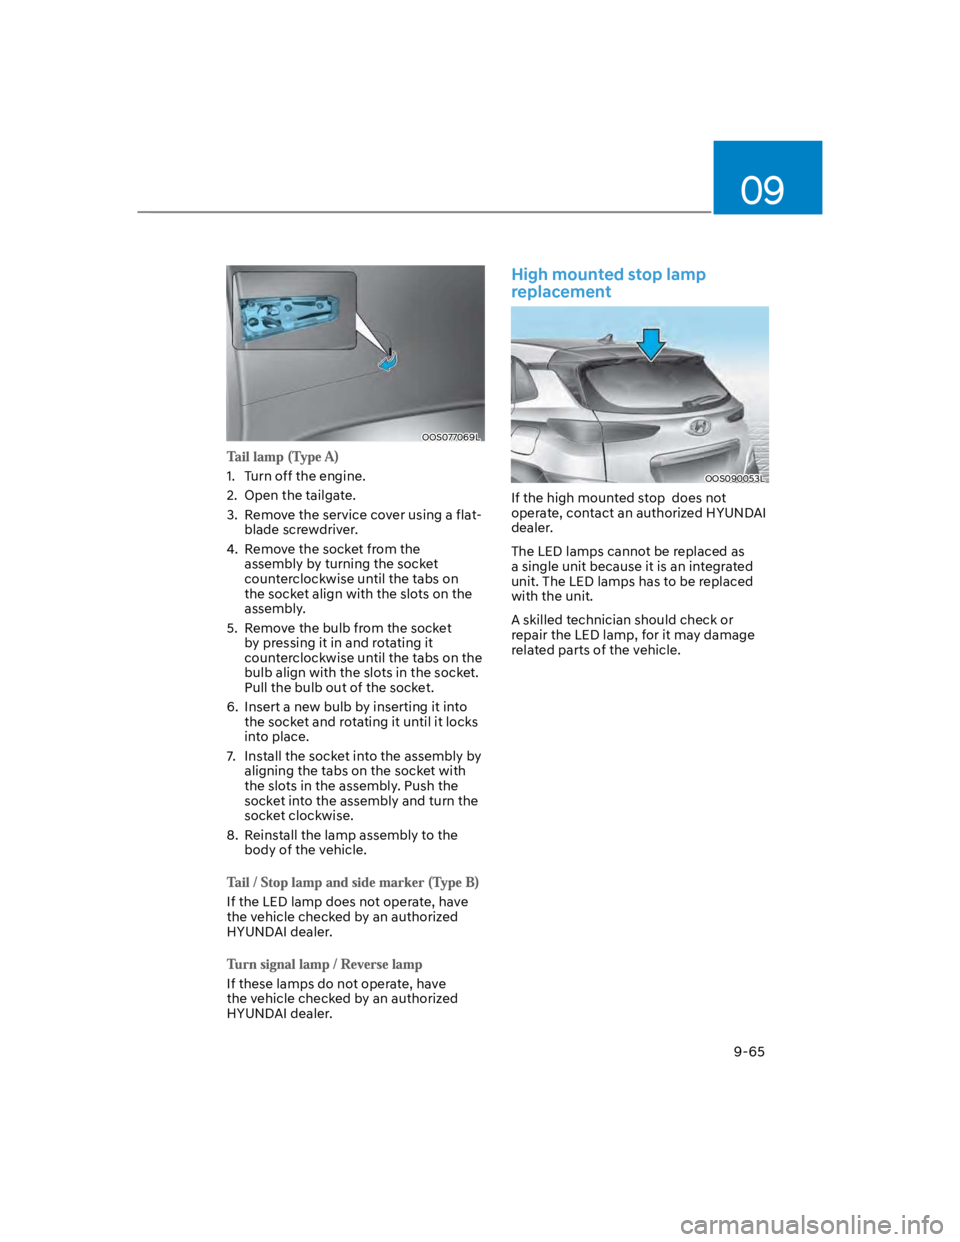
OOS077069L
1. Turn off the engine.
2. Open the tailgate.
3. Remove the service cover using a flat-
blade screwdriver.
4. Remove the socket from the
assembly by turning the socket
counterclockwise until the tabs on
the socket align with the slots on the
assembly.
5. Remove the bulb from the socket
by pressing it in and rotating it
counterclockwise until the tabs on the
bulb align with the slots in the socket.
Pull the bulb out of the socket.
6. Insert a new bulb by inserting it into
the socket and rotating it until it locks
into place.
7. Install the socket into the assembly by
aligning the tabs on the socket with
the slots in the assembly. Push the
socket into the assembly and turn the
socket clockwise.
8. Reinstall the lamp assembly to the
body of the vehicle.
If the LED lamp does not operate, have
the vehicle checked by an authorized
HYUNDAI dealer.
If these lamps do not operate, have
the vehicle checked by an authorized
HYUNDAI dealer.
High mounted stop lamp
replacement
OOS090053L
If the high mounted stop does not
operate, contact an authorized HYUNDAI
dealer.
The LED lamps cannot be replaced as
a single unit because it is an integrated
unit. The LED lamps has to be replaced
with the unit.
A skilled technician should check or
repair the LED lamp, for it may damage
related parts of the vehicle.
Page 554 of 579

Maintenance
9-68
NOTICE
If you park your vehicle near a stainless
steel sign or glass facade building, the
vehicle’s exterior plastic parts such
as a bumper, spoiler, garnish, lamp
or outside rearview mirror might be
damaged due to sunlight reflected from
the sign or building. To prevent damage
of the exterior plastic parts, you should
avoid parking in areas where light may
be reflected or use a car cover. (The
exterior plastic parts applied to your
vehicle may vary.)
Exterior care
Exterior general caution
It is very important to follow the label
directions when using any chemical
cleaner or polish. Read all warning and
caution statements that appear on the
label.
Finish maintenance
To help protect your vehicle’s finish from
rust and deterioration, wash it thoroughly
and frequently at least once a month
with lukewarm or cold water.
If you use your vehicle for off-road
driving, you should wash it after each
off-road trip. Pay special attention to the
removal of any accumulation of salt, dirt,
mud, and other foreign materials. Make
sure the drain holes in the lower edges
of the doors and rocker panels are kept
clear and clean.
Insects, tar, tree sap, bird droppings,
industrial pollution and similar deposits
can damage your vehicle’s finish if not
removed immediately.
Even prompt washing with plain water
may not completely remove all these
deposits. A mild soap, safe for use on
painted surfaces, should be used.
After washing, rinse the vehicle
thoroughly with lukewarm or cold water.
Do not allow soap to dry on the finish.
When using high-pressure washers,
make sure to maintain sufficient
distance from the vehicle.
Insufficient clearance or excessive
pressure can lead to component
damage or water penetration.
Do not spray the camera, sensors or
its surrounding area directly with a
high pressure washer. Shock applied
from high pressure water may cause
the device to not operate normally.
Do not bring the nozzle tip close to
boots (rubber or plastic covers) or
connectors as they may be damaged
if they come into contact with high
pressure water.
WARNING
After washing the vehicle, test the
brakes while driving slowly to see
if they have been affected by water
before getting on the road. If braking
performance is impaired, dry the
brakes by applying them lightly while
maintaining a slow forward speed.
APPEARANCE CARE