Page 317 of 546
5-27
Driving your vehicle
5
However, if the EPB switch is pressed within 1 second after the
vehicle is turned off, the EPB will notbe applied.Releasing the parking brake
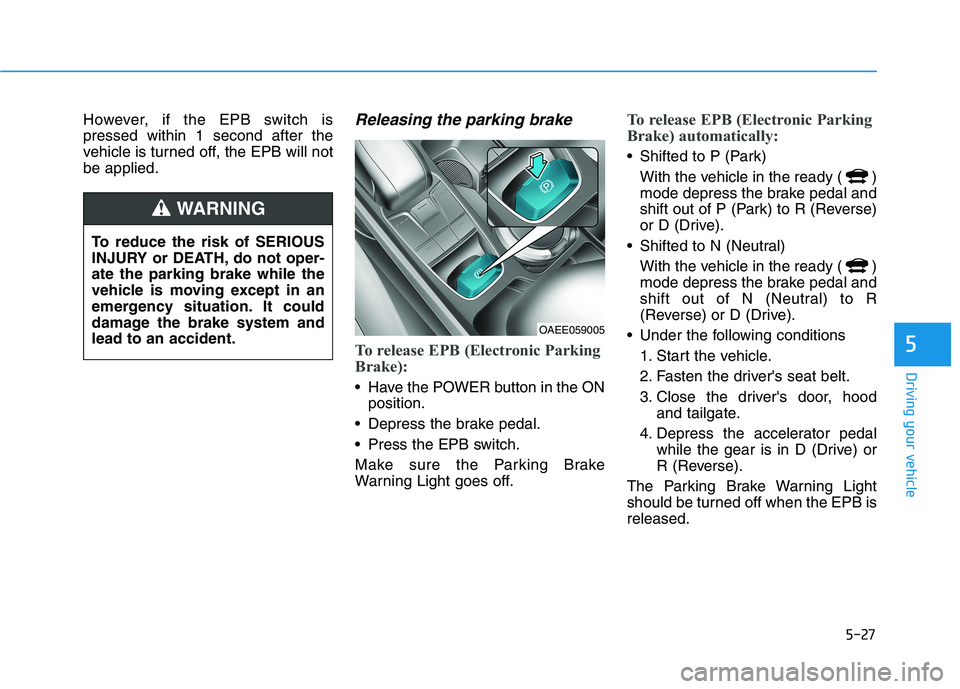
To release EPB (Electronic Parking
Brake):
Have the POWER button in the ONposition.
Depress the brake pedal.
Press the EPB switch.
Make sure the Parking Brake
Warning Light goes off.
To release EPB (Electronic Parking
Brake) automatically:
Shifted to P (Park) With the vehicle in the ready ( )
mode depress the brake pedal and
shift out of P (Park) to R (Reverse)
or D (Drive).
Shifted to N (Neutral) With the vehicle in the ready ( )
mode depress the brake pedal and
shift out of N (Neutral) to R
(Reverse) or D (Drive).
Under the following conditions 1. Start the vehicle.
2. Fasten the driver's seat belt.
3. Close the driver's door, hood and tailgate.
4. Depress the accelerator pedal while the gear is in D (Drive) or
R (Reverse).
The Parking Brake Warning Light
should be turned off when the EPB isreleased.
To reduce the risk of SERIOUS
INJURY or DEATH, do not oper-ate the parking brake while the
vehicle is moving except in an
emergency situation. It could
damage the brake system andlead to an accident.
WARNING
OAEE059005
Page 323 of 546

5-33
Driving your vehicle
5
Cancel
To cancel the Auto Hold operation,
press the [AUTO HOLD] switch. The
AUTO HOLD indicator will turn off.
To cancel the Auto Hold operation
when the vehicle is at a standstill,
press the [AUTO HOLD] switch while
depressing the brake pedal.Information
The Auto Hold does not operate when:
- The driver's seat belt is unfastenedand driver's door is opened
- The hood is opened
- The gear is in P (Park)
- The EPB is applied
- The tailgate is opened
For your safety, the Auto Hold auto- matically switches to EPB in such
cases:
- The driver’s door is opened
- The hood is opened while the gearis in D (Drive)
- The vehicle is in a standstill for more than 10 minutes
- The vehicle is standing on a steep slope
- The vehicle moved several times
- The tailgate is opened while the gear is in R (Reverse)
(Continued)(Continued)
In these cases, the parking brake
warning light comes on, the AUTO
HOLD indicator changes from green
to white, and a warning sounds and
a message will appear to inform you
that EPB has been automatically
engaged. Before driving again,
depress the brake pedal, check the
surrounding area near your vehicle
and release the parking brake man-
ually with the EPB switch.
If the AUTO HOLD indicator lights up yellow, the Auto Hold is not
working properly. Contact an
authorized HYUNDAI dealer.
While operating Auto Hold, you may hear mechanical noise. However, it is
normal operating noise.
i
OAEE059009
LLLLiiiigggghhhhtttt ooooffffffff
Page 325 of 546

5-35
Driving your vehicle
5
Press brake pedal to deactivate
AUTO HOLD
If you did not apply the brake pedal
when you release the Auto Hold by
pressing the [AUTO HOLD] switch, a
warning will sound and a message
will appear.
AUTO HOLD conditions not met.
Close door, hood and liftgate
When you press the [AUTO HOLD]
switch, if the driver’s door, hood and
liftgate are not closed or the driver’s
seat belt is unfastened, a warningwill sound and a message will
appear on the LCD display.
Press the [AUTO HOLD] switch after
closing the driver’s door, hood and
tailgate and fastening the seat belt.
Anti-lock Brake System (ABS)
OIK057080LOOSEV058076NAn Anti-Lock Braking System
(ABS) or an Electronic Stability
Control (ESC) system will not
prevent accidents due to
improper or dangerous driving
maneuvers. Even though vehi-
cle control is improved during
emergency braking, always
maintain a safe distance
between you and objects ahead
of you. Vehicle speeds should
always be reduced during
extreme road conditions. The
braking distance for cars
equipped with ABS or ESC may
be longer than for those without
these systems in the following
road conditions.
Drive your vehicle at reduced
speeds during the followingconditions:
Rough, gravel or snow-cov-
ered roads.
(Continued)
WARNING
Page 367 of 546

5-77
Driving your vehicle
5
Limitations of the system
The driver must be cautious in the
below situations because the system
may not detect other vehicles or
objects in certain circumstances:
When a trailer or carrier isinstalled.
The vehicle drives in inclement weather such as heavy rain or
snow.
The sensor is covered with rain, snow, mud, etc.
The rear bumper where the sensor is located is covered with a foreign
object such as a bumper sticker, a
bumper guard, a bike rack, etc.
The rear bumper is damaged, or the sensor is out of the original
default position.
The vehicle height gets lower or higher due to heavy loading in a
tailgate, abnormal tire pressure,etc.
When the temperature of the rear bumper is high.
When the sensors are blocked by other vehicles, walls or parking-lot
pillars. The vehicle is driven on a curved
road.
The vehicle is driven through a toll- gate.
The road pavement (or the periph- eral ground) abnormally contains
metallic components (i.e. possibly
due to subway construction).
There is a fixed object near the vehicle, such as a guardrail.
While going down or up a steep road where the height of the lane is
different.
Driving on a narrow road where trees or grass or overgrown.
Driving in rural areas where the sensor does not detect another
vehicle or structure for an extended
period of time.
Driving on a wet road.
Driving on a road where the guardrail or wall is in double struc-
ture.
A big vehicle is near such as a bus or truck. When the other vehicle approach-
es very close.
When the other vehicle passes at a very fast speed.
While changing lanes.
If the vehicle has started at the same time as the vehicle next to
you and has accelerated.
When the vehicle in the next lane moves two lanes away from you
OR when the vehicle two lanes
away moves to the next lane from
you.
A motorcycle or bicycle is near.
A flat trailer is near.
If there are small objects in the detecting area such as a shopping
cart or a baby stroller.
If there is a low height vehicle such as a sports car.
The vehicle abruptly changes driv- ing direction.
The vehicle makes sharp lane changes.
The vehicle sharply stops.
Page 420 of 546

5-130
Driving your vehicle
When the BCW canceled warning
message is displayed in the cluster,
check to make sure that the rear
bumper is free from any dirt or snowin the areas where the sensor is
located. Remove any dirt, snow, or
foreign material that could interfere
with the radar sensors.
After any dirt or debris is removed,
RCCW system should operate nor-
mally after about 10 minutes of driv-
ing the vehicle.
If the system still does not operate
normally, we recommend that the
vehicle be inspected by an author-
ized HYUNDAI dealer.
Check Blind-Spot Collision
Warning (BCW) system
If there is a problem with BCW sys-
tem, a warning message will appear
and the light on the button will turn
off. The system will turn off automat-
ically. RCCW will not operate also if
BCW system turns off due to mal-
function. We recommend that you
have your vehicle inspected by an
authorized HYUNDAI dealer.
Limitations of the system
The driver must be cautious in the
below situations because the system
may not detect other vehicles or
objects in certain circumstances:
When a trailer or carrier isinstalled.
The vehicle drives in inclement weather such as heavy rain or
snow.
The sensor is polluted with rain, snow, mud, etc.
The rear bumper where the sensor is located is covered with a foreign
object such as a bumper sticker, a
bumper guard, a bike rack, etc.
The rear bumper is damaged, or the sensor is out of the original
default position.
The vehicle height gets lower or higher due to heavy loading in a
tailgate, abnormal tire pressure,etc.
When the temperature of the rear bumper is high.
When the sensors are blocked by other vehicles, walls or parking-lot
pillars.
OIK057094N
Page 457 of 546
6-22
What to do in an emergency
When towing your vehicle in an emergency without wheel dollies:
1. While depressing the brake pedalshift to the N (Neutral) position
and turn the vehicle off. The
POWER button will be in the ACCposition.
2. Release the parking brake.
Failure to shift to N (Neutral) may
cause internal damage to the vehi-
cle.
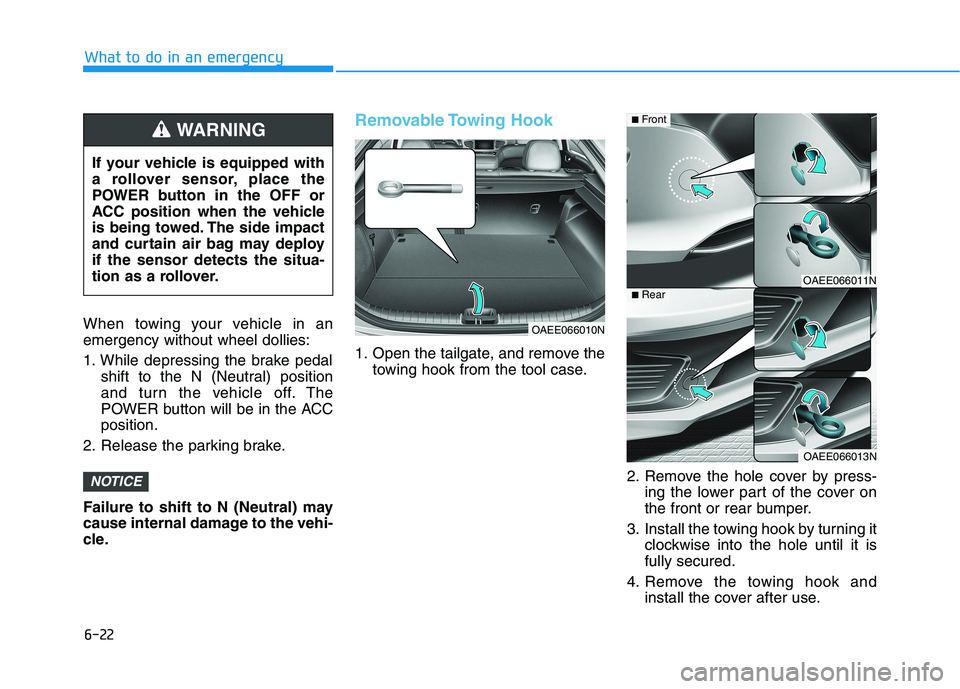
Removable Towing Hook
1. Open the tailgate, and remove the towing hook from the tool case.
2. Remove the hole cover by press-ing the lower part of the cover on
the front or rear bumper.
3. Install the towing hook by turning it clockwise into the hole until it isfully secured.
4. Remove the towing hook and install the cover after use.
NOTICE
If your vehicle is equipped with
a rollover sensor, place the
POWER button in the OFF or
ACC position when the vehicle
is being towed. The side impact
and curtain air bag may deployif the sensor detects the situa-
tion as a rollover.
WARNING
OAEE066010N
OAEE066011N
OAEE066013N
■Front
■Rear
Page 508 of 546
7-49
7
Maintenance
Motor compartment fuse panel
Fuse NameFuse RatingProtected Component
MAIN180AEPCU (Low Voltage DC-DC Converter), E/R Junction Block (Fuse - H/LAMP HI,
POWER OUTLET1, AHB2, AHB1)
MDPS80AMDPS Unit
REAR
HEATED150AE/R Junction Block (Rear Defogger Relay)
BLOWER40AE/R Junction Block (Blower Relay)
B+360AIGPM (Fuse - ARISU (4CH), IPS (1CH/2CH))
B+450AIGPM (Fuse - P/WINDOW LH/RH, TAILGATE OPEN, SUNROOF, AMP, CHARGER, OBC,
S/HEATER FRT, P/SEAT DRV)
C/FAN60AE/R Junction Block (Cooling Fan Relay)
B+260AIGPM (Fuse - S/HEATER RR, ARISU (4CH), IPS (2CH))
IG140AE/R Junction Block (Button Start #1 (ACC) Relay, Button Start #2 (IG1) Relay)
IG240AE/R Junction Block (Button Start #2 (IG2) Relay)
E-SHIFTER40AE/R Junction Block (Fuse - E-SHIFTER2, E-SHIFTER Relay)
B+560APCB Block (Fuse - EPCU1, HORN, B/A HORN, BMS, Main Relay)
Page 519 of 546
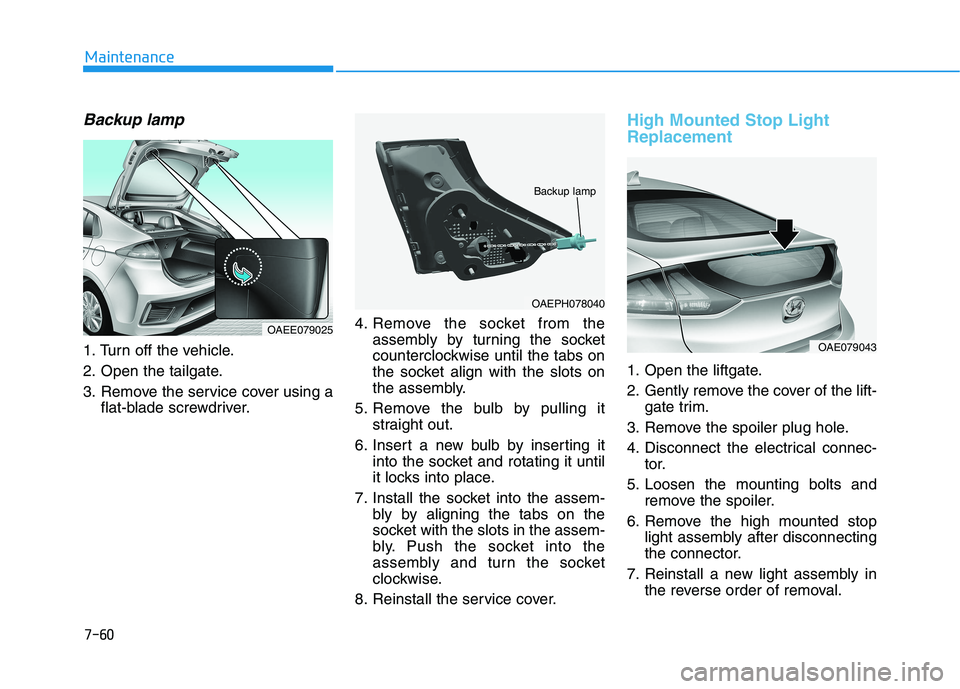
Backup lamp
1. Turn off the vehicle.
2. Open the tailgate.
3. Remove the service cover using aflat-blade screwdriver. 4. Remove the socket from the
assembly by turning the socket
counterclockwise until the tabs on
the socket align with the slots on
the assembly.
5. Remove the bulb by pulling it straight out.
6. Insert a new bulb by inserting it into the socket and rotating it until
it locks into place.
7. Install the socket into the assem- bly by aligning the tabs on the
socket with the slots in the assem-
bly. Push the socket into the
assembly and turn the socket
clockwise.
8. Reinstall the service cover.
High Mounted Stop Light Replacement
1. Open the liftgate.
2. Gently remove the cover of the lift- gate trim.
3. Remove the spoiler plug hole.
4. Disconnect the electrical connec- tor.
5. Loosen the mounting bolts and remove the spoiler.
6. Remove the high mounted stop light assembly after disconnecting
the connector.
7. Reinstall a new light assembly in the reverse order of removal.
7-60
Maintenance
OAEPH078040
Backup lamp
OAE079043
OAEE079025