2022 HYUNDAI I30 parking brake
[x] Cancel search: parking brakePage 17 of 659

1-6
I
I N
N S
S T
T R
R U
U M
M E
E N
N T
T
P
P A
A N
N E
E L
L
O
O V
V E
E R
R V
V I
I E
E W
W
(
( I
I I
I )
)
Your vehicle at a glance
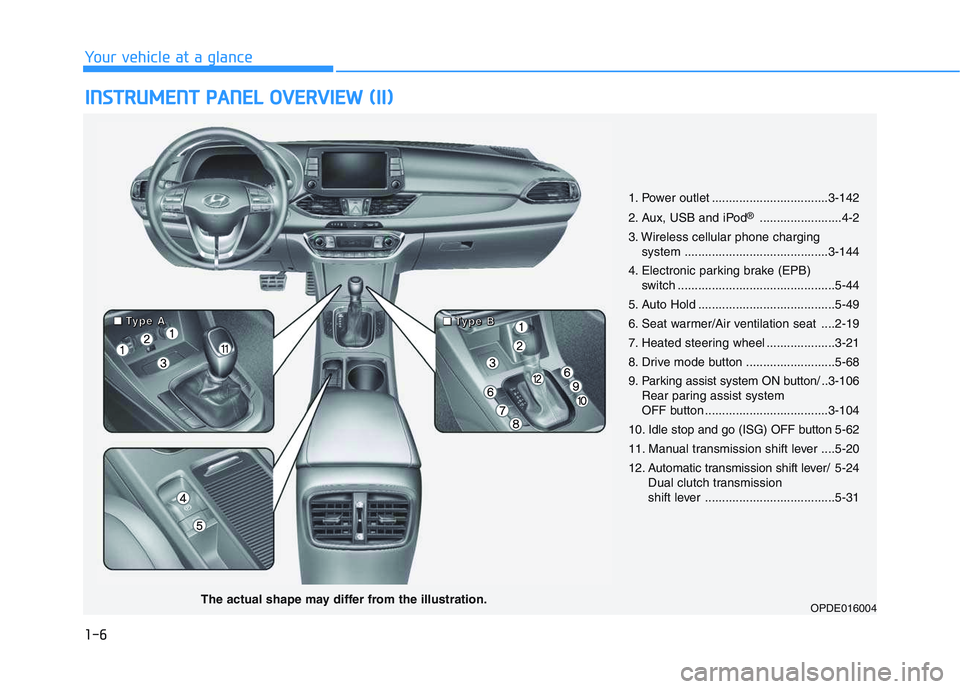
1. Power outlet ..................................3-142
2. Aux, USB and iPod
®........................4-2
3. Wireless cellular phone charging system ..........................................3-144
4. Electronic parking brake (EPB) switch ..............................................5-44
5. Auto Hold ........................................5-49
6. Seat warmer/Air ventilation seat ....2-19
7. Heated steering wheel ....................3-21
8. Drive mode button ..........................5-68
9. Parking assist system ON button/ ..3-106 Rear paring assist system
OFF button ....................................3-104
10. Idle stop and go (ISG) OFF button 5-62
11. Manual transmission shift lever ....5-20
12. Automatic transmission shift lever/ 5-24
Dual clutch transmission
shift lever ......................................5-31
OPDE016004The actual shape may differ from the illustration.
■
■
■
■
T
T
T
T
y
y
y
y
p
p
p
p
e
e
e
e
A
A
A
A
■
■
■
■
T
T
T
T
y
y
y
y
p
p
p
p
e
e
e
e
B
B
B
B
Page 34 of 659

2-14
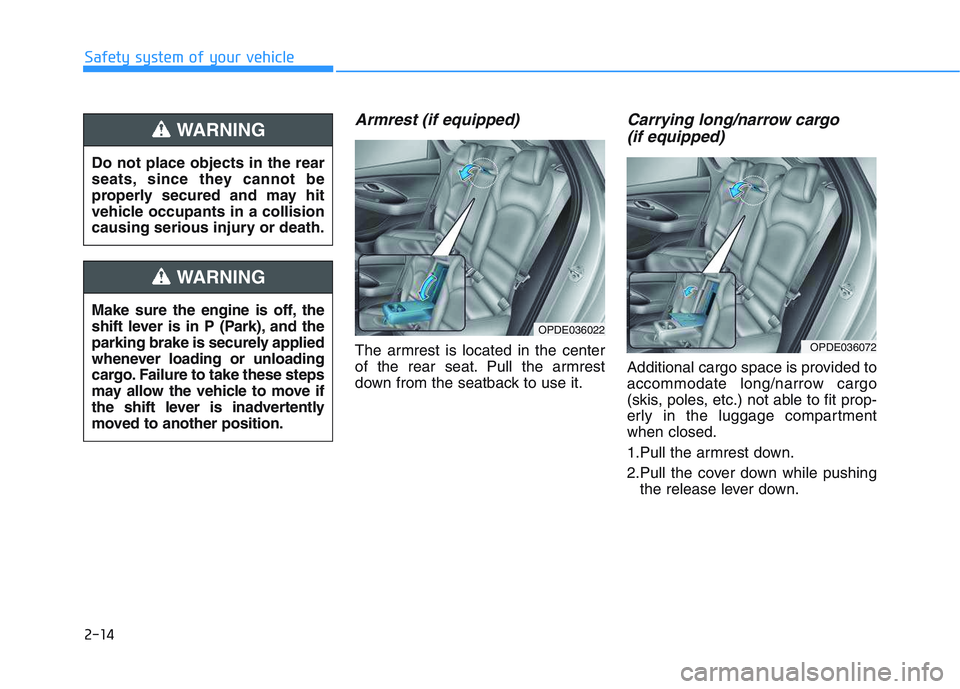
Armrest (if equipped)
The armrest is located in the center
of the rear seat. Pull the armrest
down from the seatback to use it.
Carrying long/narrow cargo (if equipped)
Additional cargo space is provided to
accommodate long/narrow cargo
(skis, poles, etc.) not able to fit prop-
erly in the luggage compartment
when closed.
1.Pull the armrest down.
2.Pull the cover down while pushing
the release lever down.
Safety system of your vehicle
Do not place objects in the rear
seats, since they cannot be
properly secured and may hit
vehicle occupants in a collision
causing serious injury or death.
WARNING
Make sure the engine is off, the
shift lever is in P (Park), and the
parking brake is securely applied
whenever loading or unloading
cargo. Failure to take these steps
may allow the vehicle to move if
the shift lever is inadvertently
moved to another position.
WARNING
OPDE036022
OPDE036072
Page 106 of 659

3-104
Convenient features of your vehicle
To turn off the Rear ParkingAssist System (if equipped)
Push the button to turn off the Rear
Parking Assist System. The indicator
light on the button will turn on.
Non-operational conditions ofParking Assist System
The Rear Parking Assist System
may not operate normally when:
Moisture is frozen to the sensor.
Sensor is covered with foreign mat-
ter, such as snow or water, or the
sensor cover is blocked.
There is a possibility of the Rear
Parking Assist System malfunction
when:
Driving on uneven road surfacessuch as unpaved roads, gravel,
bumps, or gradient.
Objects generating excessive noise such as vehicle horns, loud motor-
cycle engines, or truck air brakes
can interfere with the sensor.
Heavy rain or water spray is present.
Wireless transmitters or mobile phones are present near the sensor.
The sensor is covered with snow.
Any non-factory equipment or acces- sories have been installed, or if the
vehicle bumper height or sensor
installation has been modified.
Detecting range may decrease when:
Outside air temperature is extreme-ly hot or cold.
Undetectable objects smaller than 1 m (40 inches) and narrower than
14 cm (6 inches) in diameter.
OPDE046429
Page 110 of 659

3-108
Convenient features of your vehicle
Non-operational conditions ofParking Assist System
Parking Assist System may not
operate normally when:
Moisture is frozen to the sensor.
Sensor is covered with foreign mat-
ter, such as snow or water, or the
sensor cover is blocked.
There is a possibility of Parking
Assist System malfunction when:
Driving on uneven road surfacessuch as unpaved roads, gravel,
bumps, or gradient.
Objects generating excessive noise such as vehicle horns, loud motor-
cycle engines, or truck air brakes
can interfere with the sensor.
Heavy rain or water spray is present.
Wireless transmitters or mobile phones are present near the sensor.
The sensor is covered with snow.
Any non-factory equipment or accessories have been installed, or
if the vehicle bumper height or sen-
sor installation has been modified.
Detecting range may decrease when:
Outside air temperature isextremely hot or cold.
Undetectable objects smaller than 1 m and narrower than 14 cm in
diameter.
The following objects may not be
recognized by the sensor:
Sharp or slim objects such asropes, chains or small poles.
Objects, which tend to absorb sen- sor frequency such as clothes,
spongy material or snow.
Parking assist system precau-tions
The parking assist system may not
sound consistently depending on the
speed and shapes of the objects
detected.
The parking assist system may mal- function if the vehicle bumper height
or sensor installation has been mod-
ified or damaged. Any non-factory
installed equipment or accessories
may also interfere with the sensor
performance.
The sensor may not recognize objects less than 30 cm (11 in.) from
the sensor, or it may sense an incor-
rect distance. Use caution.
When the sensor is frozen or stained with snow, dirt, or water, the sensor
may be inoperative until the stains
are removed using a soft cloth.
Do not push, scratch or strike the sensor. Sensor damage could occur.
Do not spray the sensors or its sur- rounding area directly with a high
pressure washer. Shock applied
from high pressure water may cause
the device to not operate normally.
Your new vehicle warranty does
not cover any accidents or dam-
age to the vehicle or injuries to
its occupants related to a
Parking Assist System. Always
drive safely and cautiously.
WARNING
Page 164 of 659

3-14
Convenient features of your vehicle
Auto door lock/unlock features
Impact sensing door unlocksystem (if equipped)
All doors will be automatically
unlocked when an impact causes the
air bags to deploy.
Speed sensing door lock system(if equipped)
All doors will be automatically locked
when vehicle speed exceeds 15
km/h (9 mph).
You can activate or deactivate the
Auto Door Lock/Unlock features from
the User Settings mode on the LCD
display. For more details, refer to
"LCD Display" in this chapter.
Leaving your vehicle unlocked
increases the potential risk to
you or others from someone
hiding in your vehicle.
To secure your vehicle, while
depressing the brake, move the
shift lever to the P (Park) posi-
tion (for automatic transmis-
sion/dual clutch transmission)
or first gear or R (Reverse, for
manual transmission), engage
the parking brake, and place the
ignition switch in the LOCK/OFF
position, close all windows,
lock all doors, and always take
the key with you.
WARNING
Opening a door when something
is approaching may cause dam-
age or injury. Be careful when
opening doors and watch for
vehicles, motorcycles, bicycles
or pedestrians approaching the
vehicle in the path of the door.
WARNING
Page 188 of 659

3-38
Convenient features of your vehicle
Closing the hood
1. Before closing the hood, check thefollowing:
ment must be correctly installed.
bustible material must be removed
from the engine compartment.
2. Return the support rod to its clip to prevent it from rattling.
3. Lower the hood halfway (lifted approximately 30cm from the
closed position) and push down to
securely lock in place. Then double
check to be sure the hood is secure.
If the hood can slightly be raised, it
is not securely locked. Open it again
and close it with more force.
Tailgate
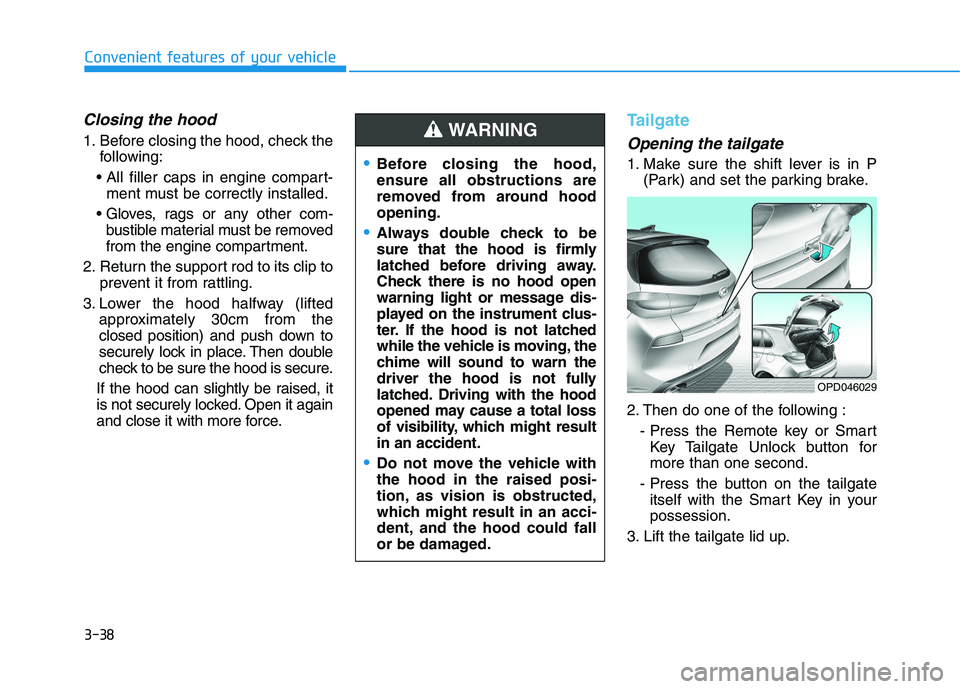
Opening the tailgate
1. Make sure the shift lever is in P (Park) and set the parking brake.
2. Then do one of the following : - Press the Remote key or SmartKey Tailgate Unlock button for
more than one second.
- Press the button on the tailgate itself with the Smart Key in your
possession.
3. Lift the tailgate lid up.Before closing the hood,
ensure all obstructions are
removed from around hood
opening.
Always double check to be
sure that the hood is firmly
latched before driving away.
Check there is no hood open
warning light or message dis-
played on the instrument clus-
ter. If the hood is not latched
while the vehicle is moving, the
chime will sound to warn the
driver the hood is not fully
latched. Driving with the hood
opened may cause a total loss
of visibility, which might result
in an accident.
Do not move the vehicle with
the hood in the raised posi-
tion, as vision is obstructed,
which might result in an acci-
dent, and the hood could fall
or be damaged.
WARNING
OPD046029
Page 191 of 659

3-41
Convenient features of your vehicle
3
Closing the fuel filler door
1. To install the fuel tank cap, turn itclockwise until it “clicks” one time.
2. Close the fuel filler door until it is latched securely.
Gasoline is highly flammable
and explosive. Failure to follow
these guidelines may result in
SERIOUS INJURY or DEATH:
Read and follow all warnings
posted at the gas station.
Before refueling, note the
location of the Emergency
Gasoline Shut-Off, if available,
at the gas station.
Before touching the fuel noz-
zle, you should eliminate the
potential build-up of static
electricity by touching a metal
part of the vehicle, a safe dis-
tance away from the fuel filler
neck, nozzle, or other gas
source, with your bare hand. (Continued)
WARNING
(Continued)
When refueling, always move
the shift lever to the P (Park)
position (for automatic transmis-
sion/
dual clutch transmission)
or first gear or R (Reverse, for
manual transmission), set the
parking brake, and place the
ignition switch to the LOCK/OFF
position. Sparks produced by
electrical components related to
the engine can ignite fuel vapors
causing a fire.
When using an approved
portable fuel container, be sure
to place the container on the
ground prior to refueling. Static
electricity discharge from the
container can ignite fuel vapors
causing a fire. Once refueling
has begun, contact between
your bare hand and the vehicle
should be maintained until the
filling is complete.
(Continued)
(Continued)
Do not use cellular phones
while refueling. Electric cur-
rent and/or electronic interfer-
ence from cellular phones can
potentially ignite fuel vapors
and cause a fire.
Do not get back into a vehicle
once you have begun refuel-
ing. You can generate a build-
up of static electricity by touch-
ing, rubbing or sliding against
any item or fabric capable of
producing static electricity.
Static electricity discharge can
ignite fuel vapors causing a
fire. If you must re-enter the
vehicle, you should once again
eliminate potentially danger-
ous static electricity discharge
by touching a metal part of the
vehicle, away from the fuel filler
neck, nozzle or other gasoline
source, with your bare hand.(Continued)
Page 201 of 659

3-51
Convenient features of your vehicle
3
Warning and indicator lightsInformation
Make sure that all warning lights are
OFF after starting the engine. If any
light is still ON, this indicates a situa-
tion that needs attention.
Air Bag Warning Light
This warning light illuminates:
When you turn the ignition switchor the Engine Start/Stop button to
the ON position.
- It illuminates for approximately 6seconds and then goes off.
When there is a malfunction with the SRS.
In this case, we recommend that
you have the vehicle inspected by
an authorized HYUNDAI dealer.
Seat Belt Warning Light
This warning light informs the driver
that the seat belt is not fastened.
For more details, refer to the “Seat
Belts” in chapter 2.
Parking Brake & BrakeFluid Warning Light
This warning light illuminates:
When you set the ignition switch or
the Engine Start/Stop button to the
ON position.
- It illuminates for approximately 3seconds
- It remains on if the parking brake is applied.
When the parking brake is applied.
When the brake fluid level in the reservoir is low.
- If the warning light illuminateswith the parking brake released, it
indicates the brake fluid level in
reservoir is low.
i