Page 159 of 506

05
5-37
WARNING
Before programming HomeLink® to a
garage door opener or gate operator,
make sure people and objects are out
of the way of the device to prevent
potential harm or damage. Do not
use the HomeLink® with any garage
door opener that lacks the safety
stop and reverse features required
by U.S. federal safety standards (this
includes any garage door opener model
manufactured before April 1, 1982).
A garage door that cannot detect an
object - signaling the door to stop and
reverse - does not meet current U.S.
federal safety standards. Using a garage
door opener without these features
increases the risk of serious injury or
death.
For more information, contact
HomeLink® at www.homelink.com, or
call Home-Link customer support at
1-800-355-3515.
It is also recommended that a new
battery be replaced in the handheld
transmitter of the device being trained
to HomeLink® for quicker training and
accurate transmission of the radio
frequency.1. Programming HomeLink
®
The following steps show how to
program HomeLink. If you have any
questions or are having difficulty
programming your HomeLink buttons,
refer to the HomeLink website or call the
HomeLink customer support toll-free
number. Do this, before going back to
the dealer who sold you the car.
• Visit the HomeLink website at: www.
homelink.com. Then at the top of the
page, choose your vehicle make. Then
watch the You Tube video, and/or
access additional website information.
• If you choose to access the website via your cell phone, scan the QR code.
• Or, call HomeLink customer support at 1-800-355-3515 (Please have the
vehicle make/model AND the opener
device make/model readily available.)
CN7 N HMA 5.indd 5-37 2021-09-06 �� 3:06:18
Page 160 of 506
Convenience Features5-38
1) Programming Preparation
OCN7050084NOCN7050084N
1. When programming a garage door opener, it is advised to park the
vehicle outside of the garage.
2. It is recommended that a new battery be placed in the handheld transmitter
of the device being programmed to
HomeLink for quicker training and
accurate transmission of the radio-
frequency signal.
3. Set the Engine Start/Stop button to the ACC (Accessory) position for
programming of HomeLink.
2) Programming a New HomeLink®
OCN7N051214NOCN7N051214N
1. Press and release the HomeLink button (1), (2) or (3), you would like
to program. The HomeLink indicator
light (7) will flash orange slowly (if
not, perform the steps of “Erasing
HomeLink Buttons” section, and start
over).
OCN7N051215NOCN7N051215N
2. Position the garage door opener remote 1 – 3 inches (2 – 8cm) away
from the HoleLink buttons.
CN7 N HMA 5.indd 5-38 2021-09-06 �� 3:06:18
Page 177 of 506
05
5-55
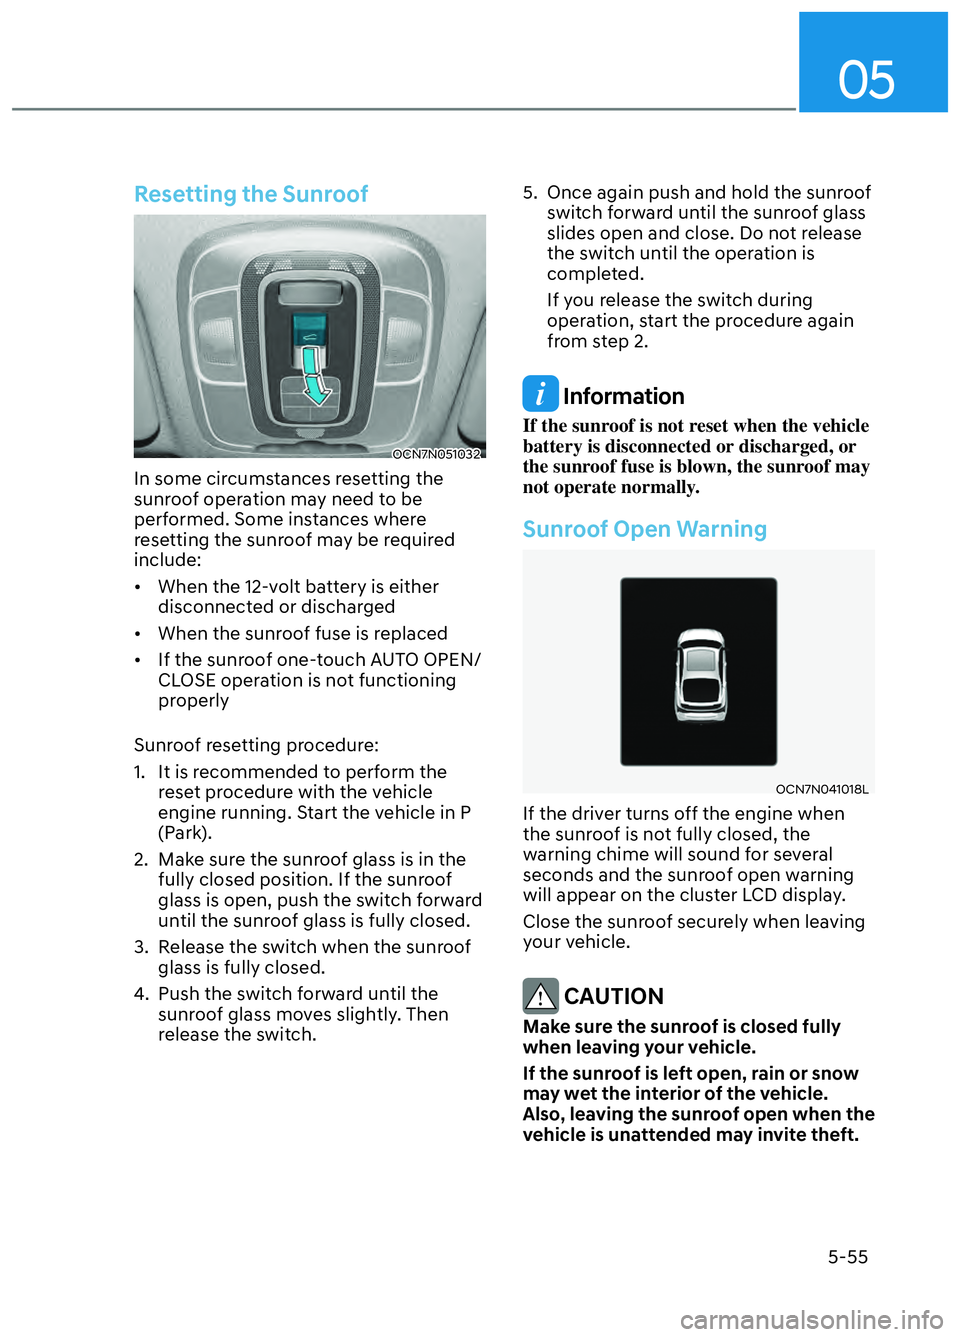
Resetting the Sunroof
OCN7N051032 OCN7N051032
In some circumstances resetting the
sunroof operation may need to be
performed. Some instances where
resetting the sunroof may be required
include:
• When the 12-volt battery is either disconnected or discharged
• When the sunroof fuse is replaced
• If the sunroof one-touch AUTO OPEN/ CLOSE operation is not functioning
properly
Sunroof resetting procedure:
1. It is recommended to perform the reset procedure with the vehicle
engine running. Start the vehicle in P
(Park).
2. Make sure the sunroof glass is in the fully closed position. If the sunroof
glass is open, push the switch forward
until the sunroof glass is fully closed.
3. Release the switch when the sunroof glass is fully closed.
4. Push the switch forward until the sunroof glass moves slightly. Then
release the switch. 5. Once again push and hold the sunroof
switch forward until the sunroof glass
slides open and close. Do not release
the switch until the operation is
completed.
If you release the switch during
operation, start the procedure again
from step 2.
Information
If the sunroof is not reset when the vehicle
battery is disconnected or discharged, or
the sunroof fuse is blown, the sunroof may
not operate normally.
Sunroof Open Warning
OCN7N041018LOCN7N041018L
If the driver turns off the engine when
the sunroof is not fully closed, the
warning chime will sound for several
seconds and the sunroof open warning
will appear on the cluster LCD display.
Close the sunroof securely when leaving
your vehicle.
CAUTION
Make sure the sunroof is closed fully
when leaving your vehicle.
If the sunroof is left open, rain or snow
may wet the interior of the vehicle.
Also, leaving the sunroof open when the
vehicle is unattended may invite theft.
CN7 N HMA 5.indd 5-55 2021-09-06 �� 3:06:23
Page 190 of 506

Convenience Features5-68
Battery Saver Function
The purpose of this feature is to
help prevent the battery from being
discharged. The system automatically
turns off the parking lamp when the
driver turns the vehicle off and opens the
driver-side door.
With this feature, the parking lamps will
turn off automatically if the driver parks
on the side of road at night.
However, the position lamps stay ON
even when the driver-side door is opened
if the headlamp switch is turned to the
position lamp or AUTO (if equipped)
position after the engine is turned off.
If necessary, to keep the lamps on
turn the position lamps OFF and ON
again using the headlamp switch on
the steering column after the engine is
turned off.
Headlamp Delay Function
(if equipped)
If the Engine Start/Stop button is in the
ACC parking or the OFF position with
the headlamps ON, the headlamps (and/
or parking lamps) remain on for about 5
minutes. However, with the engine off if
the driver’s door is opened and closed,
the headlamps (and/or parking lamps)
are turned off after 15 seconds.
The headlamps (and/or parking lamps)
can be turned off by pressing the lock
button on the remote key or smart key
twice or turning the light switch to the
OFF or AUTO position. However, if you
turn the light switch to the AUTO position
when it is dark outside, the headlamps
will not be turned off.
You can activate or deactivate the
Headlamp Delay function from the User
Settings Mode in the LCD display.
For more details, refer to “LCD Display
Modes” in chapter 4. If your vehicle is
equipped with additional navigation,
please refer to the infotainment system
manual separately supplied.
NOTICE
If the driver exits the vehicle through
another door besides the driver
door, the battery saver function
does not operate and the headlamp
delay function does not turn OFF
automatically.
This may cause the battery to
discharge. To avoid battery discharge,
turn OFF the headlamps manually from
the headlamp switch before exiting the
vehicle.
CN7 N HMA 5.indd 5-68 2021-09-06 �� 3:06:34
Page 194 of 506
Convenience Features5-72
WARNING
Do not use the interior lights when
driving in the dark. The interior lights
may obscure your view and cause an
accident.
NOTICE
Do not use the interior lights for
extended periods when the vehicle is
turned off or the battery will discharge.
Interior Lamp AUTO Cut
The interior lamps will automatically go
off approximately 20 minutes after the
engine is turned off and the doors are
closed. If a door is opened, the lamp
will go off 40 minutes after the engine
is turned off. If the doors are locked by
the smart key and the vehicle enters the
armed stage of the theft alarm system,
the lamps will go off five seconds later.
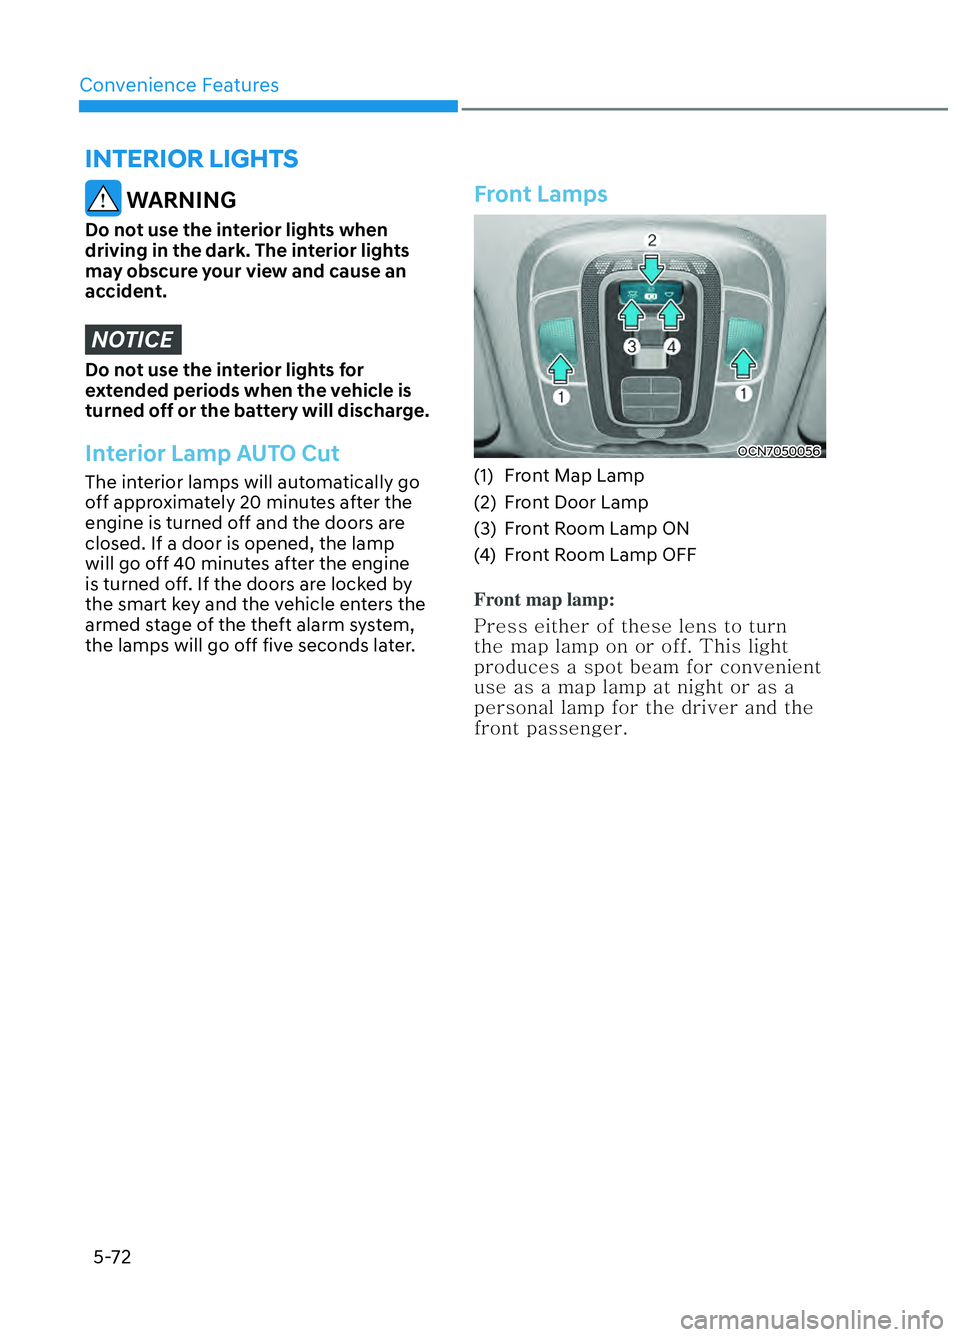
Front Lamps
OCN7050056OCN7050056
(1) Front Map Lamp
(2) Front Door Lamp
(3) Front Room Lamp ON
(4) Front Room Lamp OFF
Front map lamp:
1SFTT�FJUIFS�PG�UIFTF�MFOT�UP�UVSO�
UIF�NBQ�MBNQ�PO�PS�PGG��5IJT�MJHIU�
QSPEVDFT�B�TQPU�CFBN�GPS�DPOWFOJFOU�
VTF�BT�B�NBQ�MBNQ�BU�OJHIU�PS�BT�B�
QFSTPOBM�MBNQ�GPS�UIF�ESJWFS�BOE�UIF�
GSPOU�QBTTFOHFS�
INTERIOR LIGHTS
CN7 N HMA 5.indd 5-72 2021-09-06 �� 3:06:35
Page 196 of 506
Convenience Features5-74
Luggage Compartment Lamp
OCN7N051086NOCN7N051086N
The luggage compartment lamp comes
on when the trunk is opened.
NOTICE
The luggage compartment lamp comes
on as long as the trunk is open. To
prevent unnecessary battery system
drain, close the trunk securely after
using the luggage compartment.
Vanity Mirror Lamp (if equipped)
OCN7050058OCN7050058
Push the switch to turn the light on or off.
•
: The lamp will turn on if this button is pressed.
•
: The lamp will turn off if this button is pressed.
NOTICE
Always have the switch in the off
position when the vanity mirror lamp
is not in use. If the sunvisor is closed
without the lamp off, it may discharge
the battery or damage the sunvisor.
CN7 N HMA 5.indd 5-74 2021-09-06 �� 3:06:36
Page 206 of 506
Convenience Features5-84
Fan speed control
OCN7050108NOCN7050108N
Turn the knob to the right to increase
the fan speed and airflow. Turn the knob
to the left to decrease fan speed and
airflow.
Setting the fan speed control knob to the
“0” position turns off the fan.
NOTICE
Operating the fan speed when the
Engine Start/Stop button is in the ON
position could cause the battery to
discharge. Operate the fan speed when
the engine is running.
Air conditioning (if equipped)
OCN7050109OCN7050109
Press the A/C button to turn the air
conditioning system on (indicator light
will illuminate). Press the button again to
turn the air conditioning system off.
CN7 N HMA 5.indd 5-84 2021-09-06 �� 3:06:40
Page 217 of 506

05
5-95
OCN7050117OCN7050117
Adjusting the driver and passenger side
temperature equally
• Press the “SYNC” button to adjust the driv
er and passenger side
temperature equally.
• The passenger side temperature will be set to the same temperature as the
driver side temperature.
• Turn the driver side temperature control knob. The driver and
passenger side temperature will be
adjusted equally.
• If you rotate the passenger’s temperature control knob, the SYNC
button is off and the passenger
side temperature can be operated
individually.
Adjusting the driver and passenger side
temperatur
e individually
Press the “SYNC” button again to
adjus
t the driver and passenger side
temperature individually. The button
indicator will turn off. Temperature conversion
If the battery has been discharged or
disconnect
ed, the temperature mode
display will reset to Centigrade.
To change the temperature unit from °C
to °F or °F to °C :
- Automatic climate control system
Press the AUTO button for 3 seconds
while pressing the OFF button.
- Instrument clusterAutomatic climate
control system
Go to User Settings → Other →
Temperature Unit.
The temperature unit on both the
cluster LCD display and the climate
control screen will change.
Air intake control
Recirculated air position
With the recirculated air
position selected, air from the
passenger compartment will
be drawn through the heating
system and heated or cooled
according to the function
selected.
Outside (fresh) air position
With the outside (fresh) air
position selected, air enters
the vehicle from outside and
is heated or cooled according
to the function selected.
CN7 N HMA 5.indd 5-95 2021-09-06 �� 3:06:44


