2022 HYUNDAI ELANTRA HYBRID door lock
[x] Cancel search: door lockPage 189 of 529
Convenient Features
5-42
NOTICE
Do not install any accessories on the
windows. The automatic reverse
feature may not operate.
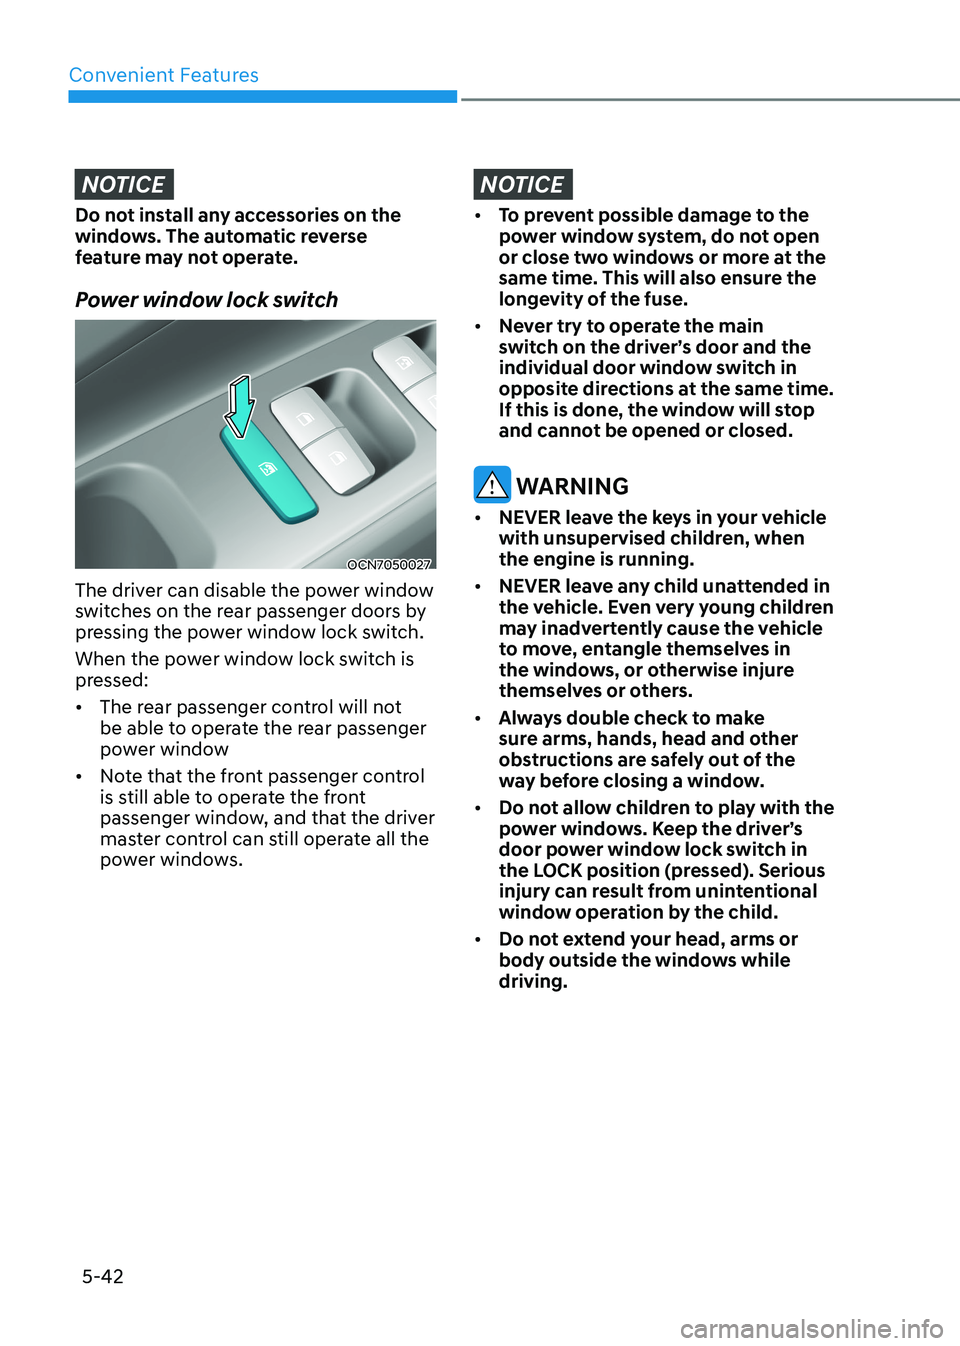
Power window lock switch
OCN7050027
The driver can disable the power window
switches on the rear passenger doors by
pressing the power window lock switch.
When the power window lock switch is
pressed: • The rear passenger control will not
be able to operate the rear passenger
power window
• Note that the front passenger control
is still able to operate the front
passenger window, and that the driver
master control can still operate all the
power windows.
NOTICE
• To prevent possible damage to the
power window system, do not open
or close two windows or more at the
same time. This will also ensure the
longevity of the fuse.
• Never try to operate the main
switch on the driver’s door and the
individual door window switch in
opposite directions at the same time.
If this is done, the window will stop
and cannot be opened or closed.
WARNING
• NEVER leave the keys in your vehicle
with unsupervised children, when the engine is running.
• NEVER leave any child unattended in
the vehicle. Even very young children
may inadvertently cause the vehicle
to move, entangle themselves in
the windows, or otherwise injure
themselves or others.
• Always double check to make
sure arms, hands, head and other
obstructions are safely out of the
way before closing a window.
• Do not allow children to play with the
power windows. Keep the driver’s
door power window lock switch in
the LOCK position (pressed). Serious
injury can result from unintentional
window operation by the child.
• Do not extend your head, arms or
body outside the windows while driving.
Page 190 of 529
05
5-43
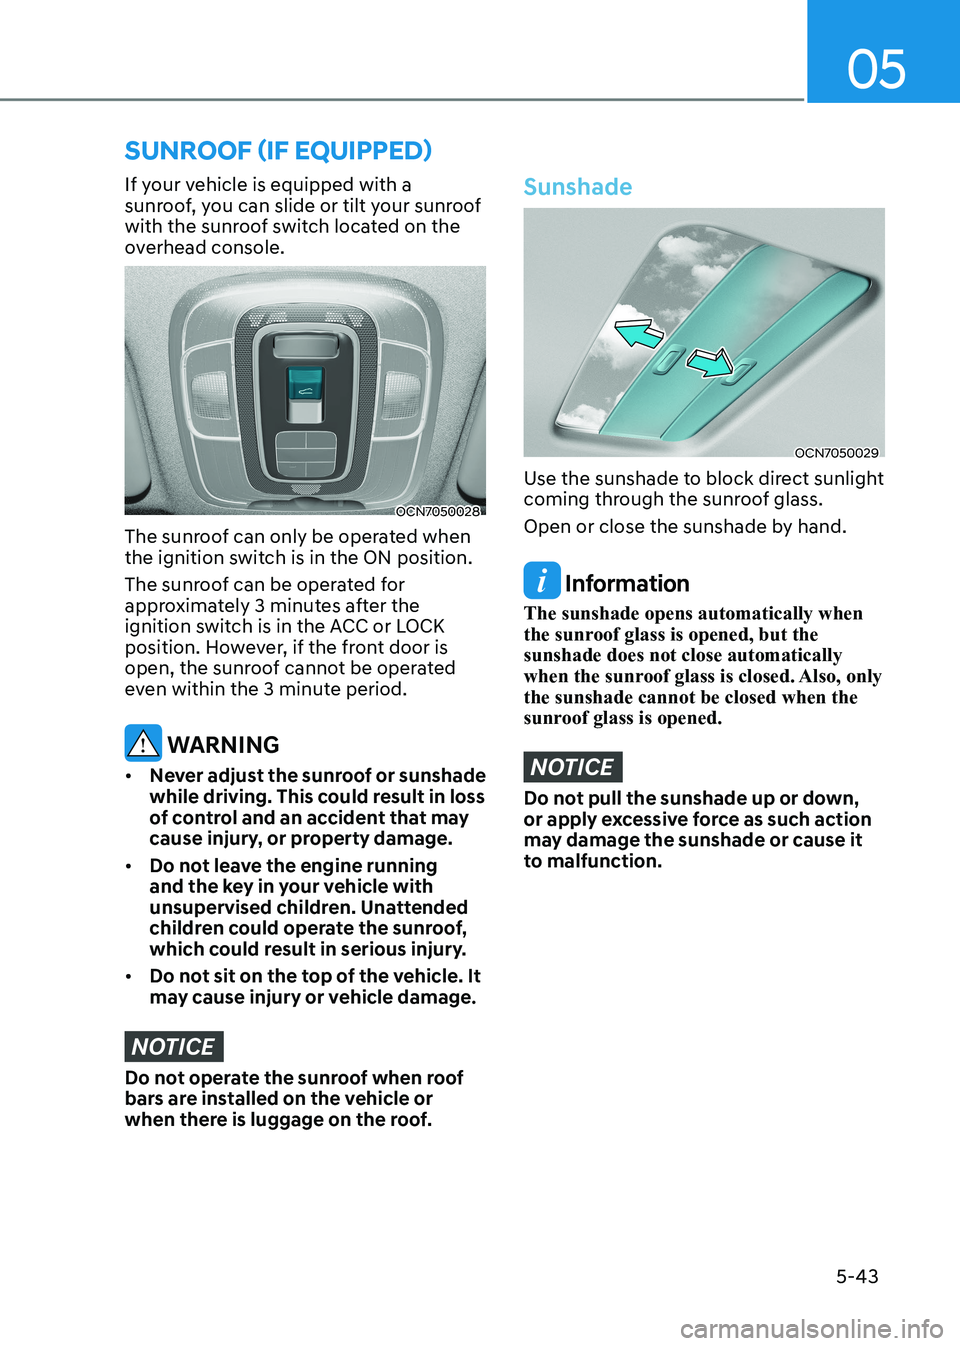
If your vehicle is equipped with a
sunroof, you can slide or tilt your sunroof
with the sunroof switch located on the
overhead console.
OCN7050028
The sunroof can only be operated when
the ignition switch is in the ON position.
The sunroof can be operated for
approximately 3 minutes after the
ignition switch is in the ACC or LOCK
position. However, if the front door is
open, the sunroof cannot be operated
even within the 3 minute period.
WARNING
• Never adjust the sunroof or sunshade
while driving. This could result in loss
of control and an accident that may
cause injury, or property damage.
• Do not leave the engine running
and the key in your vehicle with
unsupervised children. Unattended
children could operate the sunroof,
which could result in serious injury.
• Do not sit on the top of the vehicle. It
may cause injury or vehicle damage .
NOTICE
Do not operate the sunroof when roof
bars are installed on the vehicle or
when there is luggage on the roof.
Sunshade
OCN7050029
Use the sunshade to block direct sunlight
coming through the sunroof glass.
Open or close the sunshade by hand.
Information
The sunshade opens automatically when
the sunroof glass is opened, but the sunshade does not close automatically
when the sunroof glass is closed. Also, only the sunshade cannot be closed when the
sunroof glass is opened.
NOTICE
Do not pull the sunshade up or down,
or apply excessive force as such action
may damage the sunshade or cause it
to malfunction.
SunROOf (if equippeD)
Page 196 of 529
05
5-49
Opening the trunk
1. Make sure the shift lever is in P
(Park, for Dual clutch transmission/
Intelligent variable transmission) or
first gear or R (Reverse, for manual
transmission) and set the parking
brake.
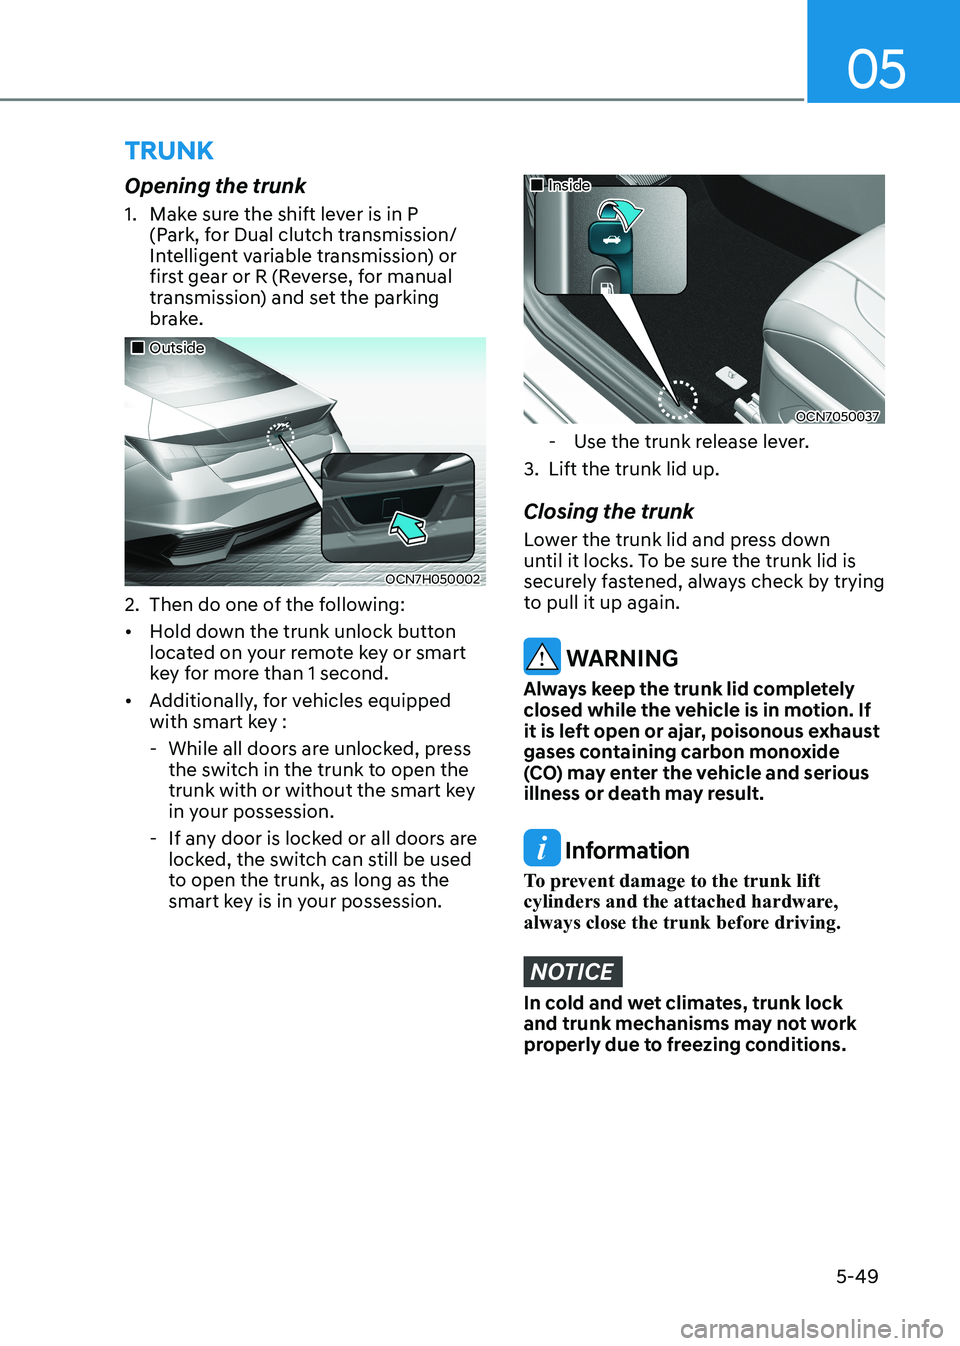
„„Outside
OCN7H050002
2. Then do one of the following: • Hold down the trunk unlock button
located on your remote key or smart
key for more than 1 second.
• Additionally, for vehicles equipped
with smart key :
- While all doors are unlocked, press the switch in the trunk to open the
trunk with or without the smart key
in your possession.
- If any door is locked or all doors are locked, the switch can still be used
to open the trunk, as long as the
smart key is in your possession.
„„Inside
OCN7050037
- Use the trunk release lever.
3. Lift the trunk lid up.
Closing the trunk
Lower the trunk lid and press down
until it locks. To be sure the trunk lid is
securely fastened, always check by trying
to pull it up again.
WARNING
Always keep the trunk lid completely
closed while the vehicle is in motion. If
it is left open or ajar, poisonous exhaust
gases containing carbon monoxide
(CO) may enter the vehicle and serious
illness or death may result.
Information
To prevent damage to the trunk lift
cylinders and the attached hardware,
always close the trunk before driving.
NOTICE
In cold and wet climates, trunk lock
and trunk mechanisms may not work
properly due to freezing conditions.
trunk
Page 198 of 529
05
5-51
Smart Trunk Release (if equipped)
OCN7H050011
On a vehicle equipped with a smart key, the trunk can be opened using the Smart
Trunk release system.
How to use the Smart Trunk release
The trunk can be opened with no touch
activation satisfying all the conditions
below. • After 15 seconds when all doors are
closed and locked
• Positioned in the detecting area for
more than 3 seconds
Information
The Smart Trunk release does not operate when: • The smart key is detected within 15
seconds after the doors are closed and locked, and is continuously detected.
• The smart key is detected within 15
seconds after the doors are closed and
locked, and 1.5 m from the front door
handles. (for vehicles equipped with
Welcome Light)
• A door is not locked or closed.
• The smart key is in the vehicle. 1. Setting
To activate the Smart Trunk release, go
to User Settings Mode and select Smart
Trunk on the LCD display.
For more details, refer to “LCD Display”
in this chapter. If your vehicle is
equipped with additional navigation,
please refer to the infotainment system
manual separately supplied.
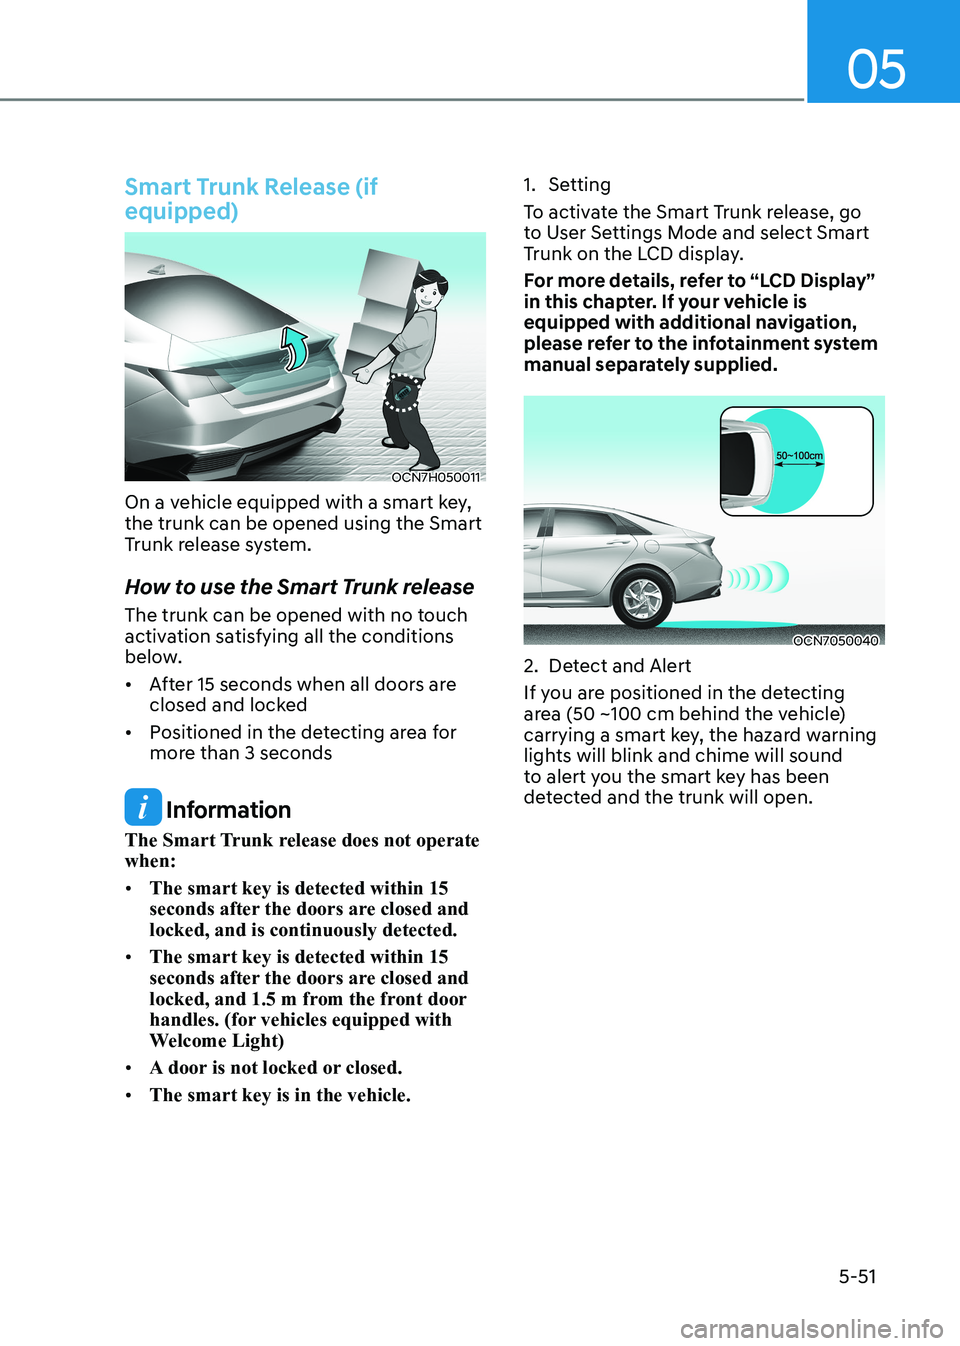
OCN7050040
2. Detect and Alert
If you are positioned in the detecting
area (50 ~100 cm behind the vehicle)
carrying a smart key, the hazard warning
lights will blink and chime will sound
to alert you the smart key has been
detected and the trunk will open.
Page 199 of 529
Convenient Features
5-52
Information
Do not approach the detecting area if you do not want the trunk to open. If you have
unintentionally entered the detecting area and the hazard warning lights and chime
starts to operate, leave the detecting area
with the smart key. The trunk will stay closed.
OCN7H050005
3. Automatic opening
The hazard warning lights will blink and chime will sound 6 times and then the trunk will open.
WARNING
• Make sure you close the trunk before
driving your vehicle.
• Make sure there are no people or
objects around the trunk before opening or closing the trunk.
• Make sure objects in the trunk do not
come out when opening the trunk on
a slope. It may cause serious injury.
• Make sure to deactivate the Smart
Trunk when washing your vehicle.
Otherwise, the trunk may open
inadvertently.
• The key should be kept out of
reach of children. Children may
inadvertently open the Smart Trunk
release while playing around the rear
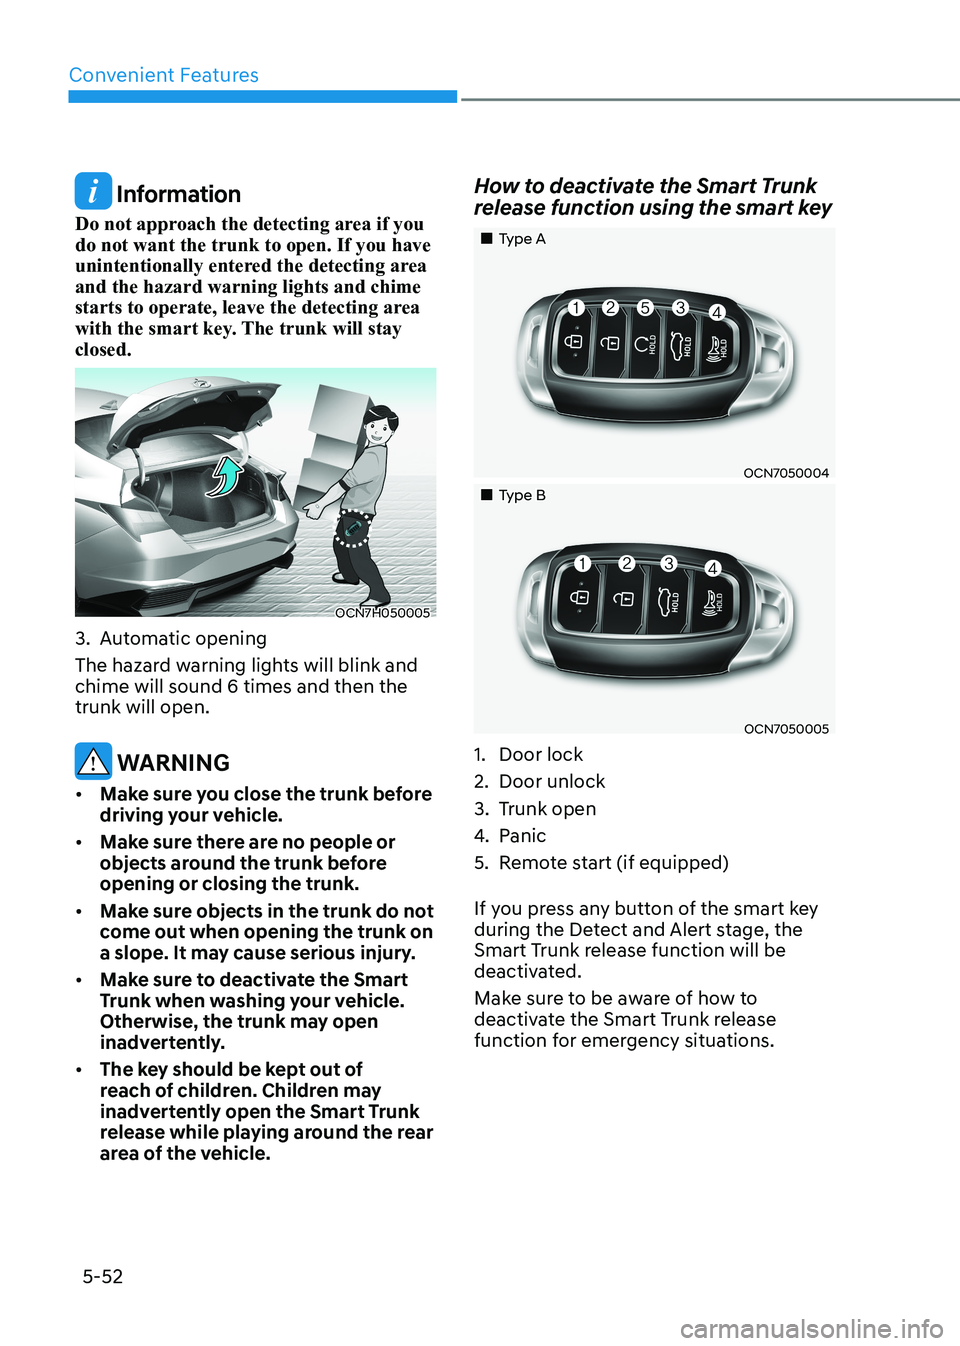
area of the vehicle. How to deactivate the Smart Trunk
release function using the smart key
„„Type A
OCN7050004
„„Type B
OCN7050005
1. Door lock
2. Door unlock
3. Trunk open
4. Panic
5. Remote start (if equipped)
If you press any button of the smart key
during the Detect and Alert stage, the
Smart Trunk release function will be
deactivated.
Make sure to be aware of how to
deactivate the Smart Trunk release
function for emergency situations.
Page 200 of 529
05
5-53
Information
• If you press the door unlock button
(2), the Smart Trunk release function
will be deactivated temporarily. But,
if you do not open any door for 30 seconds, the smart trunk function will be activated again.
• If you press the trunk open button
(3) for more than 1 second, the trunk opens.
• If you press the door lock button (1) or trunk open button (3) when the Smart
Trunk release function is not in the
Detect and Alert stage, the smart trunk function will not be deactivated.
• In case you have deactivated the Smart
Trunk function by pressing the smart
key button and opened a door, the
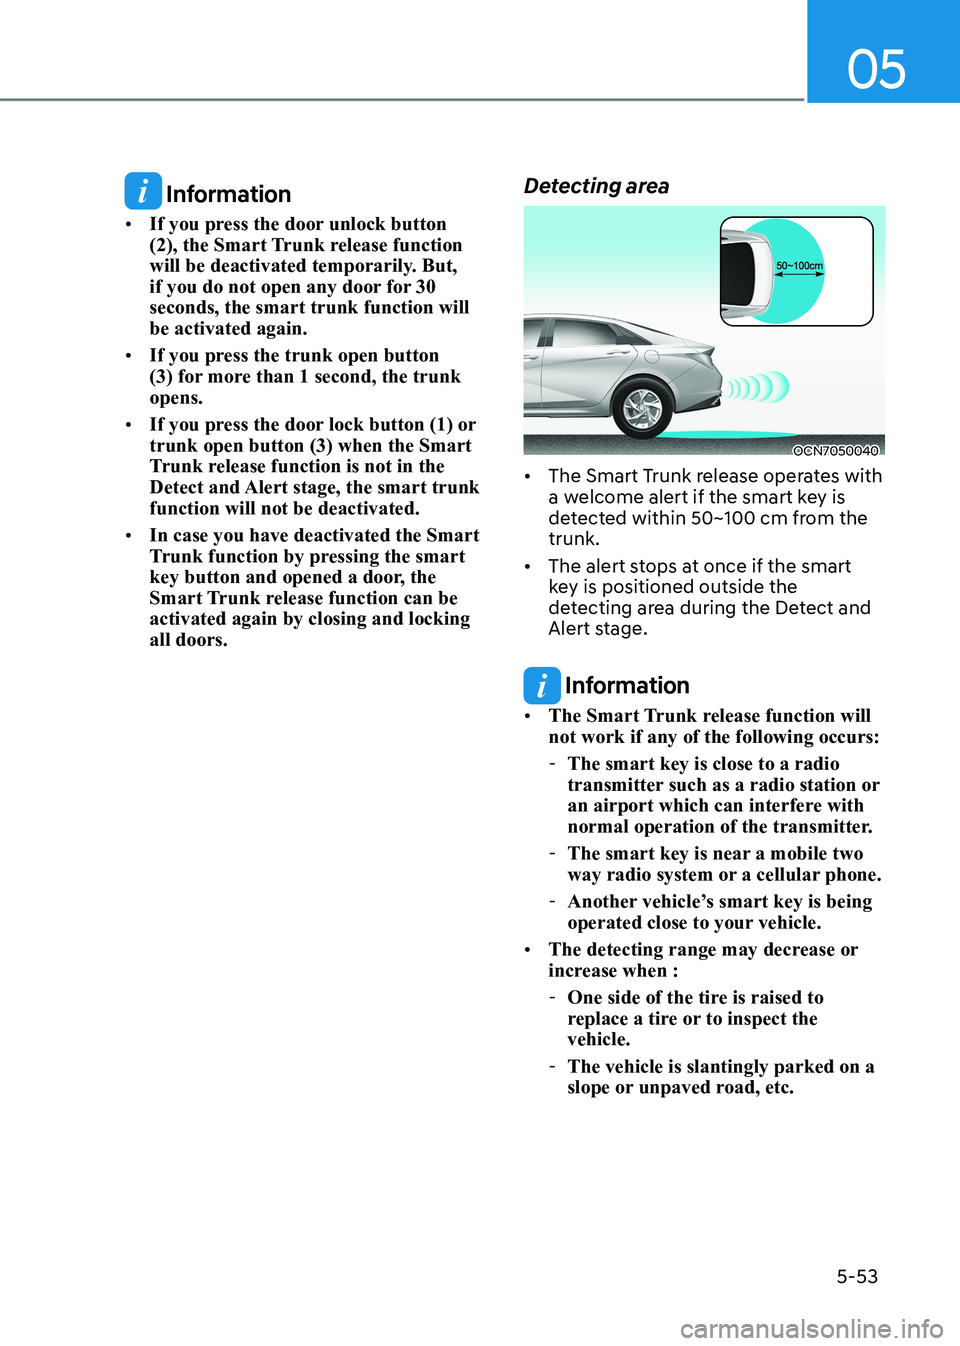
Smart Trunk release function can be activated again by closing and locking all doors. Detecting area
OCN7050040
• The Smart Trunk release operates with
a welcome alert if the smart key is
detected within 50~100 cm from the trunk.
• The alert stops at once if the smart
key is positioned outside the
detecting area during the Detect and
Alert stage.
Information
• The Smart Trunk release function will not work if any of the following occurs:
- The smart key is close to a radio
transmitter such as a radio station or
an airport which can interfere with
normal operation of the transmitter.
- The smart key is near a mobile two
way radio system or a cellular phone.
- Another vehicle’s smart key is being
operated close to your vehicle.
• The detecting range may decrease or
increase when :
- One side of the tire is raised to
replace a tire or to inspect the vehicle.
- The vehicle is slantingly parked on a
slope or unpaved road, etc.
Page 201 of 529
Convenient Features
5-54
Opening the fuel filler door
OCN7050042
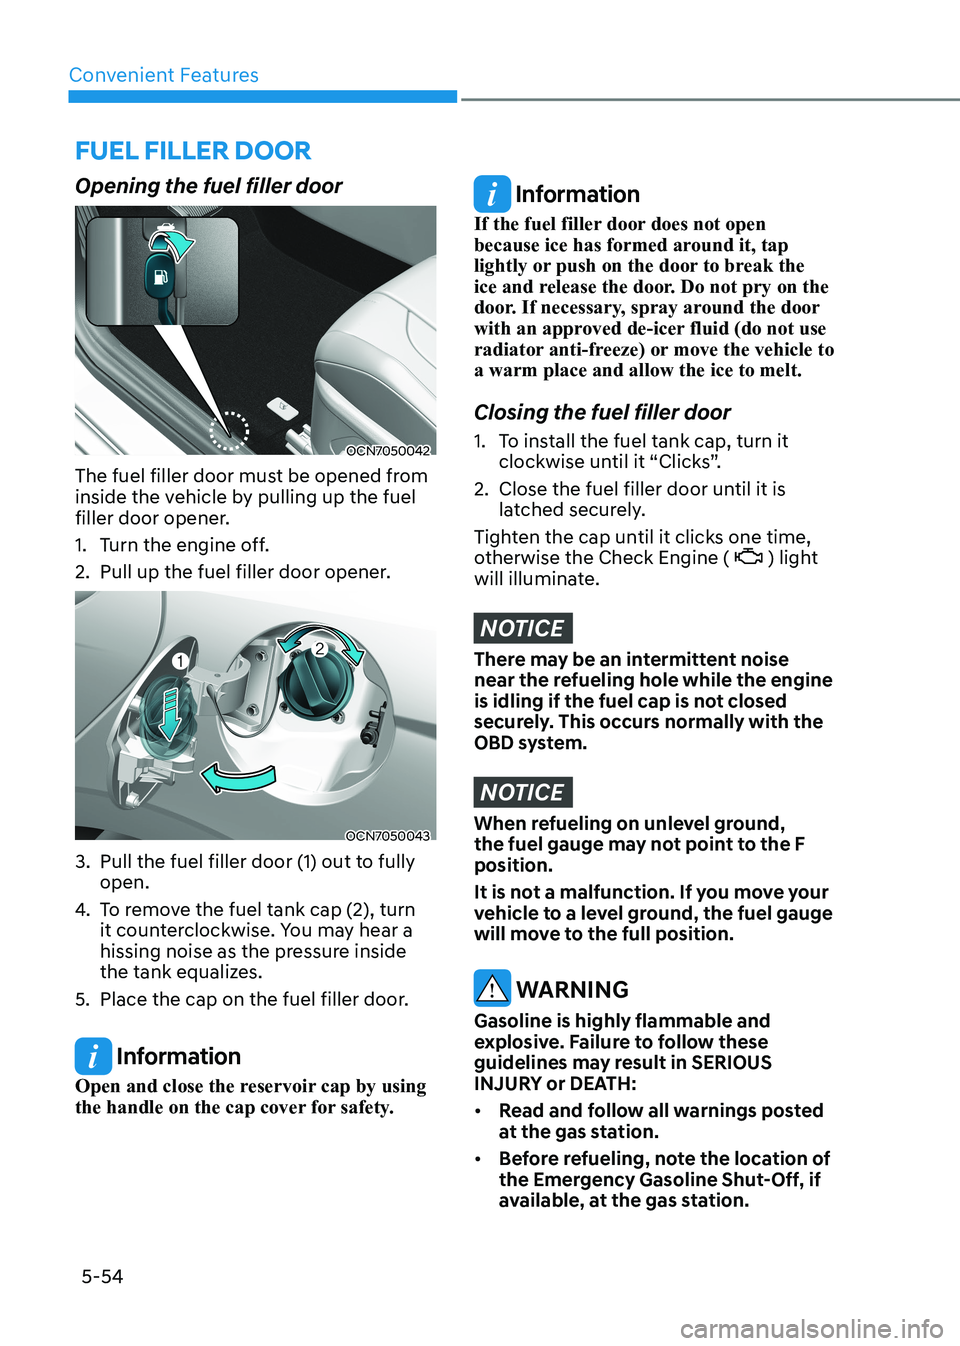
The fuel filler door must be opened from
inside the vehicle by pulling up the fuel
filler door opener.
1. Turn the engine off.
2. Pull up the fuel filler door opener.
OCN7050043
3. Pull the fuel filler door (1) out to fully open.
4. To remove the fuel tank cap (2), turn
it counterclockwise. You may hear a
hissing noise as the pressure inside
the tank equalizes.
5. Place the cap on the fuel filler door.
Information
Open and close the reservoir cap by using
the handle on the cap cover for safety.
Information
If the fuel filler door does not open
because ice has formed around it, tap
lightly or push on the door to break the
ice and release the door. Do not pry on the
door. If necessary, spray around the door
with an approved de-icer fluid (do not use
radiator anti-freeze) or move the vehicle to a warm place and allow the ice to melt. Closing the fuel filler door
1. To install the fuel tank cap, turn it clockwise until it “Clicks”.
2. Close the fuel filler door until it is latched securely.
Tighten the cap until it clicks one time,
otherwise the Check Engine (
) light
will illuminate.
NOTICE
There may be an intermittent noise
near the refueling hole while the engine
is idling if the fuel cap is not closed
securely. This occurs normally with the
OBD system.
NOTICE
When refueling on unlevel ground,
the fuel gauge may not point to the F position.
It is not a malfunction. If you move your
vehicle to a level ground, the fuel gauge
will move to the full position.
WARNING
Gasoline is highly flammable and
explosive. Failure to follow these
guidelines may result in SERIOUS
INJURY or DEATH: • Read and follow all warnings posted
at the gas station.
• Before refueling, note the location of
the Emergency Gasoline Shut-Off, if
available, at the gas station.
Fuel Filler Door
Page 206 of 529
05
5-59
Battery Saver Function
The purpose of this feature is to prevent
the battery from being discharged.
The system automatically turns off the
parking lamp when the driver turns the
vehicle off and opens the driver-side
door.
With this feature, the parking lamps will
turn off automatically if the driver parks
on the side of road at night.
If necessary, to keep the lamps on when
the vehicle is turned off, perform the
following:
(1) Open the driver-side door.
(2) Turn the parking lamps OFF and ON again using the headlamp switch on
the steering column.
However, the position lamps stay ON
even when the driver-side door is opened
if the headlamp switch is turned to the
position lamp or AUTO (if equipped)
position after the engine is turned off.
If necessary, to keep the lamps on turn the position lamps OFF and ON
again using the headlamp switch on
the steering column after the engine is
turned off.
Headlamp Delay Function (if equipped)
If you place the ignition switch in the
ACC or OFF position with the headlamps
ON, the headlamps (and/or parking
lamps) remain on for about 5 minutes.
However, with the engine off if the
driver’s door is opened and closed, the
headlamps (and/or parking lamps) are
turned off after 15 seconds.
The headlamps (and/or parking lamps)
can be turned off by pressing the lock
button on the remote key or smart key
twice or turning the light switch to the
OFF or AUTO position. However, if you
turn the light switch to the AUTO position when it is dark outside, the headlamps
will not be turned off.
You can activate or deactivate the
Headlamp Delay function from the User
Settings Mode in the LCD display.
For more details, refer to “LCD Display
Modes” in chapter 4. If your vehicle is
equipped with additional navigation,
please refer to the infotainment system
manual separately supplied.
NOTICE
If the driver exits the vehicle through
another door besides the driver
door, the battery saver function
does not operate and the headlamp
delay function does not turn OFF
automatically.
This may cause the battery to
discharge. To avoid battery discharge,
turn OFF the headlamps manually from
the headlamp switch before exiting the
vehicle.