2022 HONDA ODYSSEY warning lights
[x] Cancel search: warning lightsPage 16 of 782
15
Quick Reference Guide
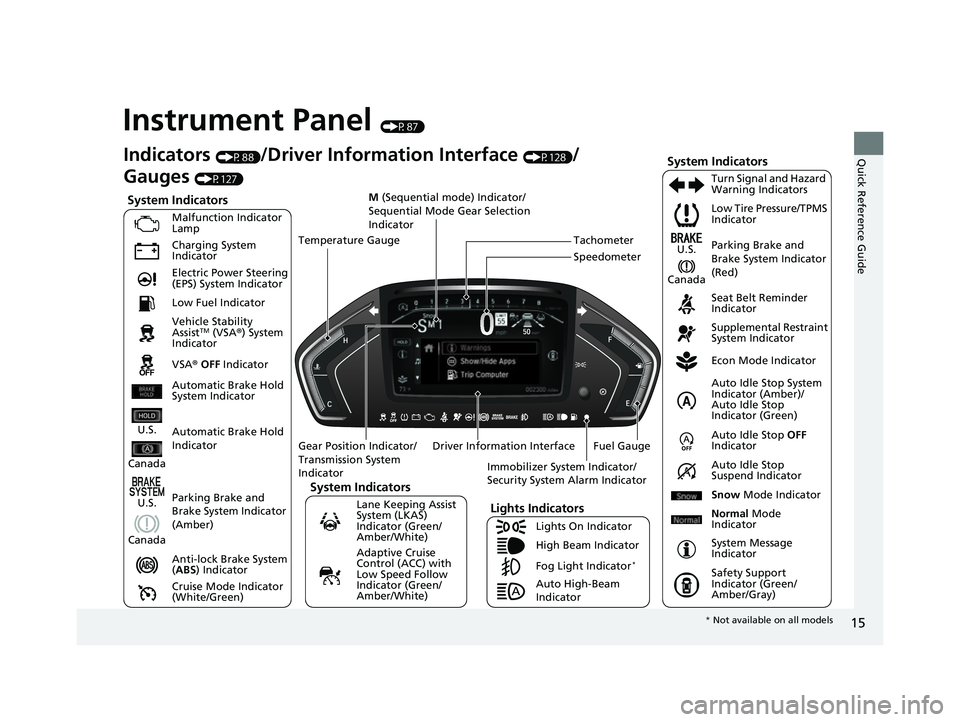
Instrument Panel (P87)
System Indicators
Malfunction Indicator
Lamp
Charging System
Indicator
Anti-lock Brake System
(ABS ) Indicator
Vehicle Stability
Assist
TM (VSA®
) System
Indicator
VSA ® OFF Indicator Low Tire Pressure/TPMS
Indicator
Immobilizer System Indicator/
Security System Alarm Indicator
Lights Indicators
Lights On Indicator
High Beam Indicator
Fog Light Indicator
*
Lane Keeping Assist
System (LKAS)
Indicator (Green/
Amber/White) Seat Belt Reminder
Indicator
System Indicators
Econ Mode Indicator
System Message
Indicator Parking Brake and
Brake System Indicator
(Red)
Supplemental Restraint
System Indicator
Driver Information Interface Auto Idle Stop
OFF
Indicator
Tachometer
M
(Sequential mode) Indicator/
Sequential Mode Gear Selection
Indicator
Speedometer
Fuel Gauge
Gear Position Indicator/
Transmission System
Indicator Auto Idle Stop System
Indicator (Amber)/
Auto Idle Stop
Indicator (Green)
Indicators (P88)/Driver Information Interface (P128)/
Gauges
(P127)
Automatic Brake Hold
Indicator Adaptive Cruise
Control (ACC) with
Low Speed Follow
Indicator (Green/
Amber/White) Turn Signal and Hazard
Warning Indicators
Electric Power Steering
(EPS) System Indicator
Cruise Mode Indicator
(White/Green) Auto Idle Stop
Suspend Indicator
Temperature Gauge
Parking Brake and
Brake System Indicator
(Amber)
U.S.
Canada
U.S.
Canada
System Indicators
U.S.
Canada
Low Fuel Indicator
Automatic Brake Hold
System Indicator
Auto High-Beam
Indicator Snow
Mode Indicator
Normal Mode
Indicator
Safety Support
Indicator (Green/
Amber/Gray)
* Not available on all models
22 US ODYSSEY-31THR6400.book 15 ページ 2020年11月16日 月曜日 午後1時41分
Page 98 of 782
97
uuIndicators u
Continued
Instrument Panel
IndicatorNameOn/BlinkingExplanationMessage
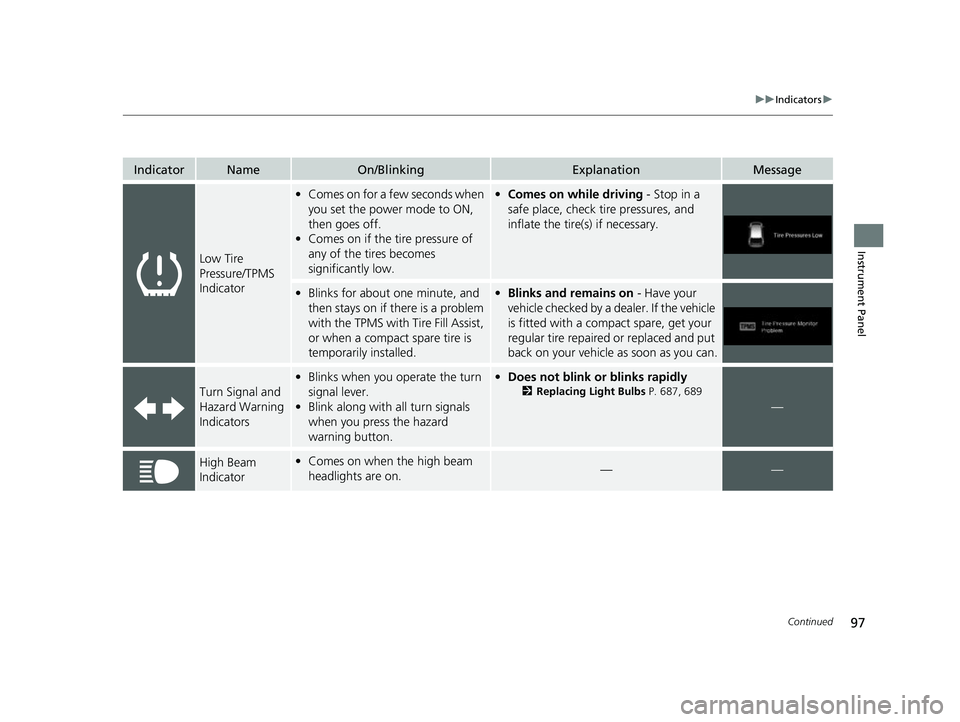
Low Tire
Pressure/TPMS
Indicator
•Comes on for a few seconds when
you set the power mode to ON,
then goes off.
• Comes on if the tire pressure of
any of the tires becomes
significantly low.•Comes on while driving - Stop in a
safe place, check tire pressures, and
inflate the tire(s) if necessary.
• Blinks for about one minute, and
then stays on if there is a problem
with the TPMS with Tire Fill Assist,
or when a compact spare tire is
temporarily installed.•Blinks and remains on - Have your
vehicle checked by a dealer. If the vehicle
is fitted with a compact spare, get your
regular tire repaired or replaced and put
back on your vehicle as soon as you can.
Turn Signal and
Hazard Warning
Indicators
• Blinks when you operate the turn
signal lever.
• Blink along with all turn signals
when you press the hazard
warning button.• Does not blink or blinks rapidly
2 Replacing Light Bulbs P. 687, 689
—
High Beam
Indicator•Comes on when the high beam
headlights are on.——
22 US ODYSSEY-31THR6400.book 97 ページ 2020年11月16日 月曜日 午後1時41分
Page 553 of 782
uuWhen Driving uStarting the Engine
552
Driving
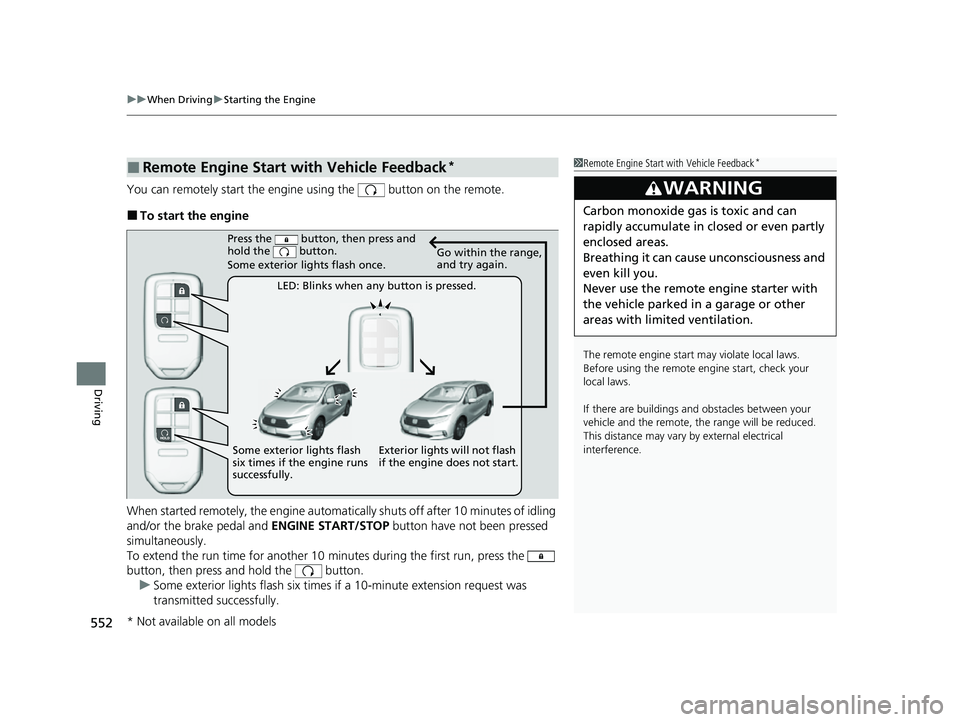
You can remotely start the engine using the button on the remote.
■To start the engine
When started remotely, the engine automati cally shuts off after 10 minutes of idling
and/or the brake pedal and ENGINE START/STOP button have not been pressed
simultaneously.
To extend the run time for another 10 minutes during the first run, press the
button, then press and hold the button.
u Some exterior lights flash six times if a 10-minute extension request was
transmitted successfully.
■Remote Engine Start with Vehicle Feedback*1Remote Engine Start with Vehicle Feedback*
The remote engine start may violate local laws.
Before using the remote e ngine start, check your
local laws.
If there are buildings an d obstacles between your
vehicle and the remote, th e range will be reduced.
This distance may vary by external electrical
interference.
3WARNING
Carbon monoxide ga s is toxic and can
rapidly accumulate in closed or even partly
enclosed areas.
Breathing it can cause unconsciousness and
even kill you.
Never use the remote engine starter with
the vehicle parked in a garage or other
areas with limited ventilation.
Press the button, then press and
hold the button.
Some exterior lights flash once.
LED: Blinks when any button is pressed. Go within the range,
and try again.
Exterior lights will not flash
if the engine does not start.
Some exterior lights flash
six times if the engine runs
successfully.
* Not available on all models
22 US ODYSSEY-31THR6400.book 552 ページ 2020年11月16日 月曜日 午後1時41分
Page 601 of 782
600
uuHonda Sensing ®u Adaptive Cruise Control (ACC) with Low Speed Follow
Driving
Adaptive Cruise Control (ACC) with Low Speed
Follow
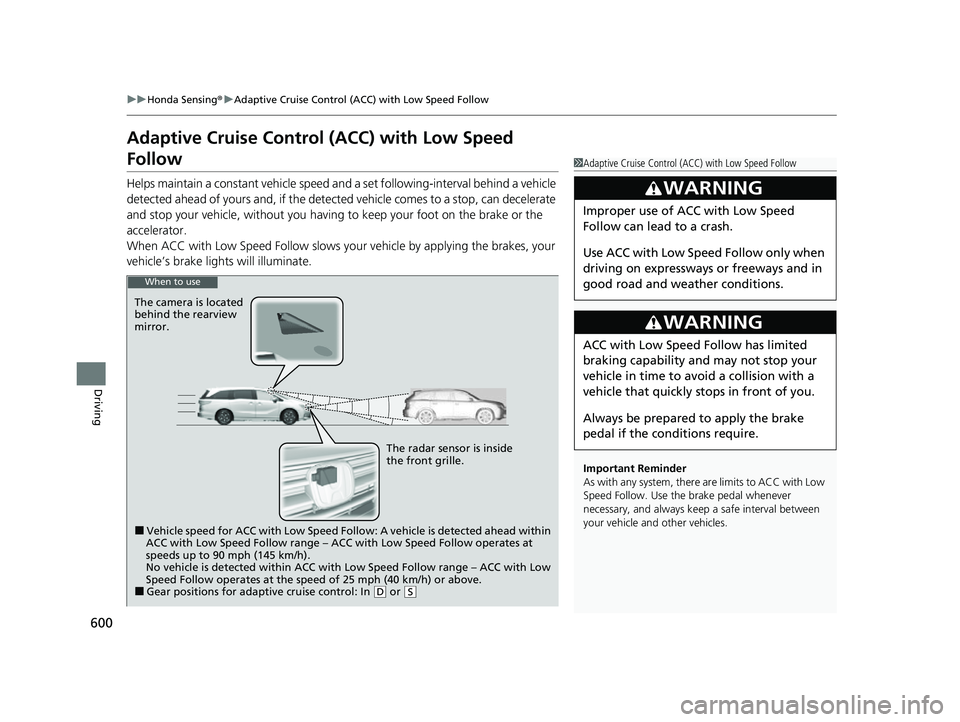
Helps maintain a constant vehicle speed a nd a set following-interval behind a vehicle
detected ahead of yours and, if the detect ed vehicle comes to a stop, can decelerate
and stop your vehicle, without you having to keep your foot on the brake or the
accelerator.
When ACC with Low Speed Follow slows y our vehicle by applying the brakes, your
vehicle’s brake lights will illuminate.
1 Adaptive Cruise Control (ACC) with Low Speed Follow
Important Reminder
As with any system, there are limits to ACC with Low
Speed Follow. Use the brake pedal whenever
necessary, and always keep a safe interval between
your vehicle and other vehicles.
3WARNING
Improper use of ACC with Low Speed
Follow can lead to a crash.
Use ACC with Low Speed Follow only when
driving on expressways or freeways and in
good road and weather conditions.
3WARNING
ACC with Low Speed Follow has limited
braking capability and may not stop your
vehicle in time to avoid a collision with a
vehicle that quickly stops in front of you.
Always be prepared to apply the brake
pedal if the conditions require.
When to use
The camera is located
behind the rearview
mirror.
The radar sensor is inside
the front grille.
■Vehicle speed for ACC with Low Speed Follow: A vehicle is detected ahead within
ACC with Low Speed Follow range – ACC with Low Speed Follow operates at
speeds up to 90 mph (145 km/h).
No vehicle is detected within ACC with Low Speed Follow range – ACC with Low
Speed Follow operates at the speed of 25 mph (40 km/h) or above.
■Gear positions for adaptive cruise control: In ( D or (S
22 US ODYSSEY-31THR6400.book 600 ページ 2020年11月16日 月曜日 午後1時41分
Page 608 of 782
Continued607
uuHonda Sensing ®u Adaptive Cruise Control (ACC) with Low Speed Follow
Driving
The system may automatically shut off and the indicator will come on under
certain conditions. Some examples of these conditions are listed below. Other
conditions may reduce some of the ACC functions.
2 Front Sensor Camera P. 635
2 Radar Sensor P. 637
■Environmental conditions
Driving in bad weather (r ain, fog, snow, etc.).
■Roadway conditions
Driving on a snowy or wet roadway (obscured lane marking, vehicle tracks, reflected
lights, road spra y, high contrast).
■Vehicle conditions
• The outside of the windshield is blocked by dirt, mud, leaves, wet snow, etc.
• An abnormal tire or wheel condition (wrong size, varied size or construction,
improperly inflated, co mpact spare tire, etc.).
• The camera temperature gets too high.
• The parking brake is applied.
• The front grille is dirty.
• The vehicle is tilted due to a heavy load or suspension modifications.
• Tire chains are installed.
• The vehicle is towing a trailer.
■ACC with Low Speed Follow Conditions and Limitations1ACC with Low Speed Follow Conditions and Limitations
If you need the radar sensor to be repaired, or
removed, or the radar se nsor cover is strongly
impacted, turn off the system by pressing the
button and take your vehicle to a dealer.
Have your vehicle checked by a dealer if you find any
unusual behavior of the system (e.g., the warning
message appears too frequently).
22 US ODYSSEY-31THR6400.book 607 ページ 2020年11月16日 月曜日 午後1時41分
Page 643 of 782
uuBraking uBrake System
642
Driving
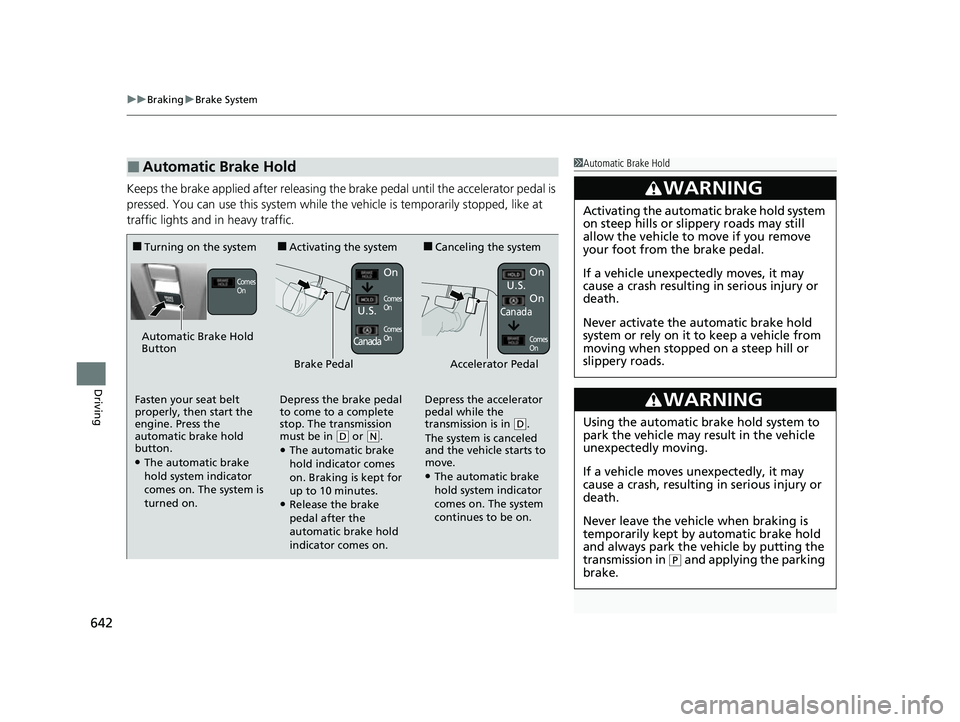
Keeps the brake applied after releasing the brake pedal until the accelerator pedal is
pressed. You can use this system while the vehicle is temporarily stopped, like at
traffic lights and in heavy traffic.
■Automatic Brake Hold1Automatic Brake Hold
3WARNING
Activating the automatic brake hold system
on steep hills or slippery roads may still
allow the vehicle to move if you remove
your foot from the brake pedal.
If a vehicle unexpectedly moves, it may
cause a crash resulting in serious injury or
death.
Never activate the automatic brake hold
system or rely on it to keep a vehicle from
moving when stopped on a steep hill or
slippery roads.
3WARNING
Using the automatic brake hold system to
park the vehicle may result in the vehicle
unexpectedly moving.
If a vehicle moves unexpectedly, it may
cause a crash, resulting in serious injury or
death.
Never leave the vehicle when braking is
temporarily kept by automatic brake hold
and always park the vehicle by putting the
transmission in
( P and applying the parking
brake.
■Turning on the system■Activating the system■Canceling the system
Automatic Brake Hold
Button
Comes
OnOn
Comes
On
Comes
On
On
U.S.
Canada
Brake PedalAccelerator Pedal
Fasten your seat belt
properly, then start the
engine. Press the
automatic brake hold
button.
●The automatic brake
hold system indicator
comes on. The system is
turned on. Depress the brake pedal
to come to a complete
stop. The transmission
must be in
(
D or (N.●The automatic brake
hold indicator comes
on. Braking is kept for
up to 10 minutes.
●Release the brake
pedal after the
automatic brake hold
indicator comes on. Depress the accelerator
pedal while the
transmission is in
(
D.
The system is canceled
and the vehicle starts to
move.
●The automatic brake
hold system indicator
comes on. The system
continues to be on. U.S.
CanadaOn
Comes
On
22 US ODYSSEY-31THR6400.book 642 ページ 2020年11月16日 月曜日 午後1時41分
Page 724 of 782
723Continued
Handling the Unexpected
If a Tire Goes Flat
Changing a Flat Tire
If a tire goes flat while driving, grasp the steering wheel firmly, and brake gradually
to reduce speed. Then, stop in a safe plac e. Replace the flat tire with a compact
spare tire. Go to a dealer as soon as possib le to have the full-size tire repaired or
replaced.
1. Park the vehicle on a firm, level, non-slippery surface and apply the parking brake.
2. Put the transmission into
(P.
3. Turn on the hazard warning lights an d set the power mode to VEHICLE OFF.
1Changing a Flat Tire
Follow compact spare precautions:
Periodically check the tire pressure of the compact
spare. It should be set to the specified pressure.
Specified Pressure: 60 psi (420 kPa, 4.2 kgf/cm
2)
When driving with the compact spare tire, keep the
vehicle speed under 50 mph (80 km/h). Replace with
a full-size tire as soon as possible.
The compact spare tire and wheel in your vehicle are
specifically for this model. Do not use them with
another vehicle. Do not us e another type of compact
spare tire or wheel with your vehicle.
Do not mount tire chains on a compact spare tire.
If a chain-mounted front tire goes flat, remove one of
the full-size rear tires and replace it with the compact
spare tire. Remove the flat front tire and replace it
with the full-size tire that was removed from the rear.
Mount the tire chains on the front tire.
Do not use a puncture-repairi ng agent on a flat tire,
as it can damage the tire pressure sensor.
Do not use the jack if it doesn’t work properly. Call
your dealer or a prof essional towing service.
22 US ODYSSEY-31THR6400.book 723 ページ 2020年11月16日 月曜日 午後1時41分
Page 736 of 782
735Continued
Handling the Unexpected
If the Battery Is Dead
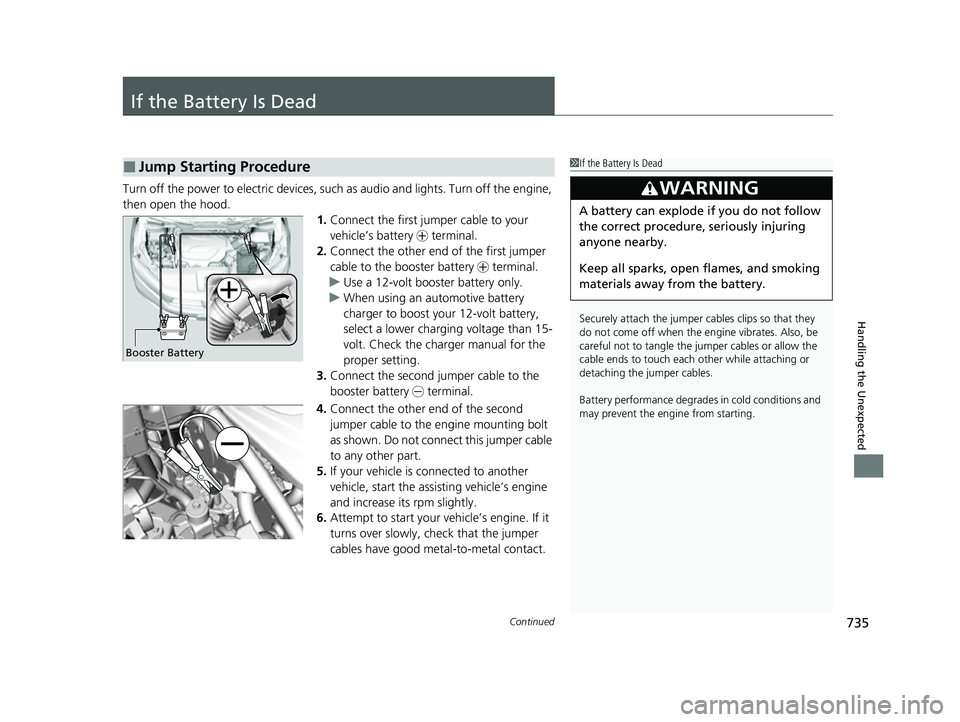
Turn off the power to electric devices, such as audio and lights. Turn off the engine,
then open the hood. 1.Connect the first jumper cable to your
vehicle’s battery + terminal.
2. Connect the other end of the first jumper
cable to the booster battery + terminal.
u Use a 12-volt booster battery only.
u When using an automotive battery
charger to boost your 12-volt battery,
select a lower charging voltage than 15-
volt. Check the charger manual for the
proper setting.
3. Connect the second jumper cable to the
booster battery - terminal.
4. Connect the other end of the second
jumper cable to the engine mounting bolt
as shown. Do not connect this jumper cable
to any other part.
5. If your vehicle is connected to another
vehicle, start the assisting vehicle’s engine
and increase its rpm slightly.
6. Attempt to start your ve hicle’s engine. If it
turns over slowly, check that the jumper
cables have good metal-to-metal contact.
■Jump Starting Procedure1 If the Battery Is Dead
Securely attach the jumper cables clips so that they
do not come off when the e ngine vibrates. Also, be
careful not to tangle the ju mper cables or allow the
cable ends to touch each other while attaching or
detaching the jumper cables.
Battery performance degrades in cold conditions and
may prevent the engi ne from starting.
3WARNING
A battery can explode if you do not follow
the correct procedure, seriously injuring
anyone nearby.
Keep all sparks, open flames, and smoking
materials away from the battery.
Booster Battery
22 US ODYSSEY-31THR6400.book 735 ページ 2020年11月16日 月曜日 午後1時41分