2022 HONDA INSIGHT wiper blades
[x] Cancel search: wiper bladesPage 5 of 609

Contents
This owner’s manual should be considered a permanent part of the
vehicle and should remain with the vehicle when it is sold.
The Navigation Manual is available online at owners.honda.com
(U.S.). If you are the first registered owner of your vehicle,
you may request a complimenta ry printed copy of the
Navigation Manual within the first six months of vehicle
purchase. To request a copy, visit owners.honda.com.
This owner’s manual covers all models of your vehicle. You may find
descriptions of equipment and features that are not on your
particular model.
Images throughout this owner’s manu al (including the front cover)
represent features and equipment that are available on some, but
not all, models. Your particular mo del may not have some of these
features.
This owner’s manual is for vehicl es sold in the United States.
The information and specifications in cluded in this publication were
in effect at the time of approval for printing. Honda Motor Co., Ltd.
reserves the right, however, to discontinue or change specifications
or design at any time without notice and without incurring any
obligation.2 Safe Driving P. 39
For Safe Driving P. 40 Seat Belts P. 44 Airbags P. 51
2Instrument Panel P. 81
Indicators P. 82 Gauges and Driver Information Interface P. 129
2Controls P. 155
Clock P. 156 Locking and Unlocking the Doors P. 157
Moonroof* P. 180
Adjusting the Seats P. 199
2 Features P. 223
Audio System P. 224 Audio Error Messages P. 302
HomeLink ® Universal Transceiver* P. 346 Bluetooth ® HandsFreeLink ® P. 349
2 Driving P. 375
Before Driving P. 376 Towing a Trailer P. 381
Parking Your Vehicle P. 478 Multi-View Rear Camera P. 483
2Maintenance P. 489
Before Performing Maintenance P. 490 Maintenance MinderTM P. 493
Checking and Maintaining Wiper Blades P. 516
Climate Control System Maintenance P. 531
2Handling the Unexpected P. 539
Tools P. 540 If a Tire Goes Flat P. 541
Indicator, Coming On/Blinking P. 569 Fuses P. 577
If You Cannot Open the Trunk P. 585
2Information P. 587
Specifications P. 588 Identification Numbers P. 590
Emissions Testing P. 593 Warranty Coverages P. 594
22 INSIGHT HMIN-31TXM6300.book 4 ページ 2021年2月24日 水曜日 午後3時45分
Page 34 of 609

33
Quick Reference Guide
Maintenance (P 489)
Under the Hood (P 499)
●Check engine oil, engine coolant, inverter coolant, and
windshield washer fluid. Add when necessary.
●Check brake fluid.
aPull the hood release handle under the corner of the
dashboard.
bLocate the hood latch lever, push it to the side, and then
raise the hood. Once you have raised the hood slightly, you
can release the lever.
cWhen finished, close the hood and make sure it is firmly
locked in place.
Lights (P 512)
●Inspect all lights regularly.
Wiper Blades (P 516)
●Replace blades if they leave streaks
across the windshield or become
noisy.
Tires (P 519)
●Inspect tires and wheels regularly.●Check tire pressures regularly.●Install snow tires for winter
driving.
22 INSIGHT HMIN-31TXM6300.book 33 ページ 2021年2月24日 水曜日 午後3時45分
Page 193 of 609

192
uuOperating the Switches Around the Steering Wheel uWipers and Washers
Controls
Wipers and Washers
The windshield wipers and washers can be
used when the power mode is in ON.
■MIST
The wipers run at high speed until you release
the lever.
■Wiper switch (OFF, INT*1/AUTO*2, LO, HI)
Move the lever up or down to change the
wiper settings.
■Adjusting wiper operation*
Turn the adjustment ring to adjust the wiper
operation.
■Washer
Sprays while you pull the lever toward you.
When you release the lever for more than one second, the spray stops, the wipers sweep two
or three more times to clear the windshield, then stop.
*1: Models with manual intermittent operation
*2: Models with automati c intermittent operation
■Windshield Wipers/Washers1Wipers and Washers
NOTICE
Do not use the wipers when the windshield is dry.
The windshield will get sc ratched, or the rubber
blades will get damaged.
NOTICE
Turn the washers off if no washer fluid comes out.
The pump may get damaged.
The wiper motor may stop motor operation
temporarily to prevent an overload. Wiper operation
will return to normal within a few minutes, once the
circuit has returned to normal.
If the vehicle speeds up while the wipers are
operating intermittently, the length of the wipe
interval shortens.
When the vehicle speeds up, the wiper operation’s
shortest delay se tting ( ) and the LO setting become
the same.
NOTICE
In cold weather, the blades may freeze to the
windshield.
Operating the wipers in th is condition may damage
the wipers. Use the defogger to warm the
windshield, then turn the wipers on.
Models with intermittent time adjustment ring
MIST
INs
*1/AUTO*2OFF
LO: Low speed wipe
HI : High speed wipe Pull to
use
washer.
Intermittent Time
Adjustment Ring*
Lower speed, fewer sweeps
Higher speed, more sweeps
* Not available on all models
22 INSIGHT HMIN-31TXM6300.book 192 ページ 2021年2月24日 水曜日 午後3時45分
Page 490 of 609

489
Maintenance
This chapter discusses basic maintenance.
Before Performing MaintenanceInspection and Maintenance ............ 490
Safety When Performing Maintenance ...491Parts and Fluids Used in Maintenance Service ........................................... 492
Maintenance Minder
TM..................... 493
Maintenance Under the Hood Maintenance Items Under the Hood .. 499
Opening the Hood ........................... 500
Recommended Engine Oil ................ 501
Oil Check ......................................... 502
Adding Engine Oil ............................ 503
Changing the Engine Oil and Oil Filter ..... 504
Cooling System ................................ 506
Inverter Coolant ............................... 508
Transmission Fluid ............................ 509
Brake Fluid ....................................... 510
Refilling Window Washer Fluid......... 511
Replacing Light Bulbs ....................... 512
Checking and Maintaining Wiper
Blades .......................................... 516
Checking and Maintaining Tires
Checking Tires ................................. 519
Tire and Loading Information Label .. 520
Tire Labeling .................................... 520
DOT Tire Quality Grading (U.S. Vehicles) .. 522
Wear Indicators ............................... 524
Tire Service Life ................................ 524
Tire and Wheel Replacement ........... 525
Tire Rotation .................................... 526
Winter Tires ..................................... 527
12-Volt Battery ................................. 528
Remote Transmitter Care Replacing the Remote Battery .......... 530
Climate Control System Maintenance.. 531Cleaning
Interior Care .................................... 532
Exterior Care.................................... 534
Accessories and Modifications ........ 537
22 INSIGHT HMIN-31TXM6300.book 489 ページ 2021年2月24日 水曜日 午後3時45分
Page 491 of 609

490
Maintenance
Before Performing Maintenance
Inspection and Maintenance
For your safety, perform all listed inspections and maintenance to keep your vehicle
in good condition. If you become aware of an y abnormality (noise, smell, insufficient
brake fluid, oil residue on the ground, etc.), have your vehicle inspected by a dealer.
(Note, however, that service at a dealer is not mandatory to keep your warranties in
effect.)
■Routine inspections
Perform inspections before long distance trips, when washing the vehicle, or when
refueling.
2 Maintenance P. 33
■Periodic inspections
• Check the brake fluid level monthly.
2 Brake Fluid P. 510
•Check the tire pressure monthly. Examin e the tread for wear and foreign objects.
2Checking and Maintaining Tires P. 519
•Check the operation of the exterior lights monthly.
2 Replacing Light Bulbs P. 512
•Check the condition of the wiper bl ades at least every six months.
2Checking and Maintaining Wiper Blades P. 516
■Types of Inspection and Maintenance
1Inspection and Maintenance
Maintenance, replacement, or repair of
emissions control devices and systems may be
done by any automotive repair establishment or
individuals using parts that are “certified” to
EPA standards.
According to state and fede ral regulations, failure to
perform maintenance on the maintenance main
items marked with # will not void your emissions
warranties. However, all ma intenance services should
be performed in accordan ce with the intervals
indicated by the driver information interface.
2 Maintenance Service Items P. 497
If you want to perform complex maintenance tasks
that require more skills a nd tools, you can purchase a
subscription to the Service Express website at
www.techinfo.honda.com .
2 Authorized Manuals P. 597
If you want to perform ma intenance yourself, make
sure that you have the necessary tools and skills first.
After performing maintenanc e, update the records in
the separate maintenance booklet.
22 INSIGHT HMIN-31TXM6300.book 490 ページ 2021年2月24日 水曜日 午後3時45分
Page 517 of 609

516
Maintenance
Checking and Maintaining Wiper Blades
Checking Wiper Blades
If the wiper blade rubber has deteriorated , it will leave streaks, become noisy, and
the hard surfaces of the blade may scratch the window glass.
Changing the Wiper Blade Rubber
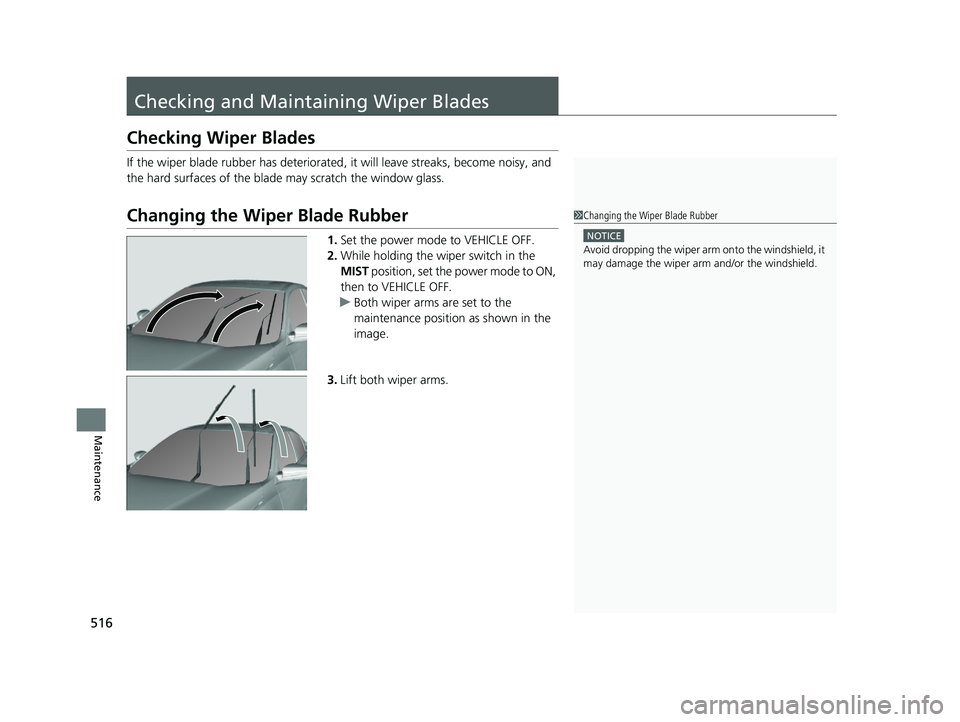
1. Set the power mode to VEHICLE OFF.
2. While holding the wiper switch in the
MIST position, set the power mode to ON,
then to VEHICLE OFF.
u Both wiper arms are set to the
maintenance position as shown in the
image.
3. Lift both wiper arms.
1Changing the Wiper Blade Rubber
NOTICE
Avoid dropping the wiper arm onto the windshield, it
may damage the wiper arm and/or the windshield.
22 INSIGHT HMIN-31TXM6300.book 516 ページ 2021年2月24日 水曜日 午後3時45分
Page 518 of 609

517
uuChecking and Maintaining Wiper Blades uChanging the Wiper Blade Rubber
Continued
Maintenance
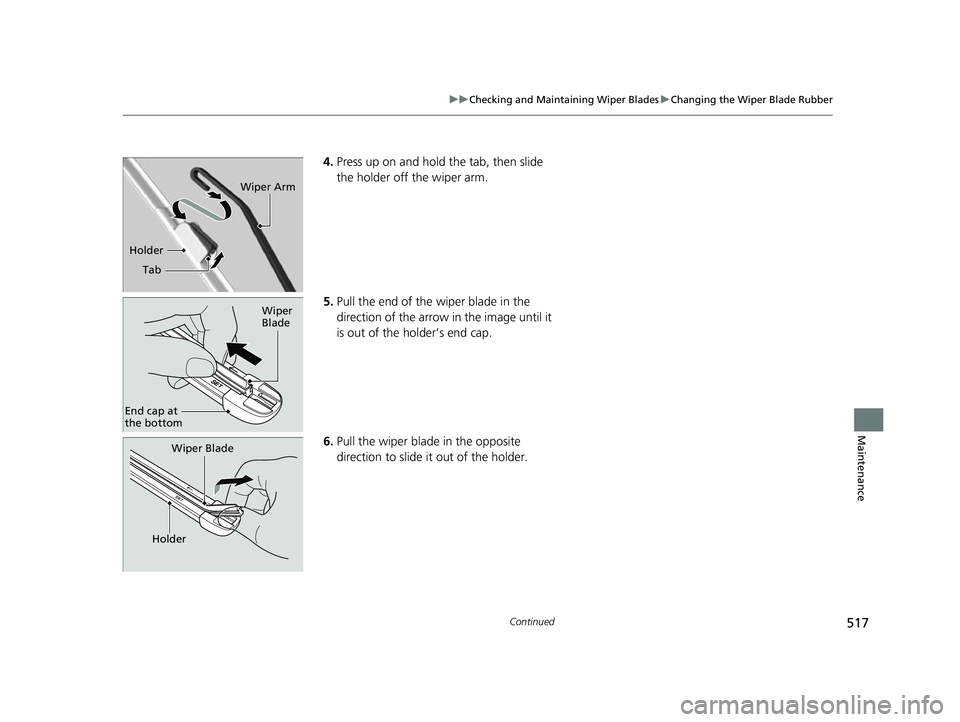
4. Press up on and hold the tab, then slide
the holder off the wiper arm.
5. Pull the end of the wiper blade in the
direction of the arrow in the image until it
is out of the holder’s end cap.
6. Pull the wiper blade in the opposite
direction to slide it out of the holder.
Tab
Wiper Arm
Holder
Wiper
Blade
End cap at
the bottom
Wiper Blade
Holder
22 INSIGHT HMIN-31TXM6300.book 517 ページ 2021年2月24日 水曜日 午後3時45分
Page 519 of 609

518
uuChecking and Maintaining Wiper Blades uChanging the Wiper Blade Rubber
Maintenance
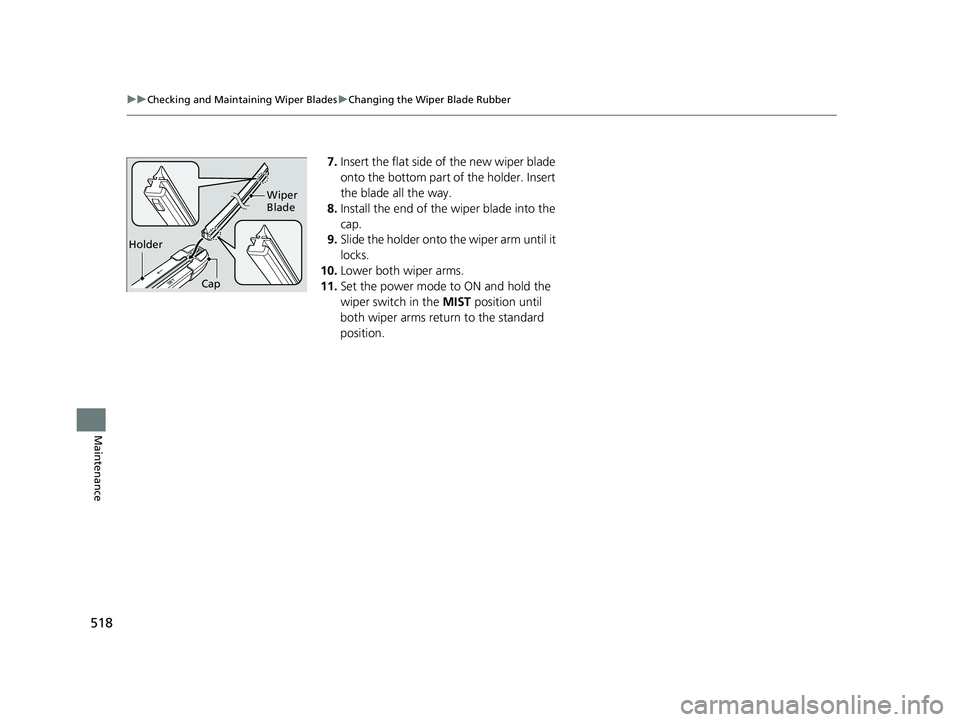
7. Insert the flat side of the new wiper blade
onto the bottom part of the holder. Insert
the blade all the way.
8. Install the end of the wiper blade into the
cap.
9. Slide the holder onto th e wiper arm until it
locks.
10. Lower both wiper arms.
11. Set the power mode to ON and hold the
wiper switch in the MIST position until
both wiper arms return to the standard
position.
Holder Wiper
Blade
Cap
22 INSIGHT HMIN-31TXM6300.book 518 ページ 2021年2月24日 水曜日 午後3時45分