2022 FORD SUPER DUTY steering
[x] Cancel search: steeringPage 398 of 740
Protected Component
Rating
Item
Adjustable pedals switch.
15 A
29
Brake on-off output to trailer
brake controller and
customer access circuits.
5 A
30
Remote keyless entry.
10 A
31
Radio.
20 A
32
Not used.
—
33
Run/start relay.
30 A
34
Not used (spare).
5 A
35
Camera module.
15 A
36
Lane keeping system.
Auto-dimming interior
mirror.
Rear heated seats.
Heated steering wheel.
20 A
37
Power windows.
30 A
38
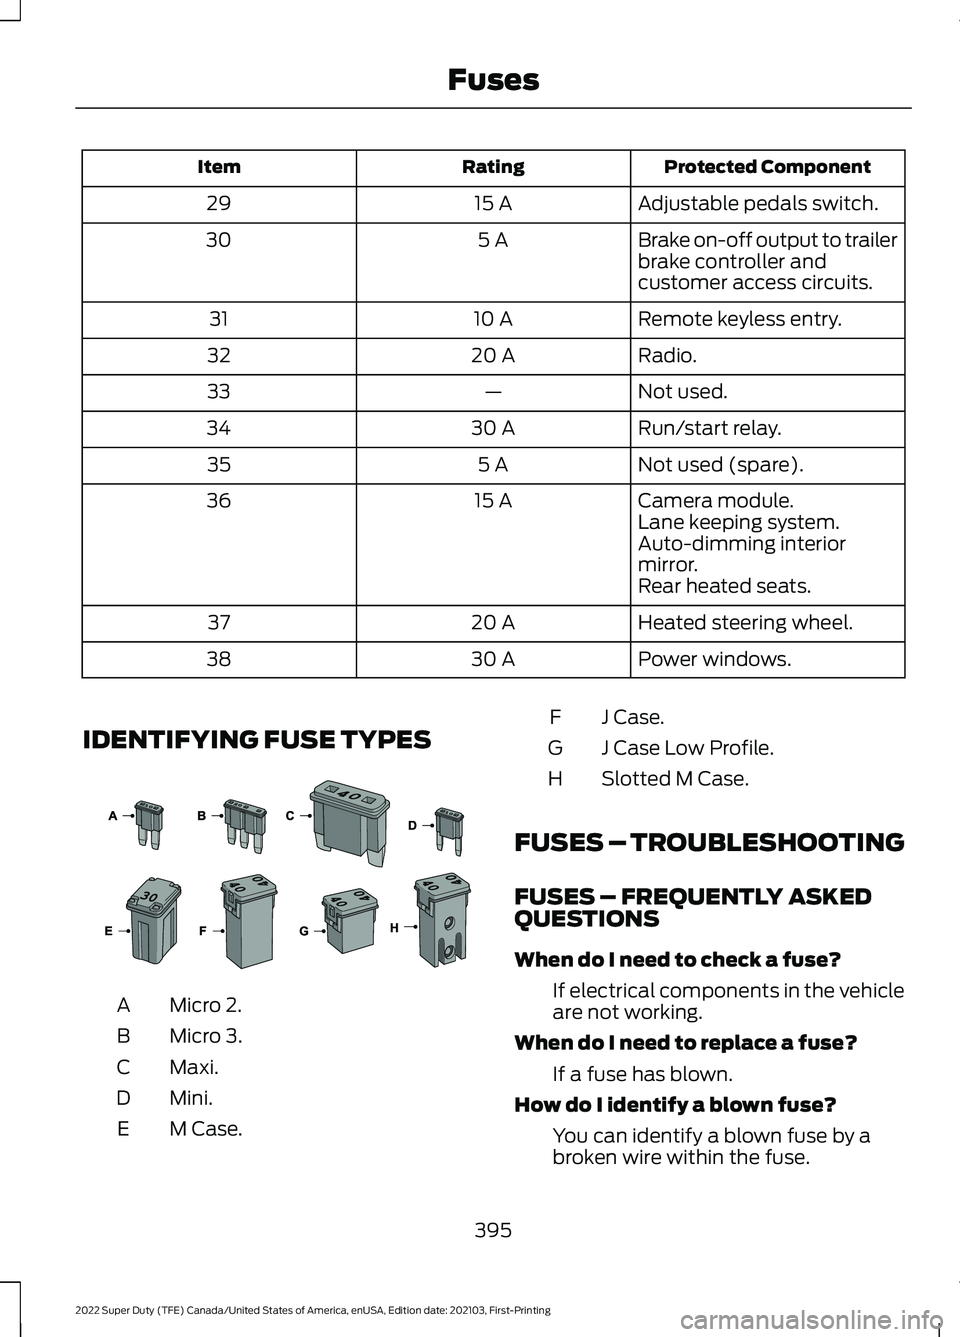
IDENTIFYING FUSE TYPES Micro 2.
A
Micro 3.
B
Maxi.
C
Mini.
D
M Case.
E J Case.
F
J Case Low Profile.
G
Slotted M Case.
H
FUSES – TROUBLESHOOTING
FUSES – FREQUENTLY ASKED
QUESTIONS
When do I need to check a fuse? If electrical components in the vehicle
are not working.
When do I need to replace a fuse? If a fuse has blown.
How do I identify a blown fuse? You can identify a blown fuse by a
broken wire within the fuse.
395
2022 Super Duty (TFE) Canada/United States of America, enUSA, Edition date: 202103, First-Printing Fuses E267379
Page 400 of 740
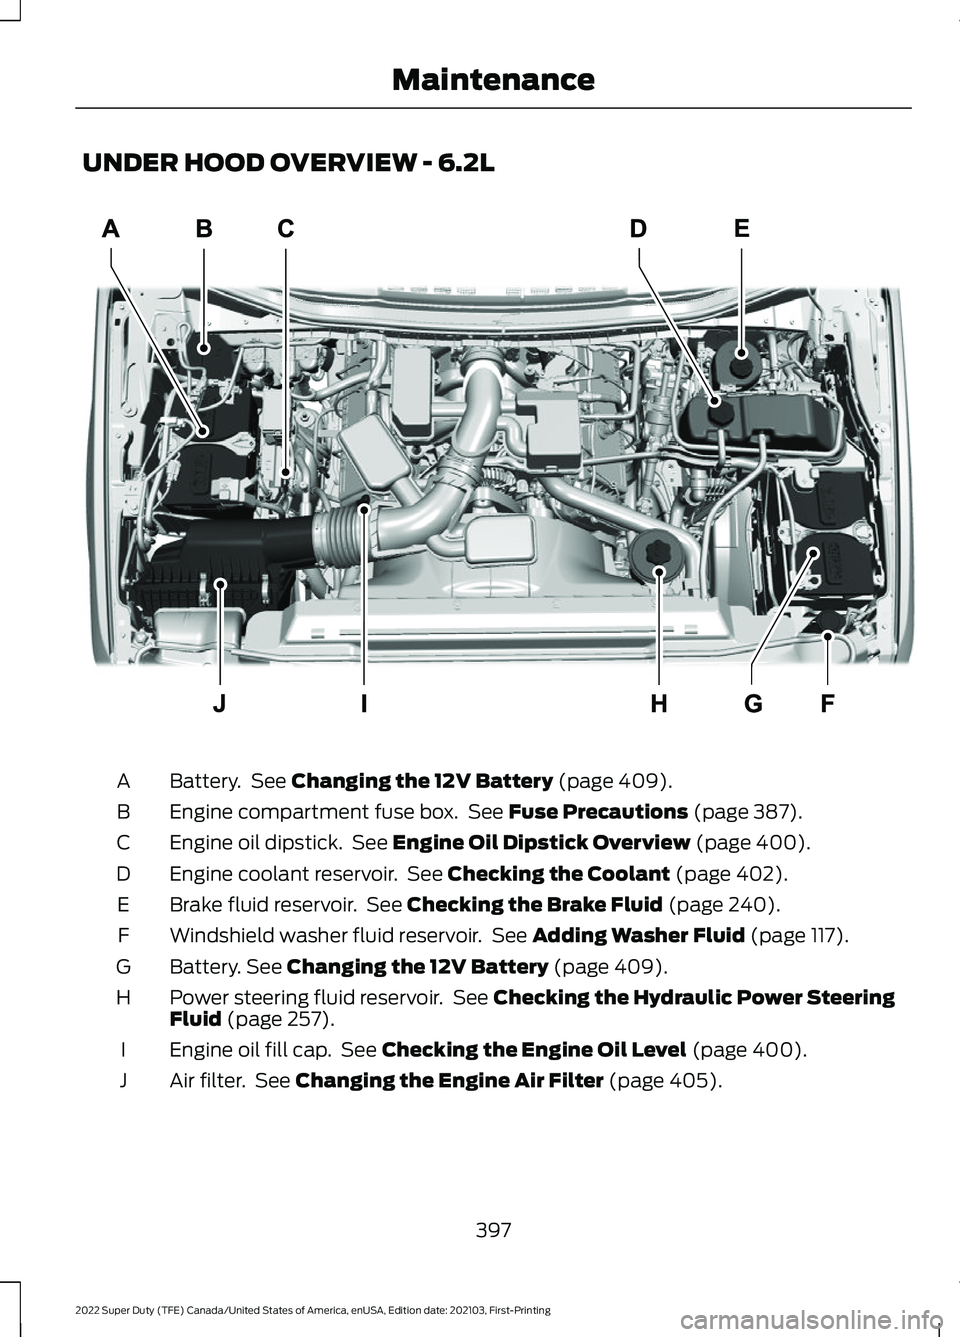
UNDER HOOD OVERVIEW - 6.2L
Battery. See Changing the 12V Battery (page 409).
A
Engine compartment fuse box. See
Fuse Precautions (page 387).
B
Engine oil dipstick. See
Engine Oil Dipstick Overview (page 400).
C
Engine coolant reservoir. See
Checking the Coolant (page 402).
D
Brake fluid reservoir. See
Checking the Brake Fluid (page 240).
E
Windshield washer fluid reservoir. See
Adding Washer Fluid (page 117).
F
Battery.
See Changing the 12V Battery (page 409).
G
Power steering fluid reservoir. See
Checking the Hydraulic Power Steering
Fluid (page 257).
H
Engine oil fill cap. See
Checking the Engine Oil Level (page 400).
I
Air filter. See
Changing the Engine Air Filter (page 405).
J
397
2022 Super Duty (TFE) Canada/United States of America, enUSA, Edition date: 202103, First-Printing MaintenanceE330427
Page 401 of 740
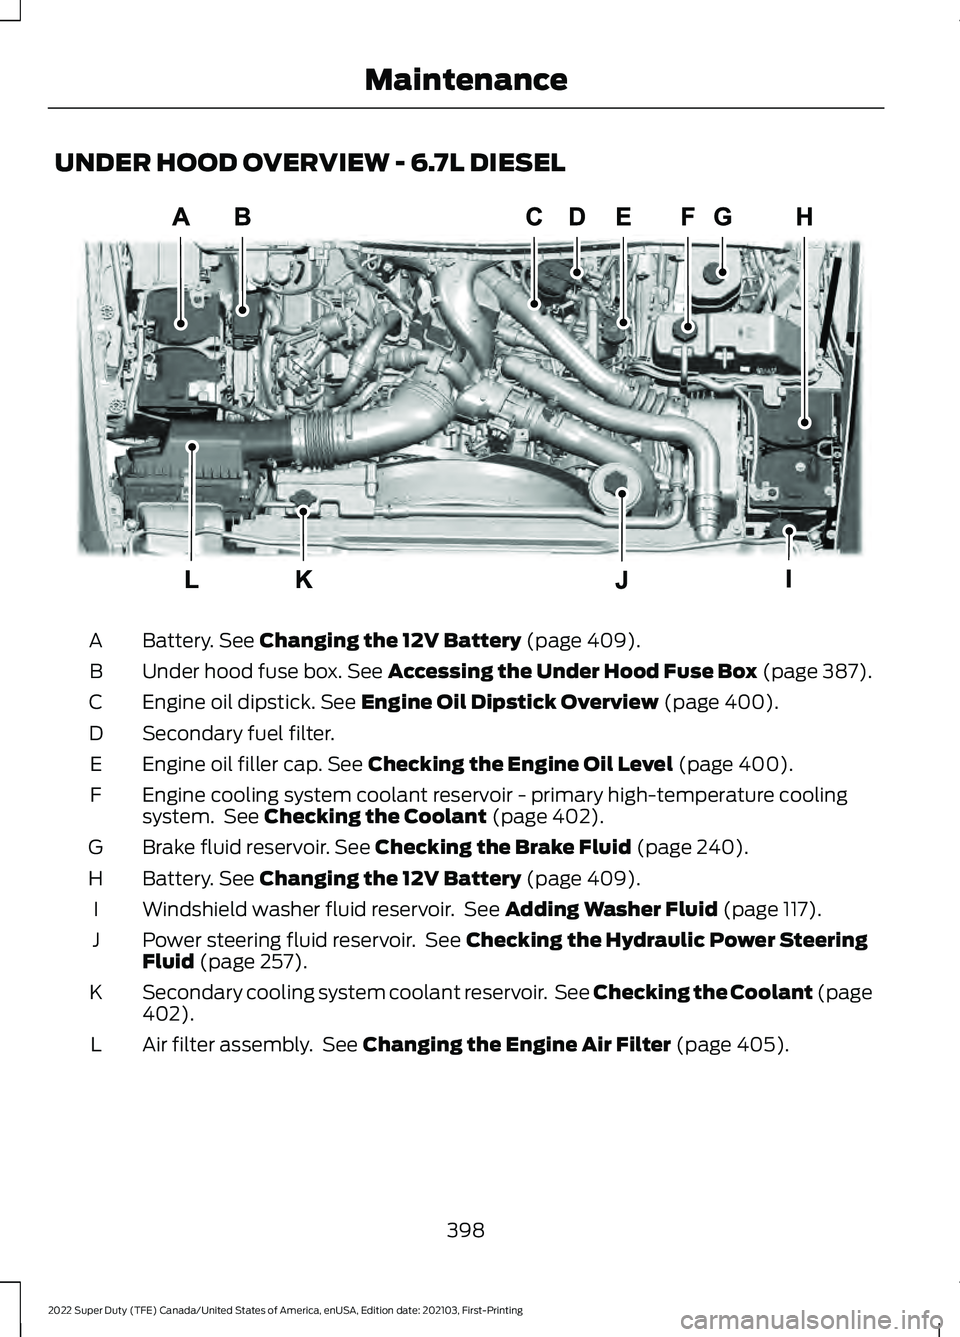
UNDER HOOD OVERVIEW - 6.7L DIESEL
Battery. See Changing the 12V Battery (page 409).
A
Under hood fuse box.
See Accessing the Under Hood Fuse Box (page 387).
B
Engine oil dipstick.
See Engine Oil Dipstick Overview (page 400).
C
Secondary fuel filter.
D
Engine oil filler cap.
See Checking the Engine Oil Level (page 400).
E
Engine cooling system coolant reservoir - primary high-temperature cooling
system. See
Checking the Coolant (page 402).
F
Brake fluid reservoir.
See Checking the Brake Fluid (page 240).
G
Battery.
See Changing the 12V Battery (page 409).
H
Windshield washer fluid reservoir. See
Adding Washer Fluid (page 117).
I
Power steering fluid reservoir. See
Checking the Hydraulic Power Steering
Fluid (page 257).
J
Secondary cooling system coolant reservoir. See Checking the Coolant (page
402
).
K
Air filter assembly. See
Changing the Engine Air Filter (page 405).
L
398
2022 Super Duty (TFE) Canada/United States of America, enUSA, Edition date: 202103, First-Printing MaintenanceE350655
Page 402 of 740
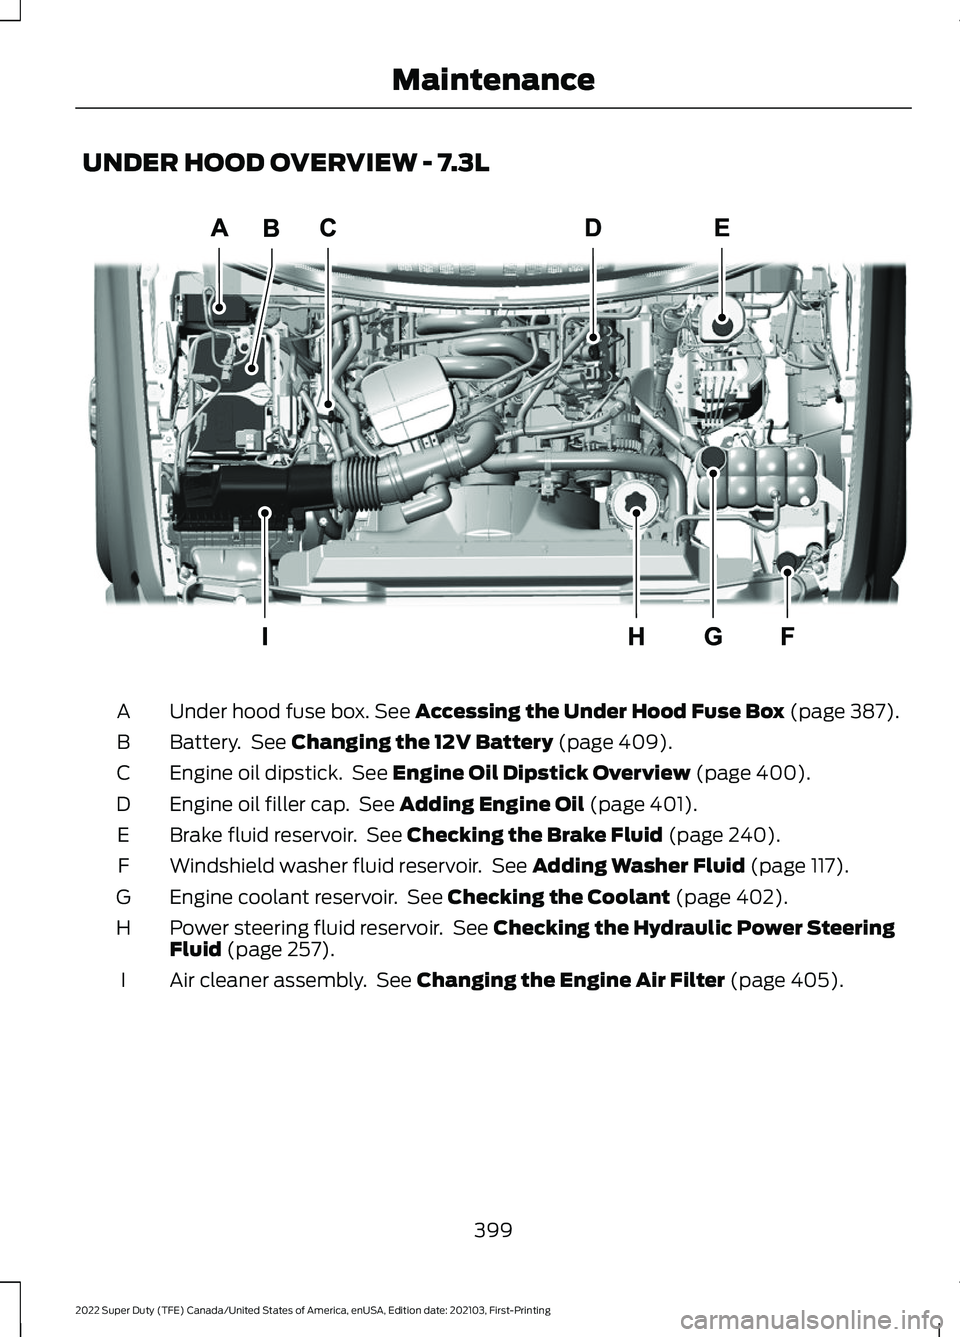
UNDER HOOD OVERVIEW - 7.3L
Under hood fuse box. See Accessing the Under Hood Fuse Box (page 387).
A
Battery. See
Changing the 12V Battery (page 409).
B
Engine oil dipstick. See
Engine Oil Dipstick Overview (page 400).
C
Engine oil filler cap. See
Adding Engine Oil (page 401).
D
Brake fluid reservoir. See
Checking the Brake Fluid (page 240).
E
Windshield washer fluid reservoir. See
Adding Washer Fluid (page 117).
F
Engine coolant reservoir. See
Checking the Coolant (page 402).
G
Power steering fluid reservoir. See
Checking the Hydraulic Power Steering
Fluid (page 257).
H
Air cleaner assembly. See
Changing the Engine Air Filter (page 405).
I
399
2022 Super Duty (TFE) Canada/United States of America, enUSA, Edition date: 202103, First-Printing MaintenanceE351057
Page 404 of 740
Note:
The oil consumption of new engines
reaches its normal level after approximately
3,000 mi (5,000 km).
ADDING ENGINE OIL WARNING: Do not remove the filler
cap when the engine is running. WARNING:
Do not add engine oil
when the engine is hot. Failure to follow
this instruction could result in personal
injury.
Do not use supplemental engine oil
additives because they are unnecessary
and could lead to engine damage that the
vehicle warranty may not cover.
1. Clean the area surrounding the engine oil filler cap before you remove it.
2. Remove the engine oil filler cap.
3. Add engine oil that meets our specifications. See
Engine Oil (page
401).
4. Reinstall the engine oil filler cap. Turn it clockwise until you feel a strong
resistance.
Note: Do not add oil further than the
maximum mark. Oil levels above the
maximum mark may cause engine damage.
Note: Immediately soak up any oil spillage
with an absorbent cloth.
RESETTING THE ENGINE OIL
CHANGE REMINDER - VEHICLES
WITH: 2.3 INCH SCREEN/4.2 INCH
SCREEN
1. Press the Menu button on the steering
wheel to enter the information display
main menu.
2. Select
Truck Info.
3. Select
Oil Life. 4. Select
Reset Oil Life.
5. Press and hold the OK button until the
system reset confirmation appears.
RESETTING THE ENGINE OIL
CHANGE REMINDER - VEHICLES
WITH: 8 INCH SCREEN
Depending on your cluster, there are two
paths to reset the engine oil change
reminder.
Path 1
1. Press the Menu button on the steering
wheel to enter the information display
main menu.
2. Select
Settings.
3. Select
Vehicle Maintenance.
4. Select
Oil Life.
5. Press and hold the OK button until the
system reset confirmation appears.
Path 2
1. Press the Menu button on the steering
wheel to enter the information display
main menu.
2. Select
Truck Info.
3. Select
Engine Information.
4. Press and hold the OK button until the
system reset confirmation appears.
ENGINE OIL CAPACITY AND
SPECIFICATION
For filling information, please refer to the
Capacities and Specifications section of
your owner's manual. See
Engine Oil
Capacity and Specification (page 401).
401
2022 Super Duty (TFE) Canada/United States of America, enUSA, Edition date: 202103, First-Printing Maintenance
Page 407 of 740
When this occurs, your vehicle still
operates, however:
•
Engine power is limited.
• The air conditioning system turns off.
Continued operation increases the engine
temperature, causing the engine to
completely shut down. Your steering and
braking effort increases in this situation.
When the engine temperature cools, you
can re-start the engine. Have your vehicle
checked as soon as possible to minimize
engine damage.
When Fail-Safe Mode Is Activated WARNING: Fail-safe mode is for
use during emergencies only. Operate
your vehicle in fail-safe mode only as
long as necessary to bring your vehicle
to rest in a safe location and seek
immediate repairs. When in fail-safe
mode, your vehicle will have limited
power, will not be able to maintain
high-speed operation, and may
completely shut down without warning,
potentially losing engine power, power
steering assist, and power brake assist,
which may increase the possibility of a
crash resulting in serious injury. WARNING:
Do not remove the
coolant reservoir cap when the engine is
on or the cooling system is hot. Wait 10
minutes for the cooling system to cool
down. Cover the coolant reservoir cap
with a thick cloth to prevent the
possibility of scalding and slowly remove
the cap. Failure to follow this instruction
could result in personal injury.
Your vehicle has limited engine power
when in the fail-safe mode, drive your
vehicle with caution. Your vehicle does not
maintain high-speed operation and the
engine could operate poorly. Remember that the engine is capable of
automatically shutting down to prevent
engine damage. In this situation:
1. Pull off the road as soon as safely
possible and switch the engine off.
2. If you are a member of a roadside assistance program, we recommend
that you contact your roadside
assistance service provider.
3. If this is not possible, wait for a short period of time for the engine to cool.
4. Check the coolant level. If the coolant level is at or below the minimum mark,
add prediluted coolant immediately.
5. When the engine temperature cools, you can re-start the engine. Have your
vehicle checked as soon as possible to
minimize engine damage.
Note: Driving your vehicle without repair
increases the chance of engine damage.
Engine Coolant Temperature
Management
(If Equipped) WARNING:
To reduce the risk of
crash and injury, be prepared that the
vehicle speed may reduce and the
vehicle may not be able to accelerate
with full power until the coolant
temperature reduces.
If you tow a trailer with your vehicle, the
engine may temporarily reach a higher
temperature during severe operating
conditions, for example ascending a long
or steep grade in high ambient
temperatures.
At this time, you may notice the coolant
temperature gauge moves toward the red
zone and a message may appear in the
information display.
404
2022 Super Duty (TFE) Canada/United States of America, enUSA, Edition date: 202103, First-Printing Maintenance
Page 413 of 740
To maintain correct operation of the
battery management system, if you add
any electrical devices to your vehicle, do
not connect the ground connection directly
to the negative battery terminal. A
connection at the negative battery terminal
can cause inaccurate measurements of
the battery condition and potential
incorrect system operation.
Note:
If you add electrical accessories or
components to your vehicle this may
adversely affect battery performance,
durability and the performance of other
electrical systems on your vehicle.
If you replace the battery make sure it
matches the electrical requirements of
your vehicle.
If you disconnect or replace the battery
and your vehicle has an automatic
transmission, it must relearn its adaptive
strategy. Because of this, the transmission
may shift firmly when first driven. This is
normal operation while the transmission
fully updates its operation to optimum
shift feel.
Remove and Reinstall the Battery
To disconnect or remove the battery, do
the following:
1. Apply the parking brake and switch the
ignition off.
2. Switch all electrical equipment off, for
example lights and radio.
3. Wait a minimum of two minutes before
disconnecting the battery.
Note: The engine management system has
a power hold function and remains powered
for a period of time after you switch the
ignition off. This is to allow diagnostic and
adaptive tables to be stored. Disconnecting
the battery without waiting can cause
damage not covered by the vehicle
Warranty. 4. Disconnect the negative battery cable
terminal.
5. Disconnect the positive battery cable terminal.
6. Remove the battery securing clamp.
7. Remove the battery.
8. To install, reverse the removal procedure.
Note: Before reconnecting the battery,
make sure the ignition remains switched off.
Note: Make sure the battery cable terminals
are fully tightened.
Note: After cleaning or replacing the
battery, make sure you reinstall the battery
cover or shield.
If you disconnect or replace the vehicle
battery, you must reset the following
features:
• Window bounce-back. See Window
Bounce-Back (page 126).
• Clock Settings.
• Pre-set radio stations.
• Steering Angle Sensor.
Note: To calibrate the steering angle
sensor, drive the vehicle above
30 mph
(50 km/h) for a minimum of 1.2 mi (2 km).
Make sure to drive straight ahead for a
minimum of 30 seconds. Several vehicle
functions are disabled and a warning light
could appear until the sensor is calibrated.
Battery Management System
The battery management system monitors
battery conditions and takes actions to
extend battery life. If excessive battery
drain is detected, the system temporarily
disables some of the following features:
• Heated rear window.
• Heated seats.
• Climate control.
• Heated steering wheel.
410
2022 Super Duty (TFE) Canada/United States of America, enUSA, Edition date: 202103, First-Printing Maintenance
Page 427 of 740
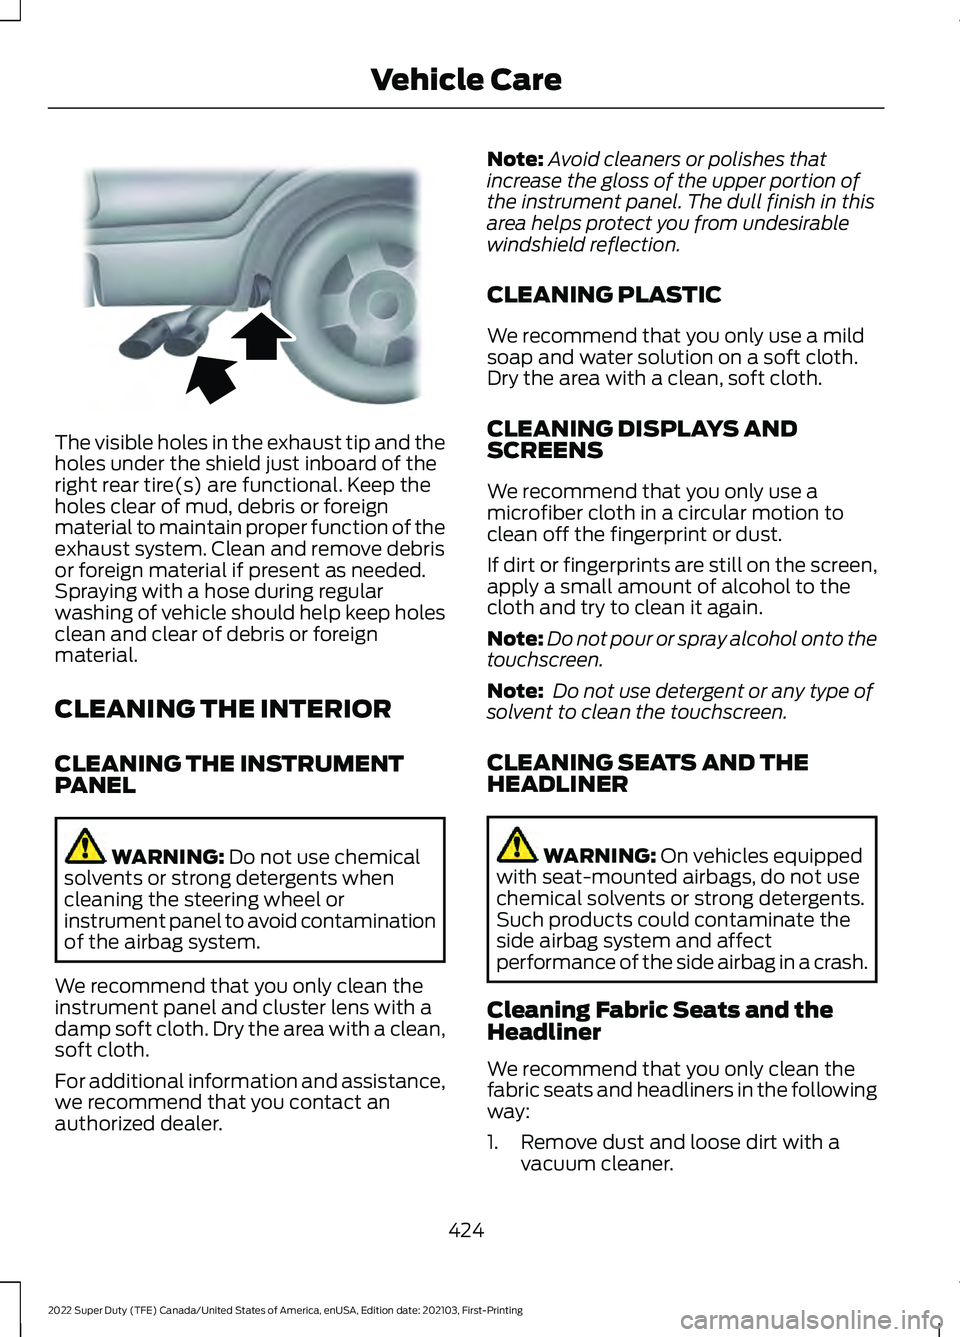
The visible holes in the exhaust tip and the
holes under the shield just inboard of the
right rear tire(s) are functional. Keep the
holes clear of mud, debris or foreign
material to maintain proper function of the
exhaust system. Clean and remove debris
or foreign material if present as needed.
Spraying with a hose during regular
washing of vehicle should help keep holes
clean and clear of debris or foreign
material.
CLEANING THE INTERIOR
CLEANING THE INSTRUMENT
PANEL
WARNING: Do not use chemical
solvents or strong detergents when
cleaning the steering wheel or
instrument panel to avoid contamination
of the airbag system.
We recommend that you only clean the
instrument panel and cluster lens with a
damp soft cloth. Dry the area with a clean,
soft cloth.
For additional information and assistance,
we recommend that you contact an
authorized dealer. Note:
Avoid cleaners or polishes that
increase the gloss of the upper portion of
the instrument panel. The dull finish in this
area helps protect you from undesirable
windshield reflection.
CLEANING PLASTIC
We recommend that you only use a mild
soap and water solution on a soft cloth.
Dry the area with a clean, soft cloth.
CLEANING DISPLAYS AND
SCREENS
We recommend that you only use a
microfiber cloth in a circular motion to
clean off the fingerprint or dust.
If dirt or fingerprints are still on the screen,
apply a small amount of alcohol to the
cloth and try to clean it again.
Note: Do not pour or spray alcohol onto the
touchscreen.
Note: Do not use detergent or any type of
solvent to clean the touchscreen.
CLEANING SEATS AND THE
HEADLINER WARNING: On vehicles equipped
with seat-mounted airbags, do not use
chemical solvents or strong detergents.
Such products could contaminate the
side airbag system and affect
performance of the side airbag in a crash.
Cleaning Fabric Seats and the
Headliner
We recommend that you only clean the
fabric seats and headliners in the following
way:
1. Remove dust and loose dirt with a vacuum cleaner.
424
2022 Super Duty (TFE) Canada/United States of America, enUSA, Edition date: 202103, First-Printing Vehicle CareE163380