Page 49 of 81

Start Option
Allows you to select the type of countdown
the information display shows before
starting an event.
Status Screen
Provides the status of your chosen
performance-related settings.
View/Clear Results
Allows you to view and clear the last and
saved results of the Acceleration Timer,
Brake Performance, and All Time Best
results.
Road Course Alignment
Recommendations
Note:
After your track day is complete,
return your car to the street alignment and
tire pressures.
Note: Using these wheel alignment settings
may cause excessive tire wear. Only use
these settings for racing or competitive
driving. Excessive tire wear is not covered
under the vehicle warranty.
If you plan to participate in road course
track days, we recommend the following
chassis settings for optimal tire wear and
handling performance.
All settings are at curb loading condition
full of fuel.
Mach 1 Street
Track
Front
-1.03°
-1.5°
Camber
0°
0°
Toe - Total Street
Track
Rear
-1.5°
-1.5°
Camber
0.24°
0.24°
Toe - Total
Mach 1 with Handling Package Street
Track
Front
-1.21°
-2.25°
Camber
0.1°
0.1°
Toe - Total Street
Track
Rear
-1.14°
-1.5°
Camber
0.3°
0.3°
Toe - Total
46
2022 Mustang (CZG) Mach 1, enUSA, Edition date: 202110, First-Printing Track Use
Page 50 of 81

30 psi (2.07 bar)
Mach 1
28 psi (1.93 bar)
28 psi (1.93 bar)
Mach 1 with Handling
Package
Hot Tire Pressures Rear
Fr")
Track Tire Pressures
Cold Tire Pressures
Rear
Front
Tire Pressure
30 psi (2.07 bar)
30 psi (2.07 bar)
Mach 1
28 psi (1.93 bar)
28 psi (1.93 bar)
Mach 1 with Handling
Package
Hot Tire Pressures Rear
Front
Tire Pressure
Less than 38 psi (2.62 bar)
Less than 38 psi (2.62 bar)
Mach 1
Less than
36 psi (2.48 bar)
Less than 36 psi (2.48 bar)
Mach 1 with Handling
Package
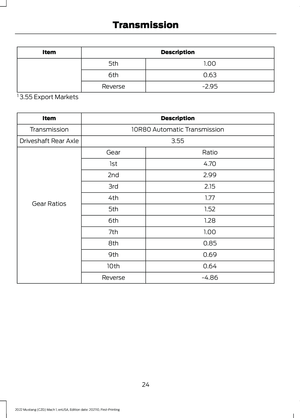
Track Use Maintenance Intervals
Follow these maintenance intervals for
when you use your vehicle on a track or in
a high-speed event. Vehicle Use and Example
Interval
Change the engine oil and filter
One track weekend or approximately 4
hours of track use
Change the rear axle fluid1
Every
500 mi (800 km)
1 Change the fluid every 500 mi (800 km) or when a message appears in the information
display stating that the axle fluid is over temperature.
Adjustable Camber Front Strut
Top Mounts (vehicles with
Optional Handling Package)
Your vehicle has adjustable strut mounts
which you can use to adjust the camber of
your vehicle before and after a track event
to the specifications listed in the Road
Course Alignment Recommendations table
previously shown. Note:
After your track day is complete,
return your car to the street alignment and
tire pressures.
47
2022 Mustang (CZG) Mach 1, enUSA, Edition date: 202110, First-Printing Track Use
Page 51 of 81

Note:
The adjustable camber front strut
mounts are fitted with three set screws that
must be removed before camber can be
adjusted. If you cannot adjust the camber,
please see your authorized dealer or call
800– 367–3788 for more details to remove
the set screws.
Aerodynamics (If Equipped)
Rear Gurney Flap The rear Gurney flap must be removed
for on-road driving. Your vehicle may include a removable
Gurney flap in the luggage compartment.
The Gurney flap greatly enhances high
speed stability and performance on the
track. It is recommended that you use the
Gurney flap at all tracks featuring high
speed corners and can be used at any track
regardless of cornering speeds.
You could benefit from the removal Gurney
flap to improve low speed balance on
smaller tracks with maximum cornering
speeds below
70 mph (112 km/h). We
recommend that you attach the Gurney
flap for all track events and carefully
assess both the vehicle's condition and
your capability before removal. Note:
The Gurney flap comes with longer
size bolts to install it onto the rear spoiler.
Do not use the longer size bolts without
the Gurney flap attached or damage to
the spoiler may occur.
48
2022 Mustang (CZG) Mach 1, enUSA, Edition date: 202110, First-Printing Track UseE343597 E307008 E310471 E310472
Page 52 of 81

Brake Burnishing
The brakes should be properly burnished
prior to heavy track use. Excessive brake
noise may occur after the track burnish or
track use. Perform this procedure in a safe
manner on dry pavement, and in
compliance with all local and state
ordinances and laws regarding motor
vehicle operation.
How to Burnish the Brakes
Initial low temperature bedding:
•
If your brakes already have 200 mi
(322 km) or more of city driving, skip
this step and go directly to the high
temperature bedding cycle procedure.
Otherwise, perform at least 30 stops
from
50 mph (80 km/h) at 1/3 g
deceleration with 1 mi (1.2 km) spacing
between stops. A deceleration gauge
can be accessed through the
TrackApps menu in your information
display.
High temperature bedding cycle:
• Beginning with cool brakes, perform 15
consecutive stops back to back,
accelerating at 3/4 throttle to
80 mph
(128 km/h) and braking to 20 mph
(32 km/h) at 1.0 g deceleration. The
brakes may omit an odor or smoke
during this part of the procedure.
Cool down:
• Cool the brakes down by driving one or
two laps, 5 mi (8 km)
, at 60 mph
(96 km/h) with minimal to no brake
usage.
Recovery low temperature bedding:
• Perform at least 30 stops from 50 mph
(80 km/h)
at 1/3 g deceleration with
0.7 mi (1.2 km) spacing between stops.
A deceleration gauge can be accessed
through the TrackApps menu in your
information display.
49
2022 Mustang (CZG) Mach 1, enUSA, Edition date: 202110, First-Printing Track Use
Page 53 of 81
 do not")
GENERAL INFORMATION
Lifting Your Vehicle
Hoist pad.
A
Rocker molding.
B
Hoist arm.
C
Sill flange.
D Using a Two Post Vehicle Hoist
When using a vehicle hoist, make sure the
rocker moldings (B) do not contact or
interfere with the hoist arms (C) or damage
to your vehicle may occur.
Follow these steps to hoist your vehicle:
1. Align your vehicle with the hoist and
position the hoist pads (A) to align with
the sill flange (D).
2. Lift the hoist until all four hoist pads (A) make contact with the sill flange
(D).
Note: The hoist pad (A) may contact the
bottom of the rocker molding (B). If the
vehicle is hoisted from the proper location
this does not damage the part.
3. Inspect all hoist arms (C) for any interference or contact with the rocker
molding (B).
4. If there is no contact with any hoist arm
(C), your vehicle can be lifted safely.
If there is contact with any hoist arm
(C), do not lift the vehicle and follow
these instructions:
1. Make sure the hoist arms (C) are fully lowered to the ground.
2. If necessary, adjust the hoist pad (A) height until it makes contact with the
sill flange (D) and the rocker molding
(B) is clear from the hoist arm. Hoist
pad (A), height can usually be adjusted
by rotating the hoist pad (A)
counter-clockwise.
3. If the vehicle hoist does not use adjustable pads, install spacers onto
the hoist pad (A) for the same effect.
Note: Do not use wood spacers as they
could split along the grain of the wood.
50
2022 Mustang (CZG) Mach 1, enUSA, Edition date: 202110, First-Printing Vehicle CareA
B
A
12
203A
A E311783
Page 54 of 81

make contact will the sill flange (D).
Make sure there is no contact between
the rocker molding (B) and all hoist
arms (C) before lifting the vehicle.
CLEAN")
4.
Raise the hoist until the hoist pads (A)
make contact will the sill flange (D).
Make sure there is no contact between
the rocker molding (B) and all hoist
arms (C) before lifting the vehicle.
CLEANING THE EXTERIOR
Washing Your Vehicle
Note: Do not use a touchless car wash or
any kind of commercial car wash equipment
with front splitter wickers installed.
Note: Always hand wash your vehicle if you
have vinyl stripes.
Do not drive your vehicle through an
automated, commercial car wash due to
the vehicle ’s low ground clearance and tire
width. Wash your vehicle by hand, or by
using a commercial wash with no
mechanical tracks on the floor. Do not use
a power washer or high pressure wand.
To maintain proper cooling and
aerodynamics at high speeds, your vehicle
has heat exchangers integrated with the
front fascia designed to maximize
performance. Do not use a power washer
or high powered spray nozzle as damage
to the cooling fins could occur.
Note: For heavy accumulation of debris or
dirt, clean with a non-metallic soft bristle
car wash brush and warm soapy water as
needed.
CLEANING THE ENGINE
Note: Do not allow water or cleaning
solutions to contact the exposed air filter
element. Cover the air filter assembly and
avoid spraying water at it.
51
2022 Mustang (CZG) Mach 1, enUSA, Edition date: 202110, First-Printing Vehicle Care
Page 55 of 81

WHEELS
Your vehicle has unique wheels matched
to the tires. These wheels are more
susceptible to damage due to their
diameter, width and low profile tires.
To avoid damage to your wheels:
•
Maintain proper tire pressure (see Tires
in this supplement).
• When installing wheels, always torque
lug nuts to specification with a torque
wrench.
• Inspect your wheels for damage on a
regular basis. If a wheel is damaged,
replace it immediately.
• In the event that you encounter an
abnormally harsh impact, inspect the
outer diameter of your wheels, both
inside and out, for damage.
Use Motorcraft™ Wheel and Tire Cleaner
to maintain your wheels. See your Owner ’s
Manual for information on other cleaning
products and vehicle care. Wheel Lug Nut Torque
Specifications WARNING: When you install a
wheel, always remove any corrosion, dirt
or foreign materials present on the
mounting surfaces of the wheel or the
surface of the wheel hub, brake drum or
brake disc that contacts the wheel. Make
sure to secure any fasteners that attach
the rotor to the hub so they do not
interfere with the mounting surfaces of
the wheel. Installing wheels without
correct metal-to-metal contact at the
wheel mounting surfaces can cause the
wheel nuts to loosen and the wheel to
come off while your vehicle is in motion,
resulting in loss of vehicle control,
personal injury or death.
Retighten the lug nuts to the specified
torque at
500 mi (800 km) after any
wheel disturbance (tire rotation, changing
a flat tire or wheel removal). lb-ft (Nm)*
Bolt Size
150 ± 15 (200 ± 20)
M14 x 1.5
*Torque specifications are for nut and bolt threads free of dirt and rust. Use only Ford
recommended replacement fasteners.
TIRES WARNING:
Only use replacement
tires and wheels that are the same size,
load index, speed rating and type (such
as P-metric versus LT-metric or
all-season versus all-terrain) as those
originally provided by Ford. The
recommended tire and wheel size may
be found on either the Safety
Compliance Certification Label (affixed to either the door hinge pillar, door-latch
post, or the door edge that meets the
door-latch post, next to the driver's
seating position), or the Tire Label which
is located on the B-Pillar or edge of the
driver's door. If this information is not
found on these labels, then you should
contact your authorized dealer as soon
52
2022 Mustang (CZG) Mach 1, enUSA, Edition date: 202110, First-Printing Wheels and Tires
Page 56 of 81

as possible. Use of any tire or wheel not
recommended by Ford can affect the
safety and performance of your vehicle,
which could result in an increased risk of
loss of vehicle control, vehicle rollover,
personal injury and death.
Note: Do not use tire chains on your vehicle.
The use of any type of tire chain on these
tires could damage your vehicle. Your vehicle comes with low profile, high
performance tires designed to optimize
the driving dynamics you expect in a Ford
Performance vehicle. These tires are not
optimized for off-road or winter, snow or
cold weather, performance, and their ride,
noise and wear characteristics are different
than non-performance tires. Also, because
of their lower profile, the tires are more
susceptible to damage due to potholes
and rough roads. Wheels (Inches)
Tires
Variant
19 x 9.5
255/40R19
Front
Mach 1
19 x 10
275/40R19
Rear
19 x 10.5
305/30R19
Front
Mach 1 with handling
package
19 x 11
315/30R19
Rear
Note: As outlined in the preceding table,
there are different sized tires and wheels on
the front and rear positions. In order to
identify that wheels are in their correct
position, check the valve hole location as
indicated in the following chart:
53
2022 Mustang (CZG) Mach 1, enUSA, Edition date: 202110, First-Printing Wheels and Tires