2022 FORD MAVERICK tow
[x] Cancel search: towPage 270 of 533
WHAT IS THE MAXIMUM LOADED
TRAILER WEIGHT
The maximum loaded trailer
weight is the highest possible
weight of a fully loaded trailer the
vehicle can tow.
CALCULATING THE MAXIMUM
LOADED TRAILER WEIGHT FOR
YOUR VEHICLE
1. Start with the gross combined
weight rating for your vehicle
model and axle ratio.
2. Subtract all of the following
that apply to your vehicle:
• Vehicle curb weight.
• Hitch hardware weight, for
example a draw bar, ball, locks
or weight distributing hardware.
• Driver weight.
• Passenger weight.
• Payload, cargo and luggage
weight.
• Aftermarket equipment weight.
This equals the maximum loaded
trailer weight for this combination.
Note: The trailer tongue load is
considered part of the payload for
your vehicle. Reduce the total
payload by the final trailer tongue
weight.
Note: Consult an authorized dealer
to determine the maximum trailer
weight allowed for your vehicle if
you are not sure.
267
2022 Maverick (CFE) Canada/United States of America, enUSA, Edition date: 202106, First-Printing Towing a Trailer
Page 271 of 533
WHAT IS THE INTEGRATED
TRAILER BRAKE CONTROLLER
The trailer brake controller assists in
smooth and effective trailer braking based
on the towing vehicle
’s brake pressure.
INTEGRATED TRAILER BRAKE
CONTROLLER PRECAUTIONS WARNING: Use the integrated
trailer brake controller to properly adjust
the trailer brakes and check all
connections before towing a trailer.
Failure to follow this instruction could
result in the loss of control of your
vehicle, personal injury or death.
• Only use the manual control lever for
proper adjustment of the gain during
trailer setup. Misuse, such as
application during trailer sway, could
cause instability of trailer or tow
vehicle.
• Avoid towing in adverse weather
conditions. The trailer brake controller
does not provide anti-lock control of
the trailer wheels. Trailer wheels can
lock up on slippery surfaces, resulting
in reduced stability of trailer and tow
vehicle.
• The trailer brake controller is only a
factory-installed or dealer-installed
item. Ford is not responsible for
warranty or performance of the
controller due to misuse or customer
installation.
Note: Do not attempt removal of the trailer
brake controller without consulting the
Workshop Manual. Damage to the unit may
result. USING THE INTEGRATED
TRAILER BRAKE CONTROLLER
1.
Make sure the trailer brakes are in good
working condition, functioning normally
and properly adjusted. See your trailer
dealer if necessary.
Note: An authorized dealer can diagnose
the trailer brake controller to determine
exactly which trailer fault has occurred. Your
vehicle warranty does not cover issues with
your trailer.
2. Hook up the trailer and make the electrical connections according to the
trailer manufacturer's instructions.
Note: Select default mode if the trailer has
surge brakes, or no brakes at all. The system
has no effect on the braking performance
of the trailer in either of these cases.
Note: If a trailer is connected by a four-pin
connector, the trailer braking function will
not be supported.
3. When you plug in a trailer with electric or electric-over-hydraulic brakes, a
message confirming connection
appears in the information display.
4. Use the gain adjustment to find the desired starting point. A gain setting of
6.0 is a good starting point for heavier
loads.
Note: Use the following steps to adjust the
gain setting whenever road, weather and
trailer, or vehicle loading conditions, change
from when you initially set the gain.
5. In a traffic-free environment, tow the trailer on a dry, level surface and
squeeze the manual control lever
completely.
268
2022 Maverick (CFE) Canada/United States of America, enUSA, Edition date: 202106, First-Printing Integrated Trailer Brake Controller
(If Equipped)
Page 272 of 533
6. If the trailer wheels lock up, indicated
by squealing tires, reduce the gain
setting. If the trailer wheels turn freely,
increase the gain setting. Repeat Steps
5 and 6 until the gain setting is at a
point just below trailer wheel lock-up.
If towing a heavier trailer, trailer wheel
lock-up may not be attainable even
with the maximum gain setting of 10.
Note: Only perform this procedure at
speeds of approximately 20– 25 mph
(30–40 km/h).
Note: The trailer brake controller reduces
output at vehicle speeds below
11 mph
(18 km/h) so that trailer and vehicle braking
is not jerky or harsh. This feature is only
available when applying the brakes using
your vehicle's brake pedal, not the
controller.
Note: Your vehicle's brake system and the
trailer brake system work independently of
each other. Changing the gain setting on the
controller does not affect the operation of
your vehicle's brakes whether you attach a
trailer or not.
Note: With the proper electrical connection,
pressing your vehicle brake pedal or using
the manual control lever illuminates both
trailer and vehicle brake lamps.
Note: When you switch the engine off, the
controller output is disabled and the display
and module shut down. The controller
module and display turn on when you switch
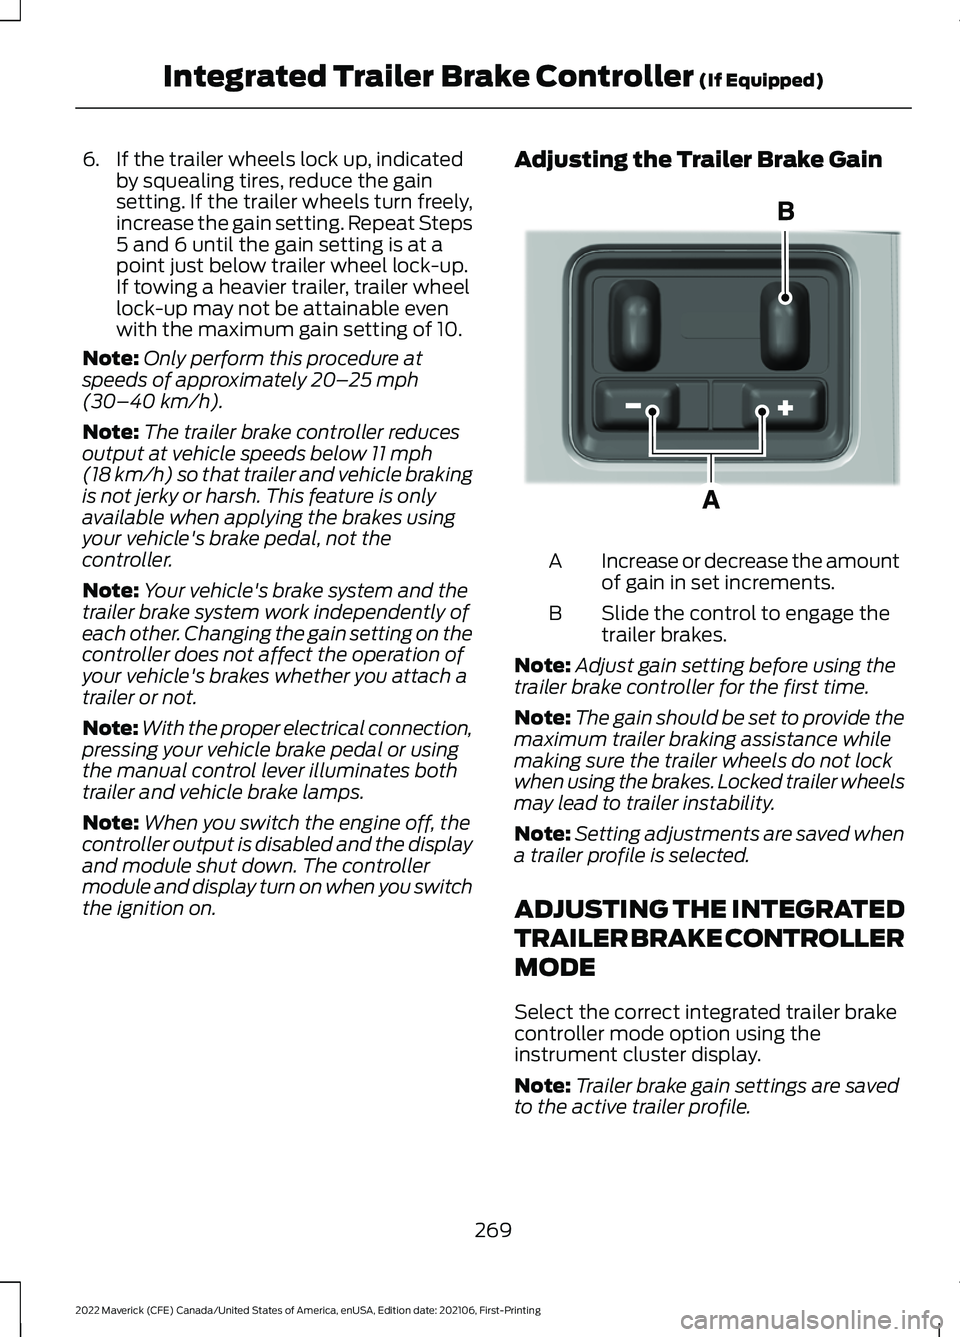
the ignition on. Adjusting the Trailer Brake Gain
Increase or decrease the amount
of gain in set increments.
A
Slide the control to engage the
trailer brakes.
B
Note: Adjust gain setting before using the
trailer brake controller for the first time.
Note: The gain should be set to provide the
maximum trailer braking assistance while
making sure the trailer wheels do not lock
when using the brakes. Locked trailer wheels
may lead to trailer instability.
Note: Setting adjustments are saved when
a trailer profile is selected.
ADJUSTING THE INTEGRATED
TRAILER BRAKE CONTROLLER
MODE
Select the correct integrated trailer brake
controller mode option using the
instrument cluster display.
Note: Trailer brake gain settings are saved
to the active trailer profile.
269
2022 Maverick (CFE) Canada/United States of America, enUSA, Edition date: 202106, First-Printing Integrated Trailer Brake Controller
(If Equipped)E333154
Page 275 of 533
HOW DOES TRAILER SWAY
CONTROL WORK
The system applies the brakes to the
individual wheels and reduces engine
torque to aid vehicle stability.
If the trailer begins to sway, the stability
control lamp flashes and the message
Trailer Sway Reduce Speed appears in
the information display.
Stop your vehicle as soon as it is safe to
do so. Check the vertical weight on the
tow ball and trailer load distribution.
TRAILER SWAY CONTROL
PRECAUTIONS WARNING: Turning off trailer sway
control increases the risk of loss of
vehicle control, serious injury or death.
Ford does not recommend disabling this
feature except in situations where speed
reduction may be detrimental (such as
hill climbing), the driver has significant
trailer towing experience, and can control
trailer sway and maintain safe operation.
Note: This feature only activates when
significant trailer sway occurs.
Note: This feature does not prevent trailer
sway, but reduces it once it begins.
Note: This feature cannot stop all trailers
from swaying.
Note: In some cases, if vehicle speed is too
high, the system may activate multiple
times, gradually reducing vehicle speed. SWITCHING TRAILER SWAY
CONTROL ON AND OFF
1. Using the instrument cluster display
controls on the steering wheel, select
Settings
.
2. Switch
Trailer Sway Control on or off.
The system turns on each time you start
your vehicle.
272
2022 Maverick (CFE) Canada/United States of America, enUSA, Edition date: 202106, First-Printing Trailer Sway Control
Page 276 of 533
COLD WEATHER
PRECAUTIONS
The functional operation of some
components and systems can be affected
at temperatures below approximately
-13°F (-25°C).
DRIVING ON SNOW AND ICE WARNING:
If you are driving in
slippery conditions that require tire
chains or cables, then it is critical that
you drive cautiously. Keep speeds down,
allow for longer stopping distances and
avoid aggressive steering to reduce the
chances of a loss of vehicle control
which can lead to serious injury or death.
If the rear end of your vehicle slides while
cornering, steer in the direction of the
slide until you regain control of your
vehicle.
On ice and snow, you should drive more
slowly than usual. Your vehicle has a four
wheel anti-lock brake system, do not pump
the brake pedal.
See Anti-Lock Braking
System Limitations (page 191).
BREAKING-IN
Your vehicle requires a break-in period. For
the first 1,000 mi (1,600 km), avoid driving
at high speeds, heavy braking, aggressive
shifting or using your vehicle to tow. During
this time, your vehicle may exhibit some
unusual driving characteristics. DRIVING ECONOMICALLY
The following helps to improve fuel
consumption:
•
Drive smoothly, accelerate gently and
anticipate the road ahead to avoid
heavy braking.
• Regularly check your tire pressures and
make sure that they are inflated to the
correct pressure.
• Follow the recommended maintenance
schedule and carry out the
recommended checks.
• Plan your journey and check the traffic
before you set off. It is more efficient
to combine errands into a single trip
whenever possible.
• Avoid idling the engine in cold weather
or for extended periods. Start the
engine only when you are ready to set
off.
• Do not carry unnecessary weight in your
vehicle as extra weight wastes fuel.
• Do not add unnecessary accessories
to the exterior of your vehicle, for
example running boards. If you use a
roof rack, remember to fold it down or
remove it when not in use.
• Do not shift into neutral when you are
braking or when your vehicle is slowing
down.
• Shut all windows when driving at high
speeds.
• Switch off all electric systems when
not in use, for example air conditioning.
Make sure that you unplug any
accessories from the auxiliary power
points when not in use.
273
2022 Maverick (CFE) Canada/United States of America, enUSA, Edition date: 202106, First-Printing Driving Hints
Page 281 of 533
ROADSIDE ASSISTANCE
Vehicles Sold in the United States:
Getting Roadside Assistance
To fully assist you should you have a
vehicle concern, Ford Motor Company
offers a complimentary roadside
assistance program. This program is
separate from the New Vehicle Limited
Warranty.
The service is available:
•
24 hours a day, seven days a week.
• For the coverage period supplied with
your vehicle.
Roadside Assistance covers:
• A flat tire change with a good spare
(except vehicles supplied with a tire
inflation kit).
• Battery jump start.
• Lock-out assistance (key replacement
cost is the customer's responsibility).
• Fuel delivery — independent service
contractors, if not prohibited by state,
local or municipal law, shall deliver up
to 2 gal (8 L) of gasoline or 5 gal (20 L)
of diesel fuel to a disabled vehicle.
Roadside assistance limits fuel delivery
service to two no-charge occurrences
within a 12-month period.
• Winch out — available within 100 ft
(30 m) of a paved or county
maintained road, no recoveries. •
Towing — independent service
contractors, if not prohibited by state,
local or municipal law, shall tow Ford
eligible vehicles to an authorized dealer
within
35 mi (56 km) of the
disablement location or to the nearest
authorized dealer. If a member
requests a tow to an authorized dealer
that is more than
35 mi (56 km) from
the disablement location, the member
shall be responsible for any mileage
costs in excess of
35 mi (56 km).
• Roadside Assistance includes up to
$200 for a towed trailer if the disabled
eligible vehicle requires service at the
nearest authorized dealer. If the towing
vehicle is operational but the trailer is
not, then the trailer does not qualify for
any roadside services.
Vehicles Sold in the United States:
Using Roadside Assistance
Complete the roadside assistance
identification card and place it in your
wallet for quick reference. This card is in
the Owner's Manual kit.
United States vehicle customers who
require Roadside Assistance, call
1-800-241-3673.
If you need to arrange roadside assistance
for yourself, Ford Motor Company
reimburses a reasonable amount for
towing to the nearest dealership within
35 mi (56 km)
. To obtain reimbursement
information, United States vehicle
customers call 1-800-241-3673.
Customers need to submit their original
receipts.
278
2022 Maverick (CFE) Canada/United States of America, enUSA, Edition date: 202106, First-Printing Crash and Breakdown Information
Page 287 of 533
HOW DOES THE POST-CRASH
ALERT SYSTEM WORK
The system is designed to turn the hazard
flashers on and to intermittently sound the
horn in the event of a serious impact that
deploys an airbag or the seatbelt
pretensioners.
POST-CRASH ALERT SYSTEM
LIMITATIONS
Depending on applicable laws in the
country your vehicle was built for, the horn
does not sound in the event of a serious
impact.
SWITCHING THE POST-CRASH
ALERT SYSTEM OFF
Press the hazard flasher switch or the
unlock button on the remote control to
switch the system off.
Note:
The alert turns off when the vehicle
battery runs out of charge.
AUTOMATIC CRASH SHUTOFF
WHAT IS AUTOMATIC CRASH
SHUTOFF
The automatic crash shutoff is designed
to stop the fuel going to the engine in the
event of a moderate or severe crash.
Note: Not every impact causes a shutoff. AUTOMATIC CRASH SHUTOFF
PRECAUTIONS WARNING: If your vehicle has been
involved in a crash, have the fuel system
checked. Failure to follow this instruction
could result in fire, personal injury or
death.
RE-ENABLING YOUR VEHICLE
1. Switch the ignition off.
2. Attempt to start your vehicle.
3. Switch the ignition off.
4. Attempt to start your vehicle.
Note: If your vehicle does not start after the
third attempt, have your vehicle checked as
soon as possible.
RECOVERY TOWING
ACCESSING THE FRONT TOWING
POINT WARNING: Using recovery hooks
is dangerous and should only be done by
a person familiar with proper vehicle
recovery safety practices. Improper use
of recovery hooks may cause hook failure
or separation from the vehicle and could
result in serious injury or death. WARNING:
Slowly remove the
slack from the recovery strap prior to
pulling. Failure to do so can introduce
significantly higher loads which can
cause the recovery hooks to break off, or
the recovery strap to fail which can cause
serious injury or death.
284
2022 Maverick (CFE) Canada/United States of America, enUSA, Edition date: 202106, First-Printing Crash and Breakdown Information
Page 288 of 533
WARNING: Never link two straps
together with a clevis pin. These heavy
metal objects could become projectiles
if the strap breaks and can cause serious
injury or death.
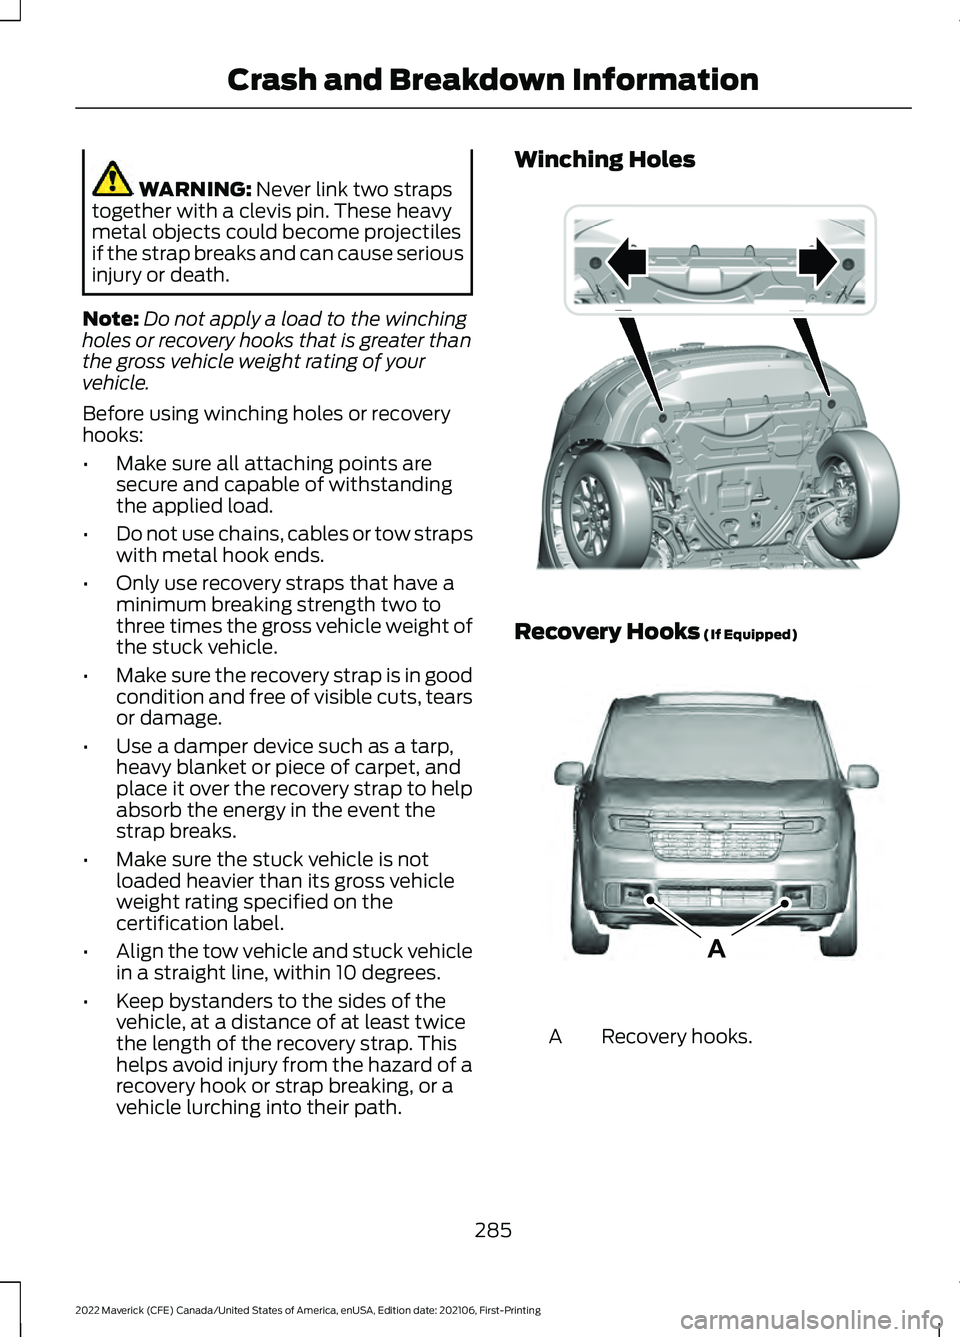
Note: Do not apply a load to the winching
holes or recovery hooks that is greater than
the gross vehicle weight rating of your
vehicle.
Before using winching holes or recovery
hooks:
• Make sure all attaching points are
secure and capable of withstanding
the applied load.
• Do not use chains, cables or tow straps
with metal hook ends.
• Only use recovery straps that have a
minimum breaking strength two to
three times the gross vehicle weight of
the stuck vehicle.
• Make sure the recovery strap is in good
condition and free of visible cuts, tears
or damage.
• Use a damper device such as a tarp,
heavy blanket or piece of carpet, and
place it over the recovery strap to help
absorb the energy in the event the
strap breaks.
• Make sure the stuck vehicle is not
loaded heavier than its gross vehicle
weight rating specified on the
certification label.
• Align the tow vehicle and stuck vehicle
in a straight line, within 10 degrees.
• Keep bystanders to the sides of the
vehicle, at a distance of at least twice
the length of the recovery strap. This
helps avoid injury from the hazard of a
recovery hook or strap breaking, or a
vehicle lurching into their path. Winching Holes
Recovery Hooks
(If Equipped)
Recovery hooks.
A
285
2022 Maverick (CFE) Canada/United States of America, enUSA, Edition date: 202106, First-Printing Crash and Breakdown InformationE354509 AE355744