2022 FORD MAVERICK flat tire
[x] Cancel search: flat tirePage 350 of 533

WARNING: Switch the ignition off
and apply the park brake fully before
lifting vehicle. WARNING:
Park your vehicle so
that you do not obstruct the flow of
traffic or place yourself in any danger and
set up a warning triangle. WARNING:
The jack supplied with
this vehicle is only intended for changing
a flat tire in an emergency. Do not
attempt to do any other work on your
vehicle when it is supported by the jack,
as your vehicle could slip off the jack.
Failure to follow this instruction could
result in personal injury or death. WARNING: No person should place
any portion of their body under a vehicle
that is supported by a jack. WARNING:
Make sure that the
wheels are pointing straight ahead. WARNING:
If your vehicle has a
manual transmission, shift into first or
reverse gear. If your vehicle has an
automatic transmission, shift into park
(P). WARNING:
Make sure that the
vehicle jack is vertical to the jacking point
and the base is flat on the ground. WARNING:
Replace the wheels
and tires with the exact original brand,
size and construction that came
originally on your vehicle. Use of any
other wheel or tire combinations, even
with identical size ratings, may result in insufficient running clearances, tire
rubbing and eventual puncture. Failure
to follow tire replacement
recommendations can lead to tire failure,
loss of vehicle control, serious injury or
death.
WARNING:
Do not fit run flat tires
on vehicles that were not originally fitted
with them. See an authorized dealer for
more details about compatibility. WARNING:
Make sure there is no
grease or oil on the threads or the
surface between the wheel lugs and
nuts. This can cause the lug nuts to
loosen while driving. WARNING:
Have the lug nuts
checked for tightness and the tire
pressure checked as soon as possible. WARNING:
Do not install alloy
wheels using lug nuts designed for use
with steel wheels. Dissimilar Spare Wheel and Tire
Assembly Information
WARNING:
Failure to follow these
guidelines could result in an increased
risk of loss of vehicle control, injury or
death.
347
2022 Maverick (CFE) Canada/United States of America, enUSA, Edition date: 202106, First-Printing Changing a Road WheelE166722
Page 353 of 533
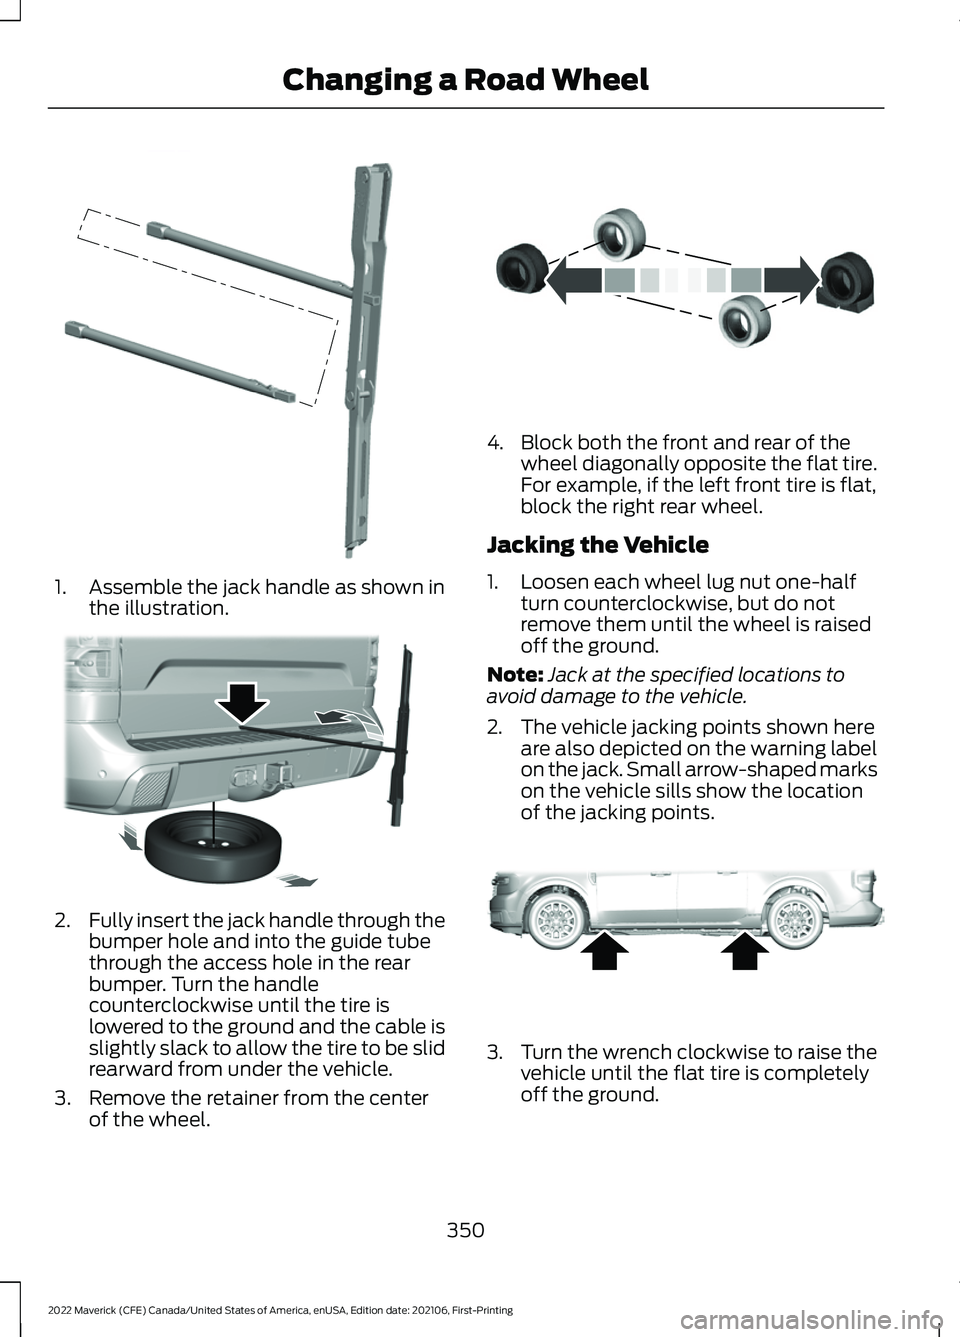
1. Assemble the jack handle as shown in
the illustration. 2.
Fully insert the jack handle through the
bumper hole and into the guide tube
through the access hole in the rear
bumper. Turn the handle
counterclockwise until the tire is
lowered to the ground and the cable is
slightly slack to allow the tire to be slid
rearward from under the vehicle.
3. Remove the retainer from the center of the wheel. 4. Block both the front and rear of the
wheel diagonally opposite the flat tire.
For example, if the left front tire is flat,
block the right rear wheel.
Jacking the Vehicle
1. Loosen each wheel lug nut one-half turn counterclockwise, but do not
remove them until the wheel is raised
off the ground.
Note: Jack at the specified locations to
avoid damage to the vehicle.
2. The vehicle jacking points shown here are also depicted on the warning label
on the jack. Small arrow-shaped marks
on the vehicle sills show the location
of the jacking points. 3.
Turn the wrench clockwise to raise the
vehicle until the flat tire is completely
off the ground.
350
2022 Maverick (CFE) Canada/United States of America, enUSA, Edition date: 202106, First-Printing Changing a Road WheelE352148 E352181 E175447 E352156
Page 354 of 533
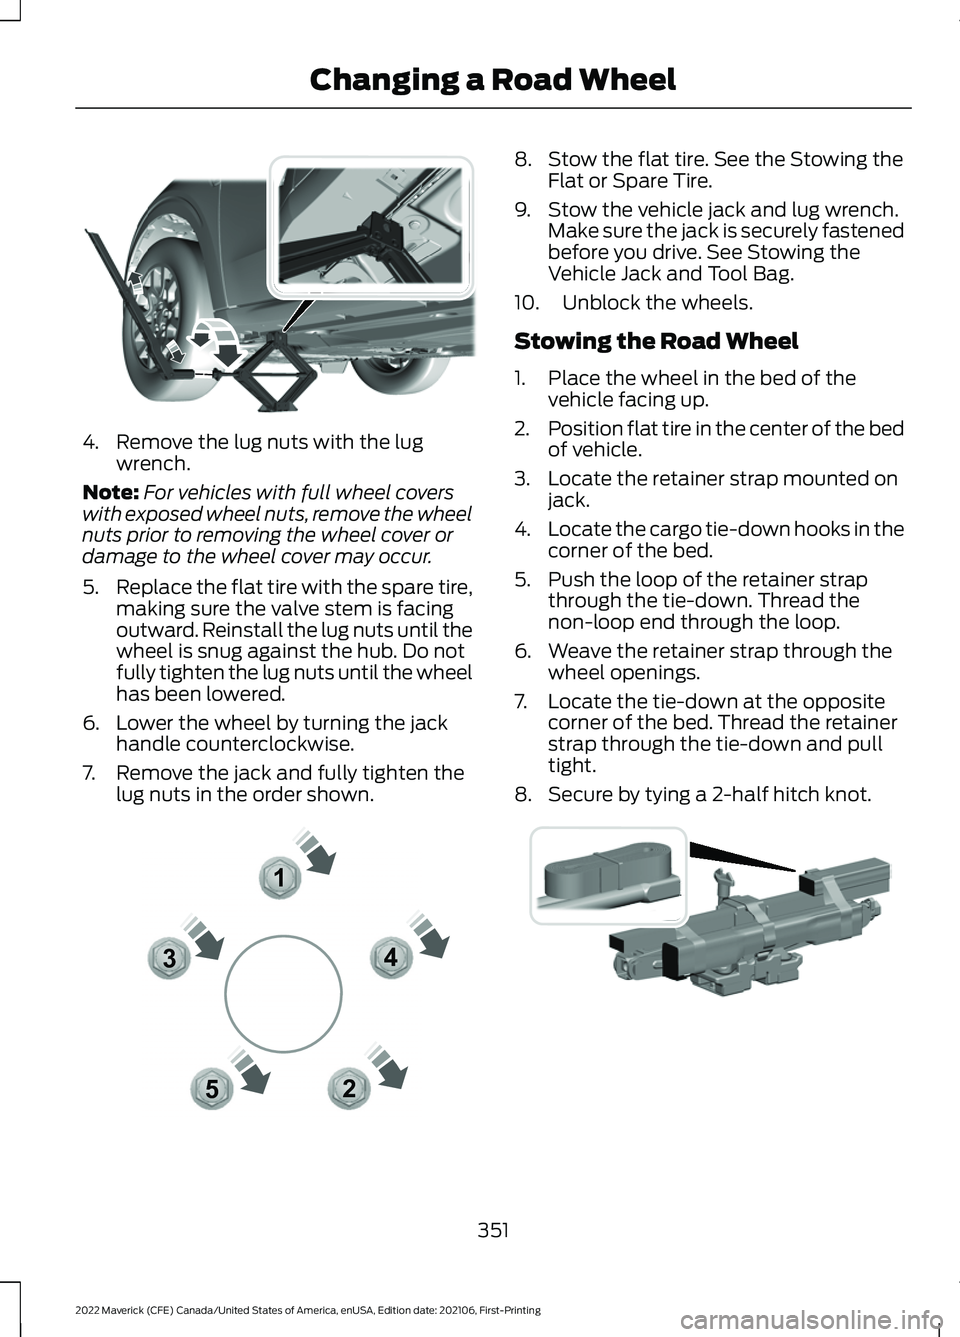
4. Remove the lug nuts with the lug
wrench.
Note: For vehicles with full wheel covers
with exposed wheel nuts, remove the wheel
nuts prior to removing the wheel cover or
damage to the wheel cover may occur.
5. Replace the flat tire with the spare tire,
making sure the valve stem is facing
outward. Reinstall the lug nuts until the
wheel is snug against the hub. Do not
fully tighten the lug nuts until the wheel
has been lowered.
6. Lower the wheel by turning the jack handle counterclockwise.
7. Remove the jack and fully tighten the lug nuts in the order shown. 8. Stow the flat tire. See the Stowing the
Flat or Spare Tire.
9. Stow the vehicle jack and lug wrench. Make sure the jack is securely fastened
before you drive. See Stowing the
Vehicle Jack and Tool Bag.
10. Unblock the wheels.
Stowing the Road Wheel
1. Place the wheel in the bed of the vehicle facing up.
2. Position flat tire in the center of the bed
of vehicle.
3. Locate the retainer strap mounted on jack.
4. Locate the cargo tie-down hooks in the
corner of the bed.
5. Push the loop of the retainer strap through the tie-down. Thread the
non-loop end through the loop.
6. Weave the retainer strap through the wheel openings.
7. Locate the tie-down at the opposite corner of the bed. Thread the retainer
strap through the tie-down and pull
tight.
8. Secure by tying a 2-half hitch knot. 351
2022 Maverick (CFE) Canada/United States of America, enUSA, Edition date: 202106, First-Printing Changing a Road WheelE352182 12
3
4
5E306781 E355266
Page 355 of 533
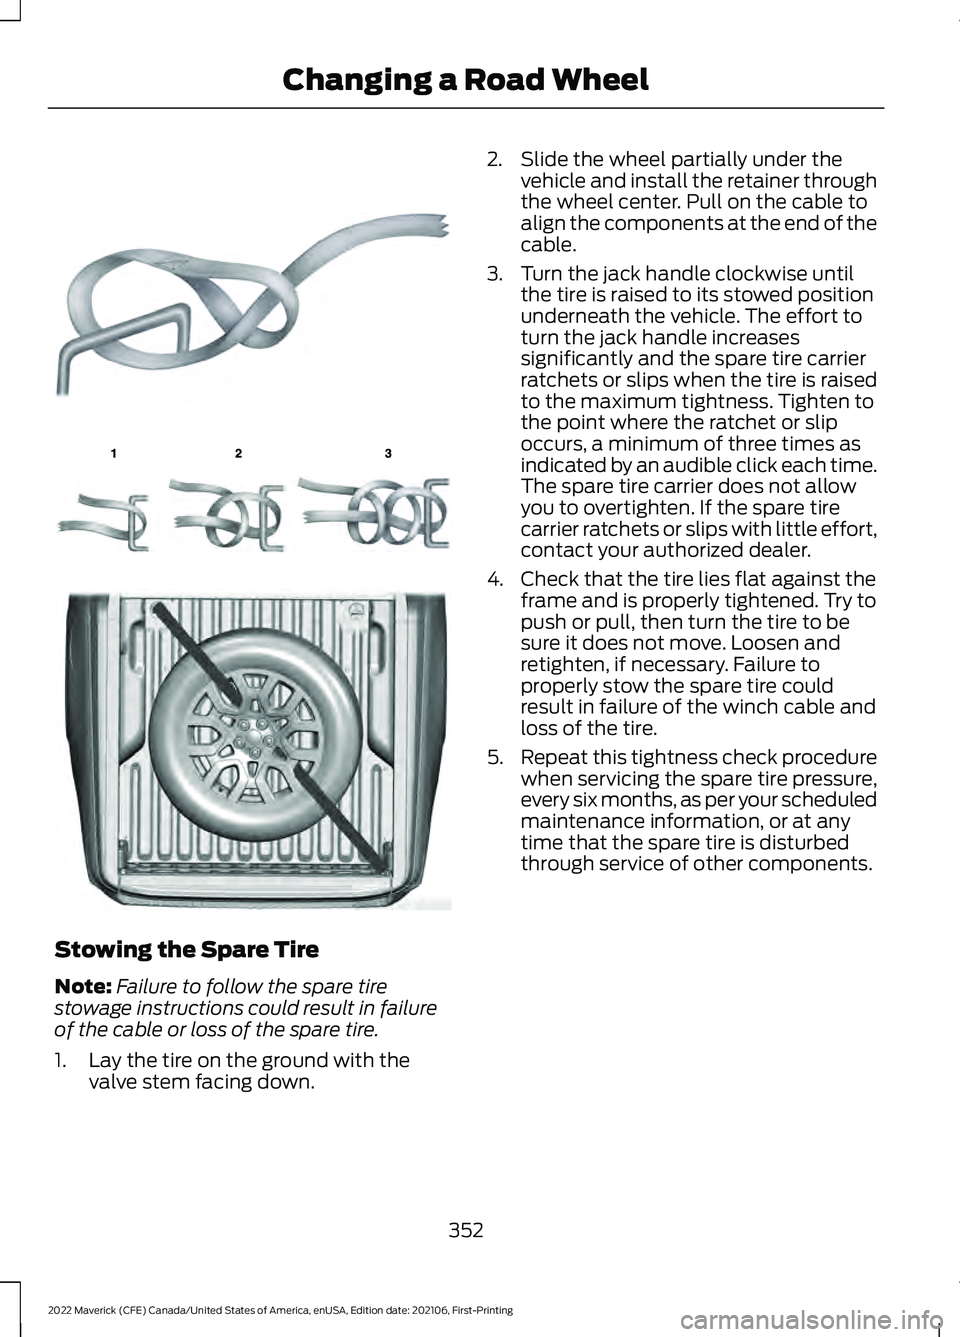
Stowing the Spare Tire
Note:
Failure to follow the spare tire
stowage instructions could result in failure
of the cable or loss of the spare tire.
1. Lay the tire on the ground with the valve stem facing down. 2. Slide the wheel partially under the
vehicle and install the retainer through
the wheel center. Pull on the cable to
align the components at the end of the
cable.
3. Turn the jack handle clockwise until the tire is raised to its stowed position
underneath the vehicle. The effort to
turn the jack handle increases
significantly and the spare tire carrier
ratchets or slips when the tire is raised
to the maximum tightness. Tighten to
the point where the ratchet or slip
occurs, a minimum of three times as
indicated by an audible click each time.
The spare tire carrier does not allow
you to overtighten. If the spare tire
carrier ratchets or slips with little effort,
contact your authorized dealer.
4. Check that the tire lies flat against the frame and is properly tightened. Try to
push or pull, then turn the tire to be
sure it does not move. Loosen and
retighten, if necessary. Failure to
properly stow the spare tire could
result in failure of the winch cable and
loss of the tire.
5. Repeat this tightness check procedure
when servicing the spare tire pressure,
every six months, as per your scheduled
maintenance information, or at any
time that the spare tire is disturbed
through service of other components.
352
2022 Maverick (CFE) Canada/United States of America, enUSA, Edition date: 202106, First-Printing Changing a Road WheelE142906 E143746 E355267
Page 357 of 533
WHEEL NUTS
WARNING: When you install a wheel, always remove any corrosion, dirt or foreign
materials present on the mounting surfaces of the wheel or the surface of the wheel
hub, brake drum or brake disc that contacts the wheel. Make sure to secure any fasteners
that attach the rotor to the hub so they do not interfere with the mounting surfaces of
the wheel. Installing wheels without correct metal-to-metal contact at the wheel
mounting surfaces can cause the wheel nuts to loosen and the wheel to come off while
your vehicle is in motion, resulting in loss of vehicle control, personal injury or death. lb.ft (Nm)
Bolt size
148 lb.ft (200 Nm)
M14 x 1.5
* Torque specifications are for nut and bolt threads free of dirt and rust. Use only Ford
recommended replacement fasteners.
Retighten the lug nuts to the specified torque within 100 mi (160 km) after any wheel
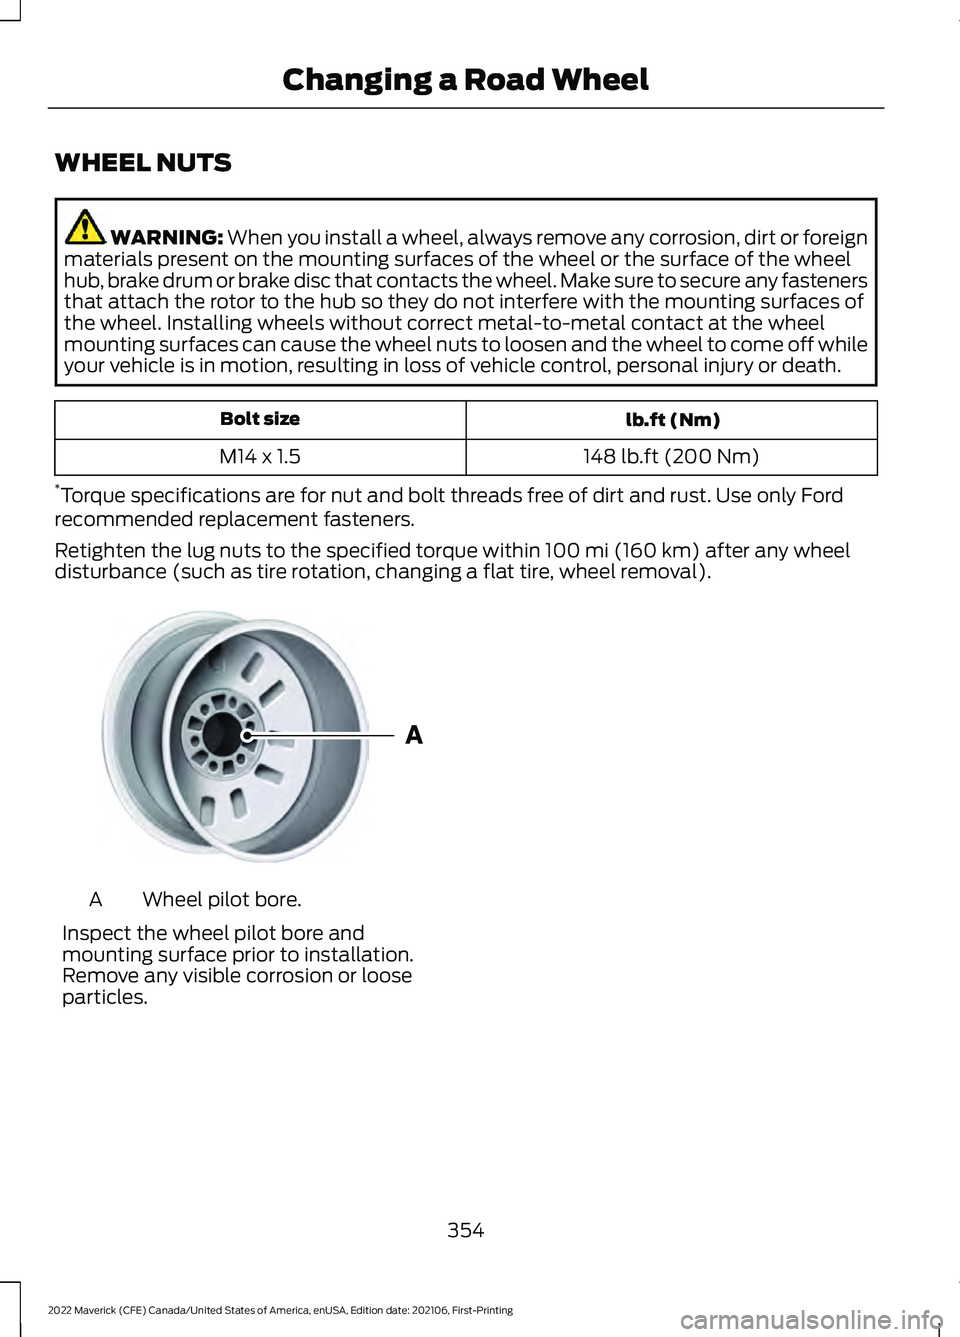
disturbance (such as tire rotation, changing a flat tire, wheel removal). Wheel pilot bore.
A
Inspect the wheel pilot bore and
mounting surface prior to installation.
Remove any visible corrosion or loose
particles.
354
2022 Maverick (CFE) Canada/United States of America, enUSA, Edition date: 202106, First-Printing Changing a Road WheelE145950
Page 437 of 533
WHAT IS FORD PROTECT
Protect yourself from the rising cost of
vehicle repairs with a Ford Protect
extended service plan.
Ford Protect Extended Service
Plans - United States Only
Ford Protect extended service plans mean
peace of mind. Extended service plans are
backed by Ford Motor Company, and
provide more protection beyond the New
Vehicle Limited Warranty coverage. When
you visit your Ford Dealer, insist on the Ford
Protect extended service plan.
Ford Protect Can Quickly Pay for Itself
One trip to the service center could easily
exceed the price of your Ford Protect
extended service plan. With the Ford
Protect extended service plan, you
minimize your risk for unexpected repair
bills and rising repair costs.
Up to 1,000+ Covered Vehicle
Components
There are four mechanical Ford Protect
extended service plans with different levels
of coverage. Ask your authorized dealer for
details.
1. PremiumCARE - Our most
comprehensive coverage. With over
1,000 covered components, this plan
is so complete it is probably easier to
list what is not covered.
2. ExtraCARE - Covers 113 components, and includes many high-tech items.
3. BaseCARE - Covers 84 components.
4. PowertrainCARE - Covers 29 critical components.
Ford Protect extended service plans are
honored by all authorized Ford dealers in
the United States, Canada and Mexico. That means you get:
•
Reliable, quality service at any Ford or
Lincoln dealership.
• Repairs performed by factory trained
technicians, using genuine parts.
Rental Car Reimbursement
First Day Rental Benefit
If you bring your car into your dealer for
service, we will give you a rental vehicle to
use for the day.
Extended Rental Benefits
If your vehicle is kept overnight for covered
repairs, you are eligible for rental car
coverage, warranty repairs, and field
service actions.
Roadside Assistance
Exclusive 24/7 roadside assistance,
including:
• Towing, flat-tire change and battery
jump starts.
• Out of fuel and lock-out assistance.
• Travel expense reimbursement for
lodging, meals and rental car.
• Assistance for taxi, shuttle, rental car
coverage or other transportation.
Transferable Coverage
If you sell your vehicle before your Ford
Protect extended service plan coverage
expires, you can transfer any remaining
coverage to the new owner. This should
give you and your potential buyer peace of
mind.
434
2022 Maverick (CFE) Canada/United States of America, enUSA, Edition date: 202106, First-Printing Ford Protect
Page 442 of 533

Multi-Point Inspection
Windshield for cracks, chips or pits
For oil and fluid leaks
Washer spray and wiper operation
Half-shaft dust boots
1 Brake, coolant recovery reservoir, automatic transmission and window washer.
2 If your vehicle has a temporary mobility kit, check the tire sealant expiration Use By date
on the canister. Replace as needed.
Be sure to ask your dealership service
advisor or technician about the multi-point
vehicle inspection. It is a comprehensive
way to perform a thorough inspection of
your vehicle. Your checklist gives you
immediate feedback on the overall
condition of your vehicle.
NORMAL SCHEDULED
MAINTENANCE
Oil Change Reminder
Your vehicle comes with an oil change
reminder that determines when you should
change the engine oil based on how you
use your vehicle. Your vehicle lets you know when an oil
change is due by displaying a message in
the information display.
The following table provides examples of
vehicle use and its impact on oil change
intervals. It is a guideline only. Actual oil
change intervals depend on several factors
and generally decrease with severity of
use.When to Expect the OIL CHANGE REQUIRED Message
Vehicle Use and Example
Interval 1
Normal
7,500– 10,000 mi
(12,000– 16,000 km) Normal commuting with highway driving
No, or moderate, load or towing
Flat to moderately hilly roads
No extended idling
Severe
5,000– 7,500 mi
(8,000– 12,000 km) Moderate to heavy load or towing
Mountainous or off-road conditions
Extended idling
Extended hot or cold operation
439
2022 Maverick (CFE) Canada/United States of America, enUSA, Edition date: 202106, First-Printing Scheduled Maintenance
Page 519 of 533
Catalytic Converter –
Troubleshooting..........................................181
C
atalytic Converter – Warning Lamps........181
Changing a Flat Tire...................................346
Changing a Road Wheel...........................346
Changing the 12V Battery..........................310
Changing the Engine Air Filter - 2.0L EcoBoost™................................................308
Changing the Engine Air Filter - 2.5L, Hybrid Electric Vehicle (HEV)
.............309
Changing the Fuel Filter...........................309
Changing the Remote Control Battery - Vehicles With: Push Button Start.........63
Changing the Remote Control Battery - Vehicles Without: Push Button
Start.................................................................62
Changing the Vehicle Wi-Fi Hotspot Name or Password...................................373
Charging a Device........................................148
Charging a Wireless Device.......................152
Checking MyKey System Status..............69
Checking the Brake Fluid...........................192
Checking the Coolant
................................304
Checking the Seatbelts...............................48
Checking the Tire Pressures....................338
Checking the Wiper Blades.......................90
Children and Airbags
.....................................53
Child Restraint Anchor Points....................32 Locating the Child Restraint Lower Anchor
Points................................................................... 32
Locating the Child Restraint Top Tether Anchor Points................................................... 33
What Are the Child Restraint Anchor Points................................................................... 32
Child Restraints
...............................................33
Child Restraint Position Information.............33
Child Restraints Recommendation...............34
Child Safety
.......................................................31
Child Restraint Anchor Points.......................... 32
Child Restraints..................................................... 33
Installing Child Restraints................................. 34
Child Safety Locks..........................................41
Child Safety Precautions
..............................31
Cleaning Products........................................319
Cleaning the Exterior...................................319 Cleaning Camera Lenses and
Sensors.............................................................. 321Cleaning Chrome, Aluminium or Stainless
Steel.................................................................. 320
Cleaning Headlamps and Rear Lamps................................................................ 319
Cleaning Stripes or Graphics..........................321
Cleaning the Engine Compartment............320
Cleaning the Exterior Precautions................319
Cleaning the Underbody.................................. 321
Cleaning Wheels................................................ 320
Cleaning Windows and Wiper Blades............................................................... 320
Cleaning the Interior....................................321 Cleaning Carpets and Floor Mats................322
Cleaning Displays and Screens..................... 322
Cleaning Fabric Seats and Headliners........................................................ 322
Cleaning Leather and Vinyl............................ 322
Cleaning Moonroof Tracks.............................. 323
Cleaning Plastic................................................... 321
Cleaning Seatbelts............................................ 323
Cleaning Storage Compartments...............323
Cleaning the Instrument Panel......................321
Clearing All MyKeys.......................................69
Climate Control.............................................126 Auto Mode............................................................. 127
Climate Control – Troubleshooting.............129
Climate Control – Troubleshooting.........................................129
Clima
te Control – Frequently Asked
Questions......................................................... 129
Cold Weather Precautions
........................273
Configuring the Trip Computer - Vehicles With: 4.2 Inch Screen.................................121
Connected Vehicle
......................................369
Connecting the Vehicle to a Mobile
Network............................................................ 369
Connected Vehicle Data
..............................24
Connected Vehicle Limitations..............369
Connected Vehicle Requirements........369
Connected Vehicle – Troubleshooting - Vehicles With: Modem
............................370
Connected Vehicle – Troubleshooting - Vehicles With: SYNC 3.............................371
Connecting a Bluetooth® Device
...........377
Connecting a Trailer.....................................261
Connecting a Trailer Precautions...........261
516
2022 Maverick (CFE) Canada/United States of America, enUSA, Edition date: 202106, First-Printing Index