2022 FORD F-650/750 reset
[x] Cancel search: resetPage 258 of 379

Air Brakes
WARNING: Do not manually adjust
the automatic slack adjusters to correct
excessive push rod stroke as it may result
in reduced brake effectiveness and a
vehicle crash. Excessive push rod stroke
indicates that a problem exists with the
automatic adjuster, with the installation
of the adjuster, or with foundation brake
components that manual adjustment
does not remedy. Seek service from a
qualified facility for excessive push rod
stroke.
Inspection and Adjustment
Establish a regular schedule for periodic
cleaning, lubrication and adjustment
inspection based on vehicle use. Exact
maintenance intervals are difficult to
predetermine due to vehicle applications
and operating conditions. If you are
uncertain of the proper schedule for your
vehicle, contact an authorized dealer.
Regular inspections should include:
• Periodic checking (every service
interval) of push rod travel or brake
adjustment. This is essential for
effective braking. Brake chamber push
rods on original equipment chambers
now incorporate an orange paint
marker near the base of the push rod as a stroke indicator to aid in
adjustment checks. If the push rod is
clean and the brakes are out of
adjustment, you can see the orange
marker protruding from the chamber
when the brakes are applied.
• Checking the brake lining (every service
interval). When brake linings or blocks
wear within 0.063 in (1.6 mm) they
must be replaced.
• Periodic checking (every service
interval) of the air compressor filter.
Check the filter minder and when the
indicator is near or on the red line
marked
Service, replace the filter and
reset the service filter minder.
Do not back off or disconnect the front
brakes so that they are less effective,
letting the rear brakes do all the stopping
of your vehicle. Do not overlook the brakes
on the trailer either. Brake condition on the
trailer is just as important as the tractor.
Proper brake balance on trucks and
tractor-trailers is essential for effective
braking.
Once a year, inspect the entire brake
system:
• Rubber components for deterioration.
A qualified technician should inspect
these components and replace them
as necessary. Replacement intervals
vary according to the severity and
length of vehicle service.
• Condition of brake drums, brake
chambers and slack adjusters.
• System for air leaks.
• Hose or pipes for rust, damage and
deterioration.
• Operation of service and parking
brakes.
Periodically inspect parts such as air brake
chamber diaphragm, air compressor and
air cleaner. Replace any parts if you can
consider them unserviceable.
255
2022 F650750 (TBC) , enUSA, Edition date: 202010, Second-Printing Maintenance
Page 270 of 379
•
With your foot on the brake, shift
through all the gears while the engine
is running.
• We recommend that you change the
engine oil before you use your vehicle
again.
Fuel system
• Fill the fuel tank with high-quality fuel
until the first automatic shutoff of the
fuel pump nozzle.
Cooling system
• Protect against freezing temperatures.
• When removing your vehicle from
storage, check coolant fluid level.
Confirm that there are no cooling
system leaks and that fluid is at the
recommended level.
Disconnecting Your 12 Volt Battery
• Check and recharge as necessary. Keep
connections clean.
• If storing your vehicle for more than 30
days without recharging the battery,
we recommend that you disconnect
the battery cables to maintain battery
charge for quick starting.
Note: It is necessary to reset memory
features if you disconnect the battery
cables.
Brakes
• Make sure the brakes and parking brake
release fully.
Tires
• Maintain recommended air pressure. Miscellaneous
•
Make sure all linkages, cables, levers
and pins under your vehicle are covered
with grease to prevent rust.
• Move vehicles at least 25 ft (7.5 m)
every 15 days to lubricate working parts
and prevent corrosion.
Removing Vehicle From Storage
When your vehicle is ready to come out of
storage, do the following:
• Wash your vehicle to remove any dirt
or grease film build-up on window
surfaces.
• Check windshield wipers for any
deterioration.
• Check under the hood for any foreign
material that may have collected
during storage such as mice or squirrel
nests.
• Check the exhaust for any foreign
material that may have collected
during storage.
• Check tire pressures and set tire
inflation per the Tire Label.
• Check brake pedal operation. Drive
your vehicle
15 ft (4.5 m) back and
forth to remove rust build-up.
• Check fluid levels (including coolant,
oil and gas) to make sure there are no
leaks, and fluids are at recommended
levels.
• If you remove the battery, clean the
battery cable ends and check for
damage.
Contact an authorized dealer if you have
any concerns or issues.
267
2022 F650750 (TBC) , enUSA, Edition date: 202010, Second-Printing Vehicle Care
Page 312 of 379
Accessing the Sound Settings
Press the button to adjust the
sound settings. You can also
activate and set the sensitivity
of the adaptive or speed compensated
volume.
Accessing the System Settings Press the button.
Adjusting the Volume Turn to adjust the volume.
Changing Radio Stations
Auto or Manual tuning.
A
Station name tuning.
B Note:
You can change between auto or
manual tuning with the rotary control using
the system settings.
Note: You can change radio stations using
the seek buttons.
Note: You can recall radio stations using
the numeric preset buttons.
Pausing or Playing Media In media mode, press and
release the button to pause
playback. Press the button again
to resume playback.
In radio mode, press the button to mute
the signal. Press the button again to
restore the signal.
Returning to the Previous Screen Press and release the button.
Scrolling Through the Menu
Options Selecting Media
Press the button to select media
mode.
Repeatedly press the button, or
rotate the right-hand rotary control to
scroll through the available media sources.
309
2022 F650750 (TBC) , enUSA, Edition date: 202010, Second-Printing Audio System (If Equipped)E280315 E260697 E260687
A
B E281480 E260782 E100027
Page 313 of 379
Selecting a Menu Option
Selecting the Radio
Press the button to select radio
mode.
Press the button again to display
the available radio sources. Repeatedly
press the button, or rotate the right-hand
rotary control to scroll through the
available radio sources.
Setting a Memory Preset
Tune to a station then press and hold one
of the numbered memory preset buttons.
The audio mutes briefly while the system
saves the station and returns once the
station is stored. Switching the Audio Unit On and
Off Press and release the button.
Using a Cell Phone
Press the button to either
answer an incoming phone call
or to make a phone call.
Press and hold the button to end
a phone call.
Using Seek, Fast Forward and
Reverse Press and release the button to
skip to the next track.
Press and hold the button to fast
forward through the track. Press and release the button to
return to the beginning of a track.
Repeatedly press the button to
return to previous tracks.
Press and hold the button to rewind.
In radio mode, select a frequency band and
press and release either button. The
system stops at the first station it finds in
that direction.
310
2022 F650750 (TBC) , enUSA, Edition date: 202010, Second-Printing Audio System (If Equipped)E260781 E260686 E265040
Page 314 of 379
In satellite radio mode, press and release
to select the next or previous satellite radio
station. If you select a specific category,
such as jazz, rock or news, press to find the
next or previous station in the category you
select.
DIGITAL RADIO
Note:
HD Radio broadcasts are not
available in all markets.
HD Radio technology is the digital
evolution of analog AM/FM radio. Your
system has a special receiver that allows
it to receive digital broadcasts, where
available, in addition to the analog
broadcasts, it already receives. Digital
broadcasts provide a better sound quality
than analog broadcasts with free,
crystal-clear audio and no static or
distortion. For more information, and a
guide to available stations and
programming, please visit
www.hdradio.com.
When HD Radio is on and you tune to a
station broadcasting HD Radio technology,
you may notice the HD Radio logo on your
screen. When this logo is available, you
may also see Title and Artist fields
on-screen. The multicast indicator appears in FM
mode, only, if the current station is
broadcasting multiple digital broadcasts.
The highlighted numbers signify available
digital channels where new or different
content is available. HD1 signifies the main
programming status and is available in
analog and digital broadcasts. Other
multicast stations, HD2 through HD7, are
only available digitally.
When HD Radio broadcasts are active, you
can access the following functions:
•
Memory presets allow you to save an
active channel as a memory preset.
Touch and hold a memory preset slot
until the sound returns. There is a brief
mute while the radio saves the station.
Sound returns when finished. When
switching to an HD2 or HD3 memory
preset, the sound mutes before the
digital audio plays, because the system
has to reacquire the digital signal.
Note: As with any saved radio station, you
cannot access the saved station if your
vehicle is outside the station ’s reception
area.
311
2022 F650750 (TBC) , enUSA, Edition date: 202010, Second-Printing Audio System
(If Equipped)
Page 316 of 379
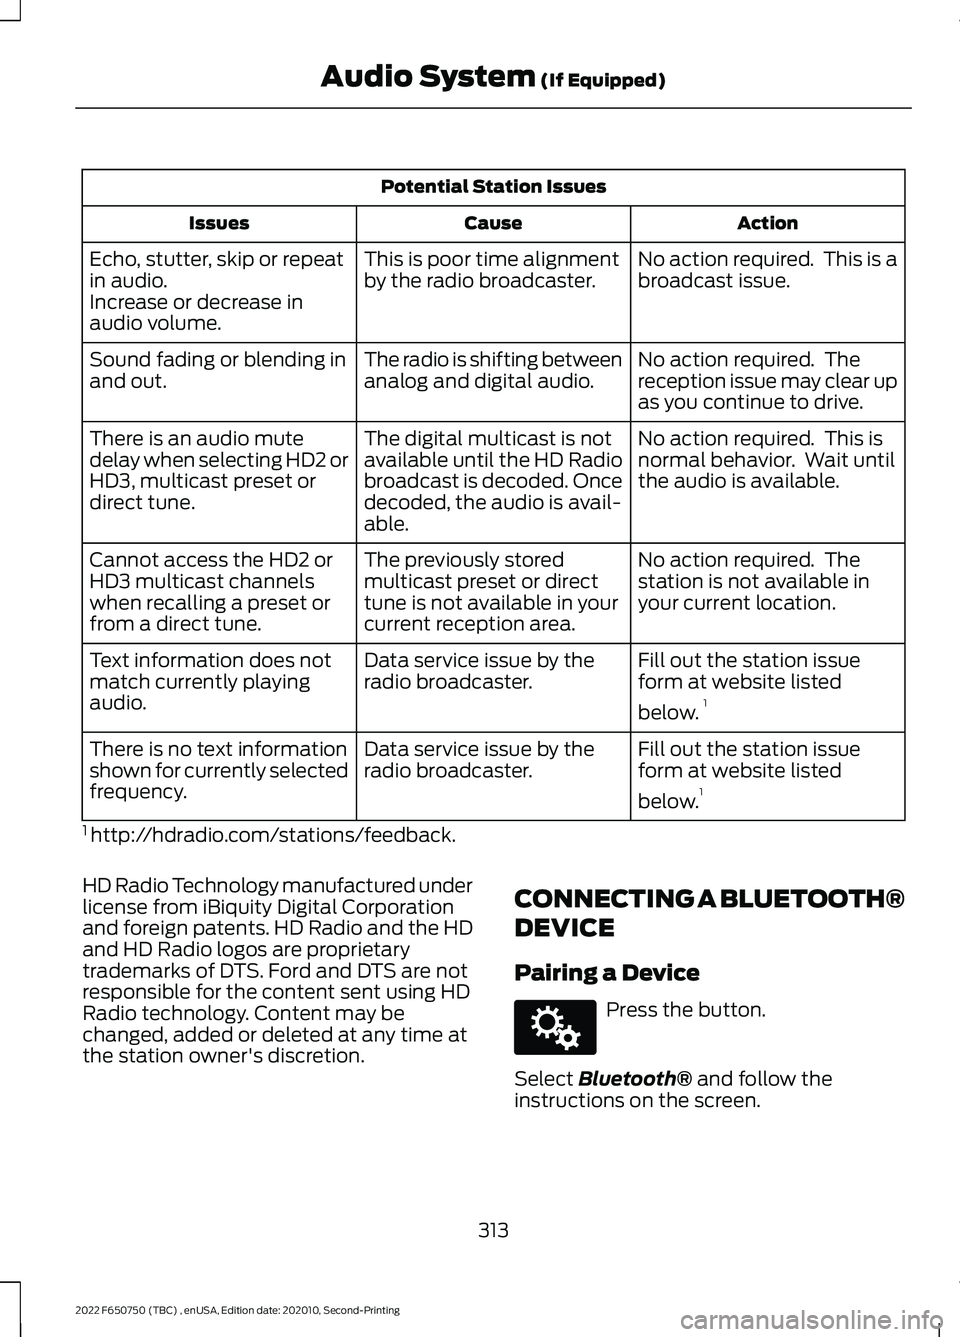
Potential Station Issues
Action
Cause
Issues
No action required. This is a
broadcast issue.
This is poor time alignment
by the radio broadcaster.
Echo, stutter, skip or repeat
in audio.
Increase or decrease in
audio volume.
No action required. The
reception issue may clear up
as you continue to drive.
The radio is shifting between
analog and digital audio.
Sound fading or blending in
and out.
No action required. This is
normal behavior. Wait until
the audio is available.
The digital multicast is not
available until the HD Radio
broadcast is decoded. Once
decoded, the audio is avail-
able.
There is an audio mute
delay when selecting HD2 or
HD3, multicast preset or
direct tune.
No action required. The
station is not available in
your current location.
The previously stored
multicast preset or direct
tune is not available in your
current reception area.
Cannot access the HD2 or
HD3 multicast channels
when recalling a preset or
from a direct tune.
Fill out the station issue
form at website listed
below.1
Data service issue by the
radio broadcaster.
Text information does not
match currently playing
audio.
Fill out the station issue
form at website listed
below.1
Data service issue by the
radio broadcaster.
There is no text information
shown for currently selected
frequency.
1 http://hdradio.com/stations/feedback.
HD Radio Technology manufactured under
license from iBiquity Digital Corporation
and foreign patents. HD Radio and the HD
and HD Radio logos are proprietary
trademarks of DTS. Ford and DTS are not
responsible for the content sent using HD
Radio technology. Content may be
changed, added or deleted at any time at
the station owner's discretion. CONNECTING A BLUETOOTH®
DEVICE
Pairing a Device Press the button.
Select Bluetooth® and follow the
instructions on the screen.
313
2022 F650750 (TBC) , enUSA, Edition date: 202010, Second-Printing Audio System
(If Equipped)E142607
Page 325 of 379

A message appears in the information
display when it is time for an oil change.
Make sure you perform the oil change
within two weeks or 500 mi (800 km) of
the message appearing. Make sure you
reset the Intelligent Oil-Life Monitor after
each oil change. See Instrument Cluster
(page
63).
If your information display resets
prematurely or becomes inoperative, you
should perform the oil change interval at
six months or
5,000 mi (8,000 km) from
your last oil change. Never exceed one year
or
10,000 mi (16,000 km) between oil
change intervals.
All Vehicles
Your vehicle is very sophisticated and built
with multiple, complex, performance
systems. Every manufacturer develops
these systems using different
specifications and performance features.
That is why it is important to rely upon your
dealership to properly diagnose and repair
your vehicle.
Ford Motor Company has recommended
maintenance intervals for various parts
and component systems based upon
engineering testing. Ford Motor Company
relies upon this testing to determine the
most appropriate mileage for replacement
of oils and fluids to protect your vehicle at
the lowest overall cost to you and
recommends against maintenance
schedules that deviate from the scheduled
maintenance information.
We strongly recommend the use of only
genuine Ford, Motorcraft or
Ford-authorized re-manufactured
replacement parts engineered for your
vehicle. Additives and Chemicals
This owner's manual and the Ford
Workshop Manual list the recommended
additives and chemicals for your vehicle.
We do not recommend using chemicals or
additives not approved by us as part of
your vehicle
’s normal maintenance. Please
consult your warranty information.
Oils, Fluids and Flushing
In many cases, fluid discoloration is a
normal operating characteristic and, by
itself, does not necessarily indicate a
concern or that the fluid needs to be
changed. However, a qualified expert, such
as the factory-trained technicians at your
dealership, should inspect discolored fluids
that also show signs of overheating or
foreign material contamination
immediately.
Make sure to change your vehicle ’s oils and
fluids at the specified intervals or in
conjunction with a repair. Flushing is a
viable way to change fluid for many vehicle
sub-systems during scheduled
maintenance. It is critical that systems are
flushed only with new fluid that is the same
as that required to fill and operate the
system or using a Ford-approved flushing
chemical.
Scheduled Maintenance Services
Maintenance service adjustments must
conform to specifications contained in this
manual, and those shown on the Important
Engine Information decal. Perform the
following services at scheduled intervals
because they essential to the life and
performance of your vehicle. Ford
recommends that you perform
maintenance on all designated items to
achieve best vehicle operation.
322
2022 F650750 (TBC) , enUSA, Edition date: 202010, Second-Printing Scheduled Maintenance
Page 332 of 379

At Every Oil Change Interval as Indicated by the Information Display
1
Perform a multi-point inspection, recommended.
Inspect the air filter restriction gauge. Replace the filter if necessary.
Inspect the automatic transmission fluid level. Consult an authorized dealer for
requirements.
Inspect the brake pads, shoes, rotors, drums, brake linings, hoses and the parking brake.
Inspect the engine and secondary coolant concentration, freeze-point protection, level
and hoses.
Inspect the exhaust system and heat shields.
Inspect the steering linkage, ball joints, suspension, tie-rod ends, driveshaft and the U-
joints. Lubricate any components that have grease fittings.
Inspect front oil hubs for leaks and check fluid level through hub cap sight glass.
1 Do not exceed one year/10,000 mi (16,000 km) or 350 engine hours between service
intervals.
2 Reset the Intelligent Oil-Life Monitor after engine oil and filter changes. See Oil Change
Indicator Reset
(page 226).
3 Rotate the front wheels on vehicles with dual rear wheels when specified. Only rotate
the rear wheels if you notice unusual wear. Brake Fluid Maintenance
1
Change the brake fluid. 2
Every 3 Years
1 Perform this maintenance item every 3 years. Do not exceed the designated time for
the interval.
2 Brake fluid servicing requires special equipment available at your authorized dealer. Other Maintenance Items
1
Replace the engine-mounted and frame-mounted fuel
filters. 2
Every
22,000 mi
(36,000 km)
Inspect the engine and secondary cooling system coolant
concentration, freeze-point protection, additive, corrosion
inhibitor, strength, coolant level, and hoses. Add coolant
additive if necessary.3
Every
30,000 mi
(48,000 km)
329
2022 F650750 (TBC) , enUSA, Edition date: 202010, Second-Printing Scheduled Maintenance