2022 FORD F-350 instrument cluster
[x] Cancel search: instrument clusterPage 145 of 740

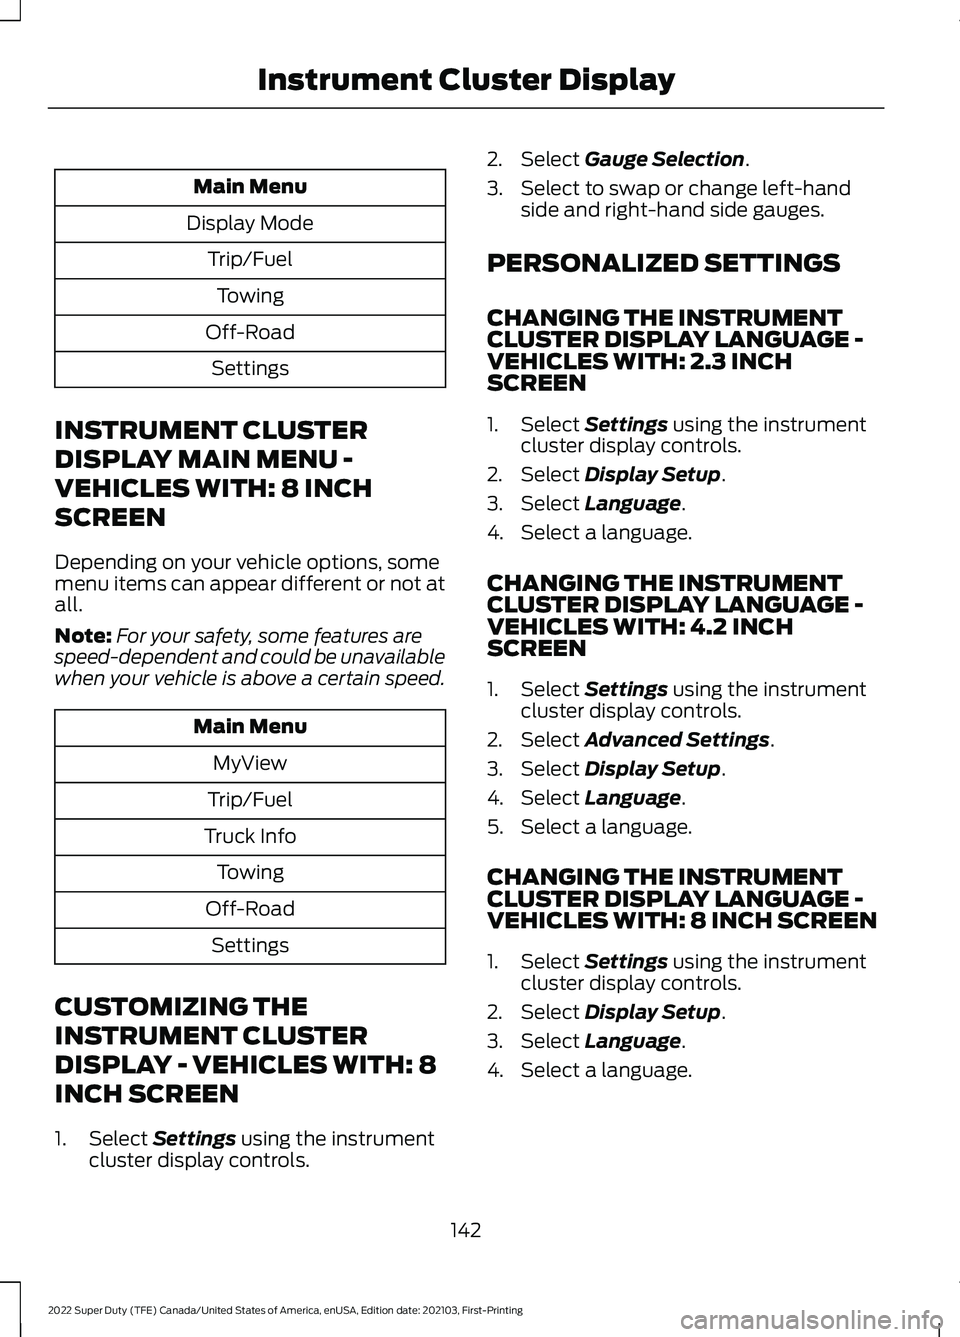
Main Menu
Display Mode Trip/FuelTowing
Off-Road Settings
INSTRUMENT CLUSTER
DISPLAY MAIN MENU -
VEHICLES WITH: 8 INCH
SCREEN
Depending on your vehicle options, some
menu items can appear different or not at
all.
Note: For your safety, some features are
speed-dependent and could be unavailable
when your vehicle is above a certain speed. Main Menu
MyView
Trip/Fuel
Truck Info Towing
Off-Road Settings
CUSTOMIZING THE
INSTRUMENT CLUSTER
DISPLAY - VEHICLES WITH: 8
INCH SCREEN
1. Select Settings using the instrument
cluster display controls. 2. Select
Gauge Selection.
3. Select to swap or change left-hand side and right-hand side gauges.
PERSONALIZED SETTINGS
CHANGING THE INSTRUMENT
CLUSTER DISPLAY LANGUAGE -
VEHICLES WITH: 2.3 INCH
SCREEN
1. Select
Settings using the instrument
cluster display controls.
2. Select
Display Setup.
3. Select
Language.
4. Select a language.
CHANGING THE INSTRUMENT
CLUSTER DISPLAY LANGUAGE -
VEHICLES WITH: 4.2 INCH
SCREEN
1. Select
Settings using the instrument
cluster display controls.
2. Select
Advanced Settings.
3. Select
Display Setup.
4. Select
Language.
5. Select a language.
CHANGING THE INSTRUMENT
CLUSTER DISPLAY LANGUAGE -
VEHICLES WITH: 8 INCH SCREEN
1. Select
Settings using the instrument
cluster display controls.
2. Select
Display Setup.
3. Select
Language.
4. Select a language.
142
2022 Super Duty (TFE) Canada/United States of America, enUSA, Edition date: 202103, First-Printing Instrument Cluster Display
Page 146 of 740

CHANGING THE MEASURE UNIT -
VEHICLES WITH: 2.3 INCH
SCREEN
1. Select Settings using the instrument
cluster display controls.
2. Select
Display Setup.
3. Select
Displ. Settings.
4. Select
Units.
5. Select a measurement unit.
CHANGING THE MEASURE UNIT -
VEHICLES WITH: 4.2 INCH
SCREEN
1. Select
Settings using the instrument
cluster display controls.
2. Select
Advanced Settings.
3. Select
Display Setup.
4. Select
Measurement Units.
5. Select a measurement unit.
CHANGING THE MEASURE UNIT -
VEHICLES WITH: 8 INCH SCREEN
1. Select
Settings using the instrument
cluster display controls.
2. Select
Display Setup.
3. Select
Measurement Units.
4. Select a measurement unit.
CHANGING THE TEMPERATURE
UNIT - VEHICLES WITH: 2.3 INCH
SCREEN
1. Select
Settings using the instrument
cluster display controls.
2. Select
Display Setup.
3. Select
Temperature.
4. Select a temperature unit. CHANGING THE TEMPERATURE
UNIT - VEHICLES WITH: 4.2 INCH
SCREEN
1. Select
Settings using the instrument
cluster display controls.
2. Select
Advanced Settings.
3. Select
Display Setup.
4. Select
Temperature Units.
5. Select a temperature unit.
CHANGING THE TEMPERATURE
UNIT - VEHICLES WITH: 8 INCH
SCREEN
1. Select
Settings using the instrument
cluster display controls.
2. Select
Display Setup.
3. Select
Temperature Units.
4. Select a temperature unit.
CHANGING THE TIRE PRESSURE
UNIT - VEHICLES WITH: 2.3 INCH
SCREEN
1. Select
Settings using the instrument
cluster display controls.
2. Select
Display Setup.
3. Select
Tire Pressure.
4. Select a tire pressure unit.
CHANGING THE TIRE PRESSURE
UNIT - VEHICLES WITH: 4.2 INCH
SCREEN
1. Select
Settings using the instrument
cluster display controls.
2. Select
Advanced Settings.
3. Select
Display Setup.
4. Select
Tire Pressure.
5. Select a pressure unit.
143
2022 Super Duty (TFE) Canada/United States of America, enUSA, Edition date: 202103, First-Printing Instrument Cluster Display
Page 147 of 740

CHANGING THE TIRE PRESSURE
UNIT - VEHICLES WITH: 8 INCH
SCREEN
1. Select Settings using the instrument
cluster display controls.
2. Select
Display Setup.
3. Select
Tire Pressure.
4. Select a tire pressure unit.
144
2022 Super Duty (TFE) Canada/United States of America, enUSA, Edition date: 202103, First-Printing Instrument Cluster Display
Page 148 of 740

ACCESSING THE TRIP
COMPUTER - VEHICLES WITH:
2.3 INCH SCREEN
1. Use the instrument cluster display
controls to navigate the home screen.
2. Select Trip 1 or Trip 2.
3. Select a setting and press the
OK
button.
ACCESSING THE TRIP
COMPUTER - VEHICLES WITH:
4.2 INCH SCREEN
1. Use the instrument cluster display controls to navigate the home screen.
2. Select
Trip/Fuel.
3. Press the
OK button.
4. Select
Trip 1 or Trip 2.
ACCESSING THE TRIP
COMPUTER - VEHICLES WITH:
8 INCH SCREEN
1. Use the instrument cluster display controls to navigate the home screen.
2. Select
Trip/Fuel.
3. Press the
OK button.
4. Select
Trip 1 or Trip 2.
RESETTING THE TRIP
COMPUTER
1. Use the instrument cluster display controls to navigate the home screen.
2. Select the trip screen you want to reset.
3. Press and hold the OK button until the
system reset confirmation appears. RESETTING THE INDIVIDUAL
TRIP VALUES
1. Use the instrument cluster display
controls to navigate the home screen.
2. Select
Trip 1 or Trip 2.
3. Press and hold the OK button until the
system reset confirmation appears.
CONFIGURING THE TRIP
COMPUTER
1. Use the instrument cluster display controls to navigate the home screen.
2. Select
Trip 1 or Trip 2.
3. Select a setting and press the
OK
button.
4. Select values to display.
TRIP DATA
Trip 1 and 2
Provides trip timer, trip average fuel
economy and total trip distance traveled.
For hybrid vehicles, the trip also shows the
distance traveled on electric power only.
Note: Trip 1 and 2 are selectable screens.
See
Accessing the Trip Computer (page
145).
This Trip
Provides trip timer, trip average fuel
economy, total trip distance traveled, and
distance traveled on electric power only
with the engine off. If the gasoline engine
has not turned on during the trip then trip
average fuel economy is not shown. This
Trip resets each time you start your vehicle.
Note: This trip is a selectable screen. See
Accessing the Trip Computer
(page 145).
145
2022 Super Duty (TFE) Canada/United States of America, enUSA, Edition date: 202103, First-Printing Trip Computer
Page 217 of 740

Before you start manual regeneration, do
the following:
•
Shift into park (P) and apply the
parking brake, on stable, level ground.
• Park your vehicle outside of any
structure.
• Park your vehicle 10– 15 ft (3–5 m)
away from any obstructions and away
from materials that can easily combust
or melt, for example paper, leaves,
petroleum products, fuels, plastics and
other dry organic material.
• Make sure there is a minimum of 1/8
tank of fuel.
• Make sure all fluids are at proper levels.
DIESEL PARTICULATE FILTER
MANUAL REGENERATION
LIMITATIONS
You cannot use manual regeneration until
the diesel particulate filter load percentage
has reached 100%. The diesel particulate
filter load percentage fluctuates up and
down when driving your vehicle due to
active and passive regenerations.
If your vehicle is operated with significant
stationary operation, low speed drive
cycles less than
25 mph (40 km/h), short
drive cycles, drive time less than 15 minutes
or the vehicle does not fully warm up,
passive and active regeneration may not
sufficiently clean the diesel particulate
filter system.
Aftermarket devices or modifications to
the exhaust system may reduce the
effectiveness of the exhaust system as
well as cause damage to the exhaust
system or engine. This may also degrade
vehicle performance and could lead to
engine damage that may not be covered
by the vehicle Warranty. STARTING DIESEL PARTICULATE
FILTER MANUAL REGENERATION
Start with your vehicle engine and when it
has reached the normal operating
temperature, press the information display
control button on the steering wheel. See
Instrument Cluster Display
(page 141).
If the diesel particulate filter is near or at
saturation, a message requesting
permission to initiate filter cleaning
appears in the information display. See
Diesel Particulate Filter – Information
Messages
(page 215). Answer yes to this
prompt and then follow the next prompts
regarding exhaust position required to
initiate manual regeneration. Be sure to
understand each prompt. If you are not
sure what is being asked by each prompt,
contact an authorized dealer. The display
confirms the operation has started and
when it has finished. You can also drive to
clean the filter. When the system is at the point
of oversaturation, the service
engine warning lamp illuminates
and a message appears in the information
display. You cannot initiate filter cleaning.
You must have your vehicle checked as
soon as possible.
Once manual regeneration starts, engine
speed increases to approximately 1600
rpm and the cooling fan speed increases.
You will hear a change in audible sound
due to engine speed and cooling fan speed
increases.
It is not necessary to open the hood on the
engine compartment. Once manual
regeneration completes, the engine speed
returns to normal idling. The exhaust
system remains very hot for several
minutes even after regeneration is
complete. Do not reposition the vehicle
over materials that could burn until the
214
2022 Super Duty (TFE) Canada/United States of America, enUSA, Edition date: 202103, First-Printing Diesel Particulate Filter
Page 246 of 740

APPLYING THE PARKING
BRAKE
WARNING: Apply the parking
brake, shift into park (P), switch the
ignition off and remove the key before
you leave your vehicle. Failure to follow
this instruction could result in personal
injury or death.
Apply the parking brake whenever you park
your vehicle. Press the pedal downward to
set the parking brake. The brake warning
lamp in the instrument cluster will
illuminate and remains illuminated until
you release the parking brake. If you are parking your vehicle on a grade
or with a trailer, press and hold the brake
pedal down, then set the parking brake.
There may be a little vehicle movement as
the parking brake sets to hold the vehicle's
weight. This is normal and should be no
reason for concern. If needed, press and
hold the service brake pedal down, then
try reapplying the parking brake. Chock the
wheels if required. If the parking brake
cannot hold the weight of the vehicle, the
parking brake may need service or the
vehicle may be overloaded.
RELEASING THE PARKING
BRAKE
To release, pull the brake release lever
located at the lower left side of the
instrument panel.
PARKING BRAKE – TROUBLESHOOTING
PARKING BRAKE – INFORMATION MESSAGES Action
Message
The system has detected a fault, contact an authorized dealer as soon as possible.
Check Brake System
The brake fluid level is low, inspect the brake system immedi- ately.
Brake Fluid Level Low
You have set the parking brake and you have driven the vehicle
more than 3.1 mph (5 km/h). If the warning stays on after you
have released the parking brake, contact an authorized dealer.
Park Brake Engaged
243
2022 Super Duty (TFE) Canada/United States of America, enUSA, Edition date: 202103, First-Printing Parking Brake
Page 250 of 740

WHAT IS TRACTION CONTROL
The traction control system helps to avoid
drive wheel spin and loss of traction.
HOW DOES TRACTION
CONTROL WORK
If your vehicle begins to slide, the system
applies the brakes to individual wheels
and, when needed, reduces engine power
at the same time. If the wheels spin when
accelerating on slippery or loose surfaces,
the system reduces engine power in order
to increase traction.
SWITCHING TRACTION
CONTROL ON AND OFF
WARNING: Operating your vehicle
with the traction control disabled could
lead to an increased risk of loss of vehicle
control, vehicle rollover, personal injury
and death. The traction control system turns on each
time you switch the ignition on.
The button for the stability and traction
control system is on the instrument panel. Press and release the button to switch
traction control off. The stability control
system remains fully active, to switch it off,
press and hold the button for a few
seconds, then release.
When you switch traction control off, a
message and an illuminated icon appear
on the instrument cluster.
Press the switch again to turn the traction
control system back on to normal
operation.
If your vehicle is stuck in mud or snow,
switching traction control off may be
beneficial as this allows the wheels to spin.
Your vehicle may have MyKey restrictions
regarding this feature. See
What Is
MyKey (page 77).
TRACTION CONTROL
INDICATOR
Stability and Traction Control
Indicator If the indicator does not
illuminate when you switch the
ignition on, or remains on when
the engine is running, this indicates a
malfunction. Have your vehicle checked
by an authorized dealer as soon as
possible. The traction control off indicator
illuminates when you switch the
traction control system off, or
when an alternative stability control mode
is selected that requires the traction
control off depending on the drive mode
selected.
247
2022 Super Duty (TFE) Canada/United States of America, enUSA, Edition date: 202103, First-Printing Traction ControlE327252 E138639 E130458
Page 264 of 740

The rear parking aid sensors are active
when your vehicle is in reverse (R) and the
vehicle speed is less than 5 mph (8 km/h).
The sensor coverage area is up to
71 in
(180 cm) from the rear bumper.
The rear parking aid detects large objects
when you shift into reverse (R) and any of
the following occur:
• Your vehicle is moving backward at a
low speed.
• Your vehicle is stationary but an object
is approaching the rear of your vehicle
at a low speed.
• Your vehicle is moving backward at a
low speed and an object is moving
towards your vehicle, for example
another vehicle at a low speed.
LOCATING THE REAR PARKING
AID SENSORS The rear parking aid sensors are in the rear
bumper.
REAR PARKING AID AUDIBLE
WARNINGS
A warning tone sounds when your vehicle
approaches an object. As your vehicle
moves closer to an object, the rate of the
tone increases. The warning tone
continuously sounds when an object is 12 in
(30 cm)
or less from the rear bumper.
If your vehicle remains stationary for a few
seconds, the audible warning turns off. If
your vehicle moves backward the tone
sounds again.
Note: When the parking aid system sounds
a tone, the audio system could reduce the
set volume.
PARKING AIDS –
TROUBLESHOOTING
PARKING AIDS – INFORMATION
MESSAGES
If a fault is present in the parking aids, a
warning message appears in the
instrument cluster or the information and
entertainment display.
261
2022 Super Duty (TFE) Canada/United States of America, enUSA, Edition date: 202103, First-Printing Parking Aids
(If Equipped)E231381