2022 FORD F-350 warning light
[x] Cancel search: warning lightPage 125 of 740

Without automatic high beam
control.
A
With automatic high beam
control.
B
AUTOMATIC HIGH BEAM
CONTROL PRECAUTIONS WARNING: The system does not
relieve you of your responsibility to drive
with due care and attention. You may
need to override the system if it does not
turn the high beams on or off. WARNING:
Do not use the system
in poor visibility, for example fog, heavy
rain, spray or snow. WARNING:
You may need to
override the system when approaching
other road users. WARNING:
You may need to
override the system during inclement
weather.
AUTOMATIC HIGH BEAM
CONTROL REQUIREMENTS
The system turns the high beams on if all
of the following occur:
• You switch the system on.
• You set the lighting control to the
autolamps position.
• The ambient light level is low enough
that you require high beams.
• There is no traffic in front of your
vehicle.
• The vehicle speed is greater than
approximately
32 mph (52 km/h).
AUTOMATIC HIGH BEAM
CONTROL LIMITATIONS
The system turns the high beams off if any
of the following occur:
• You switch the system off.
• You set the lighting control to any
position except autolamps.
• The ambient light level is high enough
that you do not require high beams.
• The system detects an approaching
vehicle's headlamps or rear lamps.
• The system detects severe rain, snow
or fog.
• The system detects street lighting.
122
2022 Super Duty (TFE) Canada/United States of America, enUSA, Edition date: 202103, First-Printing Exterior Lighting E327596
Page 129 of 740

OPENING AND CLOSING THE
WINDOWS
WARNING: Do not leave children
unattended in your vehicle and do not
let them play with the power windows.
Failure to follow this instruction could
result in personal injury. WARNING:
When closing the
power windows, verify they are free of
obstruction and make sure that children
and pets are not in the proximity of the
window openings. Press the window control switch
to open the window. Lift the
window control switch to close
the window.
Note: The power windows operate with the
ignition on, and for several minutes after you
switch the ignition off or until you open a
front door.
To reduce wind noise or pulsing noise when
one window is open, slightly open the
opposite window.
One-Touch Open
Fully press the window control switch and
release it. Press again or lift it to stop the
window.
One-Touch Close
Fully lift the window control switch and
release it. Press again or lift it to stop the
window.
Resetting One-Touch Close
Carry out all steps within 30 seconds of
starting the sequence.
1. Close the window. 2. Press and hold the window control
switch until the window is fully open.
Keep the window control switch
pressed for a few seconds.
3. Lift and hold the window control switch
until the window is fully closed. Keep
the window control switch held for a
few seconds.
4. Press and hold the window control switch until the window is fully open.
Keep the window control switch
pressed for a few seconds.
5. Lift and hold the window control switch
until the window is fully closed. Keep
the window control switch held for a
few seconds.
Note: Repeat the procedure if the window
does not close when you use one-touch.
WINDOW BOUNCE-BACK
WHAT IS WINDOW BOUNCE-BACK
The window stops and reverses if it detects
an obstruction when closing.
OVERRIDING WINDOW BOUNCE-
BACK WARNING:
If you override
bounce-back, the window does not
reverse if it detects an obstacle. Take
care when closing the windows to avoid
personal injury or damage to your
vehicle.
1. Close the window until it reaches the point of resistance and let it reverse.
2. Lift and hold the window control switch
within two seconds to override
bounce-back and close the window.
Bounce-back is now disabled and you
can close the window manually.
126
2022 Super Duty (TFE) Canada/United States of America, enUSA, Edition date: 202103, First-Printing Windows
Page 131 of 740

INTERIOR MIRROR
PRECAUTIONS
WARNING: Do not adjust the
mirrors when your vehicle is moving. This
could result in the loss of control of your
vehicle, serious personal injury or death.
Note: Do not clean the mirror housing or
glass with harsh abrasives, fuel or other
petroleum-based cleaning products.
MANUALLY DIMMING THE
INTERIOR MIRROR
Pull the tab below the mirror toward you
to reduce glare at night.
AUTO-DIMMING INTERIOR
MIRROR
(IF EQUIPPED)
WHAT IS THE AUTO-DIMMING
INTERIOR MIRROR
The mirror dims to reduce the effect of
bright light from behind. It returns to
normal when the bright light from behind
is no longer present or if you shift into
reverse (R).
AUTO-DIMMING INTERIOR
MIRROR LIMITATIONS
Do not block the sensors on the front and
back of the mirror.
Note: A rear center passenger or raised rear
center head restraint could prevent light
from reaching the sensor.
128
2022 Super Duty (TFE) Canada/United States of America, enUSA, Edition date: 202103, First-Printing Interior Mirror
Page 132 of 740

ADJUSTING THE EXTERIOR
MIRRORS
WARNING: Do not adjust the
mirrors when your vehicle is moving. This
could result in the loss of control of your
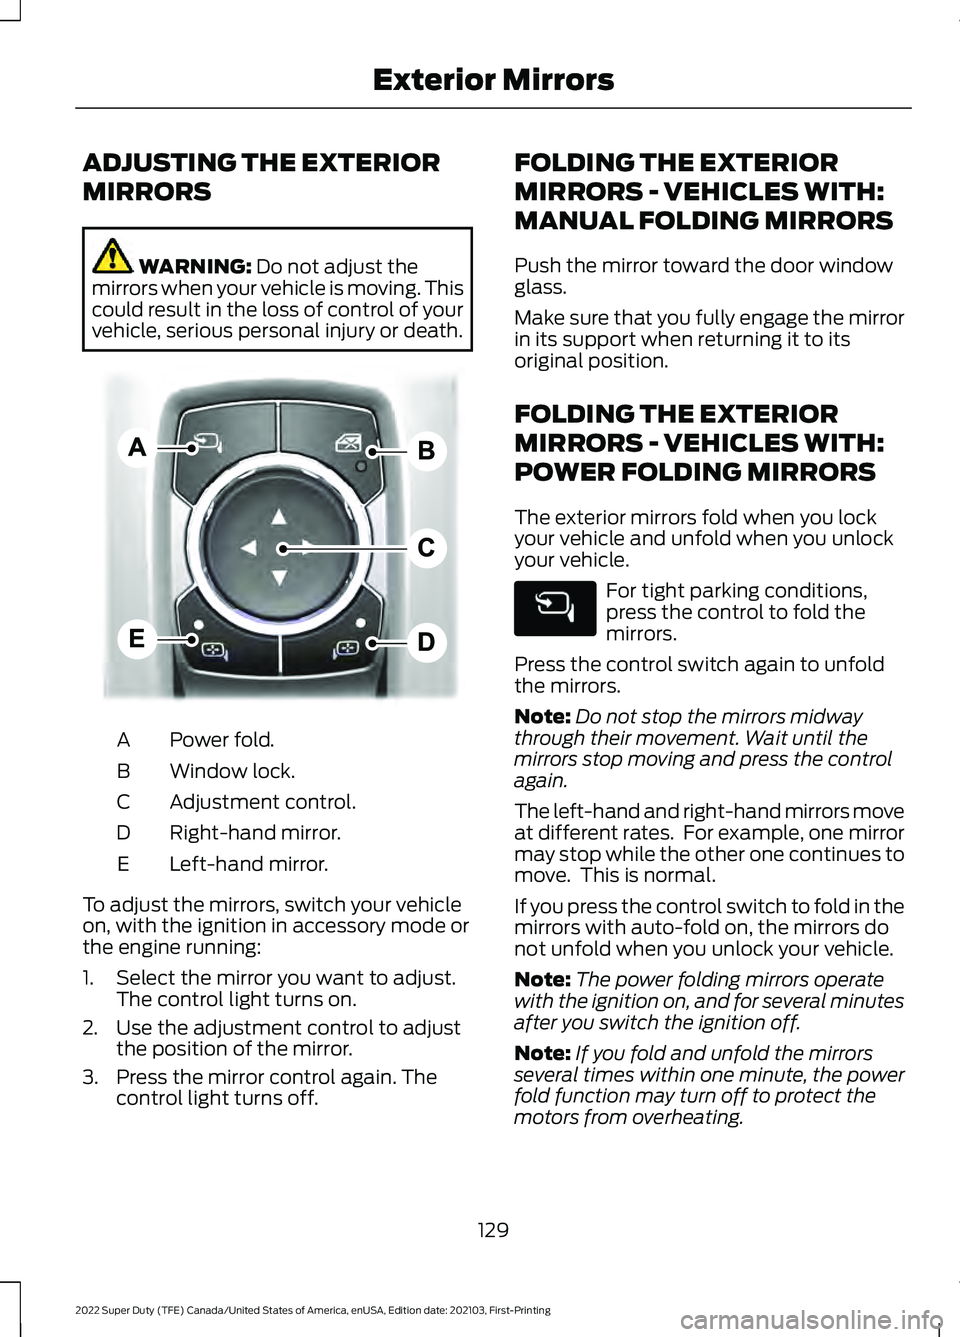
vehicle, serious personal injury or death. Power fold.
A
Window lock.
B
Adjustment control.
C
Right-hand mirror.
D
Left-hand mirror.
E
To adjust the mirrors, switch your vehicle
on, with the ignition in accessory mode or
the engine running:
1. Select the mirror you want to adjust. The control light turns on.
2. Use the adjustment control to adjust the position of the mirror.
3. Press the mirror control again. The control light turns off. FOLDING THE EXTERIOR
MIRRORS - VEHICLES WITH:
MANUAL FOLDING MIRRORS
Push the mirror toward the door window
glass.
Make sure that you fully engage the mirror
in its support when returning it to its
original position.
FOLDING THE EXTERIOR
MIRRORS - VEHICLES WITH:
POWER FOLDING MIRRORS
The exterior mirrors fold when you lock
your vehicle and unfold when you unlock
your vehicle.
For tight parking conditions,
press the control to fold the
mirrors.
Press the control switch again to unfold
the mirrors.
Note: Do not stop the mirrors midway
through their movement. Wait until the
mirrors stop moving and press the control
again.
The left-hand and right-hand mirrors move
at different rates. For example, one mirror
may stop while the other one continues to
move. This is normal.
If you press the control switch to fold in the
mirrors with auto-fold on, the mirrors do
not unfold when you unlock your vehicle.
Note: The power folding mirrors operate
with the ignition on, and for several minutes
after you switch the ignition off.
Note: If you fold and unfold the mirrors
several times within one minute, the power
fold function may turn off to protect the
motors from overheating.
129
2022 Super Duty (TFE) Canada/United States of America, enUSA, Edition date: 202103, First-Printing Exterior MirrorsE311081
Page 140 of 740

WHAT ARE THE INSTRUMENT
CLUSTER WARNING LAMPS
Warning lamps alert you to a vehicle
condition that could become serious.
Some lamps illuminate when you start
your vehicle to make sure they work. If any
lamps remain on after starting your vehicle,
refer to the respective system warning
lamp for further information.
INSTRUMENT CLUSTER
WARNING LAMPS
Depending on your vehicle options, some
warning lamps can appear different or not
at all.
Adaptive Steering
It illuminates when the adaptive
steering system detects a
concern. Have the system
checked as soon as possible.
Anti-Lock Brake System If it illuminates when you are
driving, this indicates a
malfunction. Your vehicle
continues to have normal braking without
the anti-lock brake system function. Have
your vehicle checked as soon as possible.
Battery It illuminates when you switch
the ignition on.
If it illuminates when the engine
is running, this indicates your vehicle
requires service. Have your vehicle
checked as soon as possible. Brake System It illuminates when you apply the
parking brake and the ignition is
on. If it illuminates when your
vehicle is moving, make sure the
parking brake is released. If the
parking brake is released, this
indicates low brake fluid level or the brake
system requires service. Have your vehicle
checked as soon as possible.
Note: Indicators may vary depending on
region.
Check Fuel Cap It illuminates when the fuel cap
is not properly installed.
Continued driving with this light
on may cause the malfunction indicator
lamp to illuminate.
Diesel Exhaust Fluid Illuminates when the diesel
exhaust fluid is low,
contaminated or the system
requires service. See Selective Catalytic
Reduction System (page 217).
Door Ajar It illuminates when you switch
the ignition on and remains on if
any door is open.
Electric Parking Brake It illuminates or flashes when the
electric parking brake requires
service.
137
2022 Super Duty (TFE) Canada/United States of America, enUSA, Edition date: 202103, First-Printing Instrument ClusterE223375 E270480 E163176 E325775
Page 144 of 740

USING THE INSTRUMENT
CLUSTER DISPLAY CONTROLS
WARNING: Driving while distracted
can result in loss of vehicle control, crash
and injury. We strongly recommend that
you use extreme caution when using any
device that may take your focus off the
road. Your primary responsibility is the
safe operation of your vehicle. We
recommend against the use of any
hand-held device while driving and
encourage the use of voice-operated
systems when possible. Make sure you
are aware of all applicable local laws
that may affect the use of electronic
devices while driving.
The controls are on the steering wheel. •
Press the up and down arrow buttons
to scroll through and highlight the
options within a menu.
• Press the right arrow button to enter a
sub-menu.
• Press the left arrow to exit a menu.
• Press the OK button to choose and
confirm settings or messages. This icon shows the features on
or off status. A check in the box
indicates the feature is on, and
unchecked indicates the feature is off. INSTRUMENT CLUSTER
DISPLAY MAIN MENU -
VEHICLES WITH: 2.3 INCH
SCREEN
Depending on your vehicle options, some
menu items can appear different or not at
all.
Note:
For your safety, some features are
speed-dependent and could be unavailable
when your vehicle is above a certain speed. Main Menu
Trip 1
Trip 2
Fuel Economy Seatbelts
Driver Assist Settings
INSTRUMENT CLUSTER
DISPLAY MAIN MENU -
VEHICLES WITH: 4.2 INCH
SCREEN
Depending on your vehicle options, some
menu items can appear different or not at
all.
Note: For your safety, some features are
speed-dependent and could be unavailable
when your vehicle is above a certain speed.
141
2022 Super Duty (TFE) Canada/United States of America, enUSA, Edition date: 202103, First-Printing Instrument Cluster DisplayE184451 E204495
Page 161 of 740

FRONT SEAT PRECAUTIONS
WARNING: Sitting improperly, out
of position or with the seatback reclined
too far can take weight off the seat
cushion and affect the decision of the
passenger sensing system, resulting in
serious injury or death in the event of a
crash. Always sit upright against your
seat back, with your feet on the floor. WARNING: Do not recline the seat
backrest too far as this can cause the
occupant to slide under the seatbelt,
resulting in personal injury in the event
of a crash. WARNING:
Do not place objects
higher than the top of the seat backrest.
Failure to follow this instruction could
result in personal injury or death in the
event of a sudden stop or crash. WARNING: Do not adjust the driver
seat or seat backrest when your vehicle
is moving. This may result in sudden seat
movement, causing the loss of control
of your vehicle. SITTING IN THE CORRECT
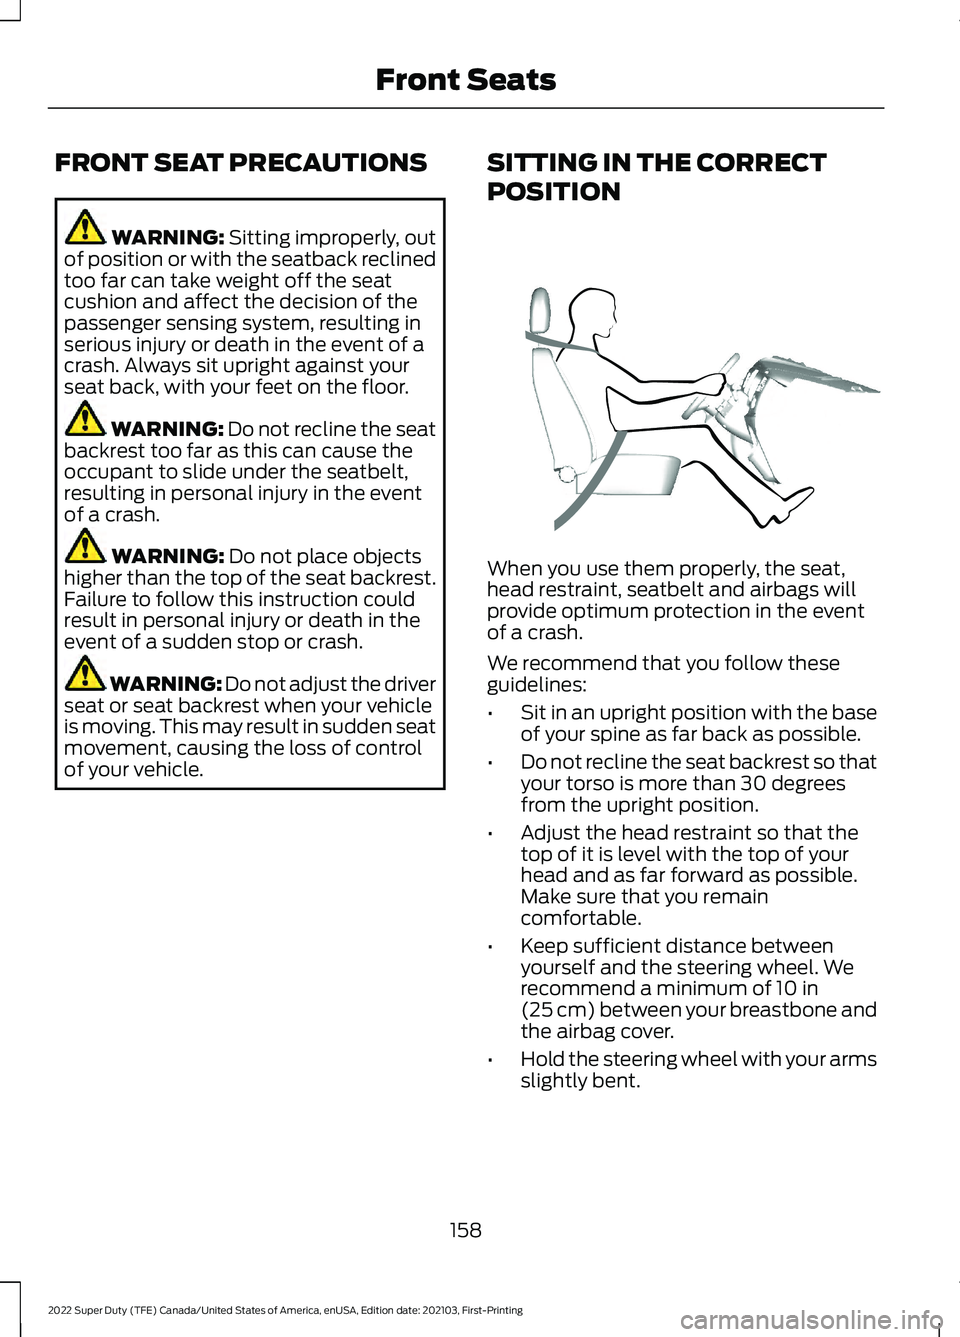
POSITION When you use them properly, the seat,
head restraint, seatbelt and airbags will
provide optimum protection in the event
of a crash.
We recommend that you follow these
guidelines:
•
Sit in an upright position with the base
of your spine as far back as possible.
• Do not recline the seat backrest so that
your torso is more than 30 degrees
from the upright position.
• Adjust the head restraint so that the
top of it is level with the top of your
head and as far forward as possible.
Make sure that you remain
comfortable.
• Keep sufficient distance between
yourself and the steering wheel. We
recommend a minimum of
10 in
(25 cm) between your breastbone and
the airbag cover.
• Hold the steering wheel with your arms
slightly bent.
158
2022 Super Duty (TFE) Canada/United States of America, enUSA, Edition date: 202103, First-Printing Front SeatsE68595
Page 162 of 740

•
Bend your legs slightly so that you can
press the pedals fully.
• Position the shoulder strap of the
seatbelt over the center of your
shoulder and position the lap strap
tightly across your hips.
Make sure that your driving position is
comfortable and that you can maintain full
control of your vehicle.
MANUAL SEATS
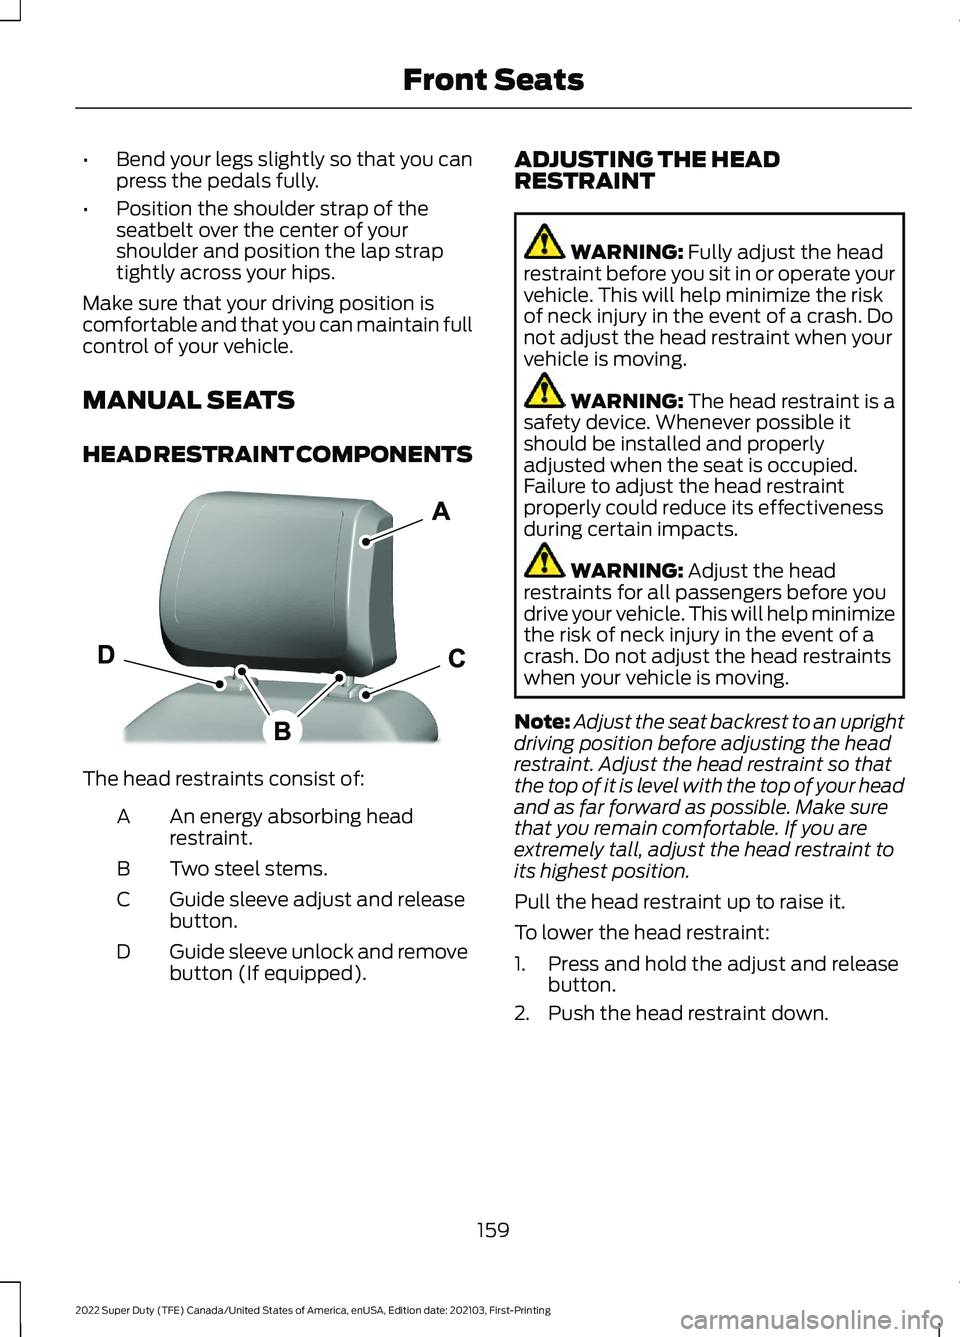
HEAD RESTRAINT COMPONENTS The head restraints consist of:
An energy absorbing head
restraint.
A
Two steel stems.
B
Guide sleeve adjust and release
button.
C
Guide sleeve unlock and remove
button (If equipped).
D ADJUSTING THE HEAD
RESTRAINT WARNING: Fully adjust the head
restraint before you sit in or operate your
vehicle. This will help minimize the risk
of neck injury in the event of a crash. Do
not adjust the head restraint when your
vehicle is moving. WARNING:
The head restraint is a
safety device. Whenever possible it
should be installed and properly
adjusted when the seat is occupied.
Failure to adjust the head restraint
properly could reduce its effectiveness
during certain impacts. WARNING:
Adjust the head
restraints for all passengers before you
drive your vehicle. This will help minimize
the risk of neck injury in the event of a
crash. Do not adjust the head restraints
when your vehicle is moving.
Note: Adjust the seat backrest to an upright
driving position before adjusting the head
restraint. Adjust the head restraint so that
the top of it is level with the top of your head
and as far forward as possible. Make sure
that you remain comfortable. If you are
extremely tall, adjust the head restraint to
its highest position.
Pull the head restraint up to raise it.
To lower the head restraint:
1. Press and hold the adjust and release button.
2. Push the head restraint down.
159
2022 Super Duty (TFE) Canada/United States of America, enUSA, Edition date: 202103, First-Printing Front SeatsE327921