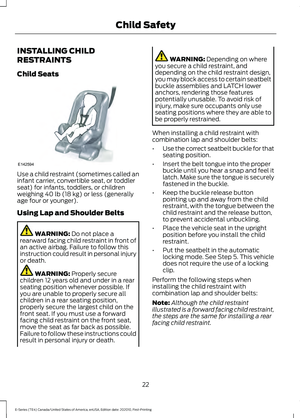
Page 49 of 300

Note:
If any door is open, the horn sounds
twice and the direction indicators do not
flash.
Autolock Feature
The autolock feature locks all the doors
when:
• All doors are closed.
• The ignition is on.
• You shift into any gear putting your
vehicle in motion.
• The ignition is on, all the doors are
closed and your vehicle has been in
motion at a speed greater than 12 mph
(20 km/h).
Autounlock Feature
The autounlock feature unlocks all the
doors when:
• Your vehicle comes to a stop and you
switch the ignition off or to accessory.
• You open the driver door within 10
minutes of switching the ignition off or
to accessory.
Note: If you electronically lock your vehicle
after you switch the ignition off with the
driver door closed, the doors do not
autounlock.
Enabling or Disabling Autolock and
Autounlock
You can enable or disable the autolock and
autounlock features independently of each
other.
To enable or disable autolock, do the
following:
1. Switch the ignition on.
2. Press the power door unlock control three times.
3. Switch the ignition off. 4. Press the power door unlock control
three times.
5. Switch the ignition on. The horn sounds
indicating your vehicle is in
programming mode.
6. Press the power door unlock control and within five seconds, press the
power door lock control. The horn
sounds once if disabled or twice if
enabled.
7. Switch the ignition off. The horn sounds
indicating programming is complete.
Note: You can also switch this feature on
or off using the information display. See
Information Displays (page 65).
To enable or disable autounlock, do the
following:
1. Switch the ignition on.
2. Press the power door unlock control three times.
3. Switch the ignition off.
4. Press the power door unlock control three times.
5. Switch the ignition on. The horn sounds
indicating your vehicle is in
programming mode.
6. Press the power door lock control and within five seconds, press the power
door unlock control. The horn sounds
once if disabled or twice if enabled.
7. Switch the ignition off. The horn sounds
indicating programming is complete.
Note: You can also switch this feature on
or off using the information display. See
Information Displays
(page 65).
Illuminated Entry
The interior lamps and some exterior
lamps illuminate when you unlock the
doors with the remote control.
46
E-Series (TE4) Canada/United States of America, enUSA, Edition date: 202010, First-Printing Doors and Locks
Page 50 of 300
The lamps turn off if:
•
The ignition is on.
• You press the remote control lock
button.
• 25 seconds have elapsed.
The lamps do not turn off if:
• You switch them on with the lighting
control.
• Any door is open.
47
E-Series (TE4) Canada/United States of America, enUSA, Edition date: 202010, First-Printing Doors and Locks
Page 51 of 300

PASSIVE ANTI-THEFT
SYSTEM
Note:
The system is not compatible with
non-Ford aftermarket remote start systems.
Use of these systems could result in engine
starting problems and a loss of security
protection.
Note: Prevent these objects from touching
the coded key when starting your vehicle.
Metallic objects, electronic devices or a
second coded key on the same key chain
could result in vehicle starting problems,
especially if they are too close to the key
when starting your vehicle. Switch the
ignition off, move all objects on the key
chain away from the coded key and restart
your vehicle if a problem occurs.
Note: Do not leave a duplicate coded key
in your vehicle. Always take your keys and
lock all doors when leaving your vehicle.
SecuriLock®
The system helps prevent the engine from
starting unless you use a coded key
programmed to your vehicle. Using the
wrong key may prevent your vehicle from
starting. A message may appear in the
information display.
If you are unable to start your vehicle with
a coded key, it is not operating correctly.
A message may appear in the information
display.
Automatic Arming
The system arms when you switch the
ignition off.
Automatic Disarming
The system disarms when you switch the
ignition on with a coded key. Replacement Keys
Your vehicle may have two integrated
keyhead transmitters.
The integrated keyhead transmitter
functions as a programmed ignition key
that starts your vehicle.
If your programmed transmitters or
standard SecuriLock coded keys become
lost or stolen and you do not have an extra
coded key, you need to have your vehicle
towed to an authorized dealer. You need
to erase the key codes from your vehicle
and program new coded keys.
Store an extra programmed key away from
your vehicle in a safe place. To purchase
additional spare or replacement keys,
contact an authorized dealer.
If you have a spare key, you need to
program it. See Replacing a Lost Key or
Remote Control (page 44).
48
E-Series (TE4) Canada/United States of America, enUSA, Edition date: 202010, First-Printing Security
Page 52 of 300
ADJUSTING THE STEERING
WHEEL
WARNING: Do not adjust the
steering wheel when your vehicle is
moving.
Note: Make sure that you are sitting in the
correct position. See
Sitting in the Correct
Position (page 77). 1. Unlock the steering column.
2. Adjust the steering wheel to the
position you prefer.
3. Lock the steering column. CRUISE CONTROL - VEHICLES
WITH: ADAPTIVE CRUISE
CONTROL
See
Using Adaptive Cruise Control
(page 110).
CRUISE CONTROL - VEHICLES
WITH: CRUISE CONTROL See
What Is Cruise Control (page 109).
49
E-Series (TE4) Canada/United States of America, enUSA, Edition date: 202010, First-Printing Steering WheelE261502 E191337 E191329
Page 53 of 300
INFORMATION DISPLAY
CONTROL
See Information Displays (page 65).
HORN 50
E-Series (TE4) Canada/United States of America, enUSA, Edition date: 202010, First-Printing Steering WheelE191336 E270945
Page 54 of 300

WINDSHIELD WIPERS
Note:
Fully defrost the windshield before
you switch the windshield wipers on.
Note: Make sure you switch the windshield
wipers off before entering a car wash.
Note: If streaks or smears appear on the
windshield, clean the windshield and the
wiper blades. If that does not resolve the
issue, install new wiper blades.
Note: Do not operate the wipers on a dry
windshield. This may scratch the glass,
damage the wiper blades or cause the wiper
motor to burn out. Always use the
windshield washers before wiping a dry
windshield. •
Rotate away from you for a long wipe
interval.
• Rotate toward you for a short wipe
interval.
Speed Dependent Wipers
When your vehicle speed increases, the
interval between wipes decreases. WINDSHIELD WASHERS
•
A brief press causes a single wipe
without washer fluid.
• A brief press and hold causes the
wipers to swipe three times with
washer fluid.
• A long press and hold turns on the
wipers and washer fluid for up to 10
seconds.
A wipe occurs a few seconds after washing
to clear any remaining washer fluid. You
can switch this feature on or off in the
information display. See Information
Displays (page 65).
Note: Do not operate the washers when
the washer reservoir is empty. This could
cause the washer pump to overheat.
51
E-Series (TE4) Canada/United States of America, enUSA, Edition date: 202010, First-Printing Wipers and WashersE172816 E172818
Page 55 of 300

GENERAL INFORMATION
Condensation in the Exterior Front
Lamps and Rear Lamps
Exterior front lamps and rear lamps have
vents to accommodate normal changes
in air pressure.
Condensation can be a natural by-product
of this design. When moist air enters the
lamp assembly through the vents, there is
a possibility that condensation can occur
when the temperature is cold. When
normal condensation occurs, a fine mist
can form on the interior of the lens. The
fine mist eventually clears and exits
through the vents during normal operation.
Clearing time may take as long as 48 hours
under dry weather conditions.
Examples of acceptable condensation are:
•
The presence of a fine mist (no streaks,
drip marks or large droplets).
• A fine mist covers less than 50% of the
lens.
Examples of unacceptable condensation
are:
• A water puddle inside the lamp.
• Streaks, drip marks or large droplets
present on the interior of the lens.
If you see any unacceptable condensation,
have your vehicle checked by an authorized
dealer. LIGHTING CONTROL Lamps off.
A
Parking lamps, instrument panel
lamps, license plate lamps and
rear lamps.
B
Headlamps.
C
Headlamp High Beam Push the lever away from you to
switch the high beam on.
Push the lever forward again or pull the
lever toward you to switch the high beams
off.
52
E-Series (TE4) Canada/United States of America, enUSA, Edition date: 202010, First-Printing LightingE142449 E308790
Page 56 of 300

Flashing the Headlamp High Beam
Slightly pull the lever toward you and
release it to flash the headlamps.
AUTOLAMPS
WARNING: The system does not
relieve you of your responsibility to drive
with due care and attention. You may
need to override the system if it does not
turn the headlamps on in low visibility
conditions, for example daytime fog.
Autolamps turn the headlamps on in low
light situations or when the wipers operate. Switch the lighting control to the
autolamps position.
The headlamps remain on for a period of
time after you switch the ignition off. Use
the information display controls to adjust
the period of time that the headlamps
remain on.
Note: If you switch the autolamps on, you
cannot switch the high beams on until the
system turns the low beams on. Windshield Wiper Activated
Headlamps
When you switch the autolamps on, the
headlamps turn on within 10 seconds of
switching the wipers on. They turn off
approximately 60 seconds after you switch
the windshield wipers off.
The headlamps do not turn on with the
wipers:
•
During a single wipe.
• When using the windshield washers.
• If the wipers are in intermittent mode.
Note: If you switch the autolamps and the
autowipers on, the headlamps turn on when
the windshield wipers continuously operate.
INSTRUMENT LIGHTING
DIMMER
The instrument lighting dimmer buttons
are on the lighting control. Repeatedly press one of the
buttons to adjust the brightness.
DAYTIME RUNNING LAMPS
(IF
EQUIPPED) WARNING:
The daytime running
lamps system does not activate the rear
lamps and may not provide adequate
lighting during low visibility driving
conditions. Make sure you switch the
headlamps on, as appropriate, during all
low visibility conditions. Failure to do so
may result in a crash.
53
E-Series (TE4) Canada/United States of America, enUSA, Edition date: 202010, First-Printing LightingE311233 E291299 E291298