2022 DODGE DURANGO U connect
[x] Cancel search: U connectPage 168 of 332

166MULTIMEDIA
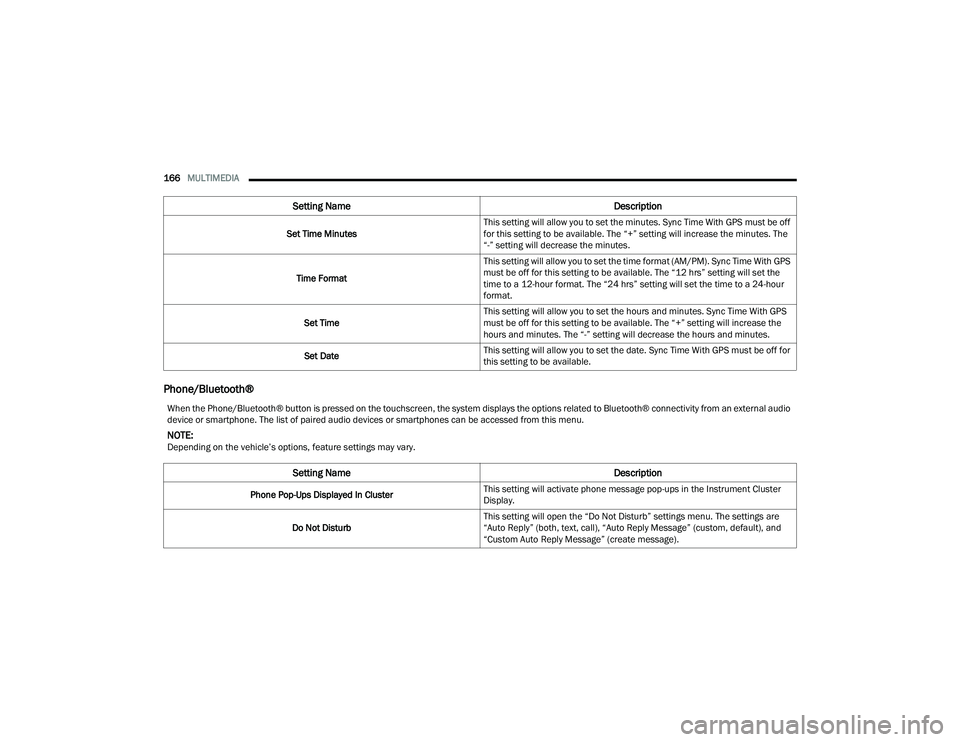
Phone/Bluetooth®
Set Time Minutes This setting will allow you to set the minutes. Sync Time With GPS must be off
for this setting to be available. The “+” setting will increase the minutes. The
“-” setting will decrease the minutes.
Time Format This setting will allow you to set the time format (AM/PM). Sync Time With GPS
must be off for this setting to be available. The “12 hrs” setting will set the
time to a 12-hour format. The “24 hrs” setting will set the time to a 24-hour
format.
Set Time This setting will allow you to set the hours and minutes. Sync Time With GPS
must be off for this setting to be available. The “+” setting will increase the
hours and minutes. The “-” setting will decrease the hours and minutes.
Set Date This setting will allow you to set the date. Sync Time With GPS must be off for
this setting to be available.
Setting Name
Description
When the Phone/Bluetooth® button is pressed on the touchscreen, the system displays the options related to Bluetooth® connectivity from an external audio
device or smartphone. The list of paired audio devices or smartphones can be accessed from this menu.
NOTE:Depending on the vehicle’s options, feature settings may vary.
Setting NameDescription
Phone Pop-Ups Displayed In ClusterThis setting will activate phone message pop-ups in the Instrument Cluster
Display.
Do Not Disturb This setting will open the “Do Not Disturb” settings menu. The settings are
“Auto Reply” (both, text, call), “Auto Reply Message” (custom, default), and
“Custom Auto Reply Message” (create message).
22_WD_OM_EN_USC_t.book Page 166
Page 170 of 332

168MULTIMEDIA
Navigation
Show Command List This setting will allow you to turn the Command List on or off. The “Always”
setting will always show the Command List. The “With Help” setting will show
the Command List and provide a brief description of what the command does.
The “Never” setting will turn the Command List off.
Wake Up Word This setting will change the system’s “Wake Up” word. The available options
are “Hey Uconnect” and “Hey Dodge”.
Voice Barge-in This setting will turn the Voice Barge-in function on or off.
Setting Name Description
When the Navigation button is pressed on the touchscreen, the system displays options related to the vehicle’s built-in Navigation system. These settings can
change which icons display on the map, how “time to arrival is calculated”, and route types.
For more information on Navigation and settings, refer to your Uconnect Owner’s Manual Supplement.
NOTE:Depending on the vehicle’s options, feature settings may vary.
22_WD_OM_EN_USC_t.book Page 168
Page 177 of 332

MULTIMEDIA175
Audio
When the Audio button is pressed on the touchscreen, the system displays options related to the vehicle’s sound system. These settings can change the audio
location within the vehicle, adjust the bass or treble levels, and auto-play settings from an audio device or smartphone.
NOTE:Depending on the vehicle’s options, feature settings may vary.
Setting Name Description
Balance/FadeThis setting will adjust audio levels from specific speakers in the front/back
and left/right of the vehicle. The Speaker icon can be moved to set audio
location.
Equalizer This setting will adjust the “Bass”, “Mid”, and “Treble” ranges of the audio.
Speed Adjusted Volume This setting will adjust audio volume as speeds increase. At a higher setting,
the volume will increase more as the vehicle speeds up. The available settings
are “Off”, “1”, “2”, and “3”.
Surround Sound This setting will turn the Surround Sound system on or off.
AUX Volume Offset This setting will tune the audio levels from a device connected through the
AUX port. The available settings are “+” and “-”.
Auto Play This setting will automatically begin playing audio from a connected device.
Auto On Radio This setting will turn the radio on with vehicle start and recall the last known
radio state. The available options are “On”, “Off”, and “Last Recall”.
Volume Adjustment This setting will let you adjust the volume levels for “Media”, “Phone”,
“Navigation”, and “VR” (Voice Recognition).
5
22_WD_OM_EN_USC_t.book Page 175
Page 178 of 332

176MULTIMEDIA
Notifications
When the Notifications button is pressed on the touchscreen, the system displays the options related to Notifications for the system.
NOTE:Depending on the vehicle’s options, feature settings may vary.
Setting Name Description
App Drawer Favoriting Pop-UpsThis setting turns the “App Favorited” pop-up on or off.
App Drawer Unfavoriting Pop-Ups This setting turns the “App Unfavorited” pop-up on or off.
New Text Message Pop-Ups This setting turns receiving/storing a pop-up for new text messages of any
connected phone on or off.
Missed Calls Message This setting turns receiving/storing a pop-up for missed calls of any connected
phone on or off.
Navigation Pop-ups This setting turns receiving/storing predictive Navigation Pop-ups on or off.
22_WD_OM_EN_USC_t.book Page 176
Page 181 of 332

MULTIMEDIA179
Software Update
System Information
When the Software Update button is selected, the system will display a menu with possible Wi-Fi connections. From this page, you can select and connect to
one of the available Wi-Fi networks to begin system software updates. To begin, make sure the system is set to allow for Wi-Fi updates.
1. Select the desired Wi-Fi network from the available list.
2. Enter the Wi-Fi password. If the password is entered incorrectly, the system will display a notification that the connection failed.
3. Once connected, the system will begin scanning for any system updates. Press the Stop Scan button to end this process.
NOTE:Depending on the vehicle’s options, feature settings may vary.
When the System Information button is pressed on the touchscreen, the system displays the radio system information.
NOTE:Depending on the vehicle’s options, feature settings may vary.
Setting Name Description
Version InformationWhen this feature is selected, the radio version build will be displayed.
License Information When this feature is selected, a Software License screen will appear,
displaying the system software version.
5
22_WD_OM_EN_USC_t.book Page 179
Page 182 of 332

180MULTIMEDIA
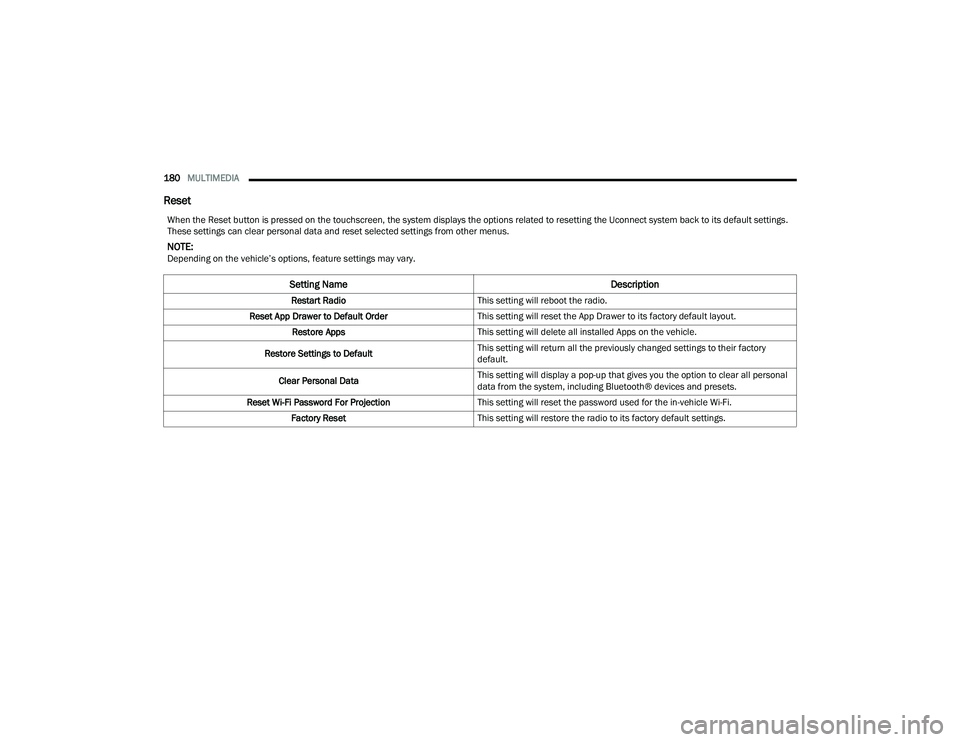
Reset
When the Reset button is pressed on the touchscreen, the system displays the options related to resetting the Uconnect system back to its default settings.
These settings can clear personal data and reset selected settings from other menus.
NOTE:Depending on the vehicle’s options, feature settings may vary.
Setting Name Description
Restart RadioThis setting will reboot the radio.
Reset App Drawer to Default Order This setting will reset the App Drawer to its factory default layout.
Restore Apps This setting will delete all installed Apps on the vehicle.
Restore Settings to Default This setting will return all the previously changed settings to their factory
default.
Clear Personal Data This setting will display a pop-up that gives you the option to clear all personal
data from the system, including Bluetooth® devices and presets.
Reset Wi-Fi Password For Projection This setting will reset the password used for the in-vehicle Wi-Fi.
Factory Reset This setting will restore the radio to its factory default settings.
22_WD_OM_EN_USC_t.book Page 180
Page 183 of 332

MULTIMEDIA181
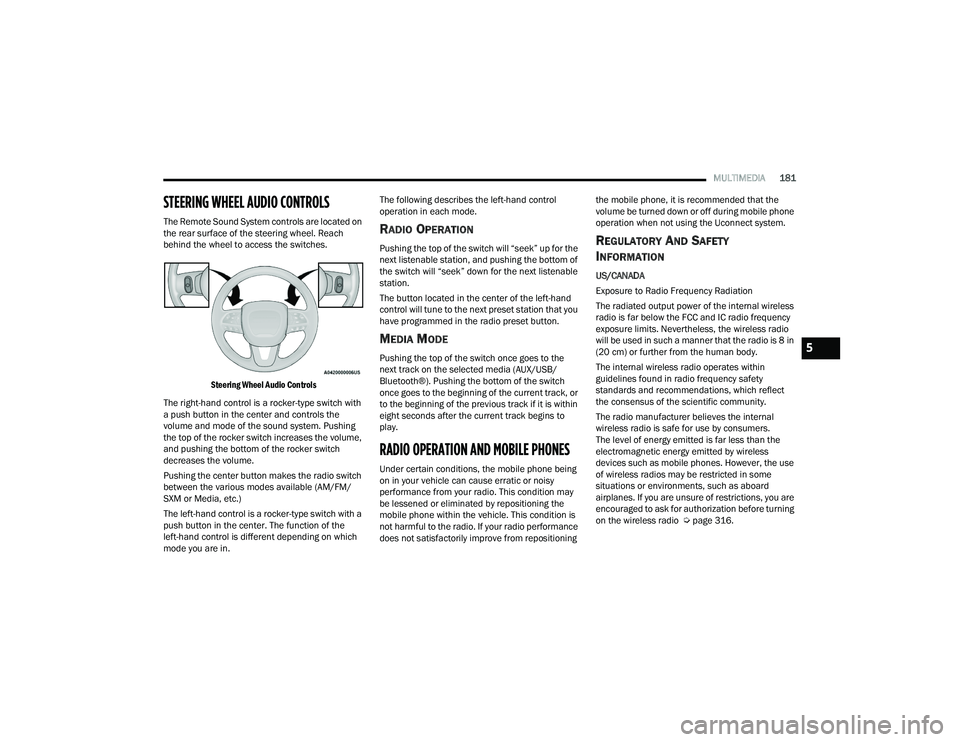
STEERING WHEEL AUDIO CONTROLS
The Remote Sound System controls are located on
the rear surface of the steering wheel. Reach
behind the wheel to access the switches.
Steering Wheel Audio Controls
The right-hand control is a rocker-type switch with
a push button in the center and controls the
volume and mode of the sound system. Pushing
the top of the rocker switch increases the volume,
and pushing the bottom of the rocker switch
decreases the volume.
Pushing the center button makes the radio switch
between the various modes available (AM/FM/
SXM or Media, etc.)
The left-hand control is a rocker-type switch with a
push button in the center. The function of the
left-hand control is different depending on which
mode you are in. The following describes the left-hand control
operation in each mode.RADIO OPERATION
Pushing the top of the switch will “seek” up for the
next listenable station, and pushing the bottom of
the switch will “seek” down for the next listenable
station.
The button located in the center of the left-hand
control will tune to the next preset station that you
have programmed in the radio preset button.
MEDIA MODE
Pushing the top of the switch once goes to the
next track on the selected media (AUX/USB/
Bluetooth®). Pushing the bottom of the switch
once goes to the beginning of the current track, or
to the beginning of the previous track if it is within
eight seconds after the current track begins to
play.
RADIO OPERATION AND MOBILE PHONES
Under certain conditions, the mobile phone being
on in your vehicle can cause erratic or noisy
performance from your radio. This condition may
be lessened or eliminated by repositioning the
mobile phone within the vehicle. This condition is
not harmful to the radio. If your radio performance
does not satisfactorily improve from repositioning
the mobile phone, it is recommended that the
volume be turned down or off during mobile phone
operation when not using the Uconnect system.
REGULATORY AND SAFETY
I
NFORMATION
US/CANADA
Exposure to Radio Frequency Radiation
The radiated output power of the internal wireless
radio is far below the FCC and IC radio frequency
exposure limits. Nevertheless, the wireless radio
will be used in such a manner that the radio is 8 in
(20 cm) or further from the human body.
The internal wireless radio operates within
guidelines found in radio frequency safety
standards and recommendations, which reflect
the consensus of the scientific community.
The radio manufacturer believes the internal
wireless radio is safe for use by consumers.
The level of energy emitted is far less than the
electromagnetic energy emitted by wireless
devices such as mobile phones. However, the use
of wireless radios may be restricted in some
situations or environments, such as aboard
airplanes. If you are unsure of restrictions, you are
encouraged to ask for authorization before turning
on the wireless radio Ú page 316.
5
22_WD_OM_EN_USC_t.book Page 181
Page 193 of 332

SAFETY191
NOTE:
In a parking lot situation, oncoming vehicles can be
blocked by vehicles parked on either side. If the
sensors are blocked by other structures or vehicles,
the system will not be able to alert the driver.
Blind Spot Modes
Blind Spot has three selectable modes of
operation that are available in the Uconnect
system.
Blind Spot Alert Lights Only
When operating in Blind Spot Alert mode, the BSM
system will provide a visual alert in the appropriate
side view mirror based on a detected object.
However, when the system is operating in Rear
Cross Path (RCP) mode, the system will respond with both visual and audible alerts when a
detected object is present. Whenever an audible
alert is requested, the radio is muted.
Blind Spot Alert Lights/Chime
When operating in Blind Spot Alert Lights/Chime
mode, the BSM system will provide a visual alert in
the appropriate side view mirror based on a
detected object. If the turn signal is then activated,
and it corresponds to an alert present on that side
of the vehicle, an audible chime will also be
sounded. Whenever a turn signal and detected
object are present on the same side at the same
time, both the visual and audible alerts will be
issued. In addition to the audible alert the radio (if
on) will also be muted.
NOTE:Whenever an audible alert is requested by the
BSM system, the radio is also muted.
When the system is in RCP, the system shall
respond with both visual and audible alerts when a
detected object is present. Whenever an audible
alert is requested, the radio is also muted. Turn/
hazard signal status is ignored; the RCP state
always requests the chime.
Blind Spot Alert Off
When the BSM system is turned off there will be
no visual or audible alerts from either the BSM or
RCP systems.
NOTE:The BSM system will store the current operating
mode when the vehicle is shut off. Each time the
vehicle is started the previously stored mode will
be recalled and used.
FORWARD COLLISION WARNING (FCW)
W
ITH MITIGATION
FCW with Mitigation provides the driver with
audible warnings, visual warnings (within the
instrument cluster display), and may apply a brake
jerk to warn the driver when it detects a potential
frontal collision. The warnings and limited braking
are intended to provide the driver with enough time
to react, avoid or mitigate the potential collision.
NOTE:FCW monitors the information from the forward
looking sensors as well as the Electronic Brake
Controller (EBC) to calculate the probability of a
forward collision. When the system determines
that a forward collision is probable, the driver will
be provided with audible and visual warnings and
may provide a brake jerk warning. If the driver does
not take action based upon these progressive
warnings, then the system will provide a limited
level of active braking to help slow the vehicle and
mitigate the potential forward collision. If the driver
reacts to the warnings by braking and the system
WARNING!
Rear Cross Path (RCP) detection is not a backup
aid system. It is intended to be used to help a
driver detect an oncoming vehicle in a parking
lot situation. Drivers must be careful when
backing up, even when using RCP. Always check
carefully behind your vehicle, look behind you,
and be sure to check for pedestrians, animals,
other vehicles, obstructions, and blind spots
before backing up. Failure to do so can result in
serious injury or death.
6
22_WD_OM_EN_USC_t.book Page 191