Page 119 of 260

117
On a new vehicle, the first particle
filter regeneration operations may be
accompanied by a "burning" smell, which
is per fectly normal.
Following prolonged operation of the
vehicle at very low speed or at idle,
you may, in exceptional circumstances,
notice the emission of water vapour at the
exhaust on acceleration. This does not
affect the behaviour of the vehicle or the
environment.
Manual gearbox
The gearbox does not require any
maintenance (no oil change).
Automatic gearbox
The gearbox does not require any
maintenance (no oil change).
Brake pads
Brake wear depends on the style
of driving, particularly in the case
of vehicles used in town, over short
distances. It may be necessary to
have the condition of the brakes
checked, even between vehicle
services.
Unless there is a leak in the circuit, a drop in
the brake fluid level indicates that the brake
pads are worn.
Brake disc wear
For information on checking brake
disc wear, contact a CITROËN
dealer or a qualified workshop.
Parking brake
If excessive travel or a loss of
effectiveness of this system is
noticed, the parking brake must
be checked, even between two
services.
This system must be checked by a CITROËN
dealer or a qualified workshop. Only use products recommended by
CITROËN or products of equivalent quality
and specification.
In order to optimise the operation of units
as important as those in the braking
system, CITROËN selects and offers very
specific products.
After washing the vehicle, dampness, or
in wintry conditions, ice can form on the
brake discs and pads: braking efficiency
may be reduced. Make light brake
applications to dry and defrost the brakes.
7
Practical information
Page 124 of 260

122
Spare wheel
Procedure for changing a damaged wheel with
the spare wheel using the tools provided with
the vehicle.
Access to tooling
List of tools
1Wheelbrace.
For removing the hub cap and removing
the wheel bolts.
2 Jack with integrated crank.
Used to raise the vehicle.
3 Wheel bolt cover removal tool.
Removes the wheel bolt covers on alloy
wheels.
4 Towing eye.
For more information on Towing the vehicle ,
refer to the corresponding section. All of these tools are specific to your
vehicle and may vary according to the
level of equipment.
Do not use them for any other purposes.
The jack must only be used to change a
wheel with a damaged or punctured tyre.
Do not use any jack other than the one
supplied with this vehicle.
If the vehicle does not have its original jack,
contact a CITROËN dealer or a qualified
workshop to obtain the correct jack for it.
The jack meets European standards,
as defined in the Machinery Directive
2006/42/EC.
The jack does not require any
maintenance.
The tools are installed in the boot under the
f l o o r.
F
O
pen the boot.
F
L
ift the floor and remove it.
F
R
emove the storage box containing the
tools. These tools are specific to your vehicle and
may vary according to the equipment. Do not
use them for purposes other than those listed
below.
In the event of a breakdown
Page 126 of 260

124
Removing a wheel
Parking the vehicle
* Position P for the automatic gearbox
Park the vehicle where it does not block
traffic: the ground must be level, stable
and non-slippery.
Apply the parking brake, switch off the
ignition and engage first gear* so as to
block the wheels.
Check that the parking brake warning
lamp comes on fixed in the instrument
panel.
The occupants must get out of the vehicle
and wait where they are safe.
Make sure that the jack is correctly
positioned at one of the vehicle's jacking
points.
Incorrect use of the jack could cause the
vehicle to collapse.
Never go underneath a vehicle raised
using a jack; use an axle stand.
Do not use a jack other than the one
supplied by the manufacturer.
Wheel with hub cap
When removing the wheel
, first remove
the hub cap using the wheelbrace by
pulling at the valve aperture.
When refitting the wheel , after tightening
the wheel bolts, refit the hub cap, starting
by placing its aperture in line with the
valve and then pushing it into place all
round its edge with the palm of your hand.
List of operations
F Remove each wheel bolt covers using the tool 3 (alloy wheels).
F
L
oosen the bolts using wheelbrace 1 o n l y.F
P
lace the foot of jack 2 on the ground and
ensure that it is directly below the front A
or rear B jacking point provided on the
underbody, whichever is closest to the
wheel to be changed.
In the event of a breakdown
Page 128 of 260

126
List of operations
Changing a bulb
The headlamps have polycarbonate
lenses with a protective coating:
F
d
o not clean them using a dr y or
abrasive cloth, nor with a detergent
or solvent product,
F
u
se a sponge and soapy water or a pH
neutral product,
F
w
hen using a high pressure washer
on persistent marks, do not keep the
lance directed towards the lamps or
their edges for too long, so as not to
damage their protective coating and
seals.
A bulb must only be changed with the
ignition off and after the headlamp has
been switched off for several minutes –
Risk of serious burns!
F
D
o not touch the bulb directly with your
fingers, use a lint-free cloth.
It is essential only to use anti-ultraviolet
(UV) type bulbs, so as not to damage the
headlamp.
Always replace a faulty bulb with a new
bulb of the same type and specification.
Fastening the spare wheel
If your vehicle is fitted with alloy wheels,
when tightening the bolts on fitting, it is
normal to notice that the washers do not
come into contact with the spare wheel.
The wheel is secured by the conical
contact of each bolt.
After changing a wheel
Do not exceed 50 mph (80 km/h) when
using a "space-saver" type spare wheel.
Have the tightening of the bolts and the
pressure of the spare wheel checked by a
CITROËN dealer or a qualified workshop
without delay.
Have the punctured wheel repaired and
refit it on the vehicle as soon as possible.
Fitting a wheelF Put the wheel in place on the hub.
F S
crew in the bolts by hand as far as possible.
F
P
re-tighten the bolts using wheelbrace
1
o
n l y.
F
L
ower the vehicle again fully.
F
F
old jack 2 and detach it.
F
T
ighten the bolts using wheelbrace 1 o n l y.
F
R
efit the wheel bolt cover (alloy wheels).
F
S
tow the tools in their box.
In the event of a breakdown
Page 129 of 260

127
In some weather conditions (e.g. low
temperature or humidity), the presence
of misting on the internal sur face of the
glass of the headlamps and rear lamps is
normal; it disappears after the lamps have
been on for a few minutes.
Front lamps
Halogen headlampsHalogen lamps with daytime
running lamps and foglamps
1
Direction indicators (PY21W).
2 Main beam headlamps (H1).
3 Dipped beam headlamps (H7LL).
4 Sidelamps (W5W). 1
Direction indicators (PY21W).
2 Main beam headlamps (H1).
3 Dipped beam headlamps (H7LL).
4 Daytime running lamps / Sidelamps (LEDs).
5 Fo g l a m p s ( H11) .
Light-emitting diodes (LEDs)
For the replacement of this type of lamp,
go to a CITROËN dealer or a qualified
workshop.
Direction indicators
Quicker flashing of the direction indicator
lamp (left or right) indicates that one of
the bulbs on the corresponding side has
failed.
F
T
urn the connector a quarter turn anti-
clockwise.
F
P
ull the bulb connector.
F
R
emove the bulb and change it.
To refit, carry out these operations in reverse
o r d e r.
Amber colour bulbs, such as the direction
indicators, must be replaced by bulbs with
identical colour and specifications.
To refit, close the protective cover very
carefully to guarantee the sealing of the
lamp.
8
In the event of a breakdown
Page 130 of 260

128
Main beam headlampsDipped beam headlampsSidelamps
F Remove the protective cover by pulling on
the tab.
F
U
nclip the module support unit.
F
R
emove the bulb connector.
F
R
emove the bulb and change it.
To reassemble it, reposition the unit in the
housing and clip it back.
Make sure to change the protective cover with
the tab facing upward. F
R emove the protective cover by pulling the
tab.
F
P
ush the entire module relative to the
support to unclip one of the two tabs.
F
O
nce the first tab is unclipped, release the
second tab.
F
R
emove the bulb connector.
F
R
emove the bulb and change it.
To reassemble it, position the unit in the
housing and push until the two tabs "clip".
Make sure to change the protective cover with
the tab facing upward. F
R emove the protective cover by pulling on
the tab.
F
R
emove the bulb connector.
F
R
emove the bulb and change it.
For reassembly, carry out these operations in
reverse order.
Make sure to change the protective cover with
the tab facing upward.
In the event of a breakdown
Page 131 of 260
129
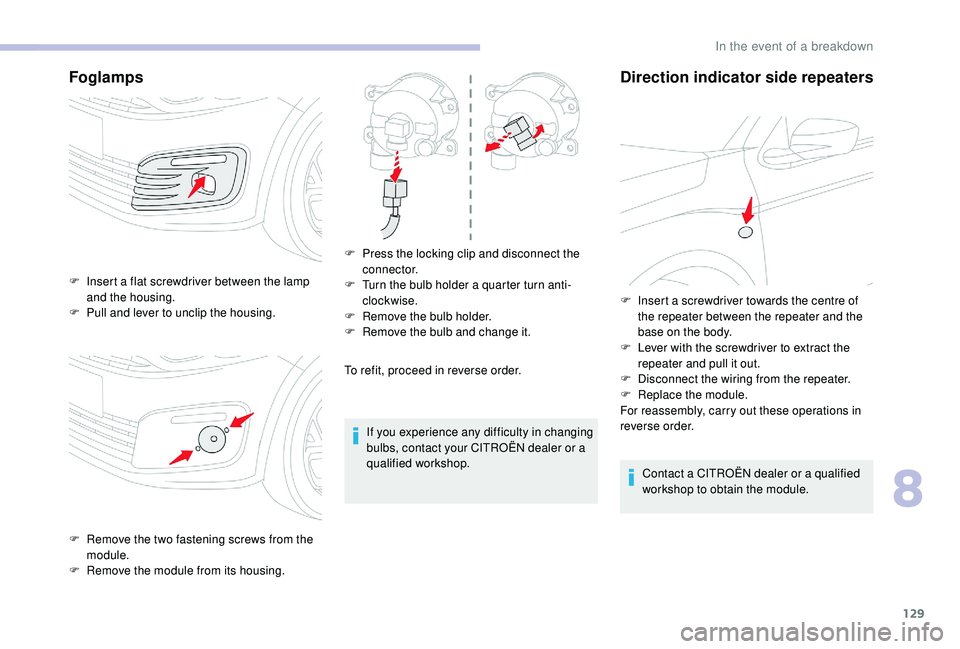
Foglamps
To refit, proceed in reverse order.If you experience any difficulty in changing
bulbs, contact your CITROËN dealer or a
qualified workshop.
Direction indicator side repeaters
Contact a CITROËN dealer or a qualified
workshop to obtain the module.
F
I
nsert a flat screwdriver between the lamp
and the housing.
F
P
ull and lever to unclip the housing.
F
R
emove the two fastening screws from the
module.
F
R
emove the module from its housing. F
P
ress the locking clip and disconnect the
connector.
F
T
urn the bulb holder a quarter turn anti-
clockwise.
F
R
emove the bulb holder.
F
R
emove the bulb and change it.
F
I
nsert a screwdriver towards the centre of
the repeater between the repeater and the
base on the body.
F
L
ever with the screwdriver to extract the
repeater and pull it out.
F
D
isconnect the wiring from the repeater.
F
R
eplace the module.
For reassembly, carry out these operations in
reverse order.
8
In the event of a breakdown
Page 132 of 260

130
Rear lampsThird brake lamp
(W5W)
You must access the housing located on the
rear shelf from the rear seats:
F
U
nclip the bulb holder by lifting the two lugs
and remove it.
F
C
hange the faulty bulb.
F
P
ull the housing cover towards you and up
to disengage it.
F
D
isconnect the lamp connector.
F
L
oosen and remove the nut.
F
F
rom the outside, carefully remove the lamp
unit straight from its housing.
These bulbs are changed from inside the boot:
F
O
pen the boot.
F
R
emove the access grille from the
corresponding side trim panel.
F
D
isconnect the lamp connector. F
R
emove the four screws and lift off the bulb
h o l d e r.
F
T
urn the faulty bulb a quarter of a turn and
change it.
For reassembly, carry out these operations in
reverse order.
Take care to engage the lamp unit in its guides,
while keeping it in line with the vehicle.
Tighten sufficiently to ensure sealing, but
without damaging the lamp.
1 Brake lamp / sidelamps (P21/5W).
2
Direction indicators (PY21W).
3 Reversing lamp (W16W).
4 Foglamp (P21/5W).
In the event of a breakdown