2022 CHRYSLER PACIFICA panel
[x] Cancel search: panelPage 3 of 384

TABLE OF CONTENTS
1
2
3
4
5
6
7
8
9
10
11
1 INTRODUCTION .............................................................................................................................. 9
2 GETTING TO KNOW YOUR VEHICLE ................................................................................. 14
3 GETTING TO KNOW YOUR INSTRUMENT PANEL ....................................................... 110
4 STARTING AND OPERATING ................................................................................................ 131 5 MULTIMEDIA ............................................................................................................................... 187
6 SAFETY ........................................................................................................................................ 223 7 IN CASE OF EMERGENCY .................................................................................................... 282
8 SERVICING AND MAINTENANCE ......................................................................................309
9 TECHNICAL SPECIFICATIONS ............................................................................................360
10 CUSTOMER ASSISTANCE ..................................................................................................... 367 11 INDEX .............................................................................................................................................. 371
22_RUP_OM_EN_USC_t.book Page 1
Page 6 of 384

4
GETTING TO KNOW YOUR
INSTRUMENT PANEL
INSTRUMENT CLUSTER....................................... 110
Instrument Cluster Descriptions .................. 112
INSTRUMENT CLUSTER DISPLAY ..................... 112
Instrument Cluster Display Location And
Controls .......................................................... 113
Engine Oil Life ................................................ 114
KeySense Cluster Messages —
If Equipped..................................................... 115
Instrument Cluster Display Menu Items ..... 116
Battery Saver On/Battery Saver Mode
Message — Electrical Load Reduction
Actions — If Equipped.................................... 119
TRIP COMPUTER ................................................. 121
WARNING LIGHTS AND MESSAGES ................. 121
Red Warning Lights ....................................... 121
Yellow Warning Lights ................................... 124Yellow Indicator Lights .................................. 127
Green Indicator Lights................................... 127White Indicator Lights ................................... 128Blue Indicator Lights ..................................... 129 ONBOARD DIAGNOSTIC SYSTEM —
OBD II .................................................................... 129
Onboard Diagnostic System
(OBD II) Cybersecurity ................................... 129
EMISSIONS INSPECTION AND
MAINTENANCE PROGRAMS ............................. 130
STARTING AND OPERATING
STARTING THE ENGINE ...................................... 131
Normal Starting ............................................ 131
AutoPark ........................................................ 132Cold Weather Operation
(Below –22°F Or −30°C) ............................ 134
After Starting — Warming Up The Engine..... 134
If Engine Fails To Start ................................. 134
To Turn Off The Engine Using ENGINE
START/STOP Button ...................................... 135
ENGINE BLOCK HEATER — IF EQUIPPED ........ 135
ENGINE BREAK-IN RECOMMENDATIONS ....... 135
PARKING BRAKE ................................................. 136
Electric Park Brake (EPB) ............................ 136 AUTOMATIC TRANSMISSION ............................. 139
Ignition Park Interlock................................... 140
Brake/Transmission Shift Interlock (BTSI)
System ........................................................... 140
9-Speed Automatic Transmission ................ 140Gear Ranges .................................................. 141
ALL-WHEEL DRIVE (AWD) — IF EQUIPPED ...... 143
ACTIVE NOISE CANCELLATION .......................... 143
POWER STEERING............................................... 143
STOP/START SYSTEM — IF EQUIPPED ............. 143 Autostop Mode .............................................. 144
Possible Reasons The Engine Does Not
Autostop......................................................... 144
To Start The Engine While In Autostop ........ 145To Manually Turn Off The Stop/Start
System ........................................................... 145
To Manually Turn On The Stop/Start
System ........................................................... 145
System Malfunction ...................................... 145
CRUISE CONTROL SYSTEMS —
IF EQUIPPED ......................................................... 146
Cruise Control................................................ 146
Adaptive Cruise Control (ACC) ...................... 147
22_RUP_OM_EN_USC_t.book Page 4
Page 25 of 384

GETTING TO KNOW YOUR VEHICLE23
Cycle the vehicle ignition system out of the
OFF position.
For vehicles equipped with Keyless
Enter ‘n Go™ — Passive Entry, push the
START/STOP ignition button (requires at
least one valid key fob in the vehicle).
NOTE:
The driver's door key cylinder and the liftgate
button on the key fob cannot arm or disarm the
Vehicle Security system.
The Vehicle Security system remains armed
during power liftgate entry. Pushing the liftgate
button will not disarm the Vehicle Security
system. If someone enters the vehicle through
the liftgate and opens any door, the alarm will
sound.
When the Vehicle Security system is armed, the
interior power door lock switches will not unlock
the doors.
The Vehicle Security system is designed to protect
your vehicle. However, you can create conditions
where the system will give you a false alarm. If one
of the previously described arming sequences has
occurred, the Vehicle Security system will arm
regardless of whether you are in the vehicle or not.
If you remain in the vehicle and open a door, the
alarm will sound. If this occurs, disarm the Vehicle
Security system. If the Vehicle Security system is armed and the
battery becomes disconnected, the Vehicle
Security system will remain armed when the
battery is reconnected; the exterior lights will flash,
and the horn will sound. If this occurs, disarm the
Vehicle Security system.
REARMING OF THE SYSTEM
If something triggers the alarm and no action is
taken to disarm it, the Vehicle Security system will
turn the horn off after a 29 second cycle (with five
seconds between cycles and up to 8 cycles if the
trigger remains active) and then rearm itself.
SECURITY SYSTEM MANUAL OVERRIDE
The Vehicle Security system will not arm if you lock
the doors using the manual door lock.
DOORS
MANUAL DOOR LOCKS — IF EQUIPPED
To lock each door, rotate the door lock on each
door trim panel forward. To unlock the front doors,
pull the inside door handle to the first detent or
rotate the door lock button until the ribbing is
visible. To unlock the rear doors, rotate the door
lock button until the red indicator is visible.
Manual Front Door Lock
Manual Rear Door Lock
1 — Door Handle
2 — Manual Door Lock
2
22_RUP_OM_EN_USC_t.book Page 23
Page 26 of 384

24GETTING TO KNOW YOUR VEHICLE
(Continued)
If the door lock is in the locked position (no ribbing
is visible) when you shut the door, the door will
lock. Therefore, make sure the key fob is not inside
the vehicle before closing the door.
NOTE:The manual door locks will not lock or unlock the
liftgate.
POWER DOOR LOCKS — IF EQUIPPED
A power door lock switch is on each front door trim
panel. Use this switch to lock or unlock the doors.
Driver Power Door Lock Switches
If you push the power door lock switch while the
ignition is in the ACC or ON/RUN position, and any
front door is open, the power locks will not operate.
This prevents you from accidentally locking your
key fob in the vehicle. Placing the ignition in the
OFF position or closing the door will allow the locks
to operate. A chime will sound if the ignition is in
the ACC or ON/RUN position and a door is open, as
a reminder to place the ignition in the OFF position
and remove the key fob.KEYLESS ENTER ‘N GO™ — PASSIVE
E
NTRY
The Passive Entry system is an enhancement to
the vehicle’s Remote Keyless Entry system. This
feature allows you to lock and unlock the vehicle’s
door(s) without having to push the key fob lock or
unlock buttons.
NOTE:
Passive Entry may be programmed on/off
through the Uconnect system Ú page 188.
The key fob may not be detected by the Passive
Entry system if it is located next to a mobile
phone, laptop, or other electronic device; these
devices may block the key fob’s wireless signal
and prevent the Passive Entry handle from
locking/unlocking the vehicle.
WARNING!
For personal security and safety in the event
of a collision, lock the vehicle doors before you
drive as well as when you park and leave the
vehicle.
Never use the PARK position as a substitute for
the parking brake. Always apply the parking
brake fully when parked to guard against vehicle
movement and possible injury or damage.
When exiting the vehicle, always make sure
the ignition is in the OFF position, remove the
key fob from the vehicle and lock the vehicle.
Never leave children alone in a vehicle, or with
access to an unlocked vehicle. Allowing chil -
dren to be in a vehicle unattended is dangerous
for a number of reasons. A child or others
could be seriously or fatally injured.
Children should be warned not to touch the
parking brake, brake pedal or the gear selector.
Do not leave the key fob in or near the vehicle,
or in a location accessible to children, and do
not leave the Keyless Enter ‘n Go™ Ignition in
the ACC or ON/RUN position. A child could
operate power windows, other controls, or
move the vehicle.
WARNING!
22_RUP_OM_EN_USC_t.book Page 24
Page 27 of 384

GETTING TO KNOW YOUR VEHICLE25
If set by the customer in the Uconnect Settings,
unlocking with Passive Entry will initiate illumi -
nated approach (low beams, license plate light,
parking lights) for the time 0, 30, 60 or
90 seconds. Passive Entry also initiates
two flashes of the turn signals.
If wearing gloves, or if it has been raining/
snowing on the Passive Entry door handle, the
unlock sensitivity can be affected, resulting in a
slower response time.
If the vehicle is unlocked by Passive Entry and
no door is opened within 60 seconds, the
vehicle will relock and will arm the Vehicle
Security system (if equipped).
The sliding side doors can be unlocked from the
outside using the hands-free or Passive Entry
system.
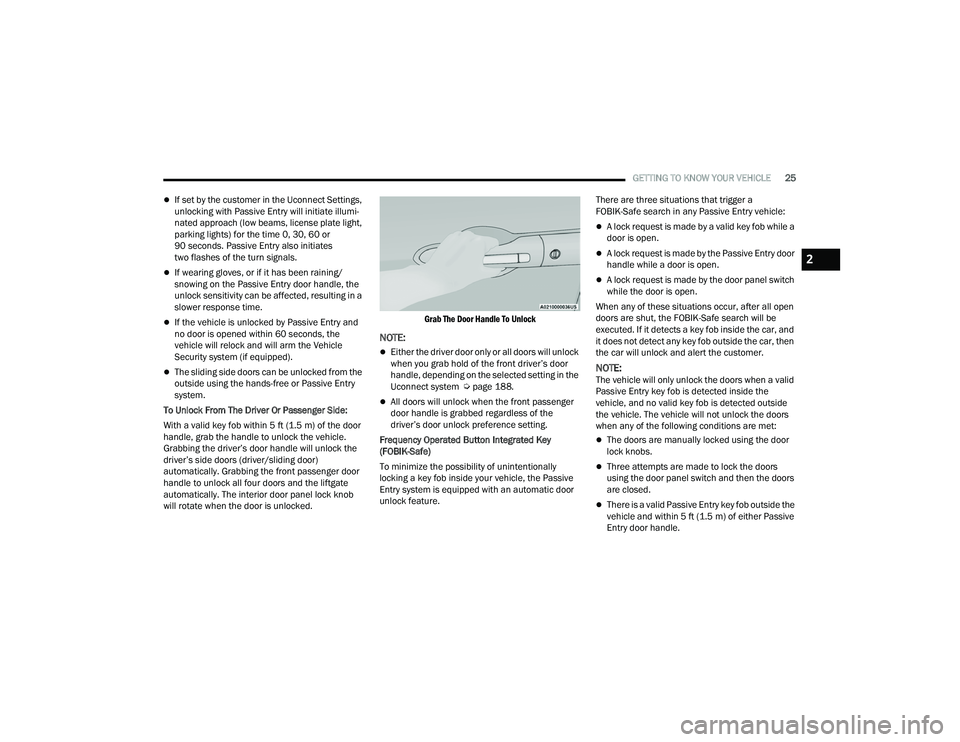
To Unlock From The Driver Or Passenger Side:
With a valid key fob within 5 ft (1.5 m) of the door
handle, grab the handle to unlock the vehicle.
Grabbing the driver’s door handle will unlock the
driver’s side doors (driver/sliding door)
automatically. Grabbing the front passenger door
handle to unlock all four doors and the liftgate
automatically. The interior door panel lock knob
will rotate when the door is unlocked.
Grab The Door Handle To Unlock
NOTE:
Either the driver door only or all doors will unlock
when you grab hold of the front driver’s door
handle, depending on the selected setting in the
Uconnect system Ú
page 188.
All doors will unlock when the front passenger
door handle is grabbed regardless of the
driver’s door unlock preference setting.
Frequency Operated Button Integrated Key
(FOBIK-Safe)
To minimize the possibility of unintentionally
locking a key fob inside your vehicle, the Passive
Entry system is equipped with an automatic door
unlock feature. There are three situations that trigger a
FOBIK-Safe search in any Passive Entry vehicle:
A lock request is made by a valid key fob while a
door is open.
A lock request is made by the Passive Entry door
handle while a door is open.
A lock request is made by the door panel switch
while the door is open.
When any of these situations occur, after all open
doors are shut, the FOBIK-Safe search will be
executed. If it detects a key fob inside the car, and
it does not detect any key fob outside the car, then
the car will unlock and alert the customer.
NOTE:The vehicle will only unlock the doors when a valid
Passive Entry key fob is detected inside the
vehicle, and no valid key fob is detected outside
the vehicle. The vehicle will not unlock the doors
when any of the following conditions are met:
The doors are manually locked using the door
lock knobs.
Three attempts are made to lock the doors
using the door panel switch and then the doors
are closed.
There is a valid Passive Entry key fob outside the
vehicle and within 5 ft (1.5 m) of either Passive
Entry door handle.
2
22_RUP_OM_EN_USC_t.book Page 25
Page 29 of 384

GETTING TO KNOW YOUR VEHICLE27
To Lock The Liftgate
With a valid Passive Entry key fob within 5 ft
(1.5 m) of the liftgate, push the Passive Entry lock
button located to the right of the liftgate release
handle.
The vehicle doors can also be locked by using the
key fob lock button, or the lock button located on
the vehicle’s interior door panel Ú page 370.
AUTOMATIC UNLOCK DOORS ON EXIT —
I
F EQUIPPED
The Unlock Doors Automatically On Exit feature
unlocks all of the vehicle doors when any door is
opened. This will occur only after the gear selector
has been placed into the PARK position, after the
vehicle has been driven (the gear selector has
been placed out of PARK and all doors closed).
The Unlock Doors Automatically On Exit feature will
not operate if there is any manual operation of the
door locks (lock or unlock).
This feature can be turned on or off in the
Uconnect system Ú page 188.
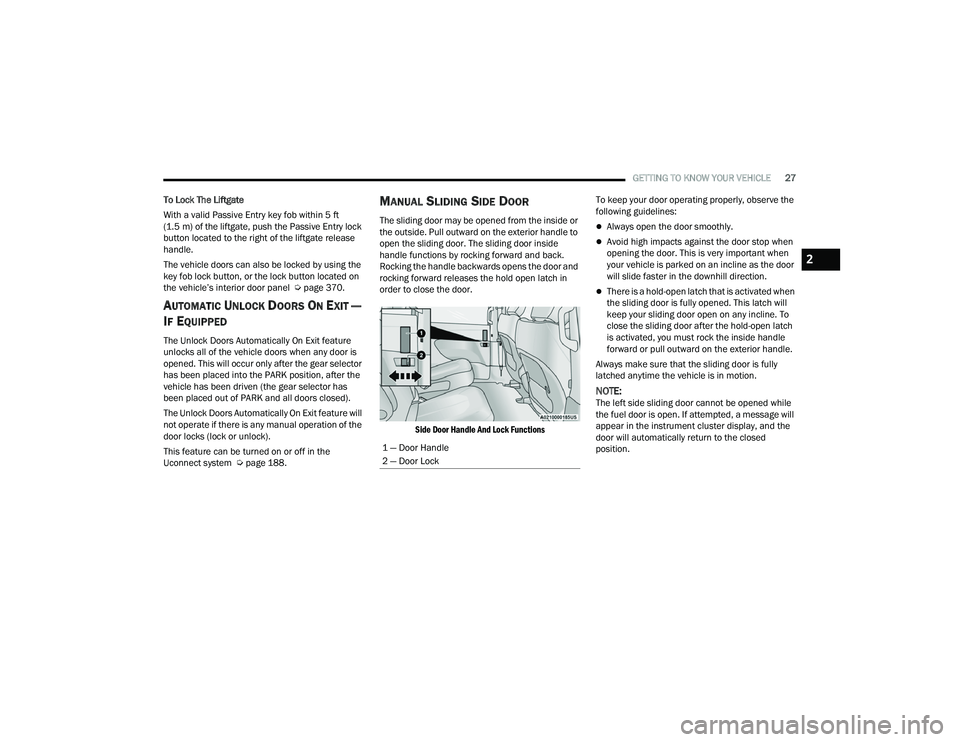
MANUAL SLIDING SIDE DOOR
The sliding door may be opened from the inside or
the outside. Pull outward on the exterior handle to
open the sliding door. The sliding door inside
handle functions by rocking forward and back.
Rocking the handle backwards opens the door and
rocking forward releases the hold open latch in
order to close the door.
Side Door Handle And Lock Functions
To keep your door operating properly, observe the
following guidelines:Always open the door smoothly.
Avoid high impacts against the door stop when
opening the door. This is very important when
your vehicle is parked on an incline as the door
will slide faster in the downhill direction.
There is a hold-open latch that is activated when
the sliding door is fully opened. This latch will
keep your sliding door open on any incline. To
close the sliding door after the hold-open latch
is activated, you must rock the inside handle
forward or pull outward on the exterior handle.
Always make sure that the sliding door is fully
latched anytime the vehicle is in motion.
NOTE:The left side sliding door cannot be opened while
the fuel door is open. If attempted, a message will
appear in the instrument cluster display, and the
door will automatically return to the closed
position.
1 — Door Handle
2 — Door Lock
2
22_RUP_OM_EN_USC_t.book Page 27
Page 30 of 384

28GETTING TO KNOW YOUR VEHICLE
POWER SLIDING SIDE DOOR —
I
F EQUIPPED
The power sliding door may be power opened or
closed in several ways:
Key fob
Inside or outside handles
Buttons located:
In the overhead console
Just inside the sliding door
On the outside handle
Push the button on the key fob twice
within five seconds to open, close, or
reverse a power sliding door.
The key fob and the overhead console button will
operate the door when the door is locked. All other
ways require the sliding door to be unlocked. If the
vehicle is equipped with Passive Entry, pushing the
button on the outside handle or Hands-Free
feature (if equipped) will unlock and open the
sliding door, with a valid Passive Entry key fob
within 5 ft (1.5 m) of the door handle.
Overhead Console Power Switches
There is a power sliding side door switch located on
the B-pillar trim panel on the driver’s and
passenger’s side, just in front of the power sliding
door for the rear seat passengers.
To operate the sliding door manually with the
handles or to avoid unintentional operation of the
power sliding doors from the rear seats, push the
power sliding door power off button, located in the
overhead console, to remove power to the handles
and buttons just inside the sliding doors. The power off LED, in the overhead console, will be
lit when the handles are manual. When the LED is
lit, pushing the power sliding door power off button
will return the handles to power operation.
NOTE:
If anything obstructs the power sliding side door
while it is closing or opening, the door will auto
-
matically reverse to the closed or open position
and an audible tone will sound, provided it
meets sufficient resistance. The turn signals will
flash with sliding door movements.
If the power sliding door stops in the middle due
to obstacles, it will power open on the next
command.
Power Sliding Side Door Switch (Left Side Shown)
1 — Liftgate
2 — Left Sliding Door
3 — Sliding Door Power Off
4 — Right Sliding Door
22_RUP_OM_EN_USC_t.book Page 28
Page 44 of 384

42GETTING TO KNOW YOUR VEHICLE
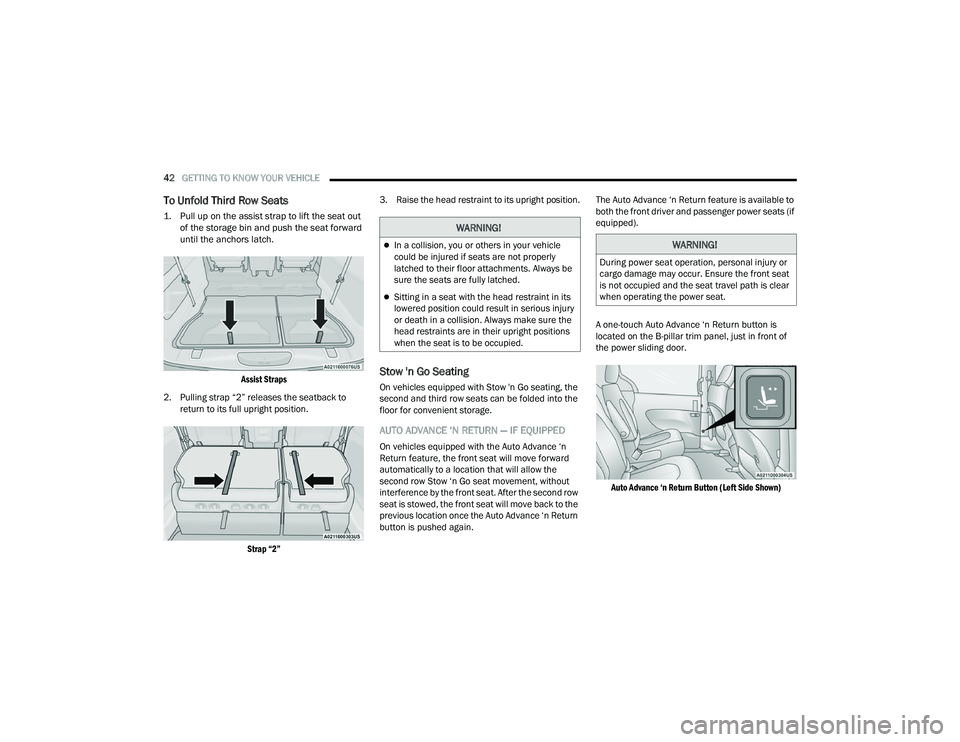
To Unfold Third Row Seats
1. Pull up on the assist strap to lift the seat out
of the storage bin and push the seat forward
until the anchors latch.
Assist Straps
2. Pulling strap “2” releases the seatback to return to its full upright position.
Strap “2”
3. Raise the head restraint to its upright position.
Stow 'n Go Seating
On vehicles equipped with Stow 'n Go seating, the
second and third row seats can be folded into the
floor for convenient storage.
AUTO ADVANCE ‘N RETURN — IF EQUIPPED
On vehicles equipped with the Auto Advance ‘n
Return feature, the front seat will move forward
automatically to a location that will allow the
second row Stow ‘n Go seat movement, without
interference by the front seat. After the second row
seat is stowed, the front seat will move back to the
previous location once the Auto Advance ‘n Return
button is pushed again.
The Auto Advance ‘n Return feature is available to
both the front driver and passenger power seats (if
equipped).
A one-touch Auto Advance ‘n Return button is
located on the B-pillar trim panel, just in front of
the power sliding door.
Auto Advance ‘n Return Button (Left Side Shown)
WARNING!
In a collision, you or others in your vehicle
could be injured if seats are not properly
latched to their floor attachments. Always be
sure the seats are fully latched.
Sitting in a seat with the head restraint in its
lowered position could result in serious injury
or death in a collision. Always make sure the
head restraints are in their upright positions
when the seat is to be occupied.
WARNING!
During power seat operation, personal injury or
cargo damage may occur. Ensure the front seat
is not occupied and the seat travel path is clear
when operating the power seat.
22_RUP_OM_EN_USC_t.book Page 42