2022 CHRYSLER PACIFICA Seat
[x] Cancel search: SeatPage 140 of 384

138STARTING AND OPERATING
If exceptional circumstances should make it
necessary to engage the parking brake while the
vehicle is in motion, push on the EPB switch for as
long as engagement is desired. The BRAKE
warning lamp will illuminate, and a continuous
chime will sound. The rear stop lamps will also be
illuminated automatically while the vehicle
remains in motion.
To disengage the parking brake while the vehicle is
in motion, release the switch. If the vehicle is
brought to a complete stop using the parking
brake, when the vehicle reaches approximately
3 mph (4.8 km/h), the parking brake will remain
engaged.
In the unlikely event of a malfunction of the EPB
system, a yellow EPB fault lamp will illuminate. This
may be accompanied by the BRAKE warning lamp
flashing. In this case, urgent service of the EPB
system is required. Do not rely on the parking
brake to hold the vehicle stationary.
Auto Park Brake
The Electric Park Brake (EPB) can be programmed
to be applied automatically whenever the vehicle is
at a standstill and the automatic transmission is
placed in PARK. Auto Park Brake is enabled and
disabled by customer selection through the
customer programmable features Ú page 188.
SafeHold
SafeHold is a safety feature of the Electric Park
Brake (EPB) system that will engage the parking
brake automatically if the vehicle is left unsecured.
If the automatic transmission is not in PARK, the
seat belt is unbuckled, the driver door is open, the
vehicle is at a standstill, and there is no attempt to
press the brake pedal or accelerator pedal, the
parking brake will automatically engage to prevent
the vehicle from rolling.
SafeHold can be temporarily bypassed by pushing
the EPB while the driver door is open and brake
pedal is pressed. Once manually bypassed,
SafeHold will be enabled again once the vehicle
reaches 12 mph (20 km/h) or the ignition is cycled
to the OFF position and back to ON again.
Brake Service Mode
We recommend having your brakes serviced by an
authorized dealer. You should only make repairs
for which you have the knowledge and the right
equipment. You should only enter Brake Service
Mode during brake service.
When servicing your rear brakes, it may be
necessary for you or your technician to push the
rear piston into the rear caliper bore. With the
Electric Park Brake (EPB) system, this can only be
done after retracting the EPB actuator. Fortunately, actuator retraction can be done easily
by entering Brake Service in your vehicle
Ú
page 188. This menu-based system will guide
you through the steps necessary to retract the EPB
actuator in order to perform rear brake service.
Brake Service has requirements that must be met
in order to be activated:
The vehicle must be at a standstill.
The parking brake must be unapplied.
The transmission must be in PARK or NEUTRAL.
While in Brake Service, the EPB fault lamp will
flash continuously while the ignition switch is ON.
When brake service work is complete, the following
steps must be followed to reset the parking brake
system to normal operation:
Ensure the vehicle is at a standstill.
Press the brake pedal with moderate force.
Apply the EPB.
WARNING!
You can be badly injured working on or around a
motor vehicle. Do only that service work for
which you have the knowledge and the right
equipment. If you have any doubt about your
ability to perform a service job, take your vehicle
to a competent mechanic.
22_RUP_OM_EN_USC_t.book Page 138
Page 146 of 384

144STARTING AND OPERATING
AUTOSTOP MODE
The Stop/Start feature is enabled after every driver
key start. At that time, the system will go into
STOP/START READY and if all other conditions are
met, can go into a STOP/START AUTOSTOP ACTIVE.
To Activate Auto STOP/START, The Following Must
Occur:
The system must be in STOP/START READY
state. A STOP/START READY message will be
displayed in the instrument cluster within the
Stop/Start section Úpage 121.
The vehicle must be completely stopped.
The gear selector must be in a forward gear and
the brake pedal pressed.
The engine will shut down, the tachometer will
move to the zero position and the Stop/Start
telltale will illuminate indicating you are in
Autostop. Customer settings will be maintained
throughout the Auto Stop/Start process.
POSSIBLE REASONS THE ENGINE DOES
N
OT AUTOSTOP
Prior to engine shut down, the system will check
many safety and comfort conditions for Stop/Start
and ensure they are fulfilled. Detailed information
about the operation of the Stop/Start system may
be viewed in the instrument cluster display Stop/
Start screen. Situations when the engine will not
stop include (but not limited to):
If Stop/Start is manually disabled by the Stop/
Start OFF button.
Driver’s seat belt is not buckled.
Driver’s door is not closed.
Battery temperature is too warm or cold.
Battery charge is low. During this time a
message will display “Stop/Start Not Ready
Battery Charging”.
The vehicle is on a steep grade.
Cabin heating or cooling is in process and an
acceptable cabin temperature has not been
achieved.
HVAC is set to full defrost mode at a high blower
speed.
HVAC is set to MAX A/C.
Engine has not reached normal operating
temperature.
The transmission is not in a forward gear.
Hood is open.
Brake pedal is not pressed with sufficient pres -
sure.
Accelerator pedal input.
Engine temp is too high.
5 mph (8 km/h) threshold has not been
achieved from previous Autostop.
Steering angle is beyond threshold.
Vehicle is at too high of an altitude.
Ambient temperature is beyond operating
range.
Stop/Start related system malfunction.
Adaptive Cruise Control (ACC) is on and speed is
set.
It may be possible for the vehicle to be driven
several times without the Stop/Start system going
into a STOP/START READY state under more
extreme conditions of the items listed above.
22_RUP_OM_EN_USC_t.book Page 144
Page 151 of 384

STARTING AND OPERATING149
Adaptive Cruise Control (ACC) Operation
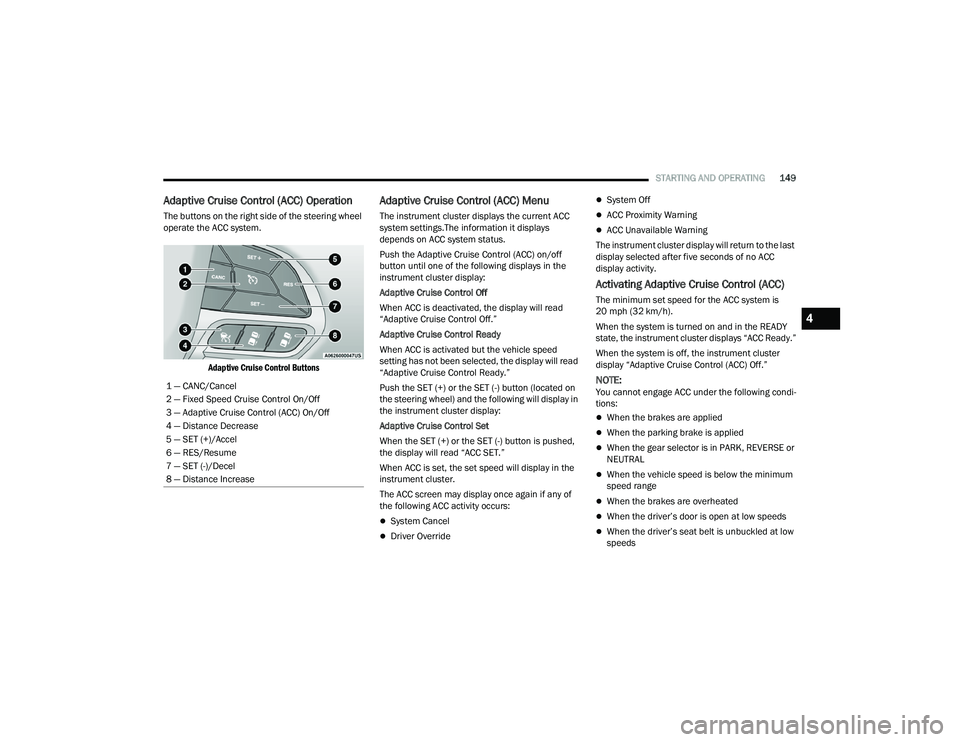
The buttons on the right side of the steering wheel
operate the ACC system.
Adaptive Cruise Control Buttons
Adaptive Cruise Control (ACC) Menu
The instrument cluster displays the current ACC
system settings.The information it displays
depends on ACC system status.
Push the Adaptive Cruise Control (ACC) on/off
button until one of the following displays in the
instrument cluster display:
Adaptive Cruise Control Off
When ACC is deactivated, the display will read
“Adaptive Cruise Control Off.”
Adaptive Cruise Control Ready
When ACC is activated but the vehicle speed
setting has not been selected, the display will read
“Adaptive Cruise Control Ready.”
Push the SET (+) or the SET (-) button (located on
the steering wheel) and the following will display in
the instrument cluster display:
Adaptive Cruise Control Set
When the SET (+) or the SET (-) button is pushed,
the display will read “ACC SET.”
When ACC is set, the set speed will display in the
instrument cluster.
The ACC screen may display once again if any of
the following ACC activity occurs:
System Cancel
Driver Override
System Off
ACC Proximity Warning
ACC Unavailable Warning
The instrument cluster display will return to the last
display selected after five seconds of no ACC
display activity.
Activating Adaptive Cruise Control (ACC)
The minimum set speed for the ACC system is
20 mph (32 km/h).
When the system is turned on and in the READY
state, the instrument cluster displays “ACC Ready.”
When the system is off, the instrument cluster
display “Adaptive Cruise Control (ACC) Off.”
NOTE:You cannot engage ACC under the following condi -
tions:
When the brakes are applied
When the parking brake is applied
When the gear selector is in PARK, REVERSE or
NEUTRAL
When the vehicle speed is below the minimum
speed range
When the brakes are overheated
When the driver’s door is open at low speeds
When the driver’s seat belt is unbuckled at low
speeds
1 — CANC/Cancel
2 — Fixed Speed Cruise Control On/Off
3 — Adaptive Cruise Control (ACC) On/Off
4 — Distance Decrease
5 — SET (+)/Accel
6 — RES/Resume
7 — SET (-)/Decel
8 — Distance Increase
4
22_RUP_OM_EN_USC_t.book Page 149
Page 153 of 384

STARTING AND OPERATING151
The vehicle parking brake is applied
The braking temperature exceeds normal range
(overheated)
The following conditions will only cancel the ACC
system:
Driver seat belt is unbuckled at low speeds
Driver door is opened at low speeds
To Turn Off
The system will turn off and clear the set speed in
memory if:
The Adaptive Cruise Control (ACC) on/off button
is pushed
The Fixed Speed Cruise Control on/off button is
pushed
The ignition is placed in the OFF position
To Resume
If there is a set speed in memory, push the RES
(resume) button and then remove your foot from
the accelerator pedal. The instrument cluster
display will display the last set speed.
Resume can be used at any speed above 20 mph
(32 km/h) when only Fixed Speed Cruise Control is
being used.
NOTE:
If your vehicle is at a standstill longer than two
seconds, the driver will either have to push the
RES (resume) button, or apply the accelerator
pedal to reengage the Adaptive Cruise Control
(ACC) to the existing set speed.
ACC cannot be resumed if there is a stationary
vehicle in front of your vehicle in close proximity.
To Vary The Speed Setting
To Increase Or Decrease The Set Speed
After setting a speed, you can increase the set
speed by pushing the SET (+) button, or decrease
speed by pushing the SET (-) button. U.S. Speed (mph)
Pushing the SET (+)
, or SET (-) button once will
result in a 1 mph speed adjustment. Each
subsequent tap of the button results in an
adjustment of 1 mph.
If the button is continually pushed, the set
speed will continue to adjust in 5 mph incre -
ments until the button is released. The new set
speed is reflected in the instrument cluster
display.
Metric Speed (km/h)
Pushing the SET (+) , or SET (-) button once will
result in a 1 km/h speed adjustment. Each
subsequent tap of the button results in an
adjustment of 1 km/h.
If the button is continually pushed, the set
speed will continue to adjust in 10 km/h incre -
ments until the button is released. The new set
speed is reflected in the instrument cluster
display.
NOTE:When you override and push the SET (+) button or
SET (-) buttons, the new set speed will be the
current speed of the vehicle.
WARNING!
The Resume function should only be used if
traffic and road conditions permit. Resuming a
set speed that is too high or too low for
prevailing traffic and road conditions could
cause the vehicle to accelerate or decelerate too
sharply for safe operation. Failure to follow these
warnings can result in a collision and death or
serious personal injury.4
22_RUP_OM_EN_USC_t.book Page 151
Page 155 of 384

STARTING AND OPERATING153
NOTE:The “BRAKE!” screen in the instrument cluster
display is a warning for the driver to take action
and does not necessarily mean that the Forward
Collision Warning system is applying the brakes
autonomously.
Overtake Aid
When driving with Adaptive Cruise Control (ACC)
engaged and following a vehicle, the system will
provide an additional acceleration up to the ACC
set speed to assist in passing the vehicle. This
additional acceleration is triggered when the driver
utilizes the left turn signal and will only be active
when passing on the left hand side.
ACC Operation At Stop
In the event that the ACC system brings your
vehicle to a standstill while following the vehicle in
front, your vehicle will resume motion, without the
need for any driver action, if the vehicle in front
starts moving within two seconds.
If the vehicle in front does not start moving within
two seconds of your vehicle coming to a standstill,
the driver will either have to push the RES (resume)
button, or apply the accelerator pedal to reengage
the ACC to the existing set speed.
NOTE:After the ACC system holds your vehicle at a stand -
still for approximately three consecutive minutes,
the parking brake will be activated, and the ACC
system will be canceled.
While the ACC system is holding your vehicle at a
standstill, if the driver seat belt is unbuckled or the
driver door is opened, the parking brake will be
activated, and the ACC system will be canceled.
Display Warnings And Maintenance
“WIPE FRONT RADAR SENSOR” WARNING
The “ACC/AEB Unavailable Wipe Front Radar
Sensor” warning will display and a chime will
sound when conditions temporarily limit system
performance. This most often occurs at times of poor visibility,
such as in snow or heavy rain. The ACC system may
also become temporarily blinded due to
obstructions, such as mud, dirt or ice. In these
cases, the instrument cluster display will show
“ACC/AEB Unavailable Wipe Front Radar Sensor”
and the system will deactivate.
The “ACC/AEB Unavailable Wipe Front Radar
Sensor” message can sometimes be displayed
while driving in highly reflective areas (i.e. ice and
snow, or tunnels with reflective tiles). The ACC
system will recover after the vehicle has left these
areas. Under rare conditions, when the radar is not
tracking any vehicles or objects in its path this
warning may temporarily occur.
NOTE:If the “ACC/AEB Unavailable Wipe Front Radar
Sensor” warning is active, Fixed Speed Cruise
Control is still available.
If weather conditions are not a factor, the driver
should examine the sensor. It may require cleaning
or removal of an obstruction. The sensor is located
in the center of the vehicle behind the lower grille.
WARNING!
When the ACC system is resumed, the driver
must ensure that there are no pedestrians,
vehicles or objects in the path of the vehicle.
Failure to follow these warnings can result in a
collision and death or serious personal injury.
4
22_RUP_OM_EN_USC_t.book Page 153
Page 174 of 384

172STARTING AND OPERATING
The display will show the entire vehicle cabin view
on the left side of the display, and a zoomed-in
view of a selected seat on the right side of the
display.
FamCam Display (7 Passenger Vehicle Shown)
To change the seat shown in the zoomed-in view,
press a different seat location on the left side of
the display. The zoomed-in view will then show the
new seat location. By default, the second row
driver’s side seat will be displayed in the zoomed-in
view.
The display will appear in color in well-lit conditions
and will appear black and white in low-light
conditions. If the driver shifts into REVERSE or presses the X
on the screen, the view will close. Otherwise, the
FamCam view will remain on the display.
NOTE:When FamCam is turned off, the selected seat in
the zoomed-in view on the right side of the display
will be retained. The next time the feature is acti
-
vated, the same seat will be shown in the
zoomed-in view.
REFUELING THE VEHICLE
There is no fuel filler cap. Two flapper doors inside
the pipe seal the system.
1. Put the vehicle in PARK and switch the
ignition OFF.
2. Push the center-rear edge of the fuel filler door (3 o'clock position) and release to open.
Fuel Filler Door
3. Insert the fuel nozzle fully into the filler pipe; the nozzle opens and holds both flapper doors
while refueling.
4. When the fuel nozzle “clicks” or shuts off, the fuel tank is full.
5. Keep the nozzle in the filler for five seconds after the nozzle clicks to allow fuel to drain
from the nozzle.
WARNING!
Never have any smoking materials lit in or
near the vehicle when the fuel door is open or
the tank is being filled.
Never add fuel when the engine is running.
This is in violation of most state and federal
fire regulations and may cause the Malfunc -
tion Indicator Light to turn on.
A fire may result if fuel is pumped into a
portable container that is inside of a vehicle.
You could be burned. Always place fuel
containers on the ground while filling.
CAUTION!
To avoid fuel spillage and overfilling, do not “top
off” the fuel tank after filling.
22_RUP_OM_EN_USC_t.book Page 172
Page 195 of 384

MULTIMEDIA193
Missed Calls Message This setting will allow you to have pop-up notifications for missed calls. This
setting options are “On” and “Off”.
Navigation Popups This setting will allow you to have pop-up notifications for Navigation. This
setting options are “On” and “Off”.
Navigation Settings This setting will allow you to customize the settings within Navigation Mode.
Auto-On Driver Heated Seat & Steering Wheel This setting will activate the vehicle’s comfort systems and heated seats or
heated steering wheel when the vehicle is remote started or ignition is
started. The “Off” setting will not activate the comfort systems. The “Remote
Start” setting will only activate the comfort systems when using Remote Start.
The “All Start” setting will activate the comfort systems whenever the vehicle
is started.
Audio Settings This setting will take you to the audio settings for the vehicle profiles.
Reset App Drawer to Default Order This setting will reset the app drawer to its factory default layout.
Restore Settings to Default This setting will return all the previously changed settings to their
factory default.
More Profile Options This setting will give access to more profile options.
Setting NameDescription
5
22_RUP_OM_EN_USC_t.book Page 193
Page 206 of 384

204MULTIMEDIA
Sound Horn With Lock This setting will sound the horn when the Lock button is pushed on the key
fob. The “Off” setting will not sound the horn when the Lock button is pushed.
The “1st Press” setting will sound the horn when the Lock button is pushed
once. The “2nd Press” setting will sound the horn when the Lock button is
pushed twice.
Sound Horn With Remote Start This setting will sound the horn when the remote start is activated from the
key fob.
Remote Door Unlock, Door Lock/1st Press Of Key Fob Unlocks This setting will change how many pushes of the Unlock button on the key fob
are needed to unlock all the doors. The “Driver Door” setting will only unlock
the driver door on the first push on the Unlock button. The “All Doors” setting
will unlock all doors with only one push of the Unlock button.
Passive Entry This setting will allow you to turn the Passive Entry feature
(Keyless Enter ‘N Go™) on or off.
Personal Settings Linked To Key Fob This setting will recall preset radio stations and driver seat position that have
been linked to the key fob.
Power Liftgate Alert This setting will chime an audible alert when the power liftgate is raising or
lowering. Selectable options are “On” and “Off”.
Sliding Door Alert This setting will chime an audible alert when the sliding door reverses or
sense an obstacle. Selectable options are “On” and “Off”.
Flash Lights with Sliding Door This setting will flash the lights when the sliding door is opening. Selectable
options are “On” and “Off”.
Hands Free Power Liftgate This setting will use hands-free technology to automatically open the power
liftgate. Selectable options are “On” and “Off”.
Hands Free Power Sliding Door This setting will use hands-free technology to automatically open the power
sliding doors. Selectable options are “On” and “Off”.
Setting Name
Description
22_RUP_OM_EN_USC_t.book Page 204