2022 CHRYSLER PACIFICA Head rest
[x] Cancel search: Head restPage 52 of 384

50GETTING TO KNOW YOUR VEHICLE
Third Row Power Stow ‘n Go Seat —
If Equipped
A one-touch power folding seat switch is located in
the right rear trim panel as part of a switch bank.
NOTE:The third row outboard seat belts may interfere
with the power folding of the seat. Place the seat
belt webbing behind the stow clip before stowing or
opening the seat. When the seat is in the desired
position, remove the webbing from the stow clip so
that it is ready for use. Never leave the seat belt in
the stow clip when it is used to restrain an
occupant.
NOTE:
The outer head restraints will lower automati -
cally as necessary when the power seat begins
to move.
The center head restraint raises and lowers
manually but will not lower automatically.
The head restraint can also be lowered manu -
ally using the pull strap located at the back of
the seat Ú page 55.
The switch is only functional when the liftgate is
open and the vehicle is in PARK.
The rear switch bank allows multiple power folding
and unfolding positions for the third row seats. Left and right third row seats can be folded
individually or together. The third row power folding
seat adjusts to the following positions using the
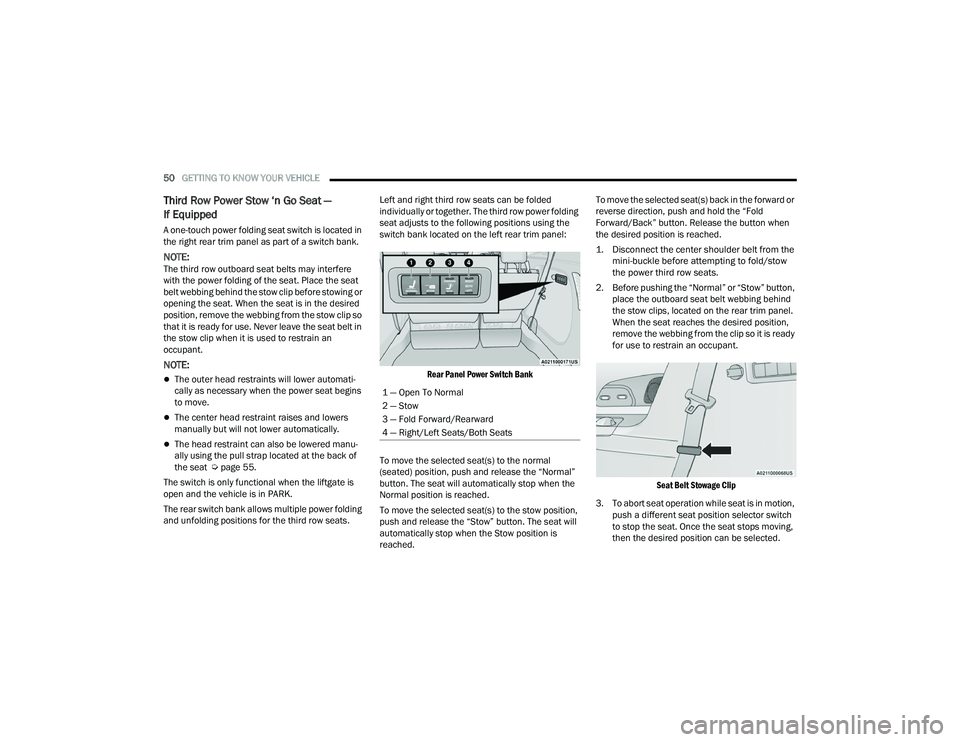
switch bank located on the left rear trim panel:
Rear Panel Power Switch Bank
To move the selected seat(s) to the normal
(seated) position, push and release the “Normal”
button. The seat will automatically stop when the
Normal position is reached.
To move the selected seat(s) to the stow position,
push and release the “Stow” button. The seat will
automatically stop when the Stow position is
reached. To move the selected seat(s) back in the forward or
reverse direction, push and hold the “Fold
Forward/Back” button. Release the button when
the desired position is reached.
1. Disconnect the center shoulder belt from the
mini-buckle before attempting to fold/stow
the power third row seats.
2. Before pushing the “Normal” or “Stow” button, place the outboard seat belt webbing behind
the stow clips, located on the rear trim panel.
When the seat reaches the desired position,
remove the webbing from the clip so it is ready
for use to restrain an occupant.
Seat Belt Stowage Clip
3. To abort seat operation while seat is in motion, push a different seat position selector switch
to stop the seat. Once the seat stops moving,
then the desired position can be selected.
1 — Open To Normal
2 — Stow
3 — Fold Forward/Rearward
4 — Right/Left Seats/Both Seats
22_RUP_OM_EN_USC_t.book Page 50
Page 54 of 384

52GETTING TO KNOW YOUR VEHICLE
VENTILATED SEATS — IF EQUIPPED
Located in the first row seat cushions are
small fans that draw the air from the
passenger compartment and move air
through fine perforations in the seat
cover to help keep the driver and front passenger
cooler in higher ambient temperatures.
The fans operate at two speeds, HI and LO.
The front ventilated seats control buttons are
located in the touchscreen.
Press the ventilated seat button once to
choose HI.
Press the ventilated seat button a second time
to choose LO.
Press the ventilated seat button a third time to
turn the ventilated seat off.
NOTE:The engine must be running for the ventilated
seats to operate.
For information on use with the Remote Start
system, see Ú page 21.
ADJUSTABLE ARMREST
(F
RONT SEATS) — IF EQUIPPED
Your vehicle may be equipped with adjustable
armrests on the front seats. The armrest can be
adjusted up or down.
To adjust the armrest height, push and hold the
button while moving the armrest to the desired
position. Release the button to lock the armrest
into place.
Adjustable Armrest Adjustment Button
PLASTIC GROCERY BAG RETAINER
H
OOKS
Retainer hooks which will hold plastic grocery bag
handles are built into the seatbacks of the second
row rear seats, and if equipped, the backs of the
front row seats. The floor supports the partial
weight of the bagged goods.
HEAD RESTRAINTS
Head restraints are designed to reduce the risk of
injury by restricting head movement in the event of
a rear impact. Head restraints should be adjusted
so that the top of the head restraint is located
above the top of your ear.
WARNING!
All occupants, including the driver, should not
operate a vehicle or sit in a vehicle’s seat until
the head restraints are placed in their proper
positions in order to minimize the risk of neck
injury in the event of a crash.
Head restraints should never be adjusted
while the vehicle is in motion. Driving a vehicle
with the head restraints improperly adjusted
or removed could cause serious injury or
death in the event of a collision.
22_RUP_OM_EN_USC_t.book Page 52
Page 55 of 384

GETTING TO KNOW YOUR VEHICLE53
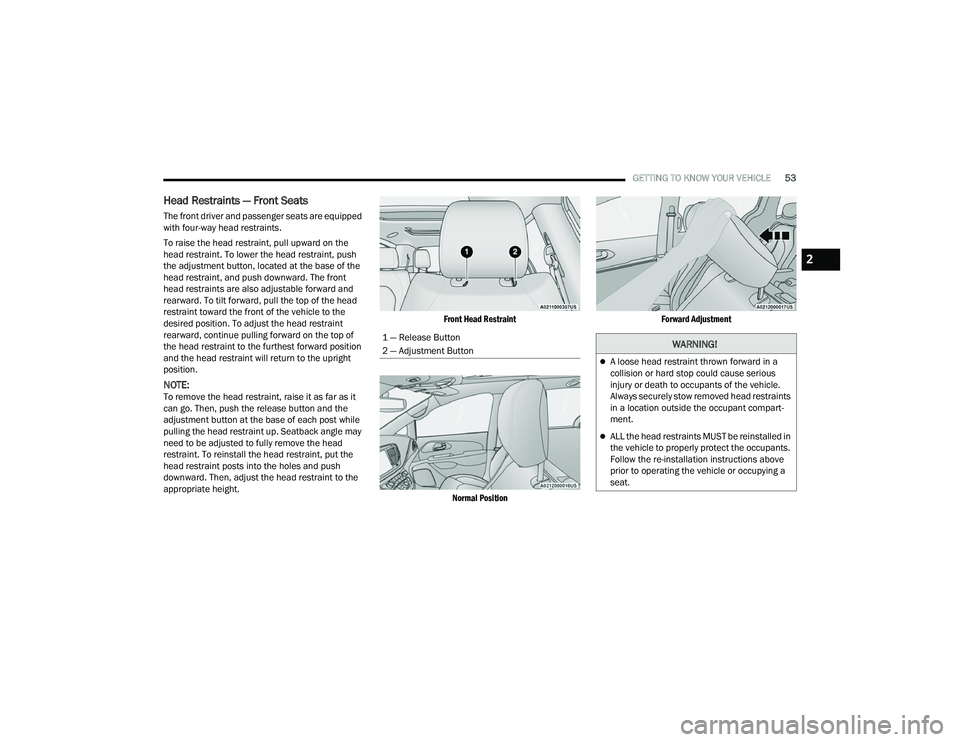
Head Restraints — Front Seats
The front driver and passenger seats are equipped
with four-way head restraints.
To raise the head restraint, pull upward on the
head restraint. To lower the head restraint, push
the adjustment button, located at the base of the
head restraint, and push downward. The front
head restraints are also adjustable forward and
rearward. To tilt forward, pull the top of the head
restraint toward the front of the vehicle to the
desired position. To adjust the head restraint
rearward, continue pulling forward on the top of
the head restraint to the furthest forward position
and the head restraint will return to the upright
position.
NOTE:To remove the head restraint, raise it as far as it
can go. Then, push the release button and the
adjustment button at the base of each post while
pulling the head restraint up. Seatback angle may
need to be adjusted to fully remove the head
restraint. To reinstall the head restraint, put the
head restraint posts into the holes and push
downward. Then, adjust the head restraint to the
appropriate height.
Front Head Restraint
Normal Position Forward Adjustment
1 — Release Button
2 — Adjustment Button
WARNING!
A loose head restraint thrown forward in a
collision or hard stop could cause serious
injury or death to occupants of the vehicle.
Always securely stow removed head restraints
in a location outside the occupant compart -
ment.
ALL the head restraints MUST be reinstalled in
the vehicle to properly protect the occupants.
Follow the re-installation instructions above
prior to operating the vehicle or occupying a
seat.
2
22_RUP_OM_EN_USC_t.book Page 53
Page 56 of 384

54GETTING TO KNOW YOUR VEHICLE
Head Restraints — Second Row Quad
Seats
The second row outboard head restraints, as well
as the removable 8th passenger seat (if equipped),
may have adjustable head restraints.
NOTE:If equipped with Stow ‘n Go seating, the head
restraints are non-adjustable and non-removable.
Do not pull on non-adjustable head restraints
when folding the seat.
To raise the head restraint, pull upward on the
head restraint. To lower the head restraint, push
the adjustment button, located at the base of the
head restraint, and push downward.
To remove the head restraint, raise it as far as it
can go. Then, push the release button and the
adjustment button at the base of each post while
pulling the head restraint up. Seatback angle may
need to be adjusted to fully remove the head
restraint. To reinstall the head restraint, put the
head restraint posts into the holes and push
downward. Then, adjust the head restraint to the
appropriate height.
Head Restraints — Second Row Bench
The second row bench seat is equipped with
adjustable head restraints.
To raise the head restraint, pull upward on the
head restraint. To lower the head restraint, push
the adjustment button, located at the base of the
head restraint, and push downward.
Bench Seat Head Restraint
To remove the head restraint, raise it as far as it
can go. Then, push the release button and the
adjustment button at the base of each post while
pulling the head restraint up. Seatback angle may
need to be adjusted to fully remove the head
restraint. To reinstall the head restraint, put the
head restraint posts into the holes and push
downward. Then, adjust the head restraint to the
appropriate height.
NOTE:For information on child restraint tethering, see
Ú
page 239.
1 — Release Button
2 — Adjustment Button
WARNING!
A loose head restraint thrown forward in a
collision or hard stop could cause serious
injury or death to occupants of the vehicle.
Always securely stow removed head restraints
in a location outside the occupant compart
-
ment.
ALL the head restraints MUST be reinstalled in
the vehicle to properly protect the occupants.
Follow the re-installation instructions above
prior to operating the vehicle or occupying a
seat.
22_RUP_OM_EN_USC_t.book Page 54
Page 57 of 384

GETTING TO KNOW YOUR VEHICLE55
Head Restraints — Third Row
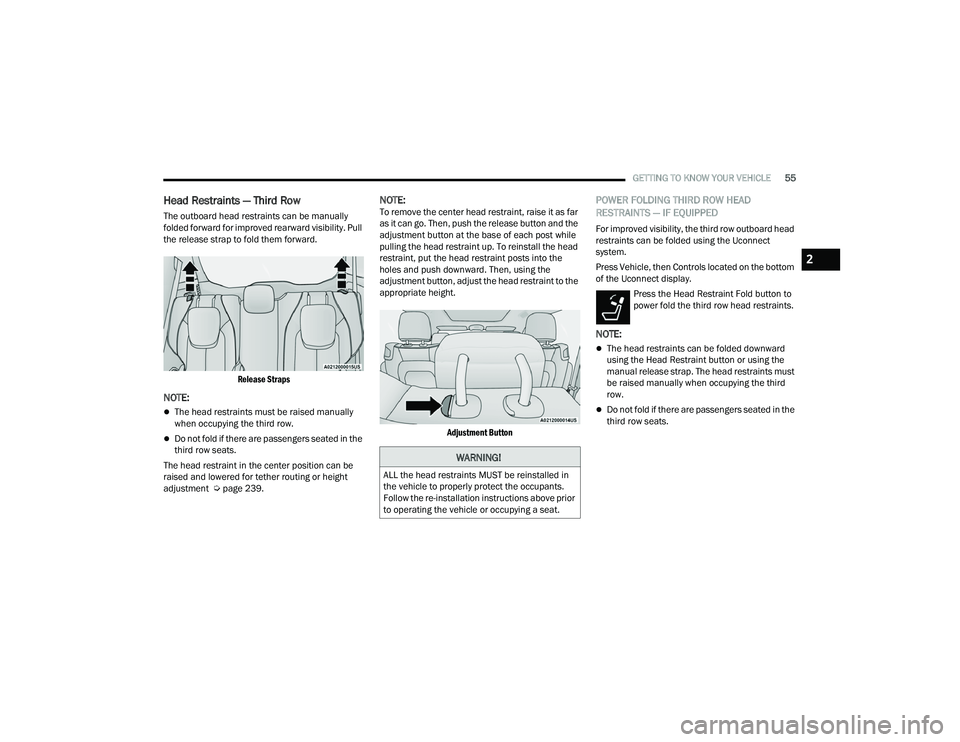
The outboard head restraints can be manually
folded forward for improved rearward visibility. Pull
the release strap to fold them forward.
Release Straps
NOTE:
The head restraints must be raised manually
when occupying the third row.
Do not fold if there are passengers seated in the
third row seats.
The head restraint in the center position can be
raised and lowered for tether routing or height
adjustment Ú page 239.
NOTE:To remove the center head restraint, raise it as far
as it can go. Then, push the release button and the
adjustment button at the base of each post while
pulling the head restraint up. To reinstall the head
restraint, put the head restraint posts into the
holes and push downward. Then, using the
adjustment button, adjust the head restraint to the
appropriate height.
Adjustment Button
POWER FOLDING THIRD ROW HEAD
RESTRAINTS — IF EQUIPPED
For improved visibility, the third row outboard head
restraints can be folded using the Uconnect
system.
Press Vehicle, then Controls located on the bottom
of the Uconnect display.Press the Head Restraint Fold button to
power fold the third row head restraints.
NOTE:
The head restraints can be folded downward
using the Head Restraint button or using the
manual release strap. The head restraints must
be raised manually when occupying the third
row.
Do not fold if there are passengers seated in the
third row seats.
WARNING!
ALL the head restraints MUST be reinstalled in
the vehicle to properly protect the occupants.
Follow the re-installation instructions above prior
to operating the vehicle or occupying a seat.
2
22_RUP_OM_EN_USC_t.book Page 55
Page 236 of 384

234SAFETY
It is unsafe to test the FCW system. To prevent
such misuse of the system, after four Active
Braking events within a key cycle, the Active
Braking portion of FCW will be deactivated until
the next key cycle.
The FCW system is intended for on-road use
only. If the vehicle is taken off-road, the FCW
system should be deactivated to prevent unnec -
essary warnings to the surroundings.
Turning FCW On Or Off
The Forward Collision menu setting is located in
the Uconnect settings.
NOTE:The default status of FCW is “on”, this allows the
system to warn you of a possible collision with the
vehicle in front of you.
Changing the FCW status to “off” deactivates the
system, so no warning or active braking will be
available in case of a possible collision.
NOTE:
The FCW system state is kept in memory from
one key cycle to the next. If the system is turned
off, it will remain off when the vehicle is
restarted.
FCW can work in conjunction with the KeySense
function of the vehicle (if equipped)
Ú page 115.
FCW Braking Status And Sensitivity
The FCW Sensitivity and Active Braking status are
programmable through the Uconnect system
Úpage 188.
The default sensitivity of FCW is the “Medium”
setting and the system status is “Warning &
Braking”. This allows the system to warn the driver
of a possible collision with the vehicle in front using
audible/visual warnings and it applies
autonomous braking.
By changing the FCW status setting to "Far", the
system provides possible collision warnings on
objects farther away. This results in earlier
warnings and provides the most reaction time to
avoid possible collisions.
NOTE:The “Far” setting may result in a greater number of
FCW possible collision warnings experienced.
By changing the FCW status setting to “Near”, the
system provides possible collision warnings on
objects closer to the vehicle. This results in later warnings and provides less
reaction time than the "Far" and "Medium"
settings, which allows for a more dynamic driving
experience.
NOTE:The “Near” setting may result in a lesser number of
FCW possible collision warnings experienced.
NOTE:
Changing the FCW status to “Only Warning”
prevents the system from providing limited
active braking, or additional brake support if the
driver is not braking adequately in the event of
a potential frontal collision, but maintains the
audible and visual warnings.
Changing the FCW status to “Off” prevents the
system from providing autonomous braking, or
additional brake support if the driver is not
braking adequately in the event of a potential
frontal collision.
The system will retain the last setting selected
by the driver after ignition shut down.
FCW may not react to irrelevant objects such as
overhead objects, ground reflections, objects
not in the path of the vehicle, stationary objects
that are far away, oncoming traffic, or leading
vehicles with the same or higher rates of speed.
FCW will be disabled like ACC, with the
unavailable screens.
WARNING!
Forward Collision Warning (FCW) is not intended
to avoid a collision on its own, nor can FCW
detect every type of potential collision. The driver
has the responsibility to avoid a collision by
controlling the vehicle via braking and steering.
Failure to follow this warning could lead to
serious injury or death.
22_RUP_OM_EN_USC_t.book Page 234
Page 244 of 384

242SAFETY
(Continued)
Be sure everyone in your vehicle is in a seat
and using a seat belt properly. Occupants,
including the driver, should always wear their
seat belts whether or not an air bag is also
provided at their seating position to minimize
the risk of severe injury or death in the event
of a crash.
Wearing your seat belt incorrectly could make
your injuries in a collision much worse. You
might suffer internal injuries, or you could
even slide out of the seat belt. Follow these
instructions to wear your seat belt safely and
to keep your passengers safe, too.
Two people should never be belted into a
single seat belt. People belted together can
crash into one another in a collision, hurting
one another badly. Never use a lap/shoulder
belt or a lap belt for more than one person, no
matter what their size.
WARNING!WARNING!
A lap belt worn too high can increase the risk
of injury in a collision. The seat belt forces
won’t be at the strong hip and pelvic bones,
but across your abdomen. Always wear the lap
part of your seat belt as low as possible and
keep it snug.
A twisted seat belt may not protect you prop-
erly. In a collision, it could even cut into you.
Be sure the seat belt is flat against your body,
without twists. If you can’t straighten a seat
belt in your vehicle, take it to an authorized
dealer immediately and have it fixed.
A seat belt that is buckled into the wrong
buckle will not protect you properly. The lap
portion could ride too high on your body,
possibly causing internal injuries. Always
buckle your seat belt into the buckle nearest
you.
A seat belt that is too loose will not protect you
properly. In a sudden stop, you could move too
far forward, increasing the possibility of injury.
Wear your seat belt snugly.
A seat belt that is worn under your arm is
dangerous. Your body could strike the inside
surfaces of the vehicle in a collision,
increasing head and neck injury. A seat belt
worn under the arm can cause internal inju -
ries. Ribs aren’t as strong as shoulder bones.
Wear the seat belt over your shoulder so that
your strongest bones will take the force in a
collision.
A shoulder belt placed behind you will not
protect you from injury during a collision. You
are more likely to hit your head in a collision if
you do not wear your shoulder belt. The lap
and shoulder belt are meant to be used
together.
A frayed or torn seat belt could rip apart in a
collision and leave you with no protection.
Inspect the seat belt system periodically,
checking for cuts, frays, or loose parts.
Damaged parts must be replaced immedi -
ately. Do not disassemble or modify the seat
belt system. If your vehicle is involved in a
collision, or if you have questions regarding
seat belt or retractor conditions, take your
vehicle to an authorized FCA dealer or autho -
rized FCA Certified Collision Care Program
facility for inspection.
WARNING!
22_RUP_OM_EN_USC_t.book Page 242
Page 246 of 384

244SAFETY
Adjustable Upper Shoulder Belt Anchorage
In the front and second row outboard seats the
shoulder belt can be adjusted upward or
downward to position the seat belt away from your
neck. Push or squeeze the anchorage button to
release the anchorage, and move it up or down to
the position that serves you best.
Adjustable Anchorage
As a guide, if you are shorter than average, you will
prefer the shoulder belt anchorage in a lower
position, and if you are taller than average, you will
prefer the shoulder belt anchorage in a higher
position. After you release the anchorage button,
try to move it up or down to make sure that it is
locked in position.
NOTE:The adjustable upper shoulder belt anchorage is
equipped with an Easy Up feature. This feature
allows the shoulder belt anchorage to be adjusted
in the upward position without pushing or
squeezing the release button. To verify the
shoulder belt anchorage is latched, pull downward
on the shoulder belt anchorage until it is locked
into position.Second Row Center (If Equipped) And Third
Row Center Seat Belt Operating
Instructions
The second row center (if equipped) and third row
center seat belts feature a seat belt with a
mini-latch plate and buckle, which allows the seat
belt to detach from the lower anchor when the seat
is folded. The mini-latch plate and regular latch
plate can then be stored out of the way in the
headliner for added convenience to open up
utilization of the storage areas behind the front
seats when the seat is not occupied.
1. Remove the mini-latch plate and regular latch plate from its stowed position in the headliner
slightly behind the second or third row seat.
Mini-Latch Stowage
WARNING!
Wearing your seat belt incorrectly could make
your injuries in a collision much worse. You
might suffer internal injuries, or you could
even slide out of the seat belt. Follow these
instructions to wear your seat belt safely and
to keep your passengers safe, too.
Position the shoulder belt across the shoulder
and chest with minimal, if any slack so that it
is comfortable and not resting on your neck.
The retractor will withdraw any slack in the
shoulder belt.
Misadjustment of the seat belt could reduce
the effectiveness of the safety belt in a crash.
Always make all seat belt height adjustments
when the vehicle is stationary.
22_RUP_OM_EN_USC_t.book Page 244