2022 CHRYSLER PACIFICA Glass
[x] Cancel search: GlassPage 173 of 384

STARTING AND OPERATING171
Zoom View
When the Rear View is being displayed, and the
vehicle speed is below 8 mph (13 km/h) while in
any gear selector position, Zoom View is available.
By pressing the “magnifying glass” icon in the
upper left of the display screen, the image will
zoom in to four times the standard view. Pressing
the icon a second time will return the view to the
standard Rear View.
When Zoom View is selected while the vehicle is in
REVERSE, then shifted to DRIVE, the camera delay
will display the standard Rear View. If the vehicle is
then returned to REVERSE gear from DRIVE, the
Zoom View selection will automatically resume.
Shifting to NEUTRAL from any gear will maintain
the selected view (Zoom or Standard) as long as
the vehicle is below 8 mph (13 km/h).
If the vehicle is in PARK, Zoom View is available
until the gear selector is placed in DRIVE or
REVERSE and speeds are at or above 8 mph
(13 km/h).
NOTE:
If the vehicle is in DRIVE, NEUTRAL, or REVERSE,
and speed is greater than or equal to 8 mph
(13 km/h), Zoom View is unavailable and the
icon will appear grey.
While in Zoom View, the guidelines will not be
visible. Deactivation
The system can be deactivated under the following
conditions:
The speed of the vehicle is greater than 8 mph
(13 km/h).
The vehicle shifted into PARK.
The vehicle is in any gear other than REVERSE
and the X button is pressed.
The camera delay system is turned off manually
through the Uconnect Settings Ú
page 188.
NOTE:
If snow, ice, mud, or any foreign substance
builds up on the camera lenses, clean the
lenses, rinse with water, and dry with a soft
cloth. Do not cover the lenses.
If a malfunction with the system has occurred,
see an authorized dealer.
FAMCAM SYSTEM — IF EQUIPPED
Your vehicle may be equipped with a FamCam
system that consists of an interior monitoring
camera mounted on the headliner that allows you
to view cargo/passengers in the rear interior of the
vehicle through the Uconnect screen.
To activate the feature, press the FamCam button
under “Controls” in the Vehicle Menu of the
Uconnect system Úpage 188. Alternatively, the
feature can be accessed through the App Drawer
or a shortcut for the feature can be added to the
Favorites bar at the top of the screen for quick
access.
WARNING!
Drivers must be careful when backing up even
when using the Surround View Camera. Always
check carefully behind your vehicle, and be sure
to check for pedestrians, animals, other
vehicles, obstructions, or blind spots before
backing up. You are responsible for the safety of
your surroundings and must continue to pay
attention while backing up. Failure to do so can
result in serious injury or death.
CAUTION!
To avoid vehicle damage, Surround View
should only be used as a parking aid. The
Surround View camera is unable to view every
obstacle or object in your drive path.
To avoid vehicle damage, the vehicle must be
driven slowly when using Surround View to be
able to stop in time when an obstacle is seen.
It is recommended that the driver look
frequently over his/her shoulder when using
Surround View.
4
22_RUP_OM_EN_USC_t.book Page 171
Page 282 of 384

280SAFETY
(Continued)
(Continued)
PERIODIC SAFETY CHECKS YOU SHOULD
M
AKE OUTSIDE THE VEHICLE
Tires
Examine tires for excessive tread wear and uneven
wear patterns. Check for stones, nails, glass, or
other objects lodged in the tread or sidewall.
Inspect the tread for cuts and cracks. Inspect
sidewalls for cuts, cracks, and bulges. Check the
lug nut/bolt torque for tightness. Check the tires
(including spare) for proper cold inflation pressure.
WARNING!
An improperly attached, damaged, folded, or
stacked floor mat, or damaged floor mat
fasteners may cause your floor mat to interfere
with the accelerator, brake, or clutch pedals and
cause a loss of vehicle control. To prevent
SERIOUS INJURY or DEATH:
ALWAYS securely attach your floor
mat using the floor mat fasteners.
DO NOT install your floor mat upside
down or turn your floor mat over.
Lightly pull to confirm mat is secured using the
floor mat fasteners on a regular basis.
ALWAYS REMOVE THE EXISTING
FLOOR MAT FROM THE VEHICLE
before installing any other floor mat.
NEVER install or stack an additional
floor mat on top of an existing floor mat.
ONLY install floor mats designed to fit your
vehicle. NEVER install a floor mat that cannot
be properly attached and secured to your
vehicle. If a floor mat needs to be replaced,
only use a FCA US LLC approved floor mat for
the specific make, model, and year of your
vehicle.
ONLY use the driver’s side floor mat on the
driver’s side floor area. To check for interfer -
ence, with the vehicle properly parked with the
engine off, fully depress the accelerator, the
brake, and the clutch pedal (if present) to
check for interference. If your floor mat inter -
feres with the operation of any pedal, or is not
secure to the floor, remove the floor mat from
the vehicle and place the floor mat in your
trunk.
ONLY use the passenger’s side floor mat on
the passenger’s side floor area.
ALWAYS make sure objects cannot fall or slide
into the driver’s side floor area when the
vehicle is moving. Objects can become
trapped under accelerator, brake, or clutch
pedals and could cause a loss of vehicle
control.
NEVER place any objects under the floor mat
(e.g., towels, keys, etc.). These objects could
change the position of the floor mat and may
cause interference with the accelerator,
brake, or clutch pedals.
WARNING!
If the vehicle carpet has been removed and
re-installed, always properly attach carpet to
the floor and check the floor mat fasteners are
secure to the vehicle carpet. Fully depress
each pedal to check for interference with the
accelerator, brake, or clutch pedals then
re-install the floor mats.
It is recommended to only use mild soap and
water to clean your floor mats. After cleaning,
always check your floor mat has been properly
installed and is secured to your vehicle using
the floor mat fasteners by lightly pulling mat.
WARNING!
22_RUP_OM_EN_USC_t.book Page 280
Page 322 of 384

320SERVICING AND MAINTENANCE
BODY LUBRICATION
Locks and all body pivot points, including such
items as seat tracks, door hinge pivot points and
rollers, liftgate, tailgate, decklid, sliding doors and
hood hinges, should be lubricated periodically. Use
a lithium-based grease, such as Mopar® Spray
White Lube to ensure quiet, easy operation and to
protect against rust and wear. Prior to the
application of any lubricant, the parts concerned
should be wiped clean to remove dust and grit;
after lubricating, excess oil and grease should be
removed. Particular attention should also be given
to hood latching components to ensure proper
function. When performing other underhood
services, the hood latch release mechanism, and
safety catch should be cleaned and lubricated.
The external lock cylinders should be lubricated
twice a year, preferably in the Autumn and Spring.
Apply a small amount of a high quality lubricant,
such as Mopar® Lock Cylinder Lubricant directly
into the lock cylinder.
WINDSHIELD WIPER BLADES
Clean the rubber edges of the wiper blades and the
windshield periodically with a sponge or soft cloth
and a mild nonabrasive cleaner. This will remove
accumulations of salt or road film. Operation of the wipers on dry glass for long
periods may cause deterioration of the wiper
blades. Always use washer fluid when using the
wipers to remove salt or dirt from a dry windshield.
Avoid using the wiper blades to remove frost or ice
from the windshield. Keep the blade rubber out of
contact with petroleum products such as engine
oil, gasoline, etc.
NOTE:Life expectancy of wiper blades varies depending
on geographical area and frequency of use. If chat
-
tering, marks, water lines or wet spots are present,
clean the wiper blades or replace as necessary.
The wiper blades and wiper arms should be
inspected periodically, not just when wiper
performance problems are experienced. This
inspection should include the following points:
Wear or uneven edges
Foreign material
Hardening or cracking
Deformation or fatigue
If a wiper blade or wiper arm is damaged, replace
the affected wiper arm or blade with a new unit. Do
not attempt to repair a wiper arm or blade that is
damaged.
Front Wiper Blade Removal/Installation
1. Lift the wiper arm to raise the wiper blade off of the glass, until the wiper arm is in the full
up position.
Wiper Blade With Release Tab In Locked Position
CAUTION!
Do not allow the wiper arm to spring back
against the glass without the wiper blade in
place or the glass may be damaged.
1 — Wiper Blade
2 — Release Tab
3 — Wiper Arm
22_RUP_OM_EN_USC_t.book Page 320
Page 323 of 384
SERVICING AND MAINTENANCE321
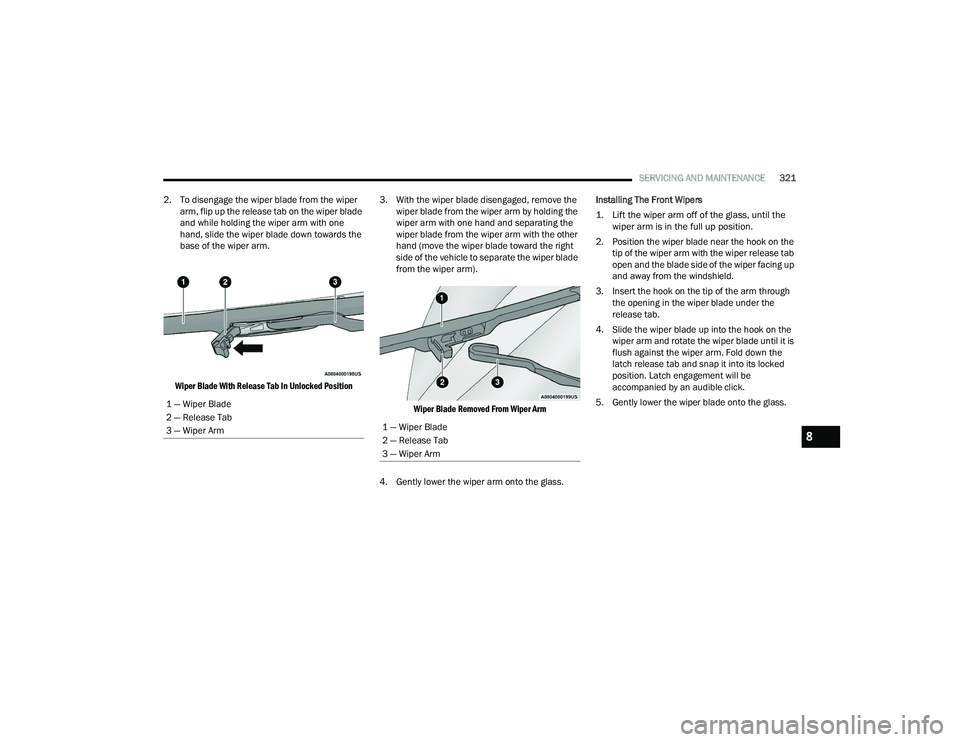
2. To disengage the wiper blade from the wiper arm, flip up the release tab on the wiper blade
and while holding the wiper arm with one
hand, slide the wiper blade down towards the
base of the wiper arm.
Wiper Blade With Release Tab In Unlocked Position
3. With the wiper blade disengaged, remove the
wiper blade from the wiper arm by holding the
wiper arm with one hand and separating the
wiper blade from the wiper arm with the other
hand (move the wiper blade toward the right
side of the vehicle to separate the wiper blade
from the wiper arm).
Wiper Blade Removed From Wiper Arm
4. Gently lower the wiper arm onto the glass. Installing The Front Wipers
1. Lift the wiper arm off of the glass, until the
wiper arm is in the full up position.
2. Position the wiper blade near the hook on the tip of the wiper arm with the wiper release tab
open and the blade side of the wiper facing up
and away from the windshield.
3. Insert the hook on the tip of the arm through the opening in the wiper blade under the
release tab.
4. Slide the wiper blade up into the hook on the wiper arm and rotate the wiper blade until it is
flush against the wiper arm. Fold down the
latch release tab and snap it into its locked
position. Latch engagement will be
accompanied by an audible click.
5. Gently lower the wiper blade onto the glass.
1 — Wiper Blade
2 — Release Tab
3 — Wiper Arm
1 — Wiper Blade
2 — Release Tab
3 — Wiper Arm8
22_RUP_OM_EN_USC_t.book Page 321
Page 324 of 384
322SERVICING AND MAINTENANCE
Rear Wiper Blade Removal/Installation
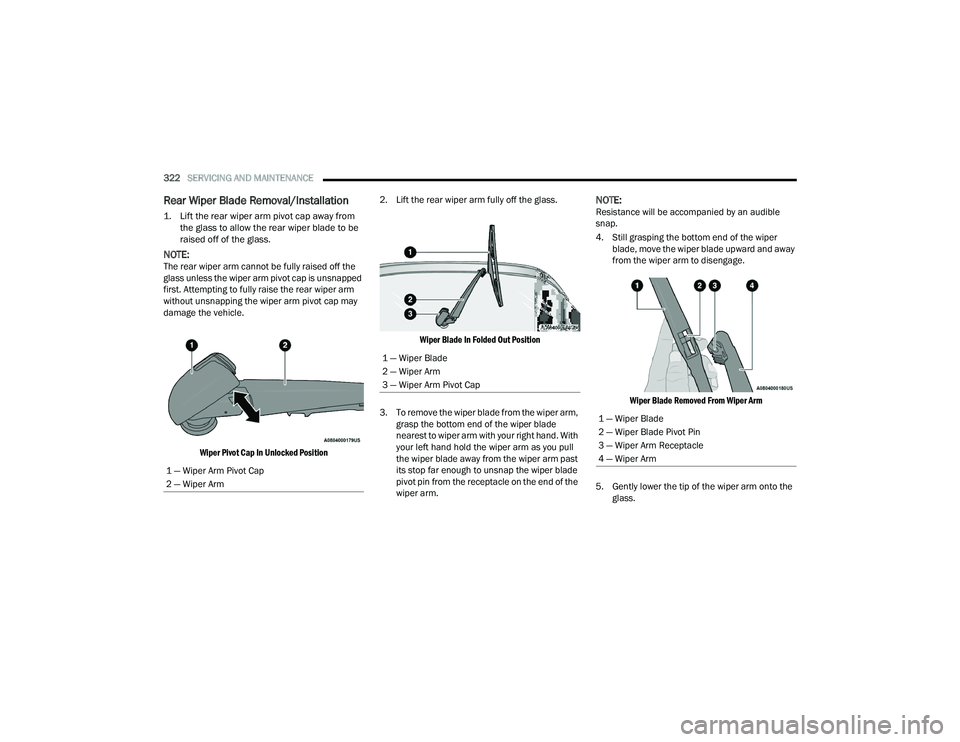
1. Lift the rear wiper arm pivot cap away from
the glass to allow the rear wiper blade to be
raised off of the glass.
NOTE:The rear wiper arm cannot be fully raised off the
glass unless the wiper arm pivot cap is unsnapped
first. Attempting to fully raise the rear wiper arm
without unsnapping the wiper arm pivot cap may
damage the vehicle.
Wiper Pivot Cap In Unlocked Position
2. Lift the rear wiper arm fully off the glass.
Wiper Blade In Folded Out Position
3. To remove the wiper blade from the wiper arm, grasp the bottom end of the wiper blade
nearest to wiper arm with your right hand. With
your left hand hold the wiper arm as you pull
the wiper blade away from the wiper arm past
its stop far enough to unsnap the wiper blade
pivot pin from the receptacle on the end of the
wiper arm.
NOTE:Resistance will be accompanied by an audible
snap.
4. Still grasping the bottom end of the wiper blade, move the wiper blade upward and away
from the wiper arm to disengage.
Wiper Blade Removed From Wiper Arm
5. Gently lower the tip of the wiper arm onto the glass.
1 — Wiper Arm Pivot Cap
2 — Wiper Arm
1 — Wiper Blade
2 — Wiper Arm
3 — Wiper Arm Pivot Cap
1 — Wiper Blade
2 — Wiper Blade Pivot Pin
3 — Wiper Arm Receptacle
4 — Wiper Arm
22_RUP_OM_EN_USC_t.book Page 322
Page 325 of 384
SERVICING AND MAINTENANCE323
Installing The Rear Wiper
1. Lift the rear wiper arm pivot cap away from the glass to allow the rear wiper blade to be
raised off of the glass.
NOTE:The rear wiper arm cannot be fully raised off the
glass unless the wiper arm pivot cap is unsnapped
first. Attempting to fully raise the rear wiper arm
without unsnapping the wiper arm pivot cap may
damage the vehicle.
2. Lift the rear wiper arm fully off the glass.
3. Insert the wiper blade pivot pin into the opening on the end of the wiper arm. Grab the
bottom end of the wiper arm with one hand,
and press the wiper blade flush with the wiper
arm until it snaps into place.
4. Lower the wiper blade onto the glass and snap the wiper arm pivot cap back into place.
EXHAUST SYSTEM
The best protection against carbon monoxide entry
into the vehicle body is a properly maintained
engine exhaust system. If you notice a change in the sound of the exhaust
system; or if the exhaust fumes can be detected
inside the vehicle; or when the underside or rear of
the vehicle is damaged; have an authorized
technician inspect the complete exhaust system
and adjacent body areas for broken, damaged,
deteriorated, or mispositioned parts. Open seams
or loose connections could permit exhaust fumes
to seep into the passenger compartment. In
addition, have the exhaust system inspected each
time the vehicle is raised for lubrication or oil
change. Replace as required.
Under normal operating conditions, the catalytic
converter will not require maintenance. However, it
is important to keep the engine properly tuned to
ensure proper catalyst operation and prevent
possible catalyst damage.
WARNING!
Exhaust gases can injure or kill. They contain
carbon monoxide (CO), which is colorless and
odorless. Breathing it can make you uncon-
scious and can eventually poison you
Ú page 278.
A hot exhaust system can start a fire if you
park over materials that can burn, such as
grass or leaves, and those items can come
into contact with your exhaust system. Do not
park or operate your vehicle in areas where
your exhaust system can contact anything that
can burn.
CAUTION!
The catalytic converter requires the use of
unleaded fuel only. Leaded gasoline will
destroy the effectiveness of the catalyst as an
emissions control device and may seriously
reduce engine performance and cause
serious damage to the engine.
Damage to the catalytic converter can result if
your vehicle is not kept in proper operating
condition. In the event of engine malfunction,
particularly involving engine misfire or other
apparent loss of performance, have your
vehicle serviced promptly. Continued opera -
tion of your vehicle with a severe malfunction
could cause the converter to overheat,
resulting in possible damage to the converter
and vehicle.
8
22_RUP_OM_EN_USC_t.book Page 323
Page 359 of 384
SERVICING AND MAINTENANCE357
STORING THE VEHICLE
If you are storing your vehicle for more than three
weeks, we recommend that you take the following
steps to minimize the drain on your vehicle's
battery:
Disconnect the negative cable from battery.
Any time you store your vehicle or keep it out of
service (i.e., vacation) for two weeks or more,
run the air conditioning system at idle for about
five minutes in the fresh air and high blower
setting. This will ensure adequate system lubri-
cation to minimize the possibility of compressor
damage when the system is started again.
BODYWORK
PROTECTION FROM ATMOSPHERIC
A
GENTS
Vehicle body care requirements vary according to
geographic locations and usage. Chemicals that
make roads passable in snow and ice and those
that are sprayed on trees and road surfaces during
other seasons are highly corrosive to the metal in
your vehicle. Outside parking, which exposes your
vehicle to airborne contaminants, road surfaces on
which the vehicle is operated, extreme hot or cold
weather and other extreme conditions will have an
adverse effect on paint, metal trim, and underbody
protection. The following maintenance recommendations will
enable you to obtain maximum benefit from the
corrosion resistance built into your vehicle.
What Causes Corrosion?
Corrosion is the result of deterioration or removal
of paint and protective coatings from your vehicle.
The most common causes are:
Road salt, dirt and moisture accumulation
Stone and gravel impact
Insects, tree sap and tar
Salt in the air near seacoast localities
Atmospheric fallout/industrial pollutants
BODY AND UNDERBODY MAINTENANCE
Cleaning Headlights
Your vehicle is equipped with plastic headlights
and fog lights that are lighter and less susceptible
to stone breakage than glass headlights.
Plastic is not as scratch resistant as glass and
therefore different lens cleaning procedures must
be followed.
To minimize the possibility of scratching the lenses
and reducing light output, avoid wiping with a dry
cloth. To remove road dirt, wash with a mild soap
solution followed by rinsing.
Do not use abrasive cleaning components,
solvents, steel wool or other aggressive material to
clean the lenses.
PRESERVING THE BODYWORK
Washing
Wash your vehicle regularly. Always wash your
vehicle in the shade using Mopar® Car Wash, or
a mild car wash soap, and rinse the panels
completely with water.
If insects, tar, or other similar deposits have
accumulated on your vehicle, use Mopar®
Super Kleen Bug and Tar Remover to remove.
Use a high quality cleaner wax, such as Mopar®
Cleaner Wax to remove road film, stains and to
protect your paint finish. Use precautions to not
scratch the paint.
Avoid using abrasive compounds and power
buffing that may diminish the gloss or thin out
the paint finish.
CAUTION!
Do not use abrasive or strong cleaning mate
-
rials such as steel wool or scouring powder
that will scratch metal and painted surfaces.
Use of power washers exceeding 1,200 psi
(8,274 kPa) can result in damage or removal
of paint and decals.
8
22_RUP_OM_EN_USC_t.book Page 357
Page 361 of 384
SERVICING AND MAINTENANCE359
PLASTIC AND COATED PARTS
Use Mopar® Total Clean to clean vinyl upholstery.
Cleaning Plastic Instrument Cluster
Lenses
The lenses in front of the instruments in this
vehicle are molded in clear plastic. When cleaning
the lenses, care must be taken to avoid scratching
the plastic. Clean with a wet soft cloth. A mild soap solution
may be used, but do not use high alcohol content
or abrasive cleaners. If soap is used, wipe clean
with a clean damp cloth. Dry with a soft cloth.
LEATHER SURFACES
Mopar® Total Clean is specifically recommended
for leather upholstery.
Your leather upholstery can be best preserved by
regular cleaning with a damp soft cloth. Small
particles of dirt can act as an abrasive and damage
the leather upholstery and should be removed
promptly with a damp cloth. Stubborn soils can be
removed easily with a soft cloth and Mopar® Total
Clean. Care should be taken to avoid soaking your
leather upholstery with any liquid. Please do not
use polishes, oils, cleaning fluids, solvents,
detergents, or ammonia-based cleaners to clean
your leather upholstery.
NOTE:If equipped with light colored leather, it tends to
show any foreign material, dirt, and fabric dye
transfer more so than darker colors. The leather is
designed for easy cleaning, and the manufacturer
recommends Mopar® total care leather cleaner
applied on a cloth to clean the leather seats as
needed.
GLASS SURFACES
All glass surfaces should be cleaned on a regular
basis with Mopar® Glass Cleaner, or any
commercial household-type glass cleaner. Never
use an abrasive type cleaner. Use caution when
cleaning the inside rear window equipped with
electric defrosters or windows equipped with radio
antennas. Do not use scrapers or other sharp
instruments that may scratch the elements.
When cleaning the rear view mirror, spray cleaner
on the towel or cloth that you are using. Do not
spray cleaner directly on the mirror.
CAUTION!
Direct contact of air fresheners, insect repel
-
lents, suntan lotions, or hand sanitizers to the
plastic, painted, or decorated surfaces of the
interior may cause permanent damage. Wipe
away immediately.
Damage caused by these type of products
may not be covered by your New Vehicle
Limited Warranty.
CAUTION!
Do not use Alcohol and Alcohol-based and/or
Ketone based cleaning products to clean leather
seats, as damage to the seat may result.
8
22_RUP_OM_EN_USC_t.book Page 359