2022 CHRYSLER PACIFICA HYBRID lights
[x] Cancel search: lightsPage 198 of 384
196MULTIMEDIA
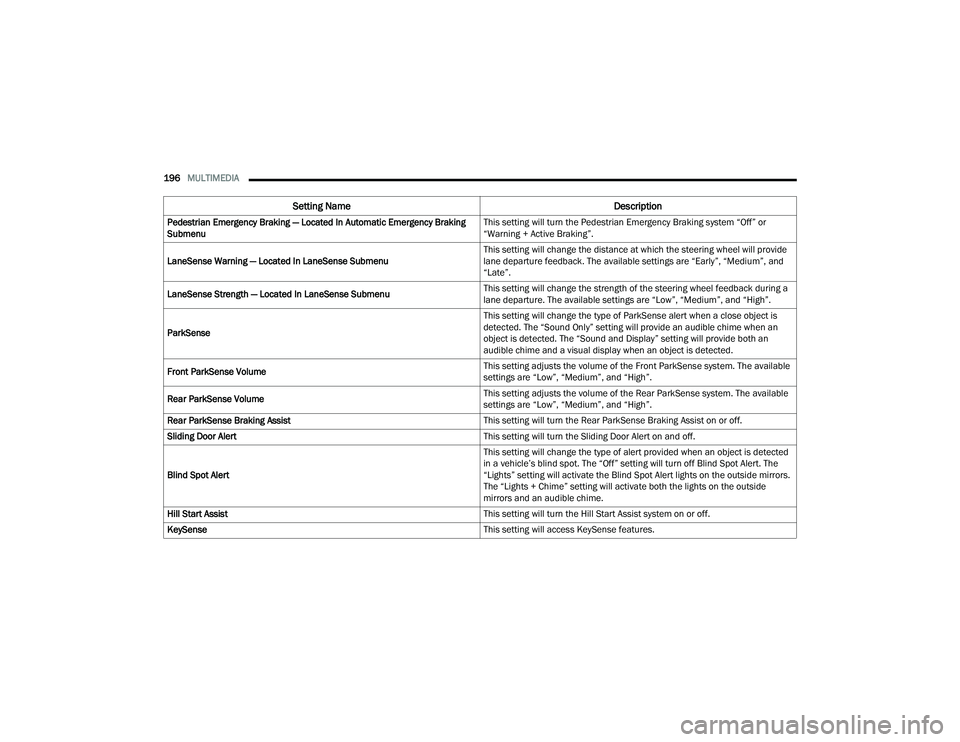
Pedestrian Emergency Braking — Located In Automatic Emergency Braking
Submenu This setting will turn the Pedestrian Emergency Braking system “Off” or
“Warning + Active Braking”.
LaneSense Warning — Located In LaneSense Submenu This setting will change the distance at which the steering wheel will provide
lane departure feedback. The available settings are “Early”, “Medium”, and
“Late”.
LaneSense Strength — Located In LaneSense Submenu This setting will change the strength of the steering wheel feedback during a
lane departure. The available settings are “Low”, “Medium”, and “High”.
ParkSense This setting will change the type of ParkSense alert when a close object is
detected. The “Sound Only” setting will provide an audible chime when an
object is detected. The “Sound and Display” setting will provide both an
audible chime and a visual display when an object is detected.
Front ParkSense Volume This setting adjusts the volume of the Front ParkSense system. The available
settings are “Low”, “Medium”, and “High”.
Rear ParkSense Volume This setting adjusts the volume of the Rear ParkSense system. The available
settings are “Low”, “Medium”, and “High”.
Rear ParkSense Braking Assist This setting will turn the Rear ParkSense Braking Assist on or off.
Sliding Door Alert This setting will turn the Sliding Door Alert on and off.
Blind Spot Alert This setting will change the type of alert provided when an object is detected
in a vehicle’s blind spot. The “Off” setting will turn off Blind Spot Alert. The
“Lights” setting will activate the Blind Spot Alert lights on the outside mirrors.
The “Lights + Chime” setting will activate both the lights on the outside
mirrors and an audible chime.
Hill Start Assist This setting will turn the Hill Start Assist system on or off.
KeySense This setting will access KeySense features.
Setting NameDescription
22_RUP_OM_EN_USC_t.book Page 196
Page 203 of 384
MULTIMEDIA201
Mirrors & Wipers
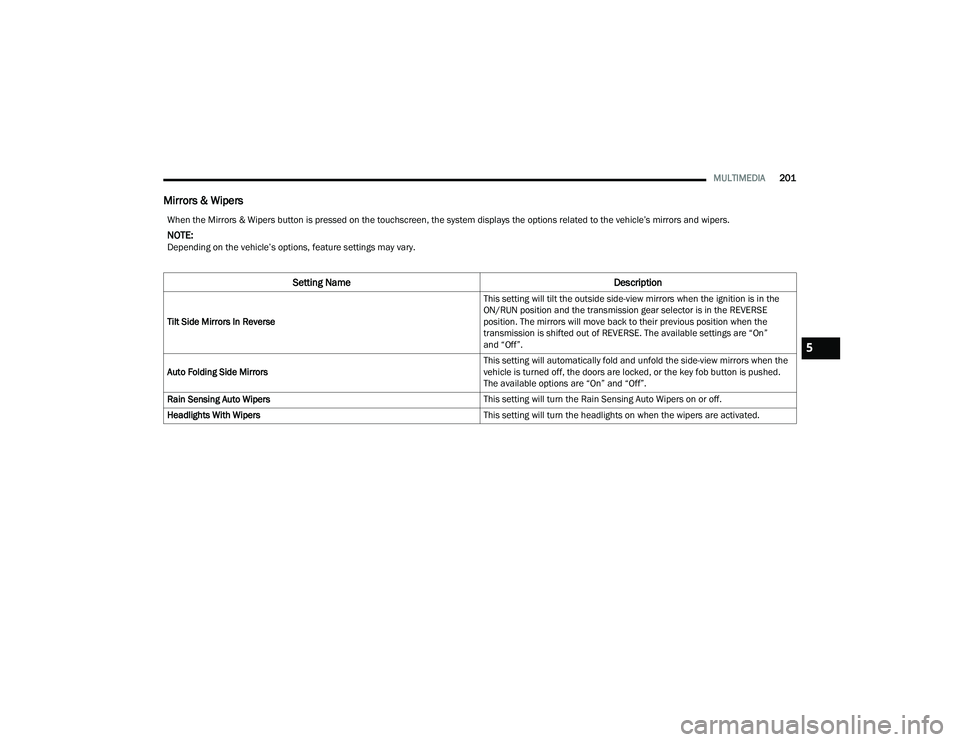
When the Mirrors & Wipers button is pressed on the touchscreen, the system displays the options related to the vehicle’s mirrors and wipers.
NOTE:Depending on the vehicle’s options, feature settings may vary.
Setting Name Description
Tilt Side Mirrors In Reverse This setting will tilt the outside side-view mirrors when the ignition is in the
ON/RUN position and the transmission gear selector is in the REVERSE
position. The mirrors will move back to their previous position when the
transmission is shifted out of REVERSE. The available settings are “On”
and “Off”.
Auto Folding Side Mirrors This setting will automatically fold and unfold the side-view mirrors when the
vehicle is turned off, the doors are locked, or the key fob button is pushed.
The available options are “On” and “Off”.
Rain Sensing Auto Wipers This setting will turn the Rain Sensing Auto Wipers on or off.
Headlights With Wipers This setting will turn the headlights on when the wipers are activated.
5
22_RUP_OM_EN_USC_t.book Page 201
Page 204 of 384
202MULTIMEDIA
Lights
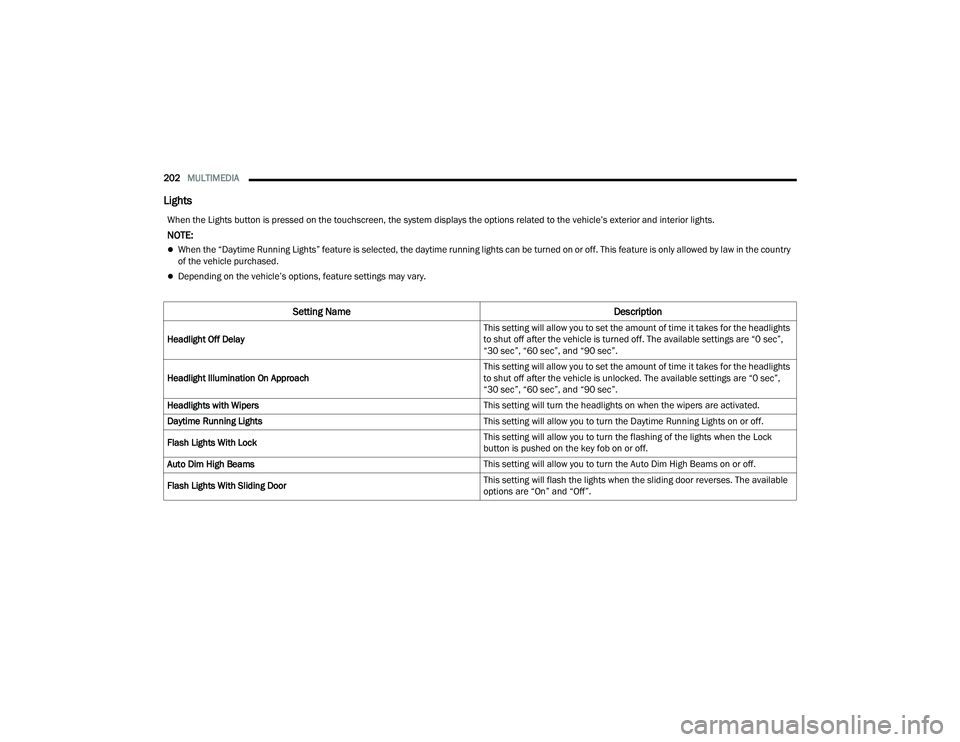
When the Lights button is pressed on the touchscreen, the system displays the options related to the vehicle’s exterior and interior lights.
NOTE:
When the “Daytime Running Lights” feature is selected, the daytime running lights can be turned on or off. This feature is only allowed by law in the country
of the vehicle purchased.
Depending on the vehicle’s options, feature settings may vary.
Setting Name Description
Headlight Off Delay This setting will allow you to set the amount of time it takes for the headlights
to shut off after the vehicle is turned off. The available settings are “0 sec”,
“30 sec”, “60 sec”, and “90 sec”.
Headlight Illumination On Approach This setting will allow you to set the amount of time it takes for the headlights
to shut off after the vehicle is unlocked. The available settings are “0 sec”,
“30 sec”, “60 sec”, and “90 sec”.
Headlights with Wipers This setting will turn the headlights on when the wipers are activated.
Daytime Running Lights This setting will allow you to turn the Daytime Running Lights on or off.
Flash Lights With Lock This setting will allow you to turn the flashing of the lights when the Lock
button is pushed on the key fob on or off.
Auto Dim High Beams This setting will allow you to turn the Auto Dim High Beams on or off.
Flash Lights With Sliding Door This setting will flash the lights when the sliding door reverses. The available
options are “On” and “Off”.
22_RUP_OM_EN_USC_t.book Page 202
Page 205 of 384
MULTIMEDIA203
Brakes
Doors & Locks
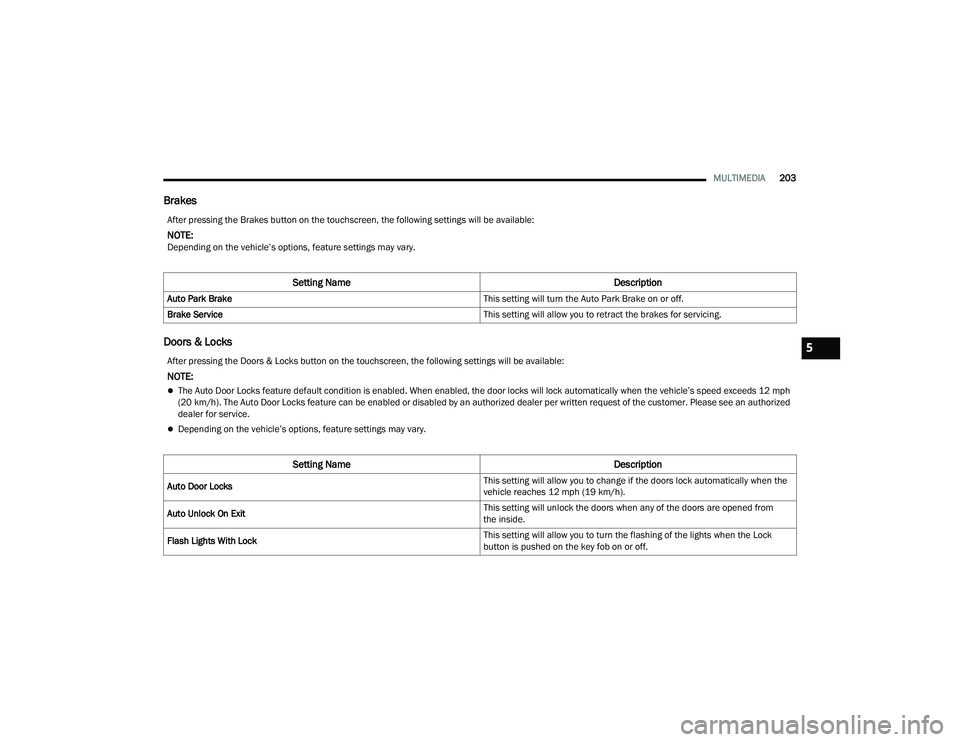
After pressing the Brakes button on the touchscreen, the following settings will be available:
NOTE:Depending on the vehicle’s options, feature settings may vary.
Setting Name Description
Auto Park Brake This setting will turn the Auto Park Brake on or off.
Brake Service This setting will allow you to retract the brakes for servicing.
After pressing the Doors & Locks button on the touchscreen, the following settings will be available:
NOTE:
The Auto Door Locks feature default condition is enabled. When enabled, the door locks will lock automatically when the vehicle’s speed exceeds 12 mph
(20 km/h). The Auto Door Locks feature can be enabled or disabled by an authorized dealer per written request of the customer. Please see an authorized
dealer for service.
Depending on the vehicle’s options, feature settings may vary.
Setting NameDescription
Auto Door Locks This setting will allow you to change if the doors lock automatically when the
vehicle reaches 12 mph (19 km/h).
Auto Unlock On Exit This setting will unlock the doors when any of the doors are opened from
the inside.
Flash Lights With Lock This setting will allow you to turn the flashing of the lights when the Lock
button is pushed on the key fob on or off.
5
22_RUP_OM_EN_USC_t.book Page 203
Page 206 of 384
204MULTIMEDIA
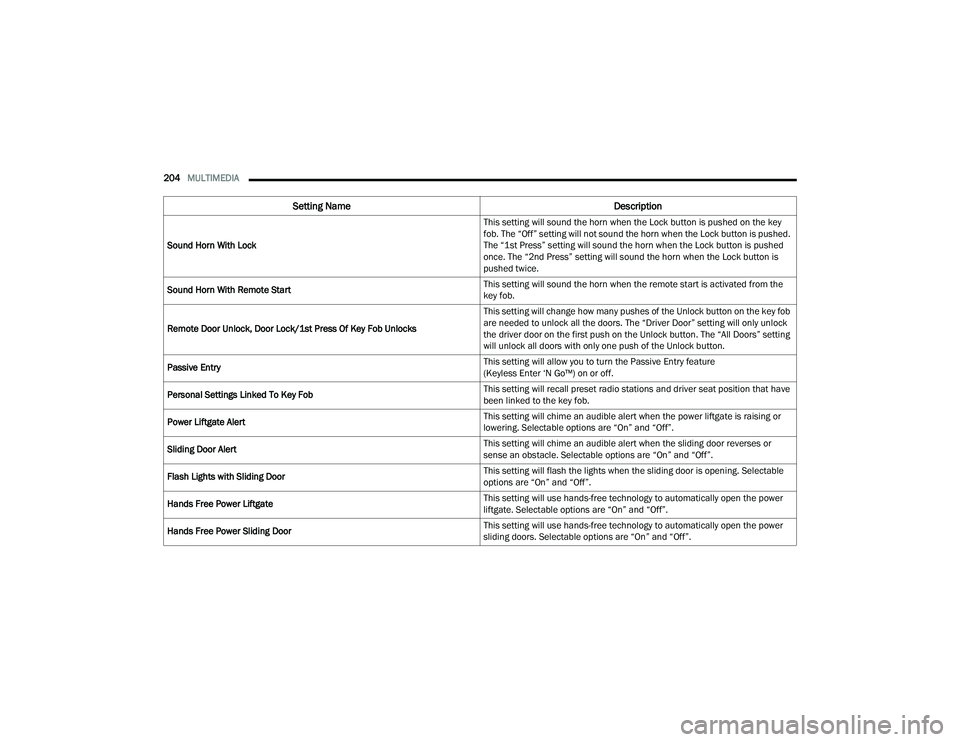
Sound Horn With Lock This setting will sound the horn when the Lock button is pushed on the key
fob. The “Off” setting will not sound the horn when the Lock button is pushed.
The “1st Press” setting will sound the horn when the Lock button is pushed
once. The “2nd Press” setting will sound the horn when the Lock button is
pushed twice.
Sound Horn With Remote Start This setting will sound the horn when the remote start is activated from the
key fob.
Remote Door Unlock, Door Lock/1st Press Of Key Fob Unlocks This setting will change how many pushes of the Unlock button on the key fob
are needed to unlock all the doors. The “Driver Door” setting will only unlock
the driver door on the first push on the Unlock button. The “All Doors” setting
will unlock all doors with only one push of the Unlock button.
Passive Entry This setting will allow you to turn the Passive Entry feature
(Keyless Enter ‘N Go™) on or off.
Personal Settings Linked To Key Fob This setting will recall preset radio stations and driver seat position that have
been linked to the key fob.
Power Liftgate Alert This setting will chime an audible alert when the power liftgate is raising or
lowering. Selectable options are “On” and “Off”.
Sliding Door Alert This setting will chime an audible alert when the sliding door reverses or
sense an obstacle. Selectable options are “On” and “Off”.
Flash Lights with Sliding Door This setting will flash the lights when the sliding door is opening. Selectable
options are “On” and “Off”.
Hands Free Power Liftgate This setting will use hands-free technology to automatically open the power
liftgate. Selectable options are “On” and “Off”.
Hands Free Power Sliding Door This setting will use hands-free technology to automatically open the power
sliding doors. Selectable options are “On” and “Off”.
Setting Name
Description
22_RUP_OM_EN_USC_t.book Page 204
Page 208 of 384
206MULTIMEDIA
Key Off Options
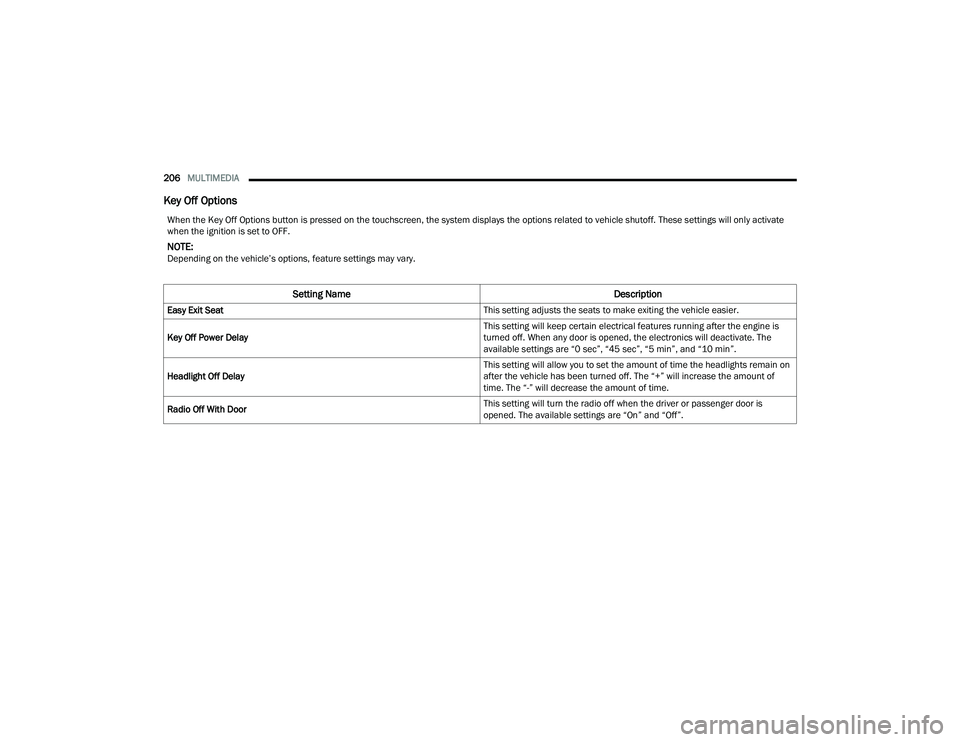
When the Key Off Options button is pressed on the touchscreen, the system displays the options related to vehicle shutoff. These settings will only activate
when the ignition is set to OFF.
NOTE:Depending on the vehicle’s options, feature settings may vary.
Setting Name Description
Easy Exit Seat This setting adjusts the seats to make exiting the vehicle easier.
Key Off Power Delay This setting will keep certain electrical features running after the engine is
turned off. When any door is opened, the electronics will deactivate. The
available settings are “0 sec”, “45 sec”, “5 min”, and “10 min”.
Headlight Off Delay This setting will allow you to set the amount of time the headlights remain on
after the vehicle has been turned off. The “+” will increase the amount of
time. The “-” will decrease the amount of time.
Radio Off With Door This setting will turn the radio off when the driver or passenger door is
opened. The available settings are “On” and “Off”.
22_RUP_OM_EN_USC_t.book Page 206
Page 234 of 384

232SAFETY
Rear Cross Path (RCP)
RCP is intended to aid the driver when backing out
of parking spaces where their vision of oncoming
vehicles may be blocked. Proceed slowly and
cautiously out of the parking space until the rear
end of the vehicle is exposed. The RCP system will
then have a clear view of the cross traffic and if an
oncoming vehicle is detected, alert the driver.
RCP Detection Zones
RCP monitors the rear detection zones on both
sides of the vehicle, for objects that are moving
toward the side of the vehicle with a minimum
speed of approximately 3 mph (5 km/h), to objects
moving a maximum of approximately 20 mph
(32 km/h), such as in parking lot situations.
NOTE:In a parking lot situation, oncoming vehicles can be
blocked by vehicles parked on either side. If the
sensors are blocked by other structures or
vehicles, the system will not be able to alert the
driver. Additionally, if your vehicle is obscured by a
flat object on one side the system can false alert
on vehicles approaching from the opposite
direction.
When RCP is on and the vehicle is in REVERSE (R),
the driver is alerted using both the visual and
audible alarms, including reducing the radio
volume.Blind Spot Modes
Three selectable modes of operation are available
in the Uconnect system.
Blind Spot Alert Lights Only — Default Setting
When operating in Blind Spot Alert mode, the BSM
system will provide a visual alert in the appropriate
side view mirror based on a detected object.
However, when the system is operating in Rear
Cross Path (RCP) mode, the system will respond
with both visual and audible alerts when a
detected object is present. Whenever an audible
alert is requested, the radio is muted.
Blind Spot Alert Lights/Chime
When operating in Blind Spot Alert Lights/Chime
mode, the BSM system will provide a visual alert in
the appropriate side view mirror based on a
detected object. If the turn signal is then activated,
and it corresponds to an alert present on that side
of the vehicle, an audible chime will also be
sounded. Whenever a turn signal and detected
object are present on the same side at the same
time, both the visual and audible alerts will be
issued. In addition to the audible alert the radio
(if on) will also be muted.
NOTE:Whenever an audible alert is requested by the
BSM system, the radio is also muted.
WARNING!
Rear Cross Path Detection (RCP) is not a back up
aid system. It is intended to be used to help a
driver detect an oncoming vehicle in a parking
lot situation. Drivers must be careful when
backing up, even when using RCP. Always check
carefully behind your vehicle, look behind you,
and be sure to check for pedestrians, animals,
other vehicles, obstructions, and blind spots
before backing up. Failure to do so can result in
serious injury or death.
22_RUP_OM_EN_USC_t.book Page 232
Page 258 of 384

256SAFETY
The Air Bag Warning Light in the instrument
panel will turn on whenever the OCS is unable to
classify the front passenger seat status. A
malfunction in the OCS may affect the operation of
the air bag system.
If the Air Bag Warning Light does not come on,
or stays on after you start the vehicle, or it comes
on as you drive, take the vehicle to an authorized
dealer for service immediately. The passenger seat assembly contains critical OCS
components that may affect the Passenger
Advanced Front Air Bag inflation. In order for the
OCS to properly classify the seated weight of a
front seat passenger, the OCS components must
function as designed. Do not make any
modifications to the front passenger seat
components, assembly, or to the seat cover. If the
seat, trim cover, or cushion needs service for any
reason, take the vehicle to an authorized dealer.
Only FCA US LLC approved seat accessories may
be used.
The following requirements must be strictly
followed:
Do not modify the front passenger seat
assembly or components in any way.
Do not use prior or future model year seat
covers or cushions not designated by FCA US
LLC for the specific model being repaired.
Always use the correct seat cover and cushion
specified for the vehicle.
Do not replace the seat cover or cushion with an
aftermarket seat cover or cushion.
Do not add a secondary seat cover or mat.
At no time should any Supplemental Restraint
System (SRS) component or SRS related
component or fastener be modified or replaced
with any part except those which are approved
by FCA US LLC.
Knee Impact Bolsters
The Knee Impact Bolsters help protect the knees
of the driver and front passenger, and position the
front occupants for improved interaction with the
front air bags.
Do not carry or hold any objects (e.g., back
-
packs, boxes, etc.) while seated in the front
passenger seat. Holding an object may
provide an output signal to the OCS that is
different than the occupant’s properly seated
weight input, which may result in serious injury
or death in a collision.
Placing an object on the floor under the front
passenger seat may prevent the OCS from
working properly, which may result in serious
injury or death in a collision. Do not place any
objects on the floor under the front passenger
seat.
WARNING!WARNING!
Unapproved modifications or service proce-
dures to the passenger seat assembly, its
related components, seat cover or cushion
may inadvertently change the air bag deploy -
ment in case of a frontal collision. This could
result in death or serious injury to the front
passenger if the vehicle is involved in a colli -
sion. A modified vehicle may not comply with
required Federal Motor Vehicle Safety Stan -
dards (FMVSS) and/or Canadian Motor
Vehicle Safety Standards (CMVSS).
If it is necessary to modify the air bag system
for persons with disabilities, contact an autho -
rized dealer.
WARNING!
Do not drill, cut, or tamper with the knee
impact bolsters in any way.
Do not mount any accessories to the knee
impact bolsters such as alarm lights, stereos,
citizen band radios, etc.
22_RUP_OM_EN_USC_t.book Page 256