2022 CHEVROLET MALIBU run flat
[x] Cancel search: run flatPage 14 of 351
Chevrolet Malibu Owner Manual (GMNA-Localizing-U.S./Canada-
14584249) - 2021 - CRC - 11/9/20
Keys, Doors, and Windows 13
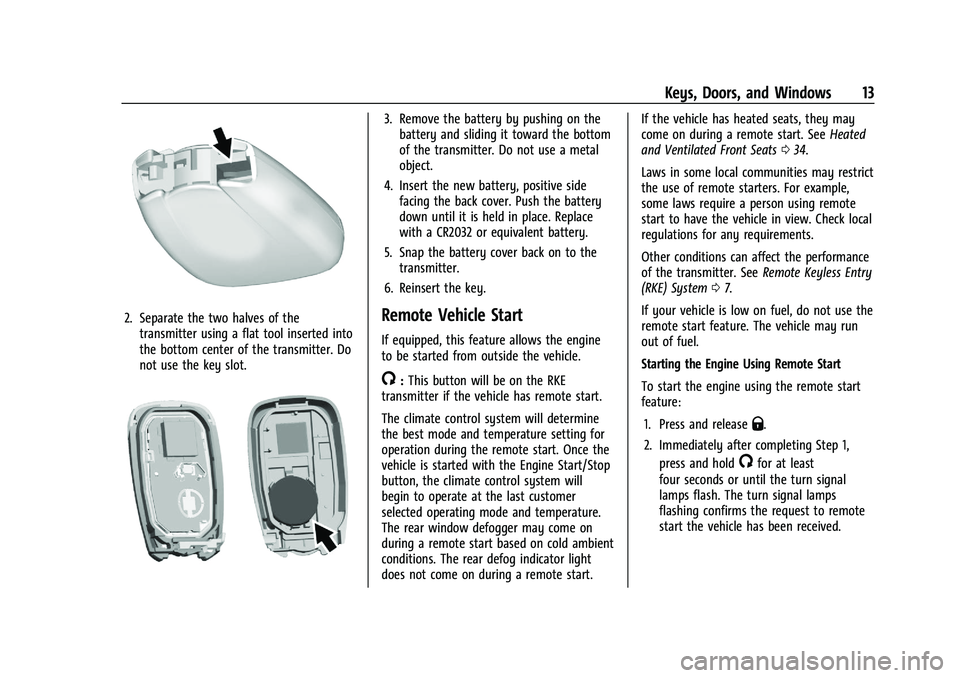
2. Separate the two halves of thetransmitter using a flat tool inserted into
the bottom center of the transmitter. Do
not use the key slot.
3. Remove the battery by pushing on thebattery and sliding it toward the bottom
of the transmitter. Do not use a metal
object.
4. Insert the new battery, positive side facing the back cover. Push the battery
down until it is held in place. Replace
with a CR2032 or equivalent battery.
5. Snap the battery cover back on to the transmitter.
6. Reinsert the key.
Remote Vehicle Start
If equipped, this feature allows the engine
to be started from outside the vehicle.
/: This button will be on the RKE
transmitter if the vehicle has remote start.
The climate control system will determine
the best mode and temperature setting for
operation during the remote start. Once the
vehicle is started with the Engine Start/Stop
button, the climate control system will
begin to operate at the last customer
selected operating mode and temperature.
The rear window defogger may come on
during a remote start based on cold ambient
conditions. The rear defog indicator light
does not come on during a remote start. If the vehicle has heated seats, they may
come on during a remote start. See
Heated
and Ventilated Front Seats 034.
Laws in some local communities may restrict
the use of remote starters. For example,
some laws require a person using remote
start to have the vehicle in view. Check local
regulations for any requirements.
Other conditions can affect the performance
of the transmitter. See Remote Keyless Entry
(RKE) System 07.
If your vehicle is low on fuel, do not use the
remote start feature. The vehicle may run
out of fuel.
Starting the Engine Using Remote Start
To start the engine using the remote start
feature:
1. Press and release
Q.
2. Immediately after completing Step 1, press and hold
/for at least
four seconds or until the turn signal
lamps flash. The turn signal lamps
flashing confirms the request to remote
start the vehicle has been received.
Page 70 of 351
Chevrolet Malibu Owner Manual (GMNA-Localizing-U.S./Canada-
14584249) - 2021 - CRC - 11/9/20
Seats and Restraints 69
SeePassenger Sensing System 050 and
Passenger Airbag Status Indicator 086 for
more information, including important
safety information.
Never put a rear-facing child seat in the
front. This is because the risk to the
rear-facing child is so great if the airbag
deploys.
{Warning
A child in a rear-facing child restraint can
be seriously injured or killed if the front
outboard passenger frontal airbag
inflates. This is because the back of the
rear-facing child restraint would be very
close to the inflating airbag. A child in a
forward-facing child restraint can be
seriously injured or killed if the front
outboard passenger frontal airbag inflates
and the passenger seat is in a forward
position.
Even if the passenger sensing system has
turned off the front outboard passenger
airbag(s), no system is fail-safe. No one
can guarantee that an airbag will not
deploy under some unusual circumstance,
even though the airbag(s) are off.
(Continued)
Warning (Continued)
Secure rear-facing child restraints in a
rear seat, even if the airbag(s) are off.
If you secure a forward-facing child
restraint in the front outboard passenger
seat, always move the seat as far back as
it will go. It is better to secure the child
restraint in a rear seat.
SeePassenger Sensing System 050 for
additional information.
If the child restraint uses a top tether, see
Lower Anchors and Tethers for Children
(LATCH System) 061 for top tether anchor
locations.
Do not secure a child seat in a position
without a top tether anchor if a national or
local law requires that the top tether be
anchored, or if the instructions that come
with the child restraint say that the top
tether must be anchored.
In Canada, the law requires that
forward-facing child restraints have a top
tether, and that the tether be attached. When using the lap-shoulder belt to secure
the child restraint in this position, follow the
instructions that came with the child
restraint and the following instructions:
1. Move the seat as far back as it will go before securing the forward-facing child
restraint. Move the seat upward or the
seatback to an upright position,
if needed, to get a tight installation of
the child restraint.
When the passenger sensing system has
turned off the front outboard passenger
frontal airbag and knee airbag, the OFF
indicator on the passenger airbag status
indicator should light and stay lit when
you start the vehicle. See Passenger
Airbag Status Indicator 086.
2. Put the child restraint on the seat.
3. Pick up the latch plate, and run the lap and shoulder portions of the vehicle seat
belt through or around the child
restraint. The child restraint instructions
will show you how.
Page 87 of 351
Chevrolet Malibu Owner Manual (GMNA-Localizing-U.S./Canada-
14584249) - 2021 - CRC - 11/9/20
86 Instruments and Controls
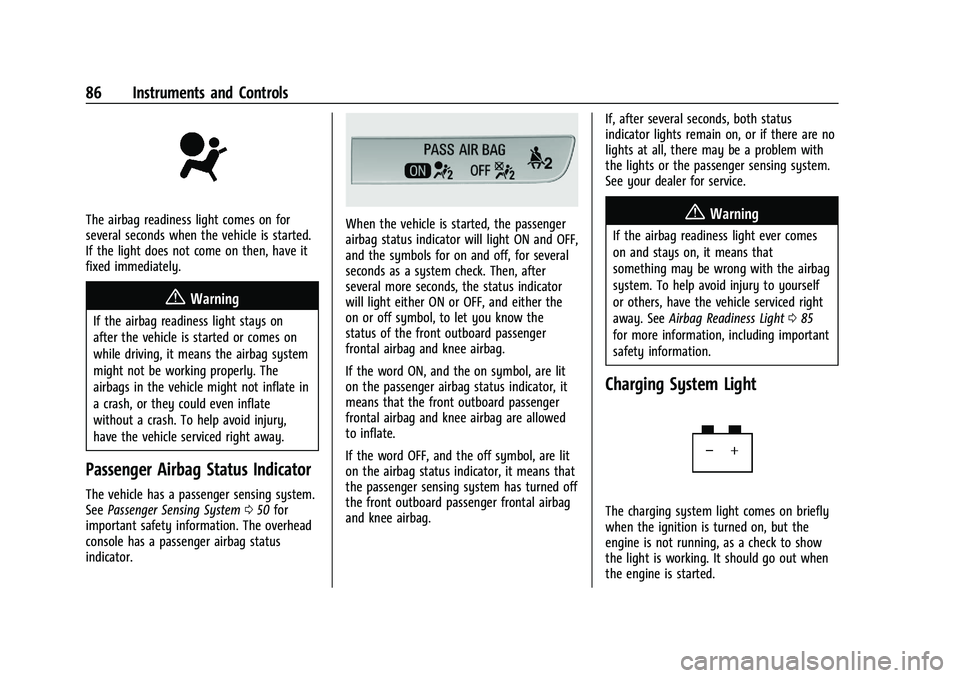
The airbag readiness light comes on for
several seconds when the vehicle is started.
If the light does not come on then, have it
fixed immediately.
{Warning
If the airbag readiness light stays on
after the vehicle is started or comes on
while driving, it means the airbag system
might not be working properly. The
airbags in the vehicle might not inflate in
a crash, or they could even inflate
without a crash. To help avoid injury,
have the vehicle serviced right away.
Passenger Airbag Status Indicator
The vehicle has a passenger sensing system.
SeePassenger Sensing System 050 for
important safety information. The overhead
console has a passenger airbag status
indicator.
When the vehicle is started, the passenger
airbag status indicator will light ON and OFF,
and the symbols for on and off, for several
seconds as a system check. Then, after
several more seconds, the status indicator
will light either ON or OFF, and either the
on or off symbol, to let you know the
status of the front outboard passenger
frontal airbag and knee airbag.
If the word ON, and the on symbol, are lit
on the passenger airbag status indicator, it
means that the front outboard passenger
frontal airbag and knee airbag are allowed
to inflate.
If the word OFF, and the off symbol, are lit
on the airbag status indicator, it means that
the passenger sensing system has turned off
the front outboard passenger frontal airbag
and knee airbag. If, after several seconds, both status
indicator lights remain on, or if there are no
lights at all, there may be a problem with
the lights or the passenger sensing system.
See your dealer for service.{Warning
If the airbag readiness light ever comes
on and stays on, it means that
something may be wrong with the airbag
system. To help avoid injury to yourself
or others, have the vehicle serviced right
away. See
Airbag Readiness Light 085
for more information, including important
safety information.
Charging System Light
The charging system light comes on briefly
when the ignition is turned on, but the
engine is not running, as a check to show
the light is working. It should go out when
the engine is started.
Page 178 of 351
Chevrolet Malibu Owner Manual (GMNA-Localizing-U.S./Canada-
14584249) - 2021 - CRC - 11/9/20
Driving and Operating 177
Other Rainy Weather Tips
Besides slowing down, other wet weather
driving tips include:
.Allow extra following distance.
.Pass with caution.
.Keep windshield wiping equipment in
good shape.
.Keep the windshield washer fluid reservoir
filled.
.Have good tires with proper tread depth.
SeeTires 0259.
.Turn off cruise control.
Hill and Mountain Roads
Driving on steep hills or through mountains
is different than driving on flat or rolling
terrain. Tips include:
.Keep the vehicle serviced and in good
shape.
.Check all fluid levels and brakes, tires,
cooling system, and transmission.
.Shift to a lower gear when going down
steep or long hills.
{Warning
Using the brakes to slow the vehicle on a
long downhill slope can cause brake
overheating, can reduce brake
performance, and could result in a loss of
braking. Shift the transmission to a lower
gear to let the engine assist the brakes
on a steep downhill slope.
{Warning
Coasting downhill in N (Neutral) or with
the ignition off is dangerous. This can
cause overheating of the brakes and loss
of steering assist. Always have the engine
running and the vehicle in gear.
.Drive at speeds that keep the vehicle in
its own lane. Do not swing wide or cross
the center line.
.Be alert on top of hills; something could
be in your lane (e.g., stalled car, crash).
.Pay attention to special road signs (e.g.,
falling rocks area, winding roads, long
grades, passing or no-passing zones) and
take appropriate action.
Winter Driving
Driving on Snow or Ice
Snow or ice between the tires and the road
creates less traction or grip, so drive
carefully. Wet ice can occur at about 0 °C
(32 °F) when freezing rain begins to fall.
Avoid driving on wet ice or in freezing rain
until roads can be treated.
For Slippery Road Driving:
.Accelerate gently. Accelerating too quickly
causes the wheels to spin and makes the
surface under the tires slick.
.Turn on Traction Control. See Traction
Control/Electronic Stability Control 0193.
.The Antilock Brake System (ABS) improves
vehicle stability during hard stops, but
the brakes should be applied sooner than
when on dry pavement. See Antilock
Brake System (ABS) 0191.
.Allow greater following distance and
watch for slippery spots. Icy patches can
occur on otherwise clear roads in shaded
areas. The surface of a curve or an
overpass can remain icy when the
surrounding roads are clear. Avoid sudden
steering maneuvers and braking while
on ice.
Page 280 of 351
Chevrolet Malibu Owner Manual (GMNA-Localizing-U.S./Canada-
14584249) - 2021 - CRC - 11/9/20
Vehicle Care 279
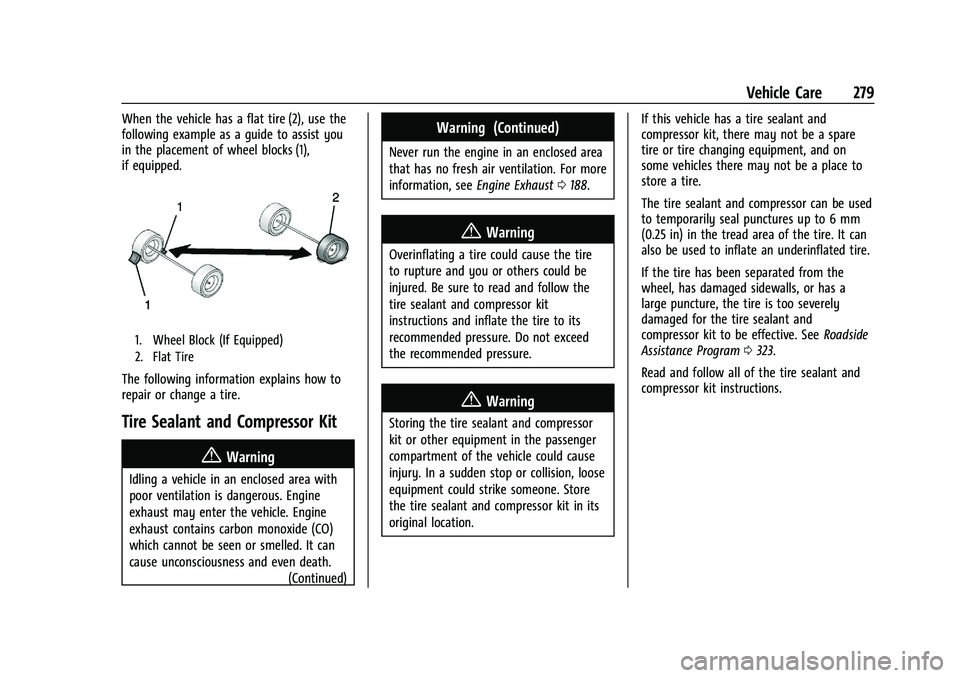
When the vehicle has a flat tire (2), use the
following example as a guide to assist you
in the placement of wheel blocks (1),
if equipped.
1. Wheel Block (If Equipped)
2. Flat Tire
The following information explains how to
repair or change a tire.
Tire Sealant and Compressor Kit
{Warning
Idling a vehicle in an enclosed area with
poor ventilation is dangerous. Engine
exhaust may enter the vehicle. Engine
exhaust contains carbon monoxide (CO)
which cannot be seen or smelled. It can
cause unconsciousness and even death.(Continued)
Warning (Continued)
Never run the engine in an enclosed area
that has no fresh air ventilation. For more
information, seeEngine Exhaust0188.
{Warning
Overinflating a tire could cause the tire
to rupture and you or others could be
injured. Be sure to read and follow the
tire sealant and compressor kit
instructions and inflate the tire to its
recommended pressure. Do not exceed
the recommended pressure.
{Warning
Storing the tire sealant and compressor
kit or other equipment in the passenger
compartment of the vehicle could cause
injury. In a sudden stop or collision, loose
equipment could strike someone. Store
the tire sealant and compressor kit in its
original location. If this vehicle has a tire sealant and
compressor kit, there may not be a spare
tire or tire changing equipment, and on
some vehicles there may not be a place to
store a tire.
The tire sealant and compressor can be used
to temporarily seal punctures up to 6 mm
(0.25 in) in the tread area of the tire. It can
also be used to inflate an underinflated tire.
If the tire has been separated from the
wheel, has damaged sidewalls, or has a
large puncture, the tire is too severely
damaged for the tire sealant and
compressor kit to be effective. See
Roadside
Assistance Program 0323.
Read and follow all of the tire sealant and
compressor kit instructions.
Page 282 of 351
Chevrolet Malibu Owner Manual (GMNA-Localizing-U.S./Canada-
14584249) - 2021 - CRC - 11/9/20
Vehicle Care 281
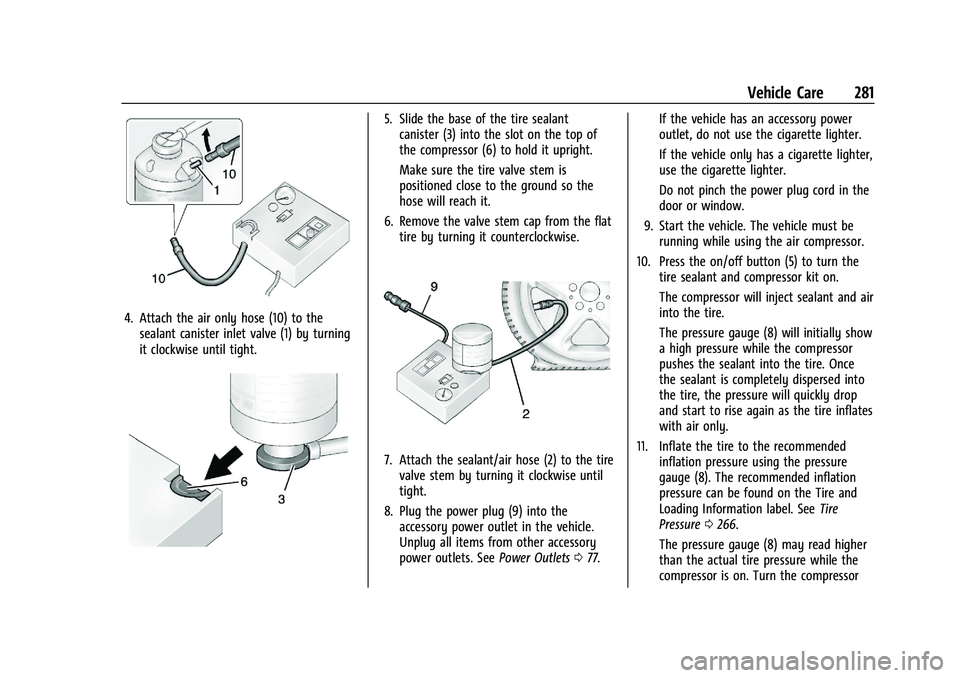
4. Attach the air only hose (10) to thesealant canister inlet valve (1) by turning
it clockwise until tight.
5. Slide the base of the tire sealantcanister (3) into the slot on the top of
the compressor (6) to hold it upright.
Make sure the tire valve stem is
positioned close to the ground so the
hose will reach it.
6. Remove the valve stem cap from the flat tire by turning it counterclockwise.
7. Attach the sealant/air hose (2) to the tirevalve stem by turning it clockwise until
tight.
8. Plug the power plug (9) into the accessory power outlet in the vehicle.
Unplug all items from other accessory
power outlets. See Power Outlets077. If the vehicle has an accessory power
outlet, do not use the cigarette lighter.
If the vehicle only has a cigarette lighter,
use the cigarette lighter.
Do not pinch the power plug cord in the
door or window.
9. Start the vehicle. The vehicle must be running while using the air compressor.
10. Press the on/off button (5) to turn the tire sealant and compressor kit on.
The compressor will inject sealant and air
into the tire.
The pressure gauge (8) will initially show
a high pressure while the compressor
pushes the sealant into the tire. Once
the sealant is completely dispersed into
the tire, the pressure will quickly drop
and start to rise again as the tire inflates
with air only.
11. Inflate the tire to the recommended inflation pressure using the pressure
gauge (8). The recommended inflation
pressure can be found on the Tire and
Loading Information label. See Tire
Pressure 0266.
The pressure gauge (8) may read higher
than the actual tire pressure while the
compressor is on. Turn the compressor
Page 285 of 351
Chevrolet Malibu Owner Manual (GMNA-Localizing-U.S./Canada-
14584249) - 2021 - CRC - 11/9/20
284 Vehicle Care
7. Start the vehicle. The vehicle must berunning while using the air compressor.
8. Press the on/off button (5) to turn the tire sealant and compressor kit on.
The compressor will inflate the tire with
air only.
9. Inflate the tire to the recommended inflation pressure using the pressure
gauge (8). The recommended inflation
pressure can be found on the Tire and
Loading Information label. See Tire
Pressure 0266.
The pressure gauge (8) may read higher
than the actual tire pressure while the
compressor is on. Turn the compressor
off to get an accurate pressure reading.
The compressor may be turned on/off
until the correct pressure is reached.
Caution
If the recommended pressure cannot be
reached after approximately 25 minutes,
the vehicle should not be driven farther.
The tire is too severely damaged and the
tire sealant and compressor kit cannot
inflate the tire. Remove the power plug
from the accessory power outlet and
(Continued)
Caution (Continued)
unscrew the inflating hose from the tire
valve. See Roadside Assistance Program
0 323.
10. Press the on/off button (5) to turn the tire sealant and compressor kit off.
Be careful while handling the compressor
as it could be warm after usage.
11. Unplug the power plug (9) from the accessory power outlet in the vehicle.
12. Turn the air only hose (10) counterclockwise to remove it from the
tire valve stem.
13. Replace the tire valve stem cap.
14. Return the air only hose (10) and power plug (9) back to their original storage
location.
15. Return the equipment to its original storage location in the vehicle.
The tire sealant and compressor kit has
accessory adapters located in a
compartment on the bottom of its housing
that can be used to inflate air mattresses,
balls, etc.
Storing the Tire Sealant and
Compressor Kit
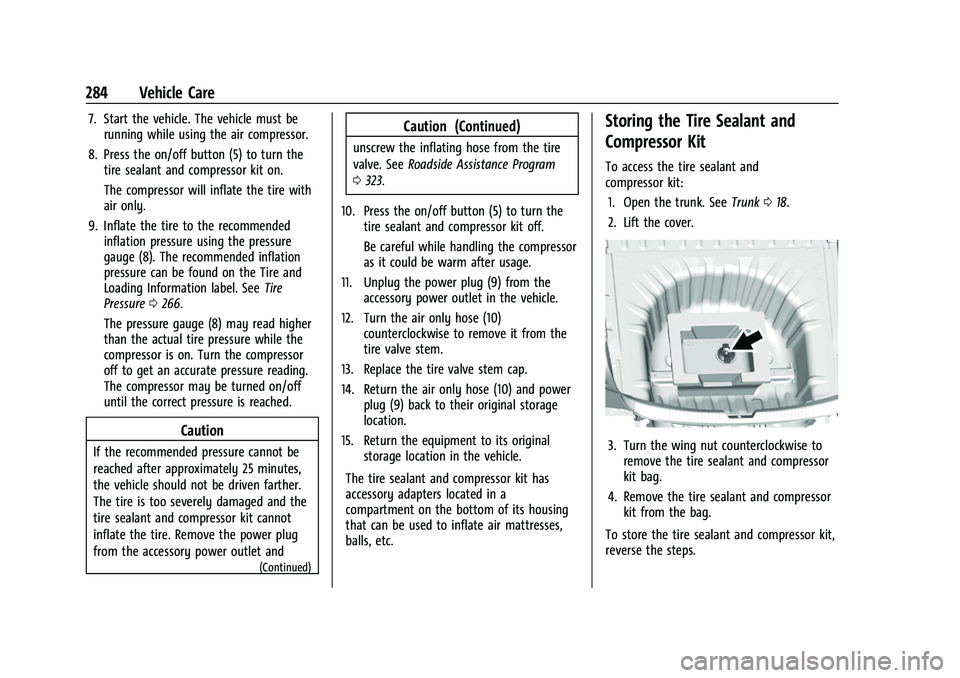
To access the tire sealant and
compressor kit: 1. Open the trunk. See Trunk018.
2. Lift the cover.
3. Turn the wing nut counterclockwise to remove the tire sealant and compressor
kit bag.
4. Remove the tire sealant and compressor kit from the bag.
To store the tire sealant and compressor kit,
reverse the steps.
Page 286 of 351
Chevrolet Malibu Owner Manual (GMNA-Localizing-U.S./Canada-
14584249) - 2021 - CRC - 11/9/20
Vehicle Care 285
Tire Changing
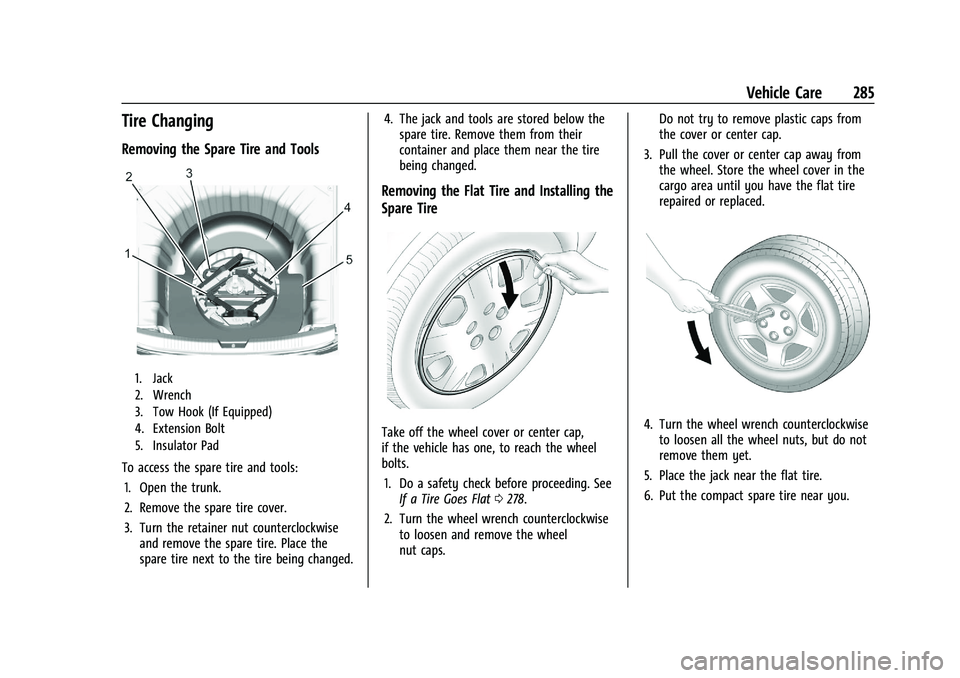
Removing the Spare Tire and Tools
1. Jack
2. Wrench
3. Tow Hook (If Equipped)
4. Extension Bolt
5. Insulator Pad
To access the spare tire and tools:1. Open the trunk.
2. Remove the spare tire cover.
3. Turn the retainer nut counterclockwise and remove the spare tire. Place the
spare tire next to the tire being changed. 4. The jack and tools are stored below the
spare tire. Remove them from their
container and place them near the tire
being changed.
Removing the Flat Tire and Installing the
Spare Tire
Take off the wheel cover or center cap,
if the vehicle has one, to reach the wheel
bolts.
1. Do a safety check before proceeding. See If a Tire Goes Flat 0278.
2. Turn the wheel wrench counterclockwise to loosen and remove the wheel
nut caps. Do not try to remove plastic caps from
the cover or center cap.
3. Pull the cover or center cap away from the wheel. Store the wheel cover in the
cargo area until you have the flat tire
repaired or replaced.4. Turn the wheel wrench counterclockwiseto loosen all the wheel nuts, but do not
remove them yet.
5. Place the jack near the flat tire.
6. Put the compact spare tire near you.