2022 CHEVROLET MALIBU air condition
[x] Cancel search: air conditionPage 106 of 351
Chevrolet Malibu Owner Manual (GMNA-Localizing-U.S./Canada-
14584249) - 2021 - CRC - 11/9/20
Lighting 105
To enable the IntelliBeam system, press
bon the turn signal lever when the
exterior lamp control is in the AUTO or
5
position.
Driving with IntelliBeam
The system only activates the high beams
when driving over 40 km/h (25 mph).
The blue high-beam on light appears on the
instrument cluster when the high beams
are on.
There is a sensor near the top center of the
windshield that automatically controls the
system. Keep this area of the windshield
clear of debris to allow for best system
performance.
The high-beam headlamps remain on, under
the automatic control, until one of the
following situations occurs:
.The system detects an approaching
vehicle's headlamps.
.The system detects a preceding vehicle's
taillamps.
.The outside light is bright enough that
high-beam headlamps are not required.
.The vehicle's speed drops below 20 km/h
(12 mph).
.The IntelliBeam system is disabled by the
button on the turn signal lever. If this
happens, press
bon the turn signal
lever when the exterior lamp control is in
the AUTO or
5position. The instrument
cluster light will come on to indicate the
IntelliBeam system is reactivated.
The high beams may not turn off
automatically if the system cannot detect
another vehicle's lamps because of any of
the following:
.The other vehicle's lamps are missing,
damaged, obstructed from view,
or otherwise undetected.
.The other vehicle's lamps are covered
with dirt, snow, and/or road spray.
.The other vehicle's lamps cannot be
detected due to dense exhaust, smoke,
fog, snow, road spray, mist, or other
airborne obstructions.
.The vehicle's windshield is dirty, cracked,
or obstructed by something that blocks
the view of the light sensor.
.The vehicle is loaded such that the front
end points upward, causing the light
sensor to aim high and not detect
headlamps and taillamps.
.Driving on winding or hilly roads. The IntelliBeam system may need to be
disabled if any of the above conditions exist.
Exterior Lamps Off Reminder
A warning chime sounds if the driver door is
opened while the ignition is off and the
exterior lamps are on.
Headlamp High/Low-Beam
Changer
3:
Push the turn signal lever away from
you and release, to turn the high beams on.
To return to low beams, push the lever
again or pull it toward you and release.
This indicator light turns on in the
instrument cluster when the high-beam
headlamps are on.
Flash-to-Pass
To flash the high beams, pull the turn signal
lever toward you, and release.
Page 128 of 351
Chevrolet Malibu Owner Manual (GMNA-Localizing-U.S./Canada-
14584249) - 2021 - CRC - 11/9/20
Infotainment System 127
being heard, volume can also be adjusted
using the knob on the center stack or the
volume switch on the steering wheel.
.Navigation Voice Prompt Level during a
Call. Options available are:
‐Full Prompt (Selected by default)
‐ Tone Only
‐ None
Traffic Events (If Equipped)
This feature provides a list of events that
are on the route or nearby. Touch
Aand
then select Traffic Events. An OnStar
connected Navigation service plan is
required.
Traffic Preferences (If Equipped)
While in Map View, touch
A, then Settings
and then Map and Navigation Settings to
access Traffic Preferences. When Show
Traffic on Map is turned on, the feature
provides an overview of the traffic flow
using different coded colors. The following
options are available for rerouting:
.Auto Reroute to Better Route –The
system will automatically reroute if the
system detects there is a traffic issue
ahead.
.Ask Before Rerouting (Default) –If the
system detects there is a traffic issue
ahead, it will display a pop-up with
details about the issue. Choose to reroute
or cancel the alert.
.Never Search for Better Route –The
system will not check for a better route
until one of the above options is selected.
Alert Preferences
Set alerts on or off during both inactive and
active guidance views. The following alerts
may be available:
.Road Safety Alerts –Touch to display
upcoming School Zones.
.Traffic Camera Alerts
Manage History
Touch Manage History to access the History
options:
.Clear Recent Destinations –Touch\to
clear the recent destinations.
.Clear Search History –Touch\to clear
the search history.
About
Touch to display software information,
such as:
.Telenav Terms and Conditions
.Telenav Privacy Statement
.Navigation Version
Maps
The Nav application requires a map database
to run. It is stored on an SD card that is
connected to the infotainment system. If the
map database is not available, a missing SD
card error message will be displayed.
SD Card Error Messages
The SD card only works for one unique
vehicle. The SD card must pass
authentication verification to be used for
that specific vehicle. Potential error scenarios
and messages include:
.The SD card has initialized for the first
time: “Once initialized, this SD card can
only be used for navigation in this
vehicle.”
.The SD card is not working properly: “SD
card is not functioning properly.
(Error Code).”
.The SD card is not paired with the
existing system: “This SD card is not valid
in this vehicle for navigation. See Owner’s
Manual for more detail or visit your
dealer. (Error Code).”
Page 136 of 351
Chevrolet Malibu Owner Manual (GMNA-Localizing-U.S./Canada-
14584249) - 2021 - CRC - 11/9/20
Infotainment System 135
Global Positioning System (GPS)
If equipped, the position of the vehicle is
determined by using satellite signals, various
vehicle signals, and map data.
At times, other interference such as the
satellite condition, road configuration,
condition of the vehicle, and/or other
circumstances can affect the navigation
system's ability to determine the accurate
position of the vehicle.
The GPS shows the current position of the
vehicle using signals sent by GPS satellites.
When the vehicle is not receiving signals
from the satellites, a symbol appears in the
status bar.
This system might not be available or
interference can occur if any of the
following are true:
.Signals are obstructed by tall buildings,
trees, large trucks, or a tunnel.
.Satellites are being repaired or improved.
For more information if the GPS is not
functioning properly, see Problems with
Route Guidance 0135 and
If the System Needs Service 0136.
Vehicle Positioning
At times, the position of the vehicle on the
map could be inaccurate due to one or more
of the following reasons:
.The road system has changed.
.The vehicle is driving on slippery road
surfaces such as sand, gravel, or snow.
.The vehicle is traveling on winding roads
or long, straight roads.
.The vehicle is approaching a tall building
or a large vehicle.
.The surface streets run parallel to a
freeway.
.The vehicle has been transferred by a
vehicle carrier or a ferry.
.The current position calibration is set
incorrectly.
.The vehicle is traveling at high speed.
.The vehicle changes directions more than
once, or the vehicle is turning on a turn
table in a parking lot.
.The vehicle is entering and/or exiting a
parking lot, garage, or a lot with a roof.
.The GPS signal is not received.
.A roof carrier is installed on the vehicle.
.Tire chains are installed on the vehicle.
.The tires are replaced or worn.
.The tire pressure for the tires is incorrect.
.This is the first navigation use after the
map data is updated.
.The 12-volt battery has been disconnected
for several days.
.The vehicle is driving in heavy traffic
where driving is at low speeds, and the
vehicle is stopped and started repeatedly.
Problems with Route Guidance
Inappropriate route guidance can occur
under one or more of the following
conditions:
.The turn was not made on the road
indicated.
.Route guidance might not be available
when using automatic rerouting for the
next right or left turn.
.The route might not be changed when
using automatic rerouting.
.There is no route guidance when turning
at an intersection.
.Plural names of places might be
announced occasionally.
.It could take a long time to operate
automatic rerouting during high-speed
driving.
Page 147 of 351
Chevrolet Malibu Owner Manual (GMNA-Localizing-U.S./Canada-
14584249) - 2021 - CRC - 11/9/20
146 Infotainment System
Apple CarPlay and Android Auto
If equipped, Android Auto and/or Apple
CarPlay capability may be available through
a compatible smartphone. If available, the
Android Auto and Apple CarPlay icons will
change from gray to color on the Home
Page of the infotainment display.
To use Android Auto and/or Apple CarPlay:
For Wired Phone Projection1. Download the Android Auto app to your smartphone from the Google Play store.
There is no app required for Apple
CarPlay.
2. Connect your Android phone or Apple iPhone by using the factory-provided
phone USB cable and plugging into a
USB data port. For best performance, it is
highly recommended to use the device’s
factory-provided USB cable, which should
be replaced after significant wear to
maintain connection quality. Aftermarket
or third-party cables may not work.
3. When the phone is first connected to activate Apple CarPlay or Android Auto,
accept the terms and conditions on both
the infotainment system and the phone.
4. Follow the instructions on the phone. The Android Auto and Apple CarPlay icons
on the Home Page will illuminate depending
on the smartphone. Android Auto and/or
Apple CarPlay may automatically launch
upon USB connection. If not, touch the
Android Auto or Apple CarPlay icon on the
Home Page to launch.
Press
{on the center stack to return to the
Home Page.
For Wireless Phone Projection
Verify your phone is wireless compatible by
visiting the Google Android Auto or Apple
CarPlay support page.
1. Download the Android Auto app to your smartphone from the Google Play store.
There is no app required for Apple
CarPlay.
2. For first time connection, there are two ways to set up wireless projection:
.Connect your Android phone or Apple
iPhone by using the factory-provided
phone USB cable and plugging into a
USB data port. For best performance,
it is highly recommended to use the
device’s factory-provided USB cable,
which should be replaced after significant wear to maintain
connection quality. Aftermarket or
third-party cables may not work.
.Connecting the phone over Bluetooth.
See
Bluetooth (Overview) 0141 or
Bluetooth (Pairing and Using a Phone)
0 142.
3. Make sure wireless is turned on the phone for wireless projection to work.
4. When the phone is first connected to activate Apple CarPlay or Android Auto,
agree to the terms and conditions on
both the infotainment system and the
phone.
5. Follow the instructions on the phone.
The Android Auto and Apple CarPlay icons
on the Home Page will illuminate depending
on the smartphone. Android Auto and/or
Apple CarPlay may automatically launch
upon wireless connection. If not, touch the
Android Auto or Apple CarPlay icon on the
Home Page to launch.
Wireless Carplay and/or Wireless Android
Auto may experience occasional service
disruption due to outside Wi-Fi interference.
To disconnect the phones wireless
projection: 1. Select Settings from the Home Page.
Page 165 of 351
Chevrolet Malibu Owner Manual (GMNA-Localizing-U.S./Canada-
14584249) - 2021 - CRC - 11/9/20
164 Climate Controls
Climate Controls
Climate Control Systems
Climate Control Systems . . . . . . . . . . . . . . 164
Dual Automatic Climate ControlSystem . . . . . . . . . . . . . . . . . . . . . . . . . . . . . . 166
Air Vents
Air Vents . . . . . . . . . . . . . . . . . . . . . . . . . . . . . . 169
Maintenance
Passenger Compartment Air Filter . . . . . 170
Service . . . . . . . . . . . . . . . . . . . . . . . . . . . . . . . . . 171
Climate Control Systems
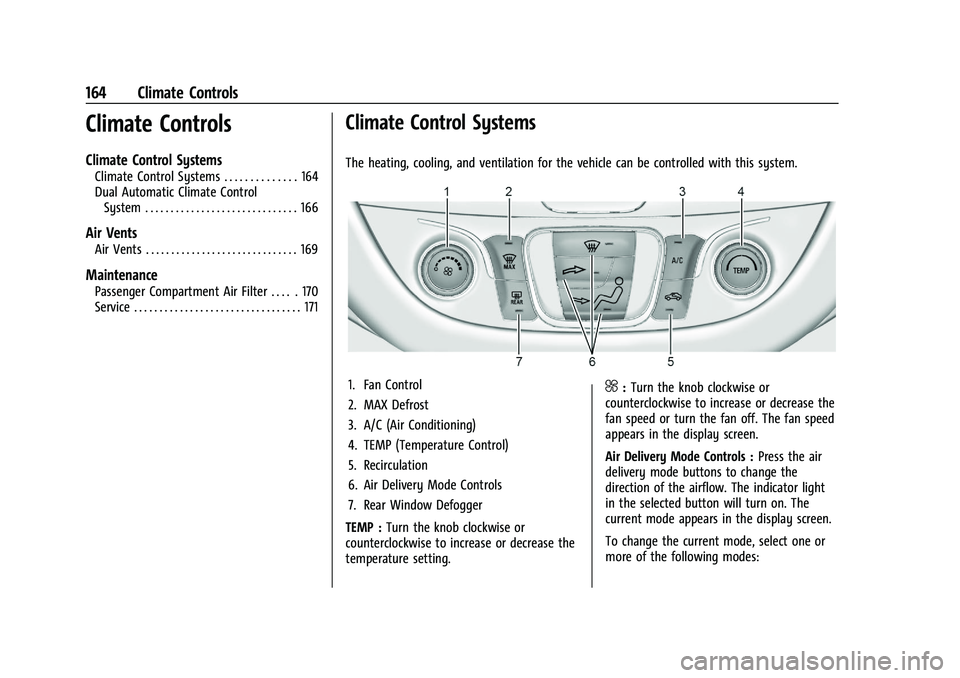
The heating, cooling, and ventilation for the vehicle can be controlled with this system.
1. Fan Control
2. MAX Defrost
3. A/C (Air Conditioning)
4. TEMP (Temperature Control)
5. Recirculation
6. Air Delivery Mode Controls
7. Rear Window Defogger
TEMP : Turn the knob clockwise or
counterclockwise to increase or decrease the
temperature setting.^: Turn the knob clockwise or
counterclockwise to increase or decrease the
fan speed or turn the fan off. The fan speed
appears in the display screen.
Air Delivery Mode Controls : Press the air
delivery mode buttons to change the
direction of the airflow. The indicator light
in the selected button will turn on. The
current mode appears in the display screen.
To change the current mode, select one or
more of the following modes:
Page 166 of 351
Chevrolet Malibu Owner Manual (GMNA-Localizing-U.S./Canada-
14584249) - 2021 - CRC - 11/9/20
Climate Controls 165
0:Clears the windows of fog or moisture.
Air is directed to the windshield.
{: Air is directed to the instrument
panel outlets.
z: Air is directed to the floor outlets.
0MAX : Air is directed to the windshield
and the fan runs at a higher speed. This
mode overrides the previous mode selected
and clears fog or frost from the windshield
more quickly. When the button is pressed
again, the system returns to the previous
mode setting and fan speed. The current
mode setting and fan speed appear in the
display screen.
For best results, clear all snow and ice from
the windshield before defrosting.
A/C : Press to turn the air conditioning
system on or off. This status appears in the
display screen. If the fan control is turned
off or the outside temperature falls below
freezing, the air conditioner will not run.
@: Press to turn on recirculation. An
indicator light comes on and the status
appears in the display screen. Air is
recirculated to quickly cool the inside of the
vehicle or to reduce the entry of outside air
and odors. Ionizer :
If equipped, this feature helps to
clean the air inside the vehicle and remove
contaminants such as pollen, odors, and
dust. If the climate control system is on and
the ionizer is enabled, the ionizer status
indicator will be lit on the climate control
display. To turn the ionizer on or off, see
“Climate and Air Quality” underVehicle
Personalization 0100.
Rear Window Defogger
K:Press to turn the rear window defogger
on or off. An indicator light on the button
comes on to show that the rear window
defogger is on. The defogger turns off when
the ignition is turned to off or to ACC/
ACCESSORY.
The upper lines on the rear window are
antenna grids and are not intended to
defrost the glass.
The rear window defogger can be set to
automatic operation. See “Climate and Air
Quality” underVehicle Personalization 0100.
When Auto Rear Defog is selected, the rear
window defogger turns on automatically
when the interior temperature is cold and
the outside temperature is about 7 °C (44 °F)
and below. The auto rear defogger turns off
automatically. If the vehicle is equipped with heated
outside mirrors, they turn on when the rear
window defogger button is on and help to
clear fog or frost from the surface of the
mirror. See
Heated Mirrors 022.
Caution
Do not try to clear frost or other material
from the inside of the front windshield
and rear window with a razor blade or
anything else that is sharp. This may
damage the rear window defogger grid
and affect the radio's ability to pick up
stations clearly. The repairs would not be
covered by the vehicle warranty.
Remote Start Climate Control Operation :
If equipped with remote start, the climate
control system may run when the vehicle is
started remotely. The system will determine
the best mode and temperature setting for
operation. Once the vehicle is started with
the Engine Start/Stop button, the climate
control system will begin to operate at the
last customer selected operating mode and
temperature. If equipped with heated or
ventilated seats, they may come on
during a remote start. See Remote Vehicle
Start 013 and
Heated and Ventilated Front Seats 034.
Page 167 of 351
Chevrolet Malibu Owner Manual (GMNA-Localizing-U.S./Canada-
14584249) - 2021 - CRC - 11/9/20
166 Climate Controls
Dual Automatic Climate Control System
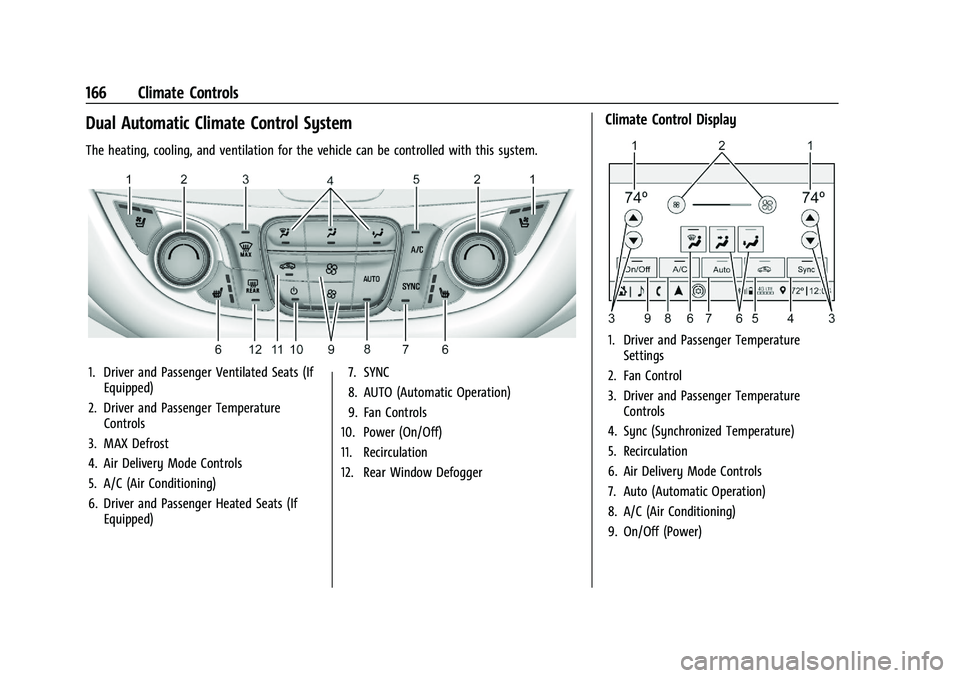
The heating, cooling, and ventilation for the vehicle can be controlled with this system.
1. Driver and Passenger Ventilated Seats (IfEquipped)
2. Driver and Passenger Temperature Controls
3. MAX Defrost
4. Air Delivery Mode Controls
5. A/C (Air Conditioning)
6. Driver and Passenger Heated Seats (If Equipped) 7. SYNC
8. AUTO (Automatic Operation)
9. Fan Controls
10. Power (On/Off)
11. Recirculation
12. Rear Window Defogger
Climate Control Display
1. Driver and Passenger Temperature Settings
2. Fan Control
3. Driver and Passenger Temperature Controls
4. Sync (Synchronized Temperature)
5. Recirculation
6. Air Delivery Mode Controls
7. Auto (Automatic Operation)
8. A/C (Air Conditioning)
9. On/Off (Power)
Page 168 of 351
Chevrolet Malibu Owner Manual (GMNA-Localizing-U.S./Canada-
14584249) - 2021 - CRC - 11/9/20
Climate Controls 167
The fan, air delivery mode, air conditioning,
driver and passenger temperatures, and Sync
settings can be controlled by touching
CLIMATE on the infotainment Home Page or
the climate button in the climate control
display application tray. A selection can then
be made on the front climate control page
displayed. See the infotainment manual.
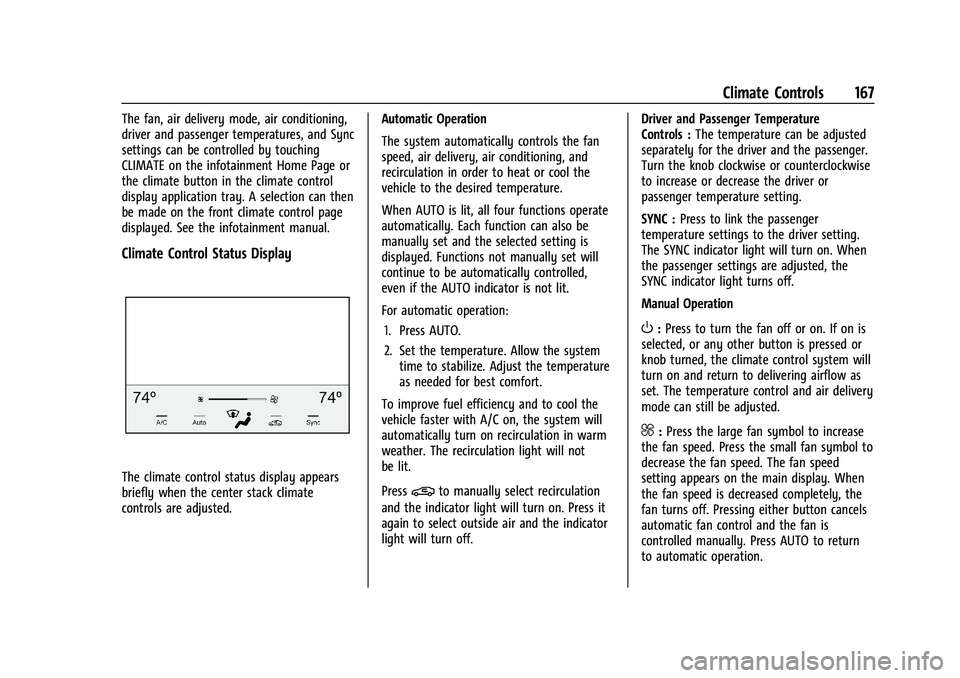
Climate Control Status Display
The climate control status display appears
briefly when the center stack climate
controls are adjusted.Automatic Operation
The system automatically controls the fan
speed, air delivery, air conditioning, and
recirculation in order to heat or cool the
vehicle to the desired temperature.
When AUTO is lit, all four functions operate
automatically. Each function can also be
manually set and the selected setting is
displayed. Functions not manually set will
continue to be automatically controlled,
even if the AUTO indicator is not lit.
For automatic operation:
1. Press AUTO.
2. Set the temperature. Allow the system time to stabilize. Adjust the temperature
as needed for best comfort.
To improve fuel efficiency and to cool the
vehicle faster with A/C on, the system will
automatically turn on recirculation in warm
weather. The recirculation light will not
be lit.
Press@to manually select recirculation
and the indicator light will turn on. Press it
again to select outside air and the indicator
light will turn off. Driver and Passenger Temperature
Controls :
The temperature can be adjusted
separately for the driver and the passenger.
Turn the knob clockwise or counterclockwise
to increase or decrease the driver or
passenger temperature setting.
SYNC : Press to link the passenger
temperature settings to the driver setting.
The SYNC indicator light will turn on. When
the passenger settings are adjusted, the
SYNC indicator light turns off.
Manual Operation
O: Press to turn the fan off or on. If on is
selected, or any other button is pressed or
knob turned, the climate control system will
turn on and return to delivering airflow as
set. The temperature control and air delivery
mode can still be adjusted.
^: Press the large fan symbol to increase
the fan speed. Press the small fan symbol to
decrease the fan speed. The fan speed
setting appears on the main display. When
the fan speed is decreased completely, the
fan turns off. Pressing either button cancels
automatic fan control and the fan is
controlled manually. Press AUTO to return
to automatic operation.