2022 CHEVROLET EQUINOX start stop button
[x] Cancel search: start stop buttonPage 7 of 360

Chevrolet Equinox Owner Manual (GMNA-Localizing-U.S./Canada-
16540728) - 2023 - crc - 6/16/22
6 Introduction
1.Air Vents 0173.
2. Turn Signal Lever. See Turn and
Lane-Change Signals 0117.
IntelliBeam System Button (If Equipped).
See Exterior Lamp Controls 0114.
3. Instrument Cluster (Base and Midlevel)
087 or
Instrument Cluster (Uplevel) 090.
Driver Information Center (DIC) Display.
See Driver Information Center (DIC) (Base
and Midlevel) 0103 or
Driver Information Center (DIC) (Uplevel)
0 107.
4. Windshield Wiper/Washer 080.
5. Infotainment Controls. See Overview
0 122.
6. Light Sensor. See Automatic Headlamp
System 0116.
7. Hazard Warning Flashers 0117.
Auto Stop Disable Switch. See Stop/Start
System 0192.
8. Climate Control Systems 0169 (If
Equipped).
Dual Automatic Climate Control System
0 171 (If Equipped).
9. Heated and Ventilated Front Seats 037
(If Equipped). 10.
Power Outlets 082.
11. Wireless Charging 084 (If Equipped).
12. USB Port 0130.
13. All-Wheel Drive 0201 (If Equipped).
Tow/Haul Mode 0200.
Park Assist 0223 (If Equipped).
Automatic Parking Assist (APA) 0224 (If
Equipped).
14. Electric Parking Brake 0202.
15. Shift Lever. See Automatic Transmission
0 198.
Manual Mode 0200.
16. ENGINE START/STOP Button. See Ignition
Positions 0190.
17. Steering Wheel Controls 0123.
Traction Control/Electronic Stability
Control 0204.
18. Horn 080.
19. Steering Wheel Adjustment 080 (Out
of View).
20. Cruise Control 0207.
Adaptive Cruise Control (Camera) 0209
(If Equipped).
Heated Steering Wheel 080 (If
Equipped). Forward Collision Alert (FCA) System
0
227 (If Equipped).
Lane Keep Assist (LKA) 0233 (If
Equipped).
21. Hood Release. See Hood0249.
22. Fog Lamps 0117 (If Equipped).
23. Exterior Lamp Controls 0114.
24. Data Link Connector (DLC) (Out of View). SeeMalfunction Indicator Lamp (Check
Engine Light) 096.
25. Instrument Panel Illumination Control
0118.
Page 10 of 360
Chevrolet Equinox Owner Manual (GMNA-Localizing-U.S./Canada-
16540728) - 2023 - crc - 6/16/22
Keys, Doors, and Windows 9
The following may be available:
Q:Press to lock all doors. The turn signal
indicators may flash and/or the horn may
sound on the second press to indicate
locking.To view available settings from the
infotainment screen, touch Settings >
Vehicle > Remote Lock, Unlock, Start. If the
driver door is open when
Qis pressed and
Open Door Anti-Lockout is enabled, all doors
will lock and then the driver door will
immediately unlock.To view available
settings from the infotainment screen, touch
Settings > Vehicle > Power Door Locks. If a
passenger door is open when
Qis pressed,
all doors lock.
Pressing
Qmay also arm the theft-deterrent
system. See Vehicle Alarm System 023.
K:Press to unlock the driver door. PressKagain within five seconds to unlock all
doors. The remote key can be programmed
to unlock all doors on the first button
press.To view available settings from the
infotainment screen, touch Settings >
Vehicle > Remote Lock, Unlock, Start. The
turn signal indicators may flash to indicate
unlocking has occurred.To view available
settings from the infotainment screen, touch
Settings > Vehicle > Remote Lock, Unlock, Start. Pressing
Kmay also disarm the
theft-deterrent system. See Vehicle Alarm
System 023.
If equipped with the manual liftgate,
unlocking all doors will also unlock the
liftgate.
Press and hold
Kuntil the windows fully
open. Windows will not operate unless
remote window operation is enabled. To
view available settings from the
infotainment screen, touch Settings >
Vehicle > Remote Lock, Unlock, Start.
b: Press twice quickly to open or close
the power liftgate, if equipped. Press again
to stop the power liftgate.
7: Press and release one time to initiate
vehicle locator. The exterior lamps flash and
the horn chirps three times. Press and hold
7for at least three seconds to sound the
panic alarm. The horn sounds and the turn
signals flash for 30 seconds or until
7is
pressed again or the vehicle is started.
/: If equipped, first press and releaseQ
then immediately press and hold/for at
least four seconds to start the engine from
outside the vehicle using the remote key.
See Remote Vehicle Start 014.
Keyless Access Operation
With the Keyless Access system, you can
lock and unlock the doors and access the
liftgate without removing the remote key
from your pocket, purse, briefcase, etc. The
remote key should be within 1 m (3 ft) of the
liftgate or door being opened. If equipped,
there will be buttons on the outside front
door handles.
Keyless Access can be programmed to
unlock all doors on the first lock/unlock
press from the driver door. To view available
settings from the infotainment screen, touch
Settings > Vehicle > Remote Lock, Unlock,
Start.
If equipped with memory seats, remote keys
1 and 2 are linked to seating positions of
memory 1 or 2. See Memory Seats034.
Keyless Unlocking/Locking from the
Driver Door
When the doors are locked and the remote
key is within 1 m (3 ft) of the driver door
handle, pressing the lock/unlock button on
the driver door handle will unlock the driver
door. If the lock/unlock button is pressed
again within five seconds, all passenger
doors will unlock.
Page 13 of 360
Chevrolet Equinox Owner Manual (GMNA-Localizing-U.S./Canada-
16540728) - 2023 - crc - 6/16/22
12 Keys, Doors, and Windows
30 minutes to complete. The vehicle must
be off and all of the remote keys you wish
to program must be with you.1. Remove the key from the remote key.
2. Remove the key lock cylinder cap on the driver door handle. See Door Locks015.
Insert the vehicle key of the remote key
into the key lock cylinder on the driver
door handle and turn the key,
counterclockwise, to the unlock position
five times within 10 seconds.
The DIC displays REMOTE LEARN
PENDING, PLEASE WAIT.
3. Wait for 10 minutes until the DIC displays PRESS ENGINE START BUTTON TO
LEARN and then press ENGINE
START/STOP.
The DIC display will again show REMOTE
LEARN PENDING, PLEASE WAIT.
4. Repeat Step 2 two additional times. After the third time all previously known
remote keys will no longer work with
the vehicle. Remaining remote keys can
be relearned during the next steps.
The DIC display should now show READY
FOR REMOTE # 1.
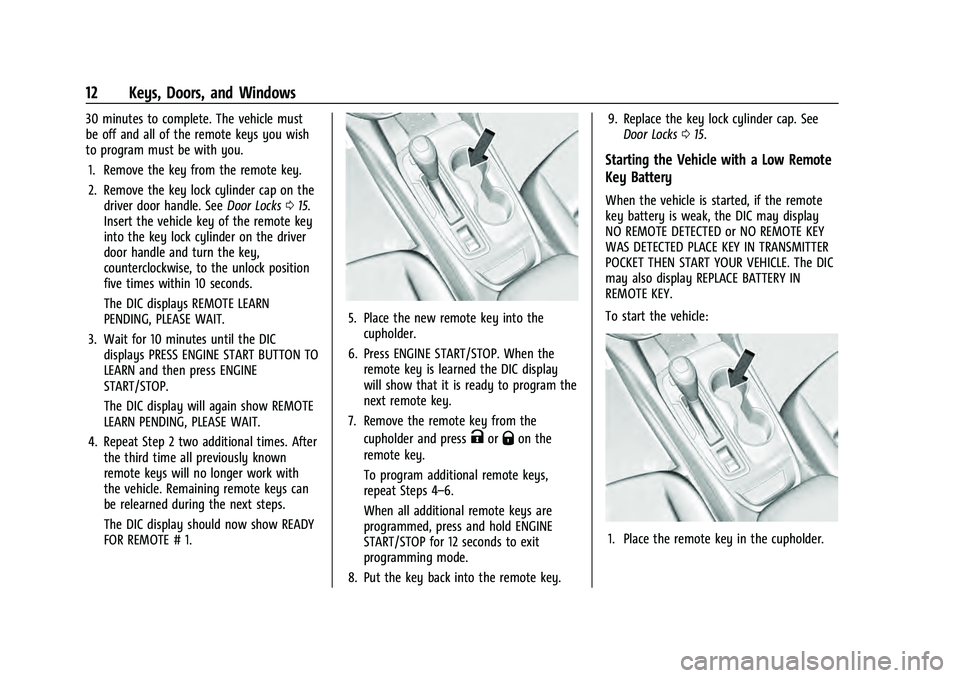
5. Place the new remote key into thecupholder.
6. Press ENGINE START/STOP. When the remote key is learned the DIC display
will show that it is ready to program the
next remote key.
7. Remove the remote key from the cupholder and press
KorQon the
remote key.
To program additional remote keys,
repeat Steps 4–6.
When all additional remote keys are
programmed, press and hold ENGINE
START/STOP for 12 seconds to exit
programming mode.
8. Put the key back into the remote key. 9. Replace the key lock cylinder cap. See
Door Locks 015.
Starting the Vehicle with a Low Remote
Key Battery
When the vehicle is started, if the remote
key battery is weak, the DIC may display
NO REMOTE DETECTED or NO REMOTE KEY
WAS DETECTED PLACE KEY IN TRANSMITTER
POCKET THEN START YOUR VEHICLE. The DIC
may also display REPLACE BATTERY IN
REMOTE KEY.
To start the vehicle:
1. Place the remote key in the cupholder.
Page 14 of 360
Chevrolet Equinox Owner Manual (GMNA-Localizing-U.S./Canada-
16540728) - 2023 - crc - 6/16/22
Keys, Doors, and Windows 13
2. With the vehicle in P (Park) orN (Neutral), press the brake pedal and
ENGINE START/STOP.
Replace the remote key battery as soon
as possible.
Battery Replacement
{Warning
Never allow children to play with the
remote key. The remote key contains a
small battery, which can be a choking
hazard. If swallowed, internal burns can
occur, resulting in severe injury or death.
Seek medical attention immediately if a
battery is swallowed.
{Warning
To avoid personal injury, do not touch
metal surfaces on the remote key when
it has been exposed to extreme heat.
These surfaces can be hot to the touch at
temperatures above 59 °C (138 °F).
Caution
When replacing the battery, do not touch
any of the circuitry on the remote key.
Static from your body could damage the
remote key.
Caution
Always replace the battery with the
correct type. Replacing the battery with
an incorrect type could potentially create
a risk of battery explosion. Dispose of
used batteries according to instructions
and local laws. Do not attempt to burn,
crush, or cut the used battery, and avoid
exposing the battery to environments
with extremely low air pressures or high
temperatures.
Caution
If the remote key is not reassembled
properly, liquids could enter the housing
and damage the circuitry, resulting in a
remote key malfunction and/or failure. To
prevent damage, always follow the steps
for remote key reassembly in this manual
(Continued)
Caution (Continued)
to ensure the remote key is sealed
properly whenever the remote key is
opened.
Replace the battery if the DIC displays
REPLACE BATTERY IN REMOTE KEY.
The battery is not rechargeable. To replace
the battery:
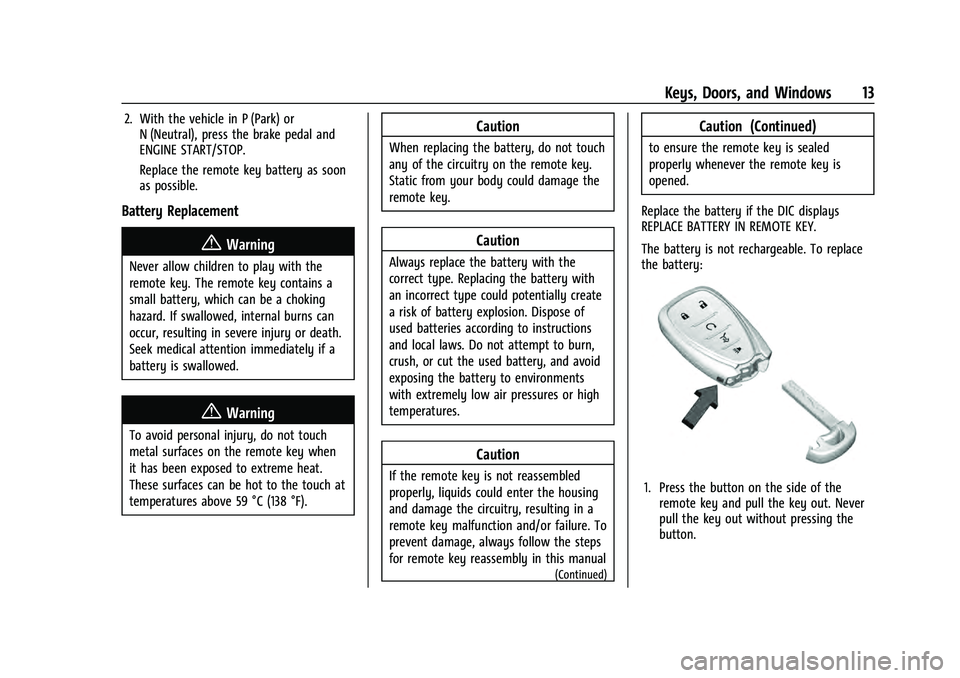
1. Press the button on the side of the remote key and pull the key out. Never
pull the key out without pressing the
button.
Page 21 of 360
Chevrolet Equinox Owner Manual (GMNA-Localizing-U.S./Canada-
16540728) - 2023 - crc - 6/16/22
20 Keys, Doors, and Windows
Power Liftgate Operation
{Warning
You or others could be injured if caught
in the path of the power liftgate. Make
sure there is no one in the way of the
liftgate as it is opening and closing.
Caution
Driving with an open and unsecured
liftgate may result in damage to the
power liftgate components.
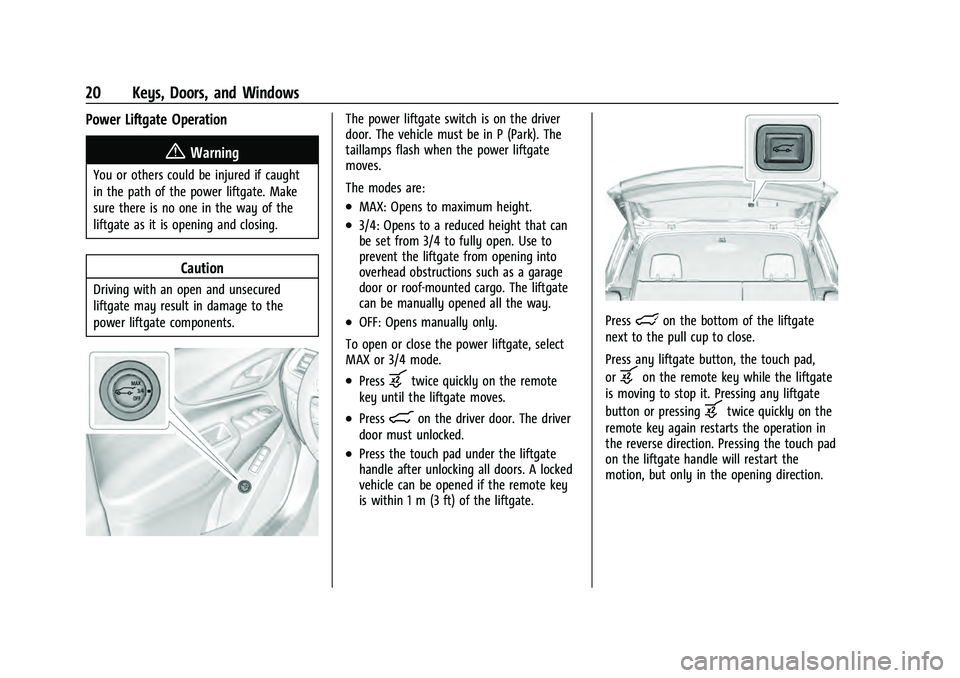
The power liftgate switch is on the driver
door. The vehicle must be in P (Park). The
taillamps flash when the power liftgate
moves.
The modes are:
.MAX: Opens to maximum height.
.3/4: Opens to a reduced height that can
be set from 3/4 to fully open. Use to
prevent the liftgate from opening into
overhead obstructions such as a garage
door or roof-mounted cargo. The liftgate
can be manually opened all the way.
.OFF: Opens manually only.
To open or close the power liftgate, select
MAX or 3/4 mode.
.Pressbtwice quickly on the remote
key until the liftgate moves.
.Press8on the driver door. The driver
door must unlocked.
.Press the touch pad under the liftgate
handle after unlocking all doors. A locked
vehicle can be opened if the remote key
is within 1 m (3 ft) of the liftgate.
Presslon the bottom of the liftgate
next to the pull cup to close.
Press any liftgate button, the touch pad,
or
bon the remote key while the liftgate
is moving to stop it. Pressing any liftgate
button or pressing
btwice quickly on the
remote key again restarts the operation in
the reverse direction. Pressing the touch pad
on the liftgate handle will restart the
motion, but only in the opening direction.
Page 23 of 360
Chevrolet Equinox Owner Manual (GMNA-Localizing-U.S./Canada-
16540728) - 2023 - crc - 6/16/22
22 Keys, Doors, and Windows
Caution
Attempting to move the liftgate too
quickly and with excessive force may
result in damage to the vehicle.
Operate the liftgate manually with a
smooth motion and moderate speed. The
system includes a feature which limits the
manual closing speed to protect the
components.
Hands-Free Operation
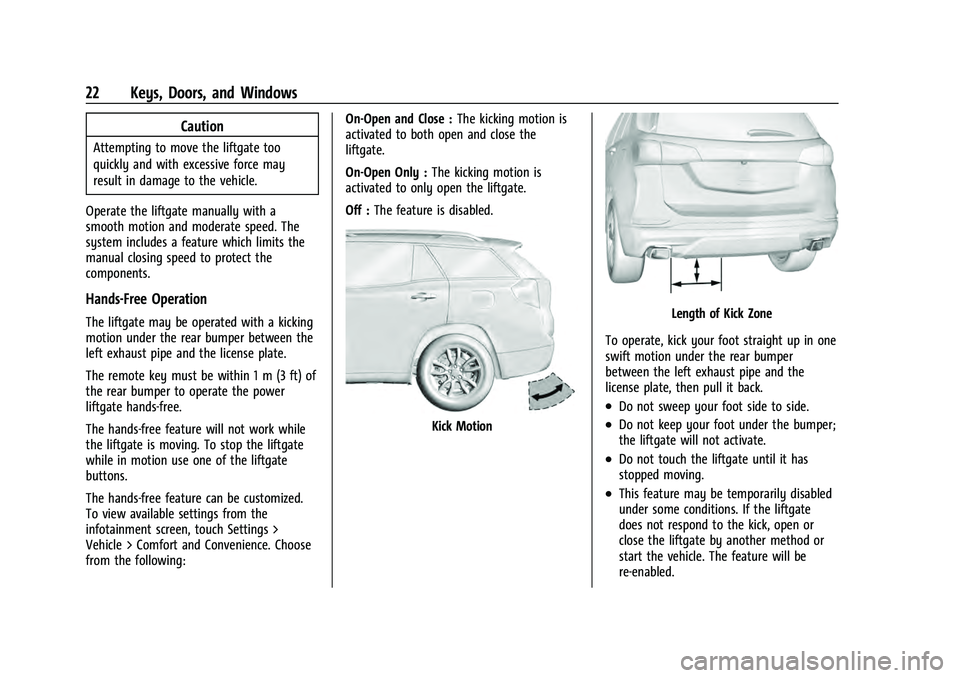
The liftgate may be operated with a kicking
motion under the rear bumper between the
left exhaust pipe and the license plate.
The remote key must be within 1 m (3 ft) of
the rear bumper to operate the power
liftgate hands-free.
The hands-free feature will not work while
the liftgate is moving. To stop the liftgate
while in motion use one of the liftgate
buttons.
The hands-free feature can be customized.
To view available settings from the
infotainment screen, touch Settings >
Vehicle > Comfort and Convenience. Choose
from the following: On-Open and Close :
The kicking motion is
activated to both open and close the
liftgate.
On-Open Only : The kicking motion is
activated to only open the liftgate.
Off : The feature is disabled.
Kick Motion
Length of Kick Zone
To operate, kick your foot straight up in one
swift motion under the rear bumper
between the left exhaust pipe and the
license plate, then pull it back.
.Do not sweep your foot side to side.
.Do not keep your foot under the bumper;
the liftgate will not activate.
.Do not touch the liftgate until it has
stopped moving.
.This feature may be temporarily disabled
under some conditions. If the liftgate
does not respond to the kick, open or
close the liftgate by another method or
start the vehicle. The feature will be
re-enabled.
Page 38 of 360
Chevrolet Equinox Owner Manual (GMNA-Localizing-U.S./Canada-
16540728) - 2023 - crc - 6/16/22
Seats and Restraints 37
Obstructions
If something has blocked the seat while
recalling a memory position, the recall may
stop. Remove the obstruction and try the
recall again. If the memory position still
does not recall, see your dealer.
Heated and Ventilated Front
Seats
{Warning
If temperature change or pain to the skin
cannot be felt, the seat heater may cause
burns. To reduce the risk of burns, use
care when using the seat heater,
especially for long periods of time. Do
not place anything on the seat that
insulates against heat, such as a blanket,
cushion, cover, or similar item. This may
cause the seat heater to overheat. An
overheated seat heater may cause a burn
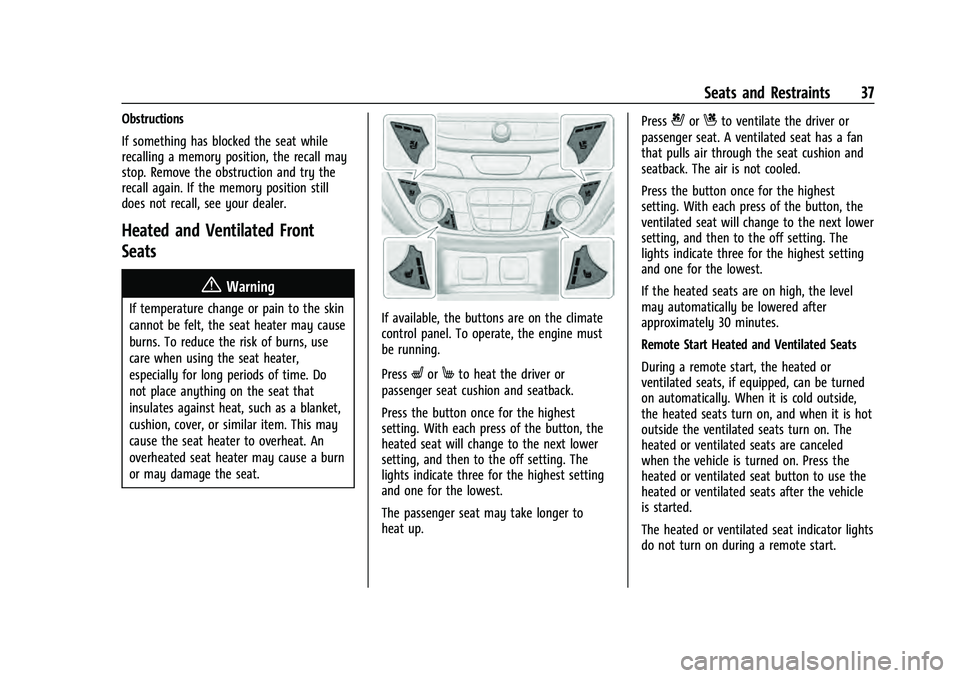
or may damage the seat.If available, the buttons are on the climate
control panel. To operate, the engine must
be running.
Press
LorMto heat the driver or
passenger seat cushion and seatback.
Press the button once for the highest
setting. With each press of the button, the
heated seat will change to the next lower
setting, and then to the off setting. The
lights indicate three for the highest setting
and one for the lowest.
The passenger seat may take longer to
heat up. Press
{orCto ventilate the driver or
passenger seat. A ventilated seat has a fan
that pulls air through the seat cushion and
seatback. The air is not cooled.
Press the button once for the highest
setting. With each press of the button, the
ventilated seat will change to the next lower
setting, and then to the off setting. The
lights indicate three for the highest setting
and one for the lowest.
If the heated seats are on high, the level
may automatically be lowered after
approximately 30 minutes.
Remote Start Heated and Ventilated Seats
During a remote start, the heated or
ventilated seats, if equipped, can be turned
on automatically. When it is cold outside,
the heated seats turn on, and when it is hot
outside the ventilated seats turn on. The
heated or ventilated seats are canceled
when the vehicle is turned on. Press the
heated or ventilated seat button to use the
heated or ventilated seats after the vehicle
is started.
The heated or ventilated seat indicator lights
do not turn on during a remote start.
Page 160 of 360
Chevrolet Equinox Owner Manual (GMNA-Localizing-U.S./Canada-
16540728) - 2023 - crc - 6/16/22
Infotainment System 159
Touch No or Yes.
Vehicle Name
Touch to edit your vehicle name.
Vehicle Account
Touch to view the vehicle account
information and to change the account
password.
Delete Profile
Touch to remove the profile from the
vehicle.
Touch Remove or Cancel.
Teen Driver
If equipped, this allows multiple keys to be
registered for beginner drivers to encourage
safe driving habits. When the vehicle is
started with a Teen Driver key, it will
automatically activate certain safety
systems, allow setting of some features, and
limit the use of others. The Report Card will
record vehicle data about driving behavior
that can be viewed later. When the vehicle
is started with a registered key, the Driver
Information Center (DIC) displays a message
that Teen Driver is active.To access:
1. Touch Settings on the Home Page, then touch Vehicle, and then Teen Driver.
2. Create a Personal Identification Number (PIN) by choosing a four-digit PIN.
Re-enter the PIN to confirm. To change
the PIN, touch Change PIN.
The PIN is required to:
.Set up/Add or remove keys.
.Change Teen Driver settings.
.Change or clear the Teen Driver PIN.
.Access or delete Report Card data.
Set up/Add keys to activate Teen Driver and
assign restrictions to the key:
Any vehicle key can be registered, up to a
maximum of eight keys. Label the key to
tell it apart from the other keys.
For a pushbutton start system: 1. Start the vehicle.
2. For automatic transmissions, the vehicle must be in P (Park). For manual
transmissions, the vehicle must be
stopped with the parking brake set.
3. From the Settings menu, touch Vehicle and then Teen Driver.
4. Enter the PIN. 5. Place the remote key you wish to
register in the transmitter pocket. The
key does not need to be the one that
started the vehicle. See Remote Key
Operation 08for transmitter pocket
location.
6. From the Teen Driver menu, touch Setup Keys or Add/Remove Teen Driver Keys.
.If the remote key has not previously
been registered, the option to add
the key displays. Touch Add and a
confirmation message displays. Teen
Driver restrictions will be applied
whenever this remote key is used to
operate the vehicle.
.If the remote key has already been
registered, the option to remove the
key displays. If Remove is touched,
the remote key is no longer
registered. A confirmation message
displays, and Teen Driver restrictions
will not be applied if this remote key
is used to operate the vehicle.
In vehicles with a pushbutton start system,
if a Teen Driver and a non-Teen Driver key
are both present at start up, the vehicle will
recognize the non-Teen Driver key to start
the vehicle. The Teen Driver settings will not
be active.