2022 CHEVROLET EQUINOX fold seats
[x] Cancel search: fold seatsPage 26 of 360

Chevrolet Equinox Owner Manual (GMNA-Localizing-U.S./Canada-
16540728) - 2023 - crc - 6/16/22
Keys, Doors, and Windows 25
Warning (Continued)
into the right lane, you could hit a
vehicle on the right. Check the inside
mirror or glance over your shoulder
before changing lanes.
The passenger side mirror is convex shaped.
A convex mirror surface is curved so more
can be seen from the driver seat.
Power Mirrors
To adjust each mirror: 1. Press
jor|to select the driver or
passenger side mirror. The indicator light
will illuminate. 2. Press the arrows on the control pad to
move the mirror in the desired direction.
3. Adjust each outside mirror so that a little of the vehicle and the area behind it can
be seen.
4. Press
jor|again to deselect the
mirror.
Memory Mirrors
The vehicle may have memory mirrors. See
Memory Seats 034.
Turn Signal Indicator
The vehicle may have a turn signal indicator
lamp built into the mirror housing. The turn
signal lamp flashes when the turn signals or
hazard flashers are used.
Lane Change Alert (LCA)
The vehicle may have LCA. See Lane Change
Alert (LCA) 0232.
Side Blind Zone Alert
The vehicle may have Side Blind Zone Alert.
See Side Blind Zone Alert (SBZA) 0232.
Folding Mirrors
Manual Folding Mirrors
The mirrors can be folded inward toward
the vehicle to prevent damage when going
through an automatic car wash. Push the
mirror outward to return it to the original
position.
Heated Mirrors
If equipped, the heated outside mirrors turn
on when the rear window defogger is on
and help to clear fog or frost from the
surface of the mirrors.
K:This button is on the climate control
panel.
See “Rear Window Defogger” underDual
Automatic Climate Control System 0171.
Automatic Dimming Mirror
If the vehicle has the automatic dimming
mirror, the driver outside mirror
automatically adjusts for the glare of
headlamps behind you.
Page 39 of 360
Chevrolet Equinox Owner Manual (GMNA-Localizing-U.S./Canada-
16540728) - 2023 - crc - 6/16/22
38 Seats and Restraints
The temperature performance of an
unoccupied seat may be reduced. This is
normal.
To enable or disable remote start heated or
ventilated seats, select Settings > Vehicle >
Remote Lock, Unlock, and Start > Remote
Start Auto Heat Seats or Remote Start Auto
Cool Seats > ON or OFF. SeeRemote Vehicle
Start 014.
Rear Seats
Rear Seat Reminder
If equipped, the message REAR SEAT
REMINDER LOOK IN REAR SEAT displays
under certain conditions indicating there
may be an item or passenger in the rear
seat. Check before exiting the vehicle.
This feature will activate when a second row
door is opened while the vehicle is on or up
to 10 minutes before the vehicle is turned
on. There will be an alert when the vehicle
is turned off. The alert does not directly
detect objects in the rear seat; instead,
under certain conditions, it detects when a
rear door is opened and closed, indicating
that there may be something in the
rear seat. The feature is active only once each time
the vehicle is turned on and off, and will
require reactivation by opening and closing
the second row doors. There may be an
alert even when there is nothing in the rear
seat; for example, if a child entered the
vehicle through the rear door and left the
vehicle without the vehicle being shut off.
The feature can be turned on or off. Select
Settings > Vehicle > Rear Seat Reminder >
ON or OFF.
Reclining the Seatback
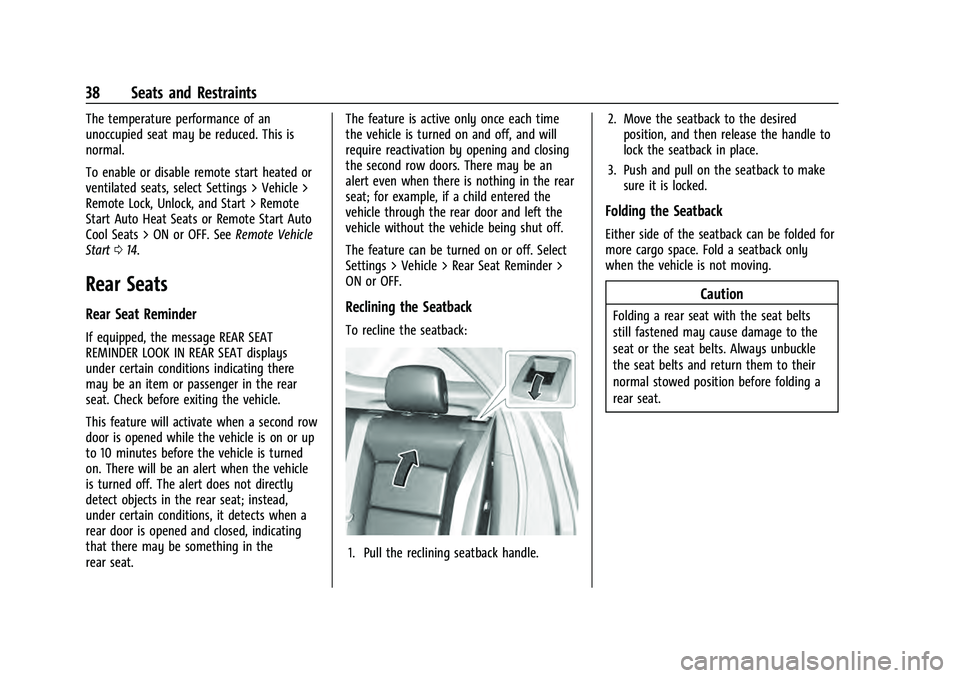
To recline the seatback:
1. Pull the reclining seatback handle.
2. Move the seatback to the desired
position, and then release the handle to
lock the seatback in place.
3. Push and pull on the seatback to make sure it is locked.
Folding the Seatback
Either side of the seatback can be folded for
more cargo space. Fold a seatback only
when the vehicle is not moving.
Caution
Folding a rear seat with the seat belts
still fastened may cause damage to the
seat or the seat belts. Always unbuckle
the seat belts and return them to their
normal stowed position before folding a
rear seat.
Page 40 of 360
Chevrolet Equinox Owner Manual (GMNA-Localizing-U.S./Canada-
16540728) - 2023 - crc - 6/16/22
Seats and Restraints 39
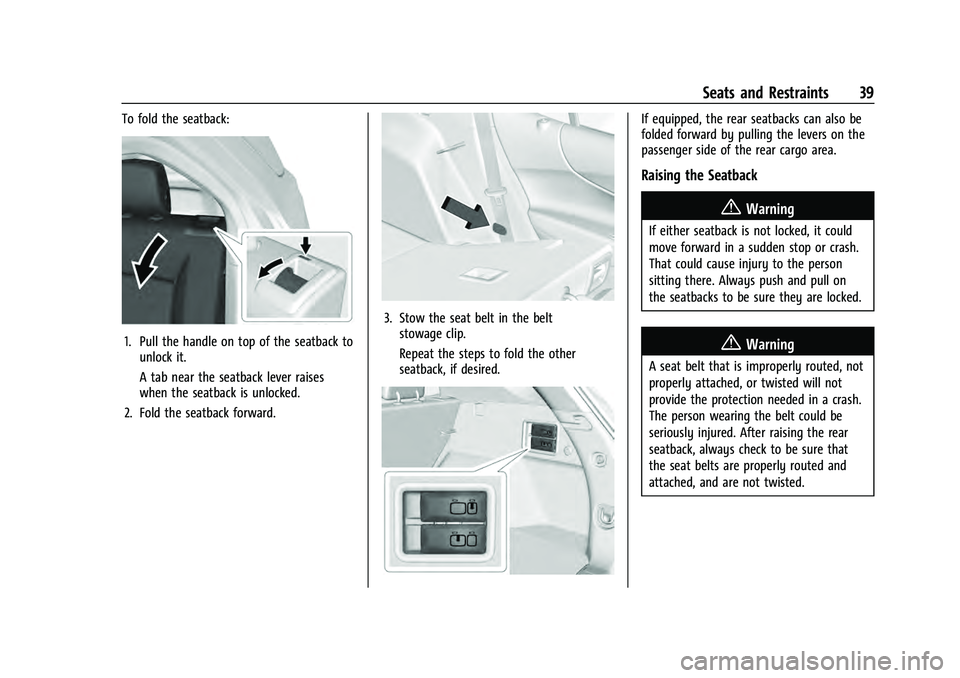
To fold the seatback:
1. Pull the handle on top of the seatback tounlock it.
A tab near the seatback lever raises
when the seatback is unlocked.
2. Fold the seatback forward.
3. Stow the seat belt in the belt stowage clip.
Repeat the steps to fold the other
seatback, if desired.
If equipped, the rear seatbacks can also be
folded forward by pulling the levers on the
passenger side of the rear cargo area.
Raising the Seatback
{Warning
If either seatback is not locked, it could
move forward in a sudden stop or crash.
That could cause injury to the person
sitting there. Always push and pull on
the seatbacks to be sure they are locked.
{Warning
A seat belt that is improperly routed, not
properly attached, or twisted will not
provide the protection needed in a crash.
The person wearing the belt could be
seriously injured. After raising the rear
seatback, always check to be sure that
the seat belts are properly routed and
attached, and are not twisted.
Page 45 of 360
Chevrolet Equinox Owner Manual (GMNA-Localizing-U.S./Canada-
16540728) - 2023 - crc - 6/16/22
44 Seats and Restraints
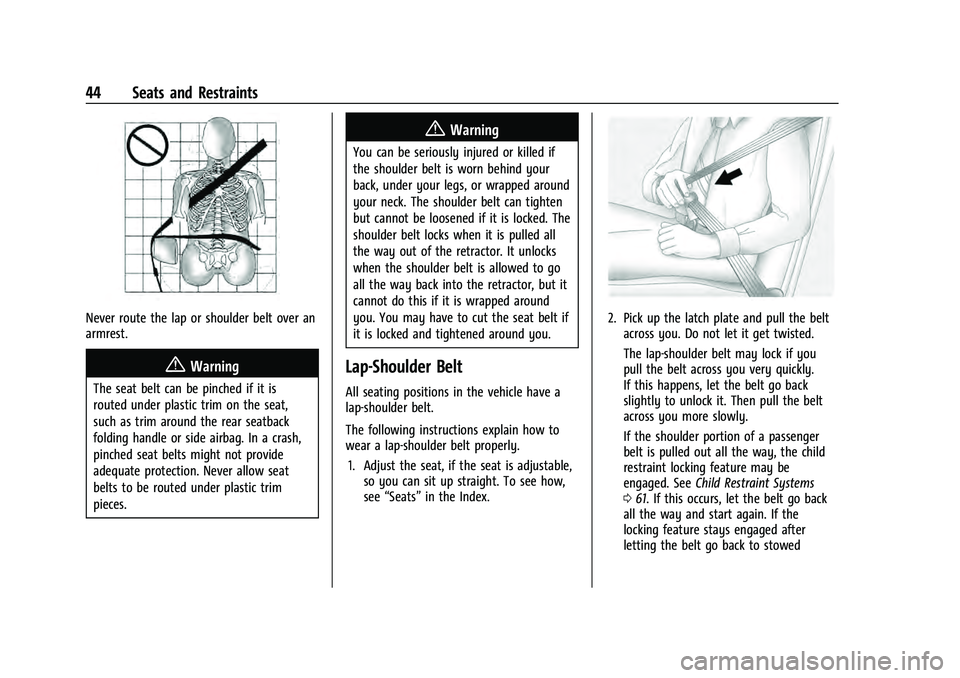
Never route the lap or shoulder belt over an
armrest.
{Warning
The seat belt can be pinched if it is
routed under plastic trim on the seat,
such as trim around the rear seatback
folding handle or side airbag. In a crash,
pinched seat belts might not provide
adequate protection. Never allow seat
belts to be routed under plastic trim
pieces.
{Warning
You can be seriously injured or killed if
the shoulder belt is worn behind your
back, under your legs, or wrapped around
your neck. The shoulder belt can tighten
but cannot be loosened if it is locked. The
shoulder belt locks when it is pulled all
the way out of the retractor. It unlocks
when the shoulder belt is allowed to go
all the way back into the retractor, but it
cannot do this if it is wrapped around
you. You may have to cut the seat belt if
it is locked and tightened around you.
Lap-Shoulder Belt
All seating positions in the vehicle have a
lap-shoulder belt.
The following instructions explain how to
wear a lap-shoulder belt properly.1. Adjust the seat, if the seat is adjustable, so you can sit up straight. To see how,
see “Seats” in the Index.
2. Pick up the latch plate and pull the belt
across you. Do not let it get twisted.
The lap-shoulder belt may lock if you
pull the belt across you very quickly.
If this happens, let the belt go back
slightly to unlock it. Then pull the belt
across you more slowly.
If the shoulder portion of a passenger
belt is pulled out all the way, the child
restraint locking feature may be
engaged. See Child Restraint Systems
0 61. If this occurs, let the belt go back
all the way and start again. If the
locking feature stays engaged after
letting the belt go back to stowed
Page 69 of 360
Chevrolet Equinox Owner Manual (GMNA-Localizing-U.S./Canada-
16540728) - 2023 - crc - 6/16/22
68 Seats and Restraints
{Warning
To reduce the risk of serious or fatal
injuries during a crash, do not attach
more than one child restraint to a single
anchor. Attaching more than one child
restraint to a single anchor could cause
the anchor or attachment to come loose
or even break during a crash. A child or
others could be injured.
{Warning
Children can be seriously injured or
strangled if a shoulder belt is wrapped
around their neck. The shoulder belt can
tighten but cannot be loosened if it is
locked. The shoulder belt locks when it is
pulled all the way out of the retractor.
It unlocks when the shoulder belt is
allowed to go all the way back into the
retractor, but it cannot do this if it is
wrapped around a child’s neck. If the
shoulder belt is locked and tightened
around a child’s neck, the only way to
loosen the belt is to cut it.(Continued)
Warning (Continued)
Buckle any unused seat belts behind the
child restraint so children cannot reach
them. Pull the shoulder belt all the way
out of the retractor to set the lock, and
tighten the belt behind the child restraint
after the child restraint has been
installed.
Caution
Do not let the LATCH attachments rub
against the vehicle’s seat belts. This may
damage these parts. If necessary, move
buckled seat belts to avoid rubbing the
LATCH attachments.
Do not fold the rear seatback when the
seat is occupied. Do not fold the empty
rear seat with a seat belt buckled. This
could damage the seat belt or the seat.
Unbuckle and return the seat belt to its
stowed position, before folding the seat.
If you need to secure more than one child
restraint in the rear seat, see Where to Put
the Restraint 063. 1. Attach and tighten the lower
attachments to the lower anchors. If the
child restraint does not have lower
attachments or the desired seating
position does not have lower anchors,
secure the child restraint with the top
tether and the seat belt. Refer to the
child restraint manufacturer instructions
and the instructions in this manual.
1.1. Find the lower anchors for the desired seating position.
1.2. Put the child restraint on the seat.
1.3. Attach and tighten the lower attachments on the child restraint
to the lower anchors.
2. If the child restraint manufacturer recommends that the top tether be
attached, adjust the top tether to its full
length and attach it to the anchor. Refer
to the child restraint instructions and the
following steps:
2.1. Find the top tether anchor.
2.2. Route, attach and tighten the top tether according to your child
restraint instructions and the
following instructions:
Page 191 of 360
Chevrolet Equinox Owner Manual (GMNA-Localizing-U.S./Canada-
16540728) - 2023 - crc - 6/16/22
190 Driving and Operating
Warning (Continued)
.Never stack heavier things, like
suitcases, inside the vehicle so
that some of them are above the
tops of the seats.
.Do not leave an unsecured child
restraint in the vehicle.
.Secure loose items in the vehicle.
.Do not leave a seat folded down
unless needed.
Starting and Operating
New Vehicle Break-In
Caution
The vehicle does not need an elaborate
break-in. But it will perform better in the
long run if you follow these guidelines:
.Do not drive at any one constant
speed, fast or slow, for the first
800 km (500 mi). Do not make
full-throttle starts. Avoid downshifting
to brake or slow the vehicle.
(Continued)
Caution (Continued)
.Avoid making hard stops for the first
300 km (200 mi) or so. During this
time the new brake linings are not yet
broken in. Hard stops with new linings
can mean premature wear and earlier
replacement. Follow this breaking-in
guideline every time you get new
brake linings.
.Do not tow a trailer during break-in.
SeeTrailer Towing 0241 for the trailer
towing capabilities of the vehicle and
more information.
Following break-in, engine speed and load
can be gradually increased.
On new vehicles, the various mechanical and
electrical systems experience a “break-in”
period during the first 6 400 km (4,000 mi)
of routine driving. As the vehicle is driven,
the mechanical systems adjust to provide
optimal fuel economy and transmission shift
performance.
Electrical systems will adapt and calibrate
during the break-in period. A one-time
occurrence of clicks and similar vehicle
noises is normal during this process. Normal driving charges the vehicle’s battery
to achieve the best operation of the vehicle,
including fuel economy and the Stop/Start
System. See
Stop/Start System 0192.
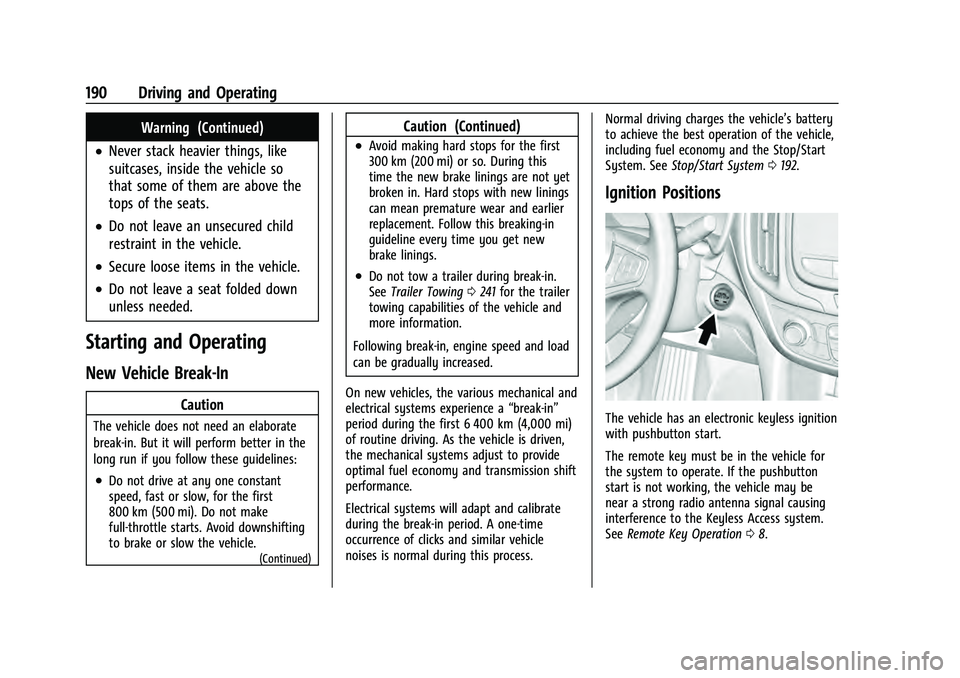
Ignition Positions
The vehicle has an electronic keyless ignition
with pushbutton start.
The remote key must be in the vehicle for
the system to operate. If the pushbutton
start is not working, the vehicle may be
near a strong radio antenna signal causing
interference to the Keyless Access system.
See Remote Key Operation 08.
Page 352 of 360
Chevrolet Equinox Owner Manual (GMNA-Localizing-U.S./Canada-
16540728) - 2023 - crc - 6/16/22
Index 351
Fog Lamps . . . . . . . . . . . . . . . . . . . . . . . . . . . . . . . . 117
Folding Mirrors . . . . . . . . . . . . . . . . . . . . . . . . . . . .25
ForwardCollision Alert (FCA) System . . . . . . . . . . . 227
Frequency Statement Radio . . . . . . . . . . . . . . . . . . . . . . . . . . . . . . . . . . 335
Front
Heated and Ventilated Seats . . . . . . . . . . . . 37
Pedestrian Braking (FPB) System . . . . . . . 230
Front Seats Adjustment . . . . . . . . . . . . . . . . . . . . . . . . . . . . . . 31
Fuel Additives . . . . . . . . . . . . . . . . . . . . . . . . . . . . . . 236
Economy, Driving for Better . . . . . . . . . . . 178
Filling a Portable Fuel Container . . . . . . . 238
Filling the Tank . . . . . . . . . . . . . . . . . . . . . . . . 236
Foreign Countries . . . . . . . . . . . . . . . . . . . . . . 236
Gauge . . . . . . . . . . . . . . . . . . . . . . . . . . . . . . . . . . 92
Low Fuel Warning Light . . . . . . . . . . . . . . . 101
Prohibited Fuels . . . . . . . . . . . . . . . . . . . . . . . 236
Recommended . . . . . . . . . . . . . . . . . . . . . . . . . 235
Top Tier . . . . . . . . . . . . . . . . . . . . . . . . . . . . . . . 235
Fuses Engine Compartment Fuse Block . . . . . . . . 271
Fuses and Circuit Breakers . . . . . . . . . . . . . . 271
Instrument Panel Fuse Block . . . . . . . . . . . 273
Rear Compartment Fuse Block . . . . . . . . . 275G
Garage Door Opener . . . . . . . . . . . . . . . . . . . . . . 111Programming . . . . . . . . . . . . . . . . . . . . . . . . . . . 111
Gas Strut(s) . . . . . . . . . . . . . . . . . . . . . . . . . . . . . . 265
Gauges Engine Coolant Temperature . . . . . . . . . . . . 93
Fuel . . . . . . . . . . . . . . . . . . . . . . . . . . . . . . . . . . . . . 92
Odometer . . . . . . . . . . . . . . . . . . . . . . . . . . . . . . 92
Speedometer . . . . . . . . . . . . . . . . . . . . . . . . . . . 92
Tachometer . . . . . . . . . . . . . . . . . . . . . . . . . . . . . 92
Trip Odometer . . . . . . . . . . . . . . . . . . . . . . . . . . 92
Warning Lights and Indicators . . . . . . . . . . 86
General Information Service and Maintenance . . . . . . . . . . . . . . 315
Towing . . . . . . . . . . . . . . . . . . . . . . . . . . . . . . . . 238
Vehicle Care . . . . . . . . . . . . . . . . . . . . . . . . . . . 248
Global Positioning System (GPS) . . . . . . . . . .143
Glove Box . . . . . . . . . . . . . . . . . . . . . . . . . . . . . . . . .75
GM Mobility Reimbursement Program . . . . . . . . . . . . . . . . . . . . . . . . . . . . . . . 330
Guidance Problems with the Route . . . . . . . . . . . . . . 144
H
Halogen Bulbs . . . . . . . . . . . . . . . . . . . . . . . . . . . 266
Hazard Warning Flashers . . . . . . . . . . . . . . . . . 117
Head Restraints . . . . . . . . . . . . . . . . . . . . . . . . . . . 30
Headlamps . . . . . . . . . . . . . . . . . . . . . . . . . . . . . . 267 Headlamps (cont'd)
Aiming . . . . . . . . . . . . . . . . . . . . . . . . . . . . . . . . 266
Automatic . . . . . . . . . . . . . . . . . . . . . . . . . . . . . . 116
Bulb Replacement . . . . . . . . . . . . . . . . . . . . . . 266
Daytime Running Lamps (DRL) . . . . . . . . . . 116
Flash-to-Pass . . . . . . . . . . . . . . . . . . . . . . . . . . . . 116
High Intensity Discharge (HID)
Lighting . . . . . . . . . . . . . . . . . . . . . . . . . . . . . . 267
High-Beam On Light . . . . . . . . . . . . . . . . . . . 102
High/Low Beam Changer . . . . . . . . . . . . . . . 115
Lamps On Reminder . . . . . . . . . . . . . . . . . . . 102
Heated
Mirrors . . . . . . . . . . . . . . . . . . . . . . . . . . . . . . . . . 25
Rear Seats . . . . . . . . . . . . . . . . . . . . . . . . . . . . . . 40
Steering Wheel . . . . . . . . . . . . . . . . . . . . . . . . . 80
Ventilated Front Seats . . . . . . . . . . . . . . . . . . 37
Heater Engine . . . . . . . . . . . . . . . . . . . . . . . . . . . . . . . . . 195
Heating . . . . . . . . . . . . . . . . . . . . . . . . . . . . . . 169, 171
High-Beam On Light . . . . . . . . . . . . . . . . . . . . . 102
Hill and Mountain Roads . . . . . . . . . . . . . . . . 184
Hill Start Assist (HSA) . . . . . . . . . . . . . . . . . . . . 203
Hood . . . . . . . . . . . . . . . . . . . . . . . . . . . . . . . . . . . . 249
Horn . . . . . . . . . . . . . . . . . . . . . . . . . . . . . . . . . . . . . . 80
How to Wear Seat Belts Properly . . . . . . . . . 42
HVAC . . . . . . . . . . . . . . . . . . . . . . . . . . . . . . . . 169, 171
Page 354 of 360
Chevrolet Equinox Owner Manual (GMNA-Localizing-U.S./Canada-
16540728) - 2023 - crc - 6/16/22
Index 353
Lights (cont'd)Security . . . . . . . . . . . . . . . . . . . . . . . . . . . . . . . . 102
Service Electric Parking Brake . . . . . . . . . . . 98
StabiliTrak OFF . . . . . . . . . . . . . . . . . . . . . . . . . 100
Tire Pressure . . . . . . . . . . . . . . . . . . . . . . . . . . . 100
Tow/Haul Mode . . . . . . . . . . . . . . . . . . . . . . . . 99
Traction Control System
(TCS)/StabiliTrak . . . . . . . . . . . . . . . . . . . . . 100
Traction Off . . . . . . . . . . . . . . . . . . . . . . . . . . . . . 99
Locks Automatic Door . . . . . . . . . . . . . . . . . . . . . . . . . . 17
Delayed Locking . . . . . . . . . . . . . . . . . . . . . . . . . 17
Door . . . . . . . . . . . . . . . . . . . . . . . . . . . . . . . . . . . . . 15
Lockout Protection . . . . . . . . . . . . . . . . . . . . . . 18
Power Door . . . . . . . . . . . . . . . . . . . . . . . . . . . . . . 17
Safety . . . . . . . . . . . . . . . . . . . . . . . . . . . . . . . . . . 18
Loss of Control . . . . . . . . . . . . . . . . . . . . . . . . . . 180
Low Fuel Warning Light . . . . . . . . . . . . . . . . . .101
Lower Anchors and Tethers for Children (LATCH System) . . . . . . . . . . . . . . . . 64
Lumbar Adjustment . . . . . . . . . . . . . . . . . . . . . . . 34
Front Seats . . . . . . . . . . . . . . . . . . . . . . . . . . . . . 34
M
MaintenanceRecords . . . . . . . . . . . . . . . . . . . . . . . . . . . . . . . . 322
Maintenance Schedule . . . . . . . . . . . . . . . . . . . 316 Maintenance Schedule (cont'd)
Recommended Fluids and
Lubricants . . . . . . . . . . . . . . . . . . . . . . . . . . . . 320
Malfunction Indicator Lamp . . . . . . . . . . . . . . . 96
Manual Mode . . . . . . . . . . . . . . . . . . . . . . . . . . . . . . . . . . 200
Map Data Updates . . . . . . . . . . . . . . . . . . . . . . . 144
Maps . . . . . . . . . . . . . . . . . . . . . . . . . . . . . . . . . . . . 136
Media
Avoiding Untrusted Devices . . . . . . . . . . . . 130
Memory Seats . . . . . . . . . . . . . . . . . . . . . . . . . . . . 34
Messages Engine Power . . . . . . . . . . . . . . . . . . . . . . . . . . 110
Vehicle . . . . . . . . . . . . . . . . . . . . . . . . . . . . . . . . 110
Vehicle Speed . . . . . . . . . . . . . . . . . . . . . . . . . . . 111
Mirrors
Automatic Dimming . . . . . . . . . . . . . . . . . . . . 25
Automatic Dimming Rearview . . . . . . . . . . 26
Convex . . . . . . . . . . . . . . . . . . . . . . . . . . . . . . . . . 24
Folding . . . . . . . . . . . . . . . . . . . . . . . . . . . . . . . . . 25
Heated . . . . . . . . . . . . . . . . . . . . . . . . . . . . . . . . . 25
Interior Rearview . . . . . . . . . . . . . . . . . . . . . . . 26
Manual Rearview . . . . . . . . . . . . . . . . . . . . . . . 26
Power . . . . . . . . . . . . . . . . . . . . . . . . . . . . . . . . . . 25
Tilt in Reverse . . . . . . . . . . . . . . . . . . . . . . . . . . 26
Monitor System, Tire Pressure . . . . . . . . . . . 283
Multi-band Antenna . . . . . . . . . . . . . . . . . . . . . 130
Multi-Point Vehicle Inspection (MPVI) . . . . .318
N
Navigation
Connected Services . . . . . . . . . . . . . . . . . . . . 344
Destination . . . . . . . . . . . . . . . . . . . . . . . . . . . . 138
Symbols . . . . . . . . . . . . . . . . . . . . . . . . . . . . . . . . 137
Using the System . . . . . . . . . . . . . . . . . . . . . . 133
Net, Convenience . . . . . . . . . . . . . . . . . . . . . . . . . .77
New Vehicle Break-In . . . . . . . . . . . . . . . . . . . . 190
O
Odometer . . . . . . . . . . . . . . . . . . . . . . . . . . . . . . . . 92 Trip . . . . . . . . . . . . . . . . . . . . . . . . . . . . . . . . . . . . . 92
Off-Road Driving . . . . . . . . . . . . . . . . . . . . . . . . . . . . . . . . . 181
Recovery . . . . . . . . . . . . . . . . . . . . . . . . . . . . . . . 180
Oil Engine . . . . . . . . . . . . . . . . . . . . . . . . . . . . . . . . . 252
Engine Oil Life System . . . . . . . . . . . . . . . . . 254
Pressure Light . . . . . . . . . . . . . . . . . . . . . . . . . 101
Older Children, Restraints . . . . . . . . . . . . . . . . . 58
Online Account . . . . . . . . . . . . . . . . . . . . . . . . . . 329
OnStar . . . . . . . . . . . . . . . . . . . . . . . . . . . . . . . . . . . 338
Additional Information . . . . . . . . . . . . . . . . . 341
Overview . . . . . . . . . . . . . . . . . . . . . . . . . . . . . . 339
OnStar Emergency . . . . . . . . . . . . . . . . . . . . . . . 340
OnStar Security . . . . . . . . . . . . . . . . . . . . . . . . . . 340
Outlets Power . . . . . . . . . . . . . . . . . . . . . . . . . . . . . . . . . . 82