2022 CHEVROLET CORVETTE change time
[x] Cancel search: change timePage 187 of 338

Chevrolet Corvette Owner Manual (GMNA-Localizing-U.S./Canada/Mexico-
15342622) - 2022 - CRC - 5/4/21
186 Driving and Operating
If it takes time for help to arrive, when
running the engine, push the accelerator
pedal slightly so the engine runs faster than
the idle speed. This keeps the battery
charged to restart the vehicle and to signal
for help with the headlamps. Do this as
little as possible, to save fuel.
If the Vehicle Is Stuck
Slowly and cautiously spin the wheels to
free the vehicle when stuck in sand, mud,
ice, or snow.
If stuck too severely for the traction system
to free the vehicle, turn the traction system
off and use the rocking method. See
Traction Control/Electronic Stability Control
0205.
{Warning
If the vehicle's tires spin at high speed,
they can explode, and you or others
could be injured. The vehicle can
overheat, causing an engine compartment
fire or other damage. Spin the wheels as
little as possible and avoid going above
56 km/h (35 mph).
Rocking the Vehicle to Get it Out
Turn the steering wheel left and right to
clear the area around the front wheels. Turn
off any traction system. Shift back and forth
between R (Reverse) and a low forward gear,
spinning the wheels as little as possible. To
prevent transmission wear, wait until the
wheels stop spinning before shifting gears.
Release the accelerator pedal while shifting,
and press lightly on the accelerator pedal
when the transmission is in gear. Slowly
spinning the wheels in the forward and
reverse directions causes a rocking motion
that could free the vehicle. If that does not
get the vehicle out after a few tries, it may
need to be towed out. If the vehicle does
need to be towed out, see Towing the
Vehicle 0279.
Vehicle Load Limits
It is very important to know how much
weight the vehicle can carry. This
weight is called the vehicle capacity
weight and includes the weight of all
occupants, cargo, and all
nonfactory-installed options. Two labels
on the vehicle may show how much weight it may properly carry: the Tire
and Loading Information label and the
Certification label.
{Warning
Do not load the vehicle any heavier
than the Gross Vehicle Weight Rating
(GVWR), or either the maximum
front or rear Gross Axle Weight
Rating (GAWR). This can cause
systems to break and change the
way the vehicle handles. This could
cause loss of control and a crash.
Overloading can also reduce stopping
performance, damage the tires, and
shorten the life of the vehicle.
Page 193 of 338

Chevrolet Corvette Owner Manual (GMNA-Localizing-U.S./Canada/Mexico-
15342622) - 2022 - CRC - 5/4/21
192 Driving and Operating
engine will not start in Service Mode. Press
ENGINE START/STOP again to turn the
vehicle off.
Starting the Engine
Caution
If you add electrical parts or accessories,
you could change the way the engine
operates. Any resulting damage would
not be covered by the vehicle warranty.
SeeAdd-On Electrical Equipment 0227.
Caution
Do not try to shift to P (Park) if the
vehicle is moving. If you do, you could
damage the transmission. Shift to P (Park)
only when the vehicle is stopped.
Place the transmission in P (Park) or
N (Neutral). To restart the vehicle when it is
already moving, use N (Neutral) only.
Starting the Vehicle
The remote key must be inside the vehicle
for the ignition to work. Cell phone chargers can interfere with the
operation of the Keyless Access system.
Battery chargers should not be plugged in
when starting or turning off the engine.
1. Press the brake pedal, then press ENGINE START/STOP on the instrument panel.
If there is no remote key in the vehicle
or if there is something causing
interference with it, the Driver
Information Center (DIC) will display a
message.
2. When the engine begins cranking, let go of the button and the engine cranks
automatically until it starts.
If the battery in the remote key is weak,
the DIC will display a message. The
vehicle can still be driven.
See “Starting the Vehicle with a
Low Remote Key Battery” under
Remote Keyless Entry (RKE) System
Operation 07. If the remote key battery
is dead, insert it into the cupholder
remote key pocket to enable engine
starting.
3. Do not race the engine immediately after starting it. Operate the engine and
transmission gently until the oil warms
up and lubricates all moving parts. 4. If the engine does not start and no DIC
message is displayed, wait 15 seconds
before trying again to let the cranking
motor cool down.
If the engine does not start after five to
10 seconds, especially in very cold
weather (below −18 °C or 0 °F), it could
be flooded with too much gasoline. Try
pushing the accelerator pedal all the way
to the floor while cranking for up to
15 seconds maximum. Wait at least
15 seconds between each try, to allow
the cranking motor to cool down. When
the engine starts, let go of the
accelerator. If the vehicle starts briefly
but then stops again, repeat these steps.
This clears the extra gasoline from the
engine.
Caution
Cranking the engine for long periods of
time, by pressing ENGINE START/STOP
immediately after cranking has ended,
can overheat and damage the cranking
motor, and drain the battery. Wait at
least 15 seconds between each try, to let
the cranking motor cool down.
Page 203 of 338

Chevrolet Corvette Owner Manual (GMNA-Localizing-U.S./Canada/Mexico-
15342622) - 2022 - CRC - 5/4/21
202 Driving and Operating
rate of launch. Tire spin may occur with the
accelerator pedal pressed and the Traction
Control System (TCS) turned off.
This launch occurs when both of these
conditions are met:
.Vehicle speed is below 10 km/h (6 mph).
.Both the + paddle and−paddle are
released at the same time.
With the accelerator fully pressed and the
engine at the rev limiter, peak performance
only occurs if the paddles are released
within a short period of time after reaching
the rev limit (i.e., a few seconds).
Applying the brakes while the tires are
spinning may result in the clutch releasing.
Standard Exit : Engine power is reapplied to
the wheels gently to support normal vehicle
operation on public roads.
This occurs when paddles are released under
any of the these conditions:
.Vehicle speed is above 10 km/h (6 mph).
.The vehicle is in R (Reverse).
.The + paddle and −paddle are not
released at the same time. If the vehicle was in Temporary Manual
Paddle Shift mode before entering Double
Paddle Declutch, the vehicle will return to D
(Drive) with automatic shifting upon exiting
Double Paddle Declutch.
{Warning
When exiting Double Paddle Declutch, the
vehicle may move rapidly. You could lose
control and cause a crash with nearby
people or objects. Be ready to release the
accelerator pedal or apply the brakes
immediately if the vehicle moves too
quickly. Do not use the Double Paddle
Declutch when people or objects are near.
Brakes
Electric Brake Boost
Vehicles equipped with electric brake boost
have hydraulic brake circuits that are
electronically controlled when the brake
pedal is applied during normal operation.
The system performs routine tests and turns
off within a few minutes after the vehicle is
turned off. Noise may be heard during this
time. If the brake pedal is pressed during the tests or when the electric brake boost
system is off, a noticeable change in pedal
force and travel may be felt. This is normal.
Antilock Brake System (ABS)
The Antilock Brake System (ABS) helps
prevent a braking skid and maintain steering
while braking hard.
If there is a problem with ABS, this warning
light stays on. See
Antilock Brake System
(ABS) Warning Light 089.
ABS does not change the time needed to
get a foot on the brake pedal and does not
always decrease stopping distance. If you
get too close to the vehicle ahead, there will
not be enough time to apply the brakes if
that vehicle suddenly slows or stops. Always
leave enough room ahead to stop, even
with ABS.
Page 208 of 338

Chevrolet Corvette Owner Manual (GMNA-Localizing-U.S./Canada/Mexico-
15342622) - 2022 - CRC - 5/4/21
Driving and Operating 207
If the vehicle is in Tour or My Mode it will
stay in that mode through future ignition
cycles. If the vehicle is in any other mode, it
will return to Tour when the vehicle is
restarted. When each mode is selected, an
indicator will come on in the instrument
cluster and stay on.
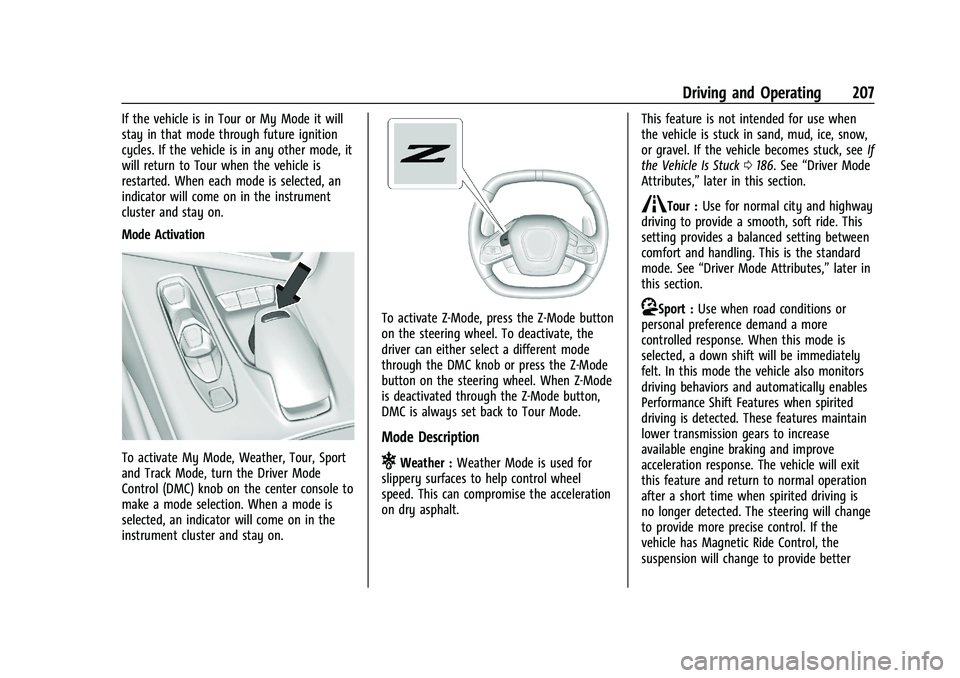
Mode Activation
To activate My Mode, Weather, Tour, Sport
and Track Mode, turn the Driver Mode
Control (DMC) knob on the center console to
make a mode selection. When a mode is
selected, an indicator will come on in the
instrument cluster and stay on.
To activate Z-Mode, press the Z-Mode button
on the steering wheel. To deactivate, the
driver can either select a different mode
through the DMC knob or press the Z-Mode
button on the steering wheel. When Z-Mode
is deactivated through the Z-Mode button,
DMC is always set back to Tour Mode.
Mode Description
uWeather :Weather Mode is used for
slippery surfaces to help control wheel
speed. This can compromise the acceleration
on dry asphalt. This feature is not intended for use when
the vehicle is stuck in sand, mud, ice, snow,
or gravel. If the vehicle becomes stuck, see
If
the Vehicle Is Stuck 0186. See “Driver Mode
Attributes,” later in this section.
sTour :Use for normal city and highway
driving to provide a smooth, soft ride. This
setting provides a balanced setting between
comfort and handling. This is the standard
mode. See “Driver Mode Attributes,” later in
this section.
rSport : Use when road conditions or
personal preference demand a more
controlled response. When this mode is
selected, a down shift will be immediately
felt. In this mode the vehicle also monitors
driving behaviors and automatically enables
Performance Shift Features when spirited
driving is detected. These features maintain
lower transmission gears to increase
available engine braking and improve
acceleration response. The vehicle will exit
this feature and return to normal operation
after a short time when spirited driving is
no longer detected. The steering will change
to provide more precise control. If the
vehicle has Magnetic Ride Control, the
suspension will change to provide better
Page 209 of 338

Chevrolet Corvette Owner Manual (GMNA-Localizing-U.S./Canada/Mexico-
15342622) - 2022 - CRC - 5/4/21
208 Driving and Operating
cornering performance. When in Sport
Mode, the displays will change to sport
theme.
Competitive Mode can be accessed through
this mode. SeeCompetitive Driving Mode
0 213.
tTrack : Track Mode is used for closed
race tracks. Use when maximum vehicle
handling is desired. When in Track Mode,
the dual clutch transmission and steering
will adjust to track settings. The accelerator
pedal is adjusted to give maximum control
during the highest level of spirited driving.
This mode also modifies real time damping,
exhaust valve tuning, engine sound, brake
pedal feel, Electronic Stability Control (ESC)
performance and Traction Control System
(TCS) performance. When in Track Mode the
displays will change to track theme.
Performance Traction Management (PTM)
can be accessed through this mode. See
“Performance Traction Management,” later
in this section.
qMy Mode : My Mode is used to
personalize everyday driving. This mode
allows the driver to configure the driver
systems to their driving preferences. This
mode modifies the suspension, steering, pedal mapping, exhaust valve tuning, and
engine sound. My Mode will remain active
across ignition cycles.
Through the center display, the following
vehicle sub-systems may be available for
customization in this mode:
Engine Sound:
Stealth, Tour, Sport, Track
Steering: Tour, Sport, Track
Suspension: Tour, Sport, Track
Brake Response: Tour, Sport, Track
For a more detailed description on how each
driver system is changed, see “Drive Mode
Customization,” later in this section.
Additionally the cluster theme can be set up
using the display menu in the cluster.
vZ-Mode : Z-Mode is used to
personalize dynamic driving. This mode
allows the driver to configure the driver
systems to their own preference for
maximum handling. Z-Mode further
enhances the experience by adding
powertrain customization. This mode
modifies pedal mapping, ESC performance,
TCS performance, suspension, steering,
exhaust valve turning, and engine sound. Through the center display, the driver can
customize multiple settings. The following
vehicle sub-systems may be available for
customization in this mode:
Engine Sound:
Stealth, Tour, Sport, Track
Steering: Tour, Sport, Track
Suspension: Tour, Sport, Track
Powertrain: Tour, Sport, Track, Weather
Brake Response: Tour, Sport, Track
PTM: Off, Wet, Dry, Sport, Race 1, Race 2
For a more detailed description on how each
driver system is changed, see “Drive Mode
Customization,” later in this section. For
more information on PTM, see “Performance
Traction Management,” later in this section.
Additionally, the cluster theme can be set
up using the display menu in the cluster.
Page 217 of 338

Chevrolet Corvette Owner Manual (GMNA-Localizing-U.S./Canada/Mexico-
15342622) - 2022 - CRC - 5/4/21
216 Driving and Operating
Limited-Slip Differential
(Without Z51)
The mechanical limited-slip differential can
give more traction on snow, mud, ice, sand,
or gravel. It works like a standard axle most
of the time, but when traction is low, this
feature allows the drive wheel with the
most traction to move the vehicle. See
Competitive Driving Mode0213 and
Maintenance Schedule 0292.
Limited-Slip Differential (With Z51)
The Electronic Limited-Slip Differential (eLSD)
is a hydraulically actuated clutch system
inside the transaxle. It can infinitely vary
the clutch engagement between 0 and
2250 N*m (1659 lb-ft) of breakaway torque
between the rear wheels. When necessary it
responds from open to full engagement in
fractions of a second. Smaller clutch
adjustments happen even faster. The eLSD:
.Uses the vehicle sensors and driver inputs
to determine the optimum amount of
clutch engagement for the conditions.
.Improves traction while cornering by
changing the engagement to achieve a
balance between directional control and
acceleration.
.Provides optimal engagement for
high-speed control and stability without
affecting precise steering and turn-in.
.Improves vehicle stability during spirited
driving and evasive maneuvers. It is fully
integrated with the Active Handling and
Performance Traction Management (PTM)
systems (if equipped).
There are unique calibrations based on the
Traction Control System (TCS) setting. eLSD
modes change automatically when the
traction control button is pressed. No unique
input from the driver is required.
.Mode 1 is the standard mode when the
vehicle is started. It provides a touring
calibration with an emphasis on vehicle
stability. Mode 1 is also used in PTM
Wet mode.
.Mode 2 is engaged when both TCS and
StabiliTrak are turned off. This calibration
provides more nimble corner turn-in, and
is biased for better traction out of
corners.
.Mode 3 is engaged when PTM is engaged
in Dry, Sport 1 & 2, and Race modes. This
is a nimble calibration with similar
functionality as eLSD Mode 2, however, it
is integrated to work with PTM.
.Mode 4 is engaged when TCS is selected
off, but StabiliTrak remains on. Vehicle
stability is still the priority, while allowing
for optimized traction out of corners.
Cruise Control
With cruise control, a speed of about
40 km/h (25 mph) or more can be
maintained without keeping your foot on
the accelerator. Cruise control does not work
at speeds below about 40 km/h (25 mph).
Page 220 of 338

Chevrolet Corvette Owner Manual (GMNA-Localizing-U.S./Canada/Mexico-
15342622) - 2022 - CRC - 5/4/21
Driving and Operating 219
{Warning
Do not rely on the Driver Assistance
Systems. These systems do not replace
the need for paying attention and driving
safely. You may not hear or see alerts or
warnings provided by these systems.
Failure to use proper care when driving
may result in injury, death, or vehicle
damage. SeeDefensive Driving 0175.
Under many conditions, these systems
will not:
.Detect children, pedestrians, bicyclists,
or animals.
.Detect vehicles or objects outside the
area monitored by the system.
.Work at all driving speeds.
.Warn you or provide you with enough
time to avoid a crash.
.Work under poor visibility or bad
weather conditions.
.Work if the detection sensor is not
cleaned or is covered by ice, snow,
mud, or dirt. (Continued)
Warning (Continued)
.Work if the detection sensor is
covered up, such as with a sticker,
magnet, or metal plate.
.Work if the area surrounding the
detection sensor is damaged or not
properly repaired.
Complete attention is always required
while driving, and you should be ready to
take action and apply the brakes and/or
steer the vehicle to avoid crashes.
Audible Alert
Some driver assistance features alert the
driver of obstacles by beeping. To change
the volume of the warning chime, see
“Comfort and Convenience” underVehicle
Personalization 098.
Cleaning
Depending on vehicle options, keep these
areas of the vehicle clean to ensure the best
driver assistance feature performance. Driver
Information Center (DIC) messages may
display when the systems are unavailable or
blocked.
.Front and rear bumpers and the area
below the bumpers
.Front grille and headlamps
.Front camera lenses in the front grille or
near the front emblem
Page 236 of 338

Chevrolet Corvette Owner Manual (GMNA-Localizing-U.S./Canada/Mexico-
15342622) - 2022 - CRC - 5/4/21
Vehicle Care 235
1. Engine Cooling Fan (Out of View). SeeCooling System 0242.
2. Engine Air Cleaner/Filter (Under Access Panel). See Engine Air Cleaner/Filter
0 240.
3. Coolant Surge Tank and Pressure Cap. See Cooling System 0242.
4. Dry Sump Engine Oil Tank and Fill Cap. See Engine Oil 0235.
5. Engine Oil Dipstick. See Engine Oil0235.
Engine Oil
To ensure proper engine performance and
long life, pay careful attention to engine oil.
Follow these important steps:
.Use engine oil approved to the proper
specification and of the proper viscosity
grade. See “Selecting the Right Engine
Oil” later in this section.
.Check the engine oil level regularly and
maintain the proper oil level. See
“Checking Engine Oil” and“When to Add
Engine Oil” later in this section.
.Change the engine oil at the appropriate
time. SeeEngine Oil Life System 0238.
.Always dispose of engine oil properly. See
“What to Do with Used Oil” in this
section.
Checking the Engine Oil
1. Engine Oil Dipstick
2. Engine Oil Fill Cap
Check the engine oil level regularly, every
650 km (400 mi), especially prior to a long
trip. To get an accurate reading, the vehicle
must be parked on a level ground.
The engine oil dipstick handle is a loop. See
Engine Compartment Overview 0232 for the
location.
The vehicle has a racetrack-ready dry sump
engine lubrication system. This high
performance system operates differently
than a standard engine lubrication system
and requires a special procedure when
checking the engine oil level. Follow this
procedure closely. The engine oil level must be checked when
the engine is warm. Cold oil level in the dry
sump tank may not indicate the actual
amount of oil in the system. Engine oil is
contained in an external tank, separate from
the engine. Under normal operating
conditions, the oil pan under the engine
does not store any oil. If the vehicle has
been parked for an extended period without
the engine being started, some oil will seep
back into the oil pan. This will reduce the
amount of oil held in the dry sump tank
and there could be no engine oil on the
dipstick. This is normal since the dipstick is
designed to read the engine oil level only
after the engine has run long enough to
reach normal operating temperature. Do not
add engine oil based on cold engine dipstick
readings. The engine oil level on the dipstick
must be checked while the engine is running
at idle.
To check the engine oil:
1. Turn the engine on and let it warm up to at least 80 °C (175 °F).
2. Once the engine is warm, check the oil while the engine is running at idle.