Page 65 of 123
Equipment operation
56
returns automatically to its original position
when released. WARNING! Do not use the
reboarding step to lift the watercraft. The
reboarding step is not designed to support
the watercraft’s weight. If the reboarding
step breaks, the watercraft could fall,
which could result in severe injury.
[EWJ01212]
VX / VX DELUXE
VX CRUISER / VX LIMITED
ECJ00743
Use the reboarding step only to board the
watercraft in the water. Do not use the re-
boarding step for any other purpose. The
watercraft can be damaged.
EJU34873Bow eye
The bow eye is used to attach a rope to the
watercraft when transporting, mooring, or
towing it in an emergency. (See page 109 for
information on towing the watercraft.)
EJU34882Stern eyes
The stern eyes are used to attach a rope to
the watercraft when transporting or mooring
it.
1 Reboarding step
1 Reboarding step
1
11Bow eye
1 Stern eye
1
1
UF4N70E0.book Page 56 Tuesday, October 6, 2020 5:13 PM
Page 66 of 123

Equipment operation
57
EJU40423Cleat
The cleat is used to attach a ski rope to the
watercraft when pulling a wakeboarder or
water-skier. WARNING! Do not use the
cleat to lift the watercraft. The cleat is not
designed to support the watercraft’s
weight. If the cleat breaks, the watercraft
could fall, which could result in severe in-
jury.
[EWJ01511]
EJU34894
Pull-up cleats (VX CRUISER / VX
LIMITED)
The pull-up cleats are used to attach a rope
to the watercraft when mooring it.
To use a pull-up cleat, pull it up. The pull-up
cleat returns automatically to its original posi-
tion when released. WARNING! Do not use
the pull-up cleats to lift the watercraft. The
pull-up cleats are not designed to support
the watercraft’s weight. If the pull-up cleats break, the watercraft could fall,
which could result in severe injury.
[EWJ00822]
EJU31685
Storage compartments
This watercraft is equipped with the following
storage compartments.
The storage compartments are not designed
to be waterproof. If you carry objects that
must be kept dry, put them in a waterproof
bag.
Make sure that the storage compartments
are closed securely before operating the wa-
tercraft.
EJU45250Bow storage compartment
The bow storage compartment is located un-
der the hood.
1 Cleat
11Pull-up cleat (VX CRUISER / VX LIMITED)
2 Pull-up cleat (VX LIMITED)
2
1
UF4N70E0.book Page 57 Tuesday, October 6, 2020 5:13 PM
Page 67 of 123

Equipment operation
58
To open the bow storage compartment:
Pull the hood latch rearward, and then lift up
the rear of the hood.To close the bow storage compartment:Push the rear of the hood down to securely
lock it in place.
EJU46211Glove compartment
The glove compartment is located in front of
the seat.
TIP:
Make sure the seal of lid is intact, clear and
properly positioned before using.
Make sure the seals around the USB char-
ger and 12V DC outlet are intact and prop-
erly positioned before using.
Completely dry inside of the glove com-
partment and its contents before and after
using.
Make sure nothing is pinches between the
glove compartment and the lid when clos-
ing the glove compartment.
When not in use, the rubber caps for the
USB charger and 12V DC outlet should be
installed to cover the connectors.
1
Hood latch
1 Bow storage compartment
Bow storage compartment:
Capacity:
92.0 L (24.3 US gal, 20.2 Imp.gal)
Load limit: 5.0 kg (11 lb)
1
1
UF4N70E0.book Page 58 Tuesday, October 6, 2020 5:13 PM
Page 68 of 123
Equipment operation
59
To open the glove compartment:
Pull the glove compartment latch up, and
then lift up the lid.To close the glove compartment:Push the lid down to securely lock it in place.
To drain water from the glove compartment:
(1) Remove the drain plug on the bottom of
the glove compartment to drain the wa-
ter.
(2) Securely install the drain plug in it original position.
EJU46011Seat storage compartment
The seat storage compartment is located un-
der the rear seat.
The storage compartment is removable.
To open the seat storage compartment:
(1) Remove the rear seat. (See page 54 forseat removal and installation proce-
dures.)
1Glove compartment latch
1 Glove compartment
Glove compartment:
Capacity:16.5 L (4.4 US gal, 3.6 Imp.gal)
Load limit: 1.5 kg (3 lb)
1
1
1Drain plug
1
UF4N70E0.book Page 59 Tuesday, October 6, 2020 5:13 PM
Page 69 of 123
Equipment operation
60
(2) Push the latch forward, and then lift upthe lid and remove it. To close the seat storage compartment:
(1) Insert the projections on the lid into the
slots on the seat storage compartment.
(2) Push the rear of the lid down.
(3) Securely install the rear seat in its original position.
EJU46030Fire extinguisher holder and cover
The fire extinguisher holder and cover are lo-
cated in the bow storage compartment.
1Lid
2 Latch
1 Seat storage compartment
Seat storage compartment:
Capacity:5.4 L (1.4 US gal, 1.2 Imp.gal)
Load limit:
3.0 kg (7 lb)
2
1
1
UF4N70E0.book Page 60 Tuesday, October 6, 2020 5:13 PM
Page 70 of 123
Equipment operation
61
To use the fire extinguisher holder and cover:
(1) Pull the hood latch rearward, and then liftup the rear of the hood.
(2) Unhook the band and remove the fire ex- tinguisher from the fire extinguisher cov-
er.
(3) Place the fire extinguisher in the fire ex- tinguisher cover, and then securely fas-
ten the fire extinguisher with the band.
(4) Push the rear of the hood down to se- curely lock it in place. Make sure that the hood is securely closed before using the
watercraft.
1
Hood latch
1 Fire extinguisher holder and cover
2 Band
1
2
1
UF4N70E0.book Page 61 Tuesday, October 6, 2020 5:13 PM
Page 71 of 123

Operation and handling requirements
62
EJU31823
Fuel requirementsEJU45311FuelEWJ00283
Gasoline and gasoline vapors are ex-
tremely flammable. To avoid fires and
explosions and to reduce the risk of in-
jury when refueling, follow these in-
structions.
Gasoline is poisonous and can cause in-
jury or death. Handle gasoline with care.
Never siphon gasoline by mouth. If you
should swallow some gasoline, inhale a
lot of gasoline vapor, or get some gaso-
line in your eyes, see your doctor imme-
diately. If gasoline spills on your skin,
wash with soap and water. If gasoline
spills on your clothing, change your
clothes.
ECJ00322
Do not use leaded gasoline. Leaded
gasoline can seriously damage the en-
gine.
Avoid getting water and contaminants in
the fuel tank. Contaminated fuel can
cause poor performance and engine
damage. Use only fresh gasoline that
has been stored in clean containers.
TIP:
This mark identifies the recommended fuel
for this watercraft as specified by European
regulation (EN228).
Check that the gasoline nozzle has the
same identifier when fueling.
Gasohol
There are two types of gasohol: gasohol con-
taining ethanol and gasohol containing meth-
anol.
Gasohol containing ethanol can be used if
the ethanol content does not exceed 10%
and the fuel meets th e minimum octane rat-
ings. E-85 is a fuel blend containing 85% eth-
anol and therefore must not be used in this
watercraft. All ethanol blends containing
more than 10% ethanol can cause fuel sys-
tem damage or engine performance prob-
lems.
Yamaha does not recommend gasohol con- taining methanol because it can cause fuel
system damage and engine performance
problems. Recommended fuel:
Regular unleaded gasoline with a
minimum octane rating of 86
(Pump octane number) = (R + M)/2
90 (Research octane number)
E5E10
UF4N70E0.book Page 62 Tuesday, October 6, 2020 5:13 PM
Page 72 of 123
 Before refueling, stop the engine. Do notstand or sit on the watercraft. Never refu-
el while smoking, or while in the vicinity
of spa")
Operation and handling requirements
63
To fill the fuel tank:
(1) Before refueling, stop the engine. Do notstand or sit on the watercraft. Never refu-
el while smoking, or while in the vicinity
of sparks, open flames, or other sources
of ignition.
(2) Place the watercraft in a well-ventilated area and in a horizontal position.
(3) Remove the seats, and then check the fuel level. (See page 54 for seat removal
and installation procedures.)
(4) Loosen the fuel filler cap and remove it.
(5) Slowly add fuel to the fuel tank.
(6) Stop filling when the fuel level reaches approximately 50 mm (2 in) from the top
of the fuel tank. Do not overfill the fuel
tank. Because fuel expands when it heats up, heat from the engine or the sun
can cause fuel to spill out of the fuel tank.
Do not leave the watercraft with a full
tank in direct sunlight.
(7) Wipe up any spilled fuel immediately with a dry cloth.
(8) Securely install the fuel filler cap by tight- ening it until it clicks.
(9) Securely install the seats in their original positions.
1Fuel filler cap
Fuel tank capacity:
70 L (18.5 US gal, 15.4 Imp.gal)
1
1Top of the fuel tank
2 Approximately 50 mm (2 in) from top of the
fuel tank
1 Top of the fuel tank
2 Approximately 50 mm (2 in) from top of the
fuel tank
1
2
21
UF4N70E0.book Page 63 Tuesday, October 6, 2020 5:13 PM
 1
1 2
2 3
3 4
4 5
5 6
6 7
7 8
8 9
9 10
10 11
11 12
12 13
13 14
14 15
15 16
16 17
17 18
18 19
19 20
20 21
21 22
22 23
23 24
24 25
25 26
26 27
27 28
28 29
29 30
30 31
31 32
32 33
33 34
34 35
35 36
36 37
37 38
38 39
39 40
40 41
41 42
42 43
43 44
44 45
45 46
46 47
47 48
48 49
49 50
50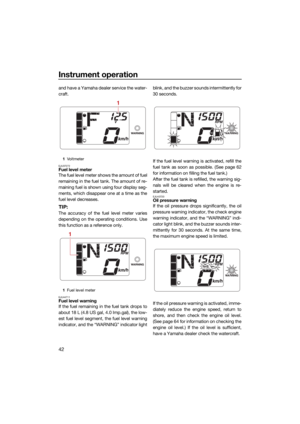 51
51 52
52 53
53 54
54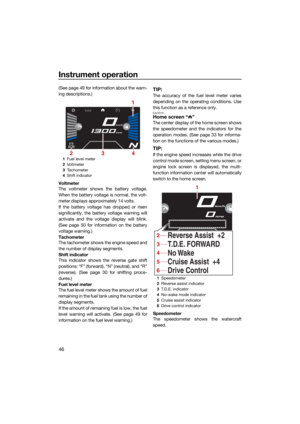 55
55 56
56 57
57 58
58 59
59 60
60 61
61 62
62 63
63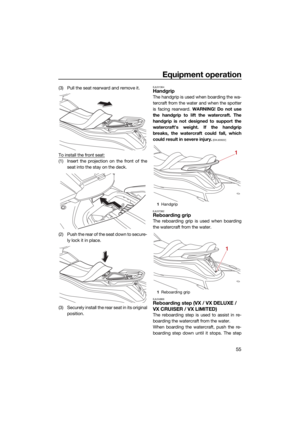 64
64 65
65 66
66 67
67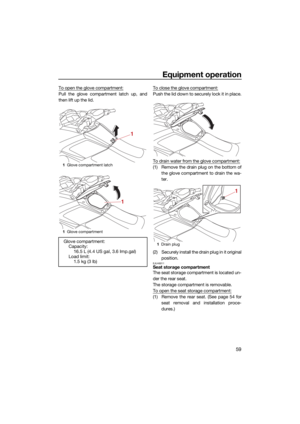 68
68 69
69 70
70 71
71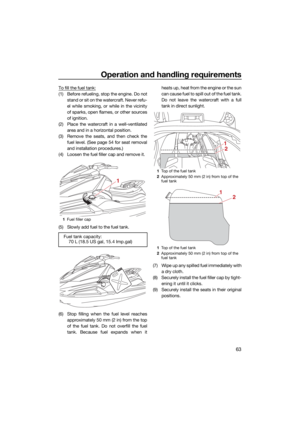 72
72 73
73 74
74 75
75 76
76 77
77 78
78 79
79 80
80 81
81 82
82 83
83 84
84 85
85 86
86 87
87 88
88 89
89 90
90 91
91 92
92 93
93 94
94 95
95 96
96 97
97 98
98 99
99 100
100 101
101 102
102 103
103 104
104 105
105 106
106 107
107 108
108 109
109 110
110 111
111 112
112 113
113 114
114 115
115 116
116 117
117 118
118 119
119 120
120 121
121 122
122

 Push the latch forward, and then lift upthe lid and remove it. To close the seat storage compartment:
(1) Insert the projections on the lid into the
slots on the seat storag")
 Pull the hood latch rearward, and then liftup the rear of the hood.
(2) Unhook the band and remove the fire ex- tinguisher fro")