2021 VOLVO V90 CROSS COUNTRY towing
[x] Cancel search: towingPage 454 of 683
||
STARTING AND DRIVING
* Option/accessory.
452
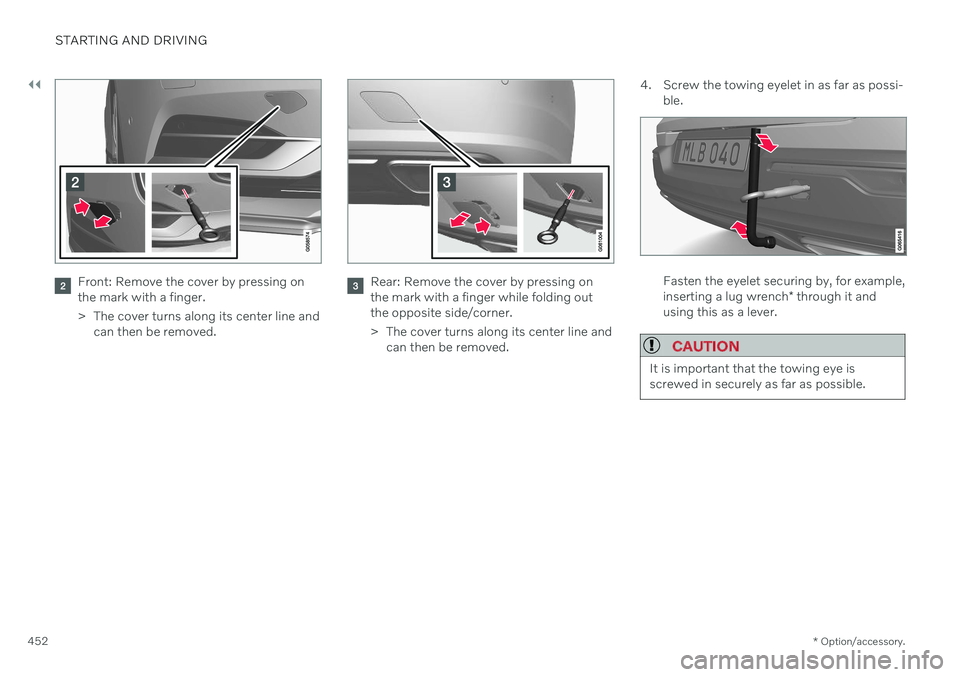
Front: Remove the cover by pressing on the mark with a finger.
> The cover turns along its center line and
can then be removed.Rear: Remove the cover by pressing on the mark with a finger while folding outthe opposite side/corner.
> The cover turns along its center line and can then be removed. 4. Screw the towing eyelet in as far as possi-
ble.Fasten the eyelet securing by, for example, inserting a lug wrench * through it and
using this as a lever.
CAUTION
It is important that the towing eye is screwed in securely as far as possible.
Page 455 of 683
STARTING AND DRIVING
}}
* Option/accessory.453
To consider before using the towing eyelet
In certain conditions, the towing eyelet may be used to pull the vehicle onto a flat-bed tow truck. The vehicle's position andground clearance determines if this is pos-sible.
If the incline of the tow truck is too steepor if the ground clearance under the vehi-cle is insufficient, attempting to pull it upusing the towing eyelet may result in dam-age.
If necessary, lift the vehicle using the towtruck's lifting device instead of using thetowing eyelet.
WARNING
No person or object should be behind the tow truck when the vehicle is lifted ontothe bed of the truck.
CAUTION
The towing eyelet is only intended for tow- ing on roads – not for pulling vehicles fromditches or any similar purpose involvingsevere strain. Call a tow truck for profes-sional assistance.
Removing the towing eyelet–Unscrew the towing eyelet after use and return it to the foam block. Replace the cover on the bumper.
Related information
Towing using a towline (p. 450)
Recovery (p. 453)
Tool kit (p. 550)
Recovery
This section refers to transporting the vehicle with a tow truck or similar vehicle.
Call a professional towing service for assis- tance. In certain conditions, the towing eyelet can be used to pull the vehicle onto a flatbed towtruck. For vehicles equipped with leveling con- trol *: If the vehicle is equipped with pneumatic
suspension, this feature must be turned off before the vehicle is lifted onto a tow truck.Turning off the function in the center display. 1. Tap
Settings in the Top view.
2. Tap
My CarParking Brake and
Suspension.
3. Select
Disable Leveling Control.
The vehicle's location and ground clearance determine if it can be lifted onto a tow truck. Ifthe incline of the tow truck is too steep or ifthe ground clearance under the vehicle isinsufficient, attempting to pull it up may resultin damage. In this case, the vehicle shouldonly be lifted with the tow truck's lifting equip-ment.
Page 456 of 683
||
STARTING AND DRIVING
* Option/accessory.
454
WARNING
No person or object should be behind the tow truck when the vehicle is lifted ontothe bed of the truck.
CAUTION
The towing eyelet is only intended for tow- ing on roads, and must not be used to pull
vehicles from ditches or any similar pur-pose involving severe strain. Call a towtruck for professional assistance.
CAUTION
Note that the vehicle must always be towed with the wheels rolling forward.
Related information
Attaching and removing the towing eyelet (p. 451)
HomeLink ®
*25
HomeLink ®
26
is a programmable remote con-
trol, integrated in the vehicle electrical sys- tem, that can control up to three differentdevices (e.g. garage door opener, alarm sys-tem, outdoor and indoor lighting) and therebyreplace the remote controls for these.
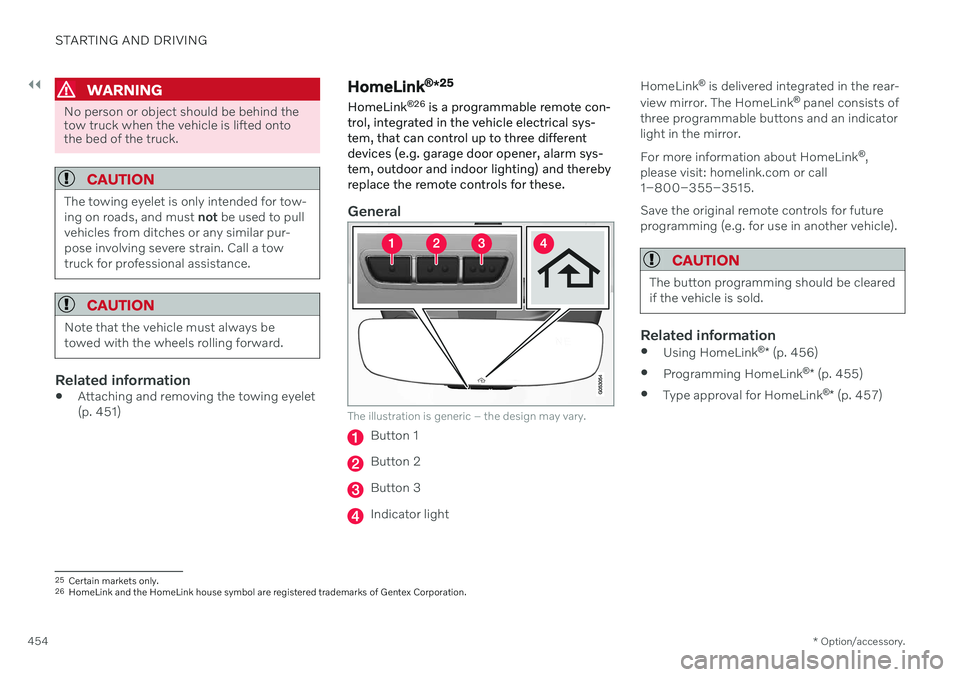
General
The illustration is generic – the design may vary.
Button 1
Button 2
Button 3
Indicator light HomeLink
®
is delivered integrated in the rear-
view mirror. The HomeLink ®
panel consists of
three programmable buttons and an indicator light in the mirror. For more information about HomeLink ®
,
please visit: homelink.com or call 1–800–355–3515. Save the original remote controls for future programming (e.g. for use in another vehicle).
CAUTION
The button programming should be cleared if the vehicle is sold.
Related information
Using HomeLink ®
* (p. 456)
Programming HomeLink ®
* (p. 455)
Type approval for HomeLink ®
* (p. 457)
25
Certain markets only.
26 HomeLink and the HomeLink house symbol are registered trademarks of Gentex Corporation.
Page 551 of 683
WHEELS AND TIRES
}}
* Option/accessory.549
CAUTION
When not in use, the jack
* should be
kept in its storage compartment under the cargo compartment floor.
The jack provided with your vehicle isintended to be used only in temporarysituations such as changing wheels inthe event of a flat tire. Only the jackthat came with your particular modelshould be used to lift the vehicle. If thevehicle needs to be lifted more fre-quently or for a prolonged period, usinga garage jack or hoist is recommended.Always follow this device's instructionsfor use.
Removing a wheelRead through all instructions before starting. Before raising the vehicle using a jack or lift,take out all the tools you will need.
1. Turn on the vehicle's hazard warning
flashers if a wheel change must be per- formed in an area with traffic.
2. Make sure that the parking brake is engaged and put the gear selector in P
position.
3. Place chocks in front of and behind the wheels that are still on the ground. Forexample, use heavy wooden blocks orlarge stones. 4. Using the lug wrench, screw the towing
eye into place as far as possible.
5. Remove the plastic covers from the wheelbolts using the designated tool.
6. With the vehicle still on the ground, use the lug wrench/towing eye to loosen the wheel bolts ½-1 turn by pressing down-ward (counterclockwise). Always start with the locking wheel bolts *.
7. Follow the instructions for safely lifting the vehicle using a jack.
8. Raise the vehicle until the wheel to be changed can move freely. Unscrew the wheel bolts and lift off the wheel.
Installing a wheel1. Clean the contact surfaces between thewheel and the wheel hub. 2. Lift the wheel into place. Tighten the
wheel bolts securely. Do not grease the wheel bolt threads.
3. Lower the vehicle so that the wheel can- not rotate.
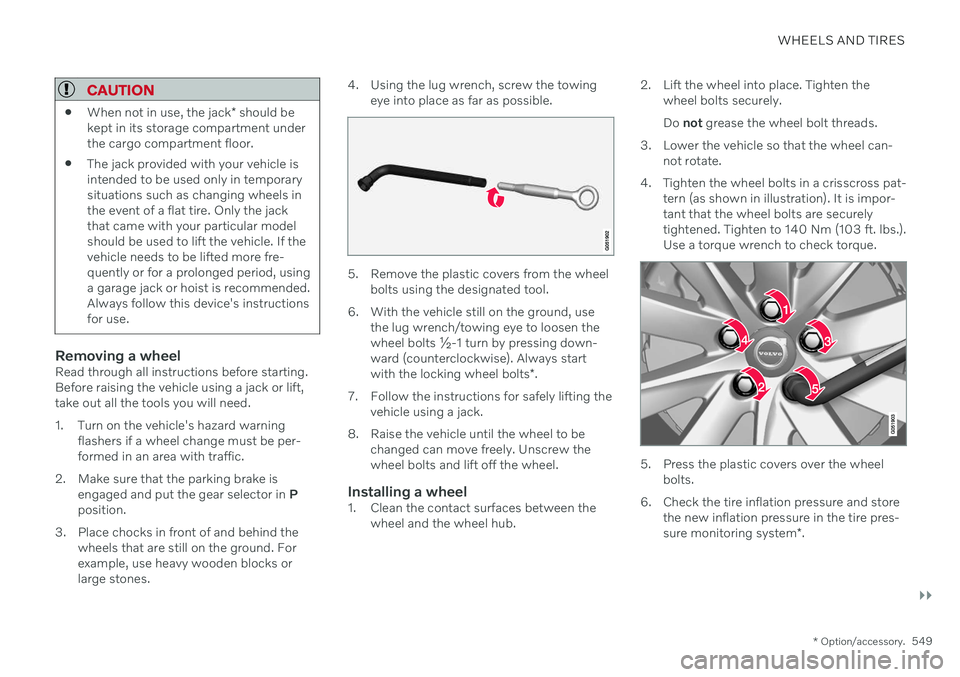
4. Tighten the wheel bolts in a crisscross pat- tern (as shown in illustration). It is impor- tant that the wheel bolts are securelytightened. Tighten to 140 Nm (103 ft. lbs.).Use a torque wrench to check torque.
5. Press the plastic covers over the wheelbolts.
6. Check the tire inflation pressure and store the new inflation pressure in the tire pres- sure monitoring system *.
Page 552 of 683
||
WHEELS AND TIRES
* Option/accessory.
550
WARNING
The wheel bolts may need to be tightened again several days after a wheel change.Temperature fluctuations and vibrationscan cause them to loosen slightly.
NOTE
After inflating a tire, always replace the valve cap to help prevent valve damagecaused by gravel, dirt, etc.
Use plastic valve caps only. Metal capscould corrode and become difficult toremove.
Related information
Leveling control settings
* (p. 432)
Hoisting the vehicle (p. 589)
Tool kit (p. 550)
Saving new reference values for tire infla- tion pressure monitoring
* (p. 545)
Tool kit
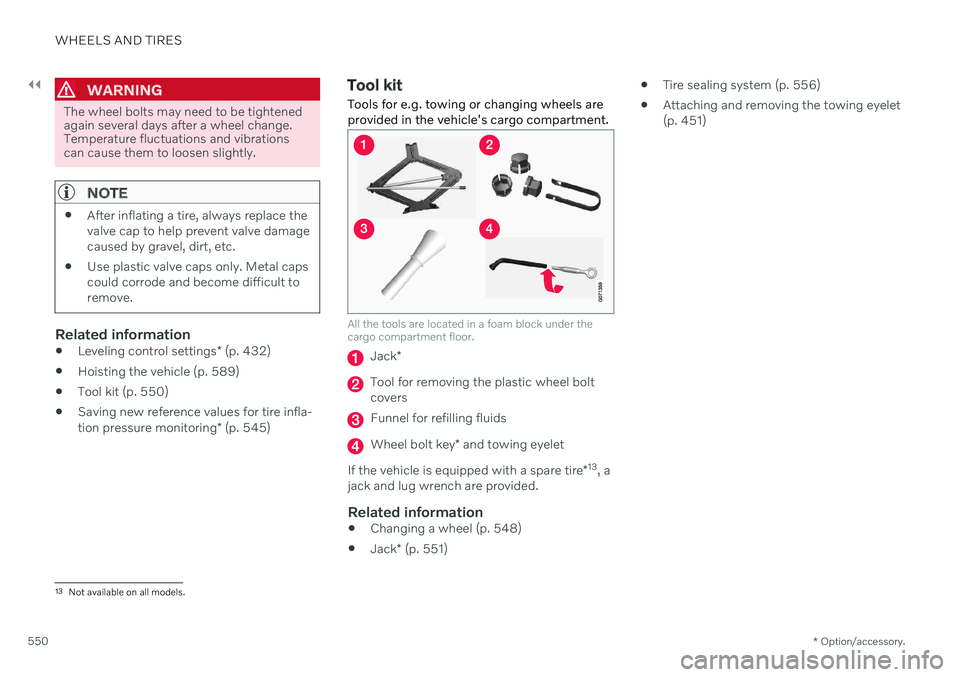
Tools for e.g. towing or changing wheels are provided in the vehicle's cargo compartment.
All the tools are located in a foam block under the cargo compartment floor.
Jack *
Tool for removing the plastic wheel bolt covers
Funnel for refilling fluids
Wheel bolt key * and towing eyelet
If the vehicle is equipped with a spare tire *13
, a
jack and lug wrench are provided.
Related information
Changing a wheel (p. 548)
Jack
* (p. 551)
Tire sealing system (p. 556)
Attaching and removing the towing eyelet (p. 451)
13
Not available on all models.
Page 555 of 683

WHEELS AND TIRES
}}
553
CAUTION
The vehicle must not be driven with tires of different dimensions or with a spare wheelother than the one that came with the vehi-cle. The use of different size wheels canseriously damage your vehicle's transmis-sion.
Related information
Changing a wheel (p. 548)
Recommended tire pressure (p. 543)
Handling the spare wheel 15
Follow these instructions regarding handling the spare wheel.
Accessing the spare wheel
This illustration is generic and appearance may vary.
The spare tire is located in the spare wheel well under the cargo compartment with theoutside of the wheel facing downward. Thespare tire is secured with a bolt that goesthrough the tire and attaches it to the body.The foam block contains all tools needed tochange a wheel.
1. Lift the rear edge of the cargo compart- ment floor.
2. Unscrew the retaining bolt.
3. Lift out the spare wheel.
Stowing a flat tire1. Screw the spare tire's retaining bolt back on.
CAUTION
Do not attempt to unscrew the lower part of the retaining bolt if it is attached to thebody, as this could cause it to break. If the retaining bolt becomes dislodged from its lower attachment point in thebody under the spare tire, replace it in thehole and turn clockwise to secure it again.
WARNING
On vehicles with 48 V batteries, the bolt is attached to the battery box instead of thebody. If the lower part of the retaining boltis not dislodged when the spare tire istaken out, it should be removed to helpprevent injury when the flat tire is replaced.
2. Put the tools back in their correct posi- tions in the foam block.
3. Then lower the trunk/cargo compartment floor and place the punctured tire in the trunk/cargo compartment.
15Not available on all models.
Page 563 of 683
WHEELS AND TIRES
}}
561
4. Start the compressor by moving the
switch to the I (On) position.
CAUTION
Risk of overheating. The compressor should not be running for longer than 10minutes at a time.
5. Inflate the tire to the pressure specified on
the tire pressure decal on the driver's side door pillar. If the inflation pressure is toohigh, use the air release valve to releaseair.
6. Switch off the compressor. Remove the hose and the electrical cable.
7. Screw the valve cap back onto the tire.
NOTE
After inflating a tire, always replace the valve cap to help prevent valve damagecaused by gravel, dirt, etc.
Use plastic valve caps only. Metal capscould corrode and become difficult toremove.
NOTE
The compressor is an electric device. Fol- low local regulations for disposal.
Related information
Recommended tire pressure (p. 543)
Using the tire sealing system (p. 557)
Tire sealing system (p. 556)
Determining the vehicle's permitted weight
Properly loading your vehicle will provide maximum return of vehicle design perform-ance.
Weight designationsBefore loading your vehicle, familiarize your- self with the following terms for determiningyour vehicle's weight ratings, with or without atrailer, from the vehicle's Federal/CanadianMotor Vehicle Safety Standards (FMVSS/CMVSS) label, and the vehicle's tire informa-tion placard:
Curb weight
The weight of the vehicle including a full tank of fuel and all standard equipment. It does notinclude passengers, cargo, or optional equip-ment.
Capacity weight
All weight added to the curb weight, including cargo and optional equipment. When towing,towbar weight is also part of cargo weight.
Permissible axle weight
The maximum allowable weight that can be carried by a single axle (front or rear). Thesenumbers are shown on the Federal/CanadianMotor Vehicle Safety Standards (FMVSS/CMVSS) label. The total load on each axlemust never exceed its maximum permissibleweight.
Page 564 of 683
||
WHEELS AND TIRES
562
Gross vehicle weight (GVW)
The vehicle's curb weight + cargo + passen- gers.
Steps for Determining Correct Load
Limit
1. Locate the statement "the combined weight of occupants and cargo shouldnever exceed XXX kg or XXX lbs." on yourvehicle's placard.
2. Determine the combined weight of the driver and passengers that will be riding inyour vehicle.
3. Subtract the combined weight of the driver and passengers from XXX kg or XXXlbs.
4. The resulting figure equals the available amount of cargo and luggage loadcapacity. For example, if the "XXX"amount equals 1400 lbs. and there will befive 150 lb. passengers in your vehicle, theamount of available cargo and luggageload capacity is 650 lbs. (1400 - 750 (5 ×150) = 650 lbs.)
5. Determine the combined weight of lug- gage and cargo being loaded on the vehi-cle. That weight may not safely exceed theavailable cargo and luggage load capacitycalculated in Step 4. 6. If your vehicle will be towing a trailer, load
from your trailer will be transferred to yourvehicle. Consult this manual to determinehow this reduces the available cargo andluggage load capacity of your vehicle.WARNING
Exceeding the permissible axle weight, gross vehicle weight, or any otherweight rating limits can cause tire over-heating resulting in permanent defor-mation or catastrophic failure.
Do not use replacement tires withlower load carrying capacities than thetires that were original equipment onthe vehicle because this will lower thevehicle's GVW rating. Use only tireswith the correct load carrying capacity.Consult your Volvo retailer for informa-tion.
Related information
Loading recommendations (p. 570)