2021 VOLVO V90 CROSS COUNTRY fuel
[x] Cancel search: fuelPage 5 of 683

3
Top tether anchors75
Lower child seat attachment points 77
ISOFIX/LATCH lower anchors 77
Integrated booster cushion *
79
Folding up the integrated booster cushion * 80
Folding down the integratedbooster cushion * 82
DISPLAYS AND VOICE CONTROL
Displays and controls by the driver in a left-hand drive vehicle
86
Instrument panel 88
Instrument panel settings 92
Fuel gauge 93
Trip computer 93
Displaying trip data in the instru-ment panel 95
Resetting the trip odometer 96
Displaying trip statistics in thecenter display 96
Trip statistics settings 97
Date and time 98
Ambient temperature sensor 98
Indicator and warning symbols 99
Instrument panel licenses 102
App menu in instrument panel 108
Handling the App menu in theinstrument panel 109
Messages in the instrument panel 110
Handling messages in the instru-ment panel 111
Handling messages saved fromthe instrument panel 112
Center display overview 114
Handling the center display 116
Activating and deactivating the center display119
Navigating in the center display'sviews 119
Handling tiles in the center display 123
Function view in the center display 126
Moving apps and buttons in thecenter display 128
Symbols in the center display sta-tus bar 128
Using the center display keyboard 130
Changing keyboard language inthe center display 133
Entering characters, letters andwords by hand in the center display 133
Changing the appearance of thecenter display 135
Turning off and adjusting the vol-ume of the center display systemsounds 135
Changing system units of meas-urement 136
Changing system language 136
Changing settings in the centerdisplay's Top view 136
Opening contextual setting in thecenter display 137
Resetting user data when thevehicle changes owners 138
Page 11 of 683

9
STARTING AND DRIVING
Starting the vehicle398
Switching off the vehicle 400
Ignition modes 401
Selecting ignition mode 402
Brake functions 403
Brakes 403
Brake Assist System 404
Braking on wet roads 405
Braking on salted roads 405
Maintenance of the brake system 405
Parking brake 406
Activating and deactivating the parking brake 406
Settings for automatically activat-ing the parking brake 408
Parking on a hill 408
Parking brake malfunction 408
Auto-hold brakes 409
Activating and deactivating Auto-hold at a standstill 410
Hill Start Assist 411
Braking assist after a collision 411
Regenerative braking *
411
Transmission 412
Automatic transmission 412
Shifting gears with automatic transmission413
Using the steering wheel paddles *
to shift 415
Shiftlock 417
Deactivating the automatic shiftlock 417
The kickdown function 418
The Launch function *
418
Automatic transmission symbolsand messages 419
All Wheel Drive (AWD) 419
Drive modes *
419
Changing drive mode *
421
Eco drive mode 422
Activating and deactivating Ecodrive mode using the function button 424
Start/Stop function 425
Driving with the Start/Stop function 425
Deactivating the Start/Stop function 426
Conditions for the Start/Stop function 427
Leveling control * and suspension
429
Leveling control settings *
432
Low Speed Control 432
Activating and deactivating LowSpeed Control using the functionbutton 433
Hill Descent Control
433
Activating and deactivating Hill Descent Control using the func-tion button 434
Economical driving 435
Preparing for a long trip 436
Winter driving 436
Driving through standing water 437
Opening/closing the fuel filler door 438
Refueling 438
Fuel 439
Octane rating 440
Emission controls 442
Overheating of engine and trans-mission 442
Battery drain 443
Jump starting using another battery 444
Driving with a trailer 446
Trailer Stability Assist *
448
Checking trailer lights 449
Towing using a towline 450
Attaching and removing the tow-ing eyelet 451
Recovery 453
HomeLink ®
* 454
Programming HomeLink ®
* 455
Page 12 of 683

10
Using HomeLink®
* 456
Type approval for HomeLink ®
* 457
Compass *
458
Activating and deactivating the compass * 458
Calibrating the compass *
458
AUDIO, MEDIA AND INTERNET
Audio, media and Internet
462
Sound settings 462
Sound experience *
463
Apps 464
Download apps 465
Updating apps 465
Deleting apps 466
Radio 466
Starting the radio 467
Changing waveband and radio station 468
Searching for a radio station 468
Storing radio channels in the Radio favorites app 469
Radio settings 470
RBDS 470
HD Radio ™
471
Activating and deactivating the HDRadio ™ 472
HD Radio ™ sub-channels
473
HD Radio ™ limitations
473
SiriusXM ®
Satellite radio *
474
Using SiriusXM ®
Satellite radio *
475
Settings for SiriusXM ®
Satellite radio *
477
SiriusXM Travel Link ®
* 478
SiriusXM Travel Link ®
* - Weather
479
SiriusXM Travel Link ®
* - Notifications
481
SiriusXM Travel Link ®
* - Fuel
481
SiriusXM Travel Link ®
* - Sports
483
Media player 483
Playing media 484
Controlling and changing media 485
Media searches 486
Gracenote ®
487
Video 488
Playing video 488
Playing DivX ®
488
Video settings 489
Streaming media via Bluetooth ®
489
Connecting a device via Bluetooth ®
489
Playing media via the USB port 490
Connecting a device via the USB port 490
Technical specifications for USB devices 491
Compatible file formats for media 491
Apple ®
CarPlay ®
* 492
Using Apple ®
CarPlay ®
* 493
Settings for Apple ®
CarPlay ®
* 495
Tips for using Apple ®
CarPlay ®
* 495
Android Auto *
496
Page 15 of 683

13
Fuses in the engine compartment607
Fuses under the glove compartment 612
Fuses in the cargo compartment 618
Replacing bulbs 623
Removing the plastic cover to replace bulbs 624
Location of exterior lights 624
Replacing the low beam headlightbulbs 625
Replacing the high beam headlightbulbs 626
Replacing daytime running lights/front parking light bulbs 626
Replacing front turn signal bulbs 627
Bulb specifications 628
Cleaning the interior 628
Cleaning the center display 629
Cleaning the head-up display * and
instrument panel 630
Cleaning fabric upholstery andceiling liner 630
Cleaning the seat belt 631
Cleaning textile floor and inlay mats 632
Cleaning leather upholstery *
632
Cleaning the leather steering wheel 633
Cleaning interior plastic, metal andwood surfaces 634
Cleaning the exterior
634
Polishing and waxing 635
Hand washing 636
Automatic car washes 637
High-pressure washing 638
Cleaning the wiper blades 639
Cleaning exterior plastic, rubber and trim components 639
Cleaning rims 640
Corrosion protection 641
Paintwork 641
Touching up minor paint damage 642
Color codes 643
Changing rear window wipers 643
Replacing windshield wiper blades 644
Putting the wiper blades in serviceposition 645
Filling washer fluid 646
SPECIFICATIONS
Type designations650
Dimensions 653
Weights 655
Towing capacity and tongue weight 656
Engine specifications 657
Engine oil specifications 658
Transmission fluid specifications 658
Brake fluid specifications 659
Fuel tank volume 659
Air conditioning specifications 659
Approved tire pressure 661
Page 28 of 683

YOUR VOLVO
26
Contacting VolvoUse the following contact information if you would like to get in touch with Volvo in theUnited States or Canada.
In the USA: Volvo Car USA, LLCCustomer Care Center1 Volvo Drive,P.O. Box 914Rockleigh, New Jersey 076471-800-458-1552volvocars.com/us In Canada: Volvo Car Canada Ltd.Customer Care Centre9130 Leslie Street, Suite 101Richmond Hill, Ontario L4B 0B91-800-663-8255volvocars.com/ca
Volvo ID Volvo ID is a personal ID that gives you access to a range of services using a singleusername and password.
NOTE
The available services can vary over time and depend on equipment level and mar-ket.
Examples of services: Volvo On Call-app - check your vehicle using your phone. You can check fuellevel, find the nearest gas station and lockthe vehicle remotely.
Send to Car – send addresses from onlinemap services directly to the vehicle.
Send a request for service and repairsdirectly from the vehicle. The booking willthen be completed via email.
NOTE
If the username/password for a service (e.g. Volvo On Call) is changed, the changewill also automatically be applied to otherservices.
The creation of a Volvo ID is initiated through the Volvo On Call app or from the vehicle and then completed by email. When a Volvo ID is registered in the vehicle,additional services are available. MultipleVolvo IDs can be used for the same vehicle,and multiple vehicles can be linked to thesame Volvo ID.
Related information
Creating and registering a Volvo ID(p. 27)
Scheduling service and repairs (p. 587)
Page 30 of 683

YOUR VOLVO
* Option/accessory.
28
Drive-E ‒ purer driving pleasure
Volvo is committed to the well-being of its customers. As a natural part of this commit-ment, we care about the environment inwhich we all live. Concern for the environ-ment means an everyday involvement inreducing our environmental impact.
Volvo's environmental activities are based on a holistic view, which means we consider theoverall environmental impact of a productthroughout its complete life cycle. In this con-text, design, production, product use, andrecycling are all important considerations. Inproduction, Volvo has partly or completelyphased out several chemicals including CFCs,lead chromates, asbestos, and cadmium; andreduced the number of chemicals used in ourplants 50% since 1991. Volvo was the first in the world to introduce into production a three-way catalytic converterwith a Lambda sond, now called the heatedoxygen sensor, in 1976. The current version ofthis highly efficient system reduces emissionsof harmful substances (CO, HC, NOx) from theexhaust pipe by approximately 95 - 99% andthe search to eliminate the remaining emis-sions continues. Volvo is the only automobilemanufacturer to offer CFC-free retrofit kits forthe air conditioning system of all models as farback as the 1975 model 240. Advanced elec-tronic engine controls and cleaner fuels arebringing us closer to our goal. In addition to continuous environmental refinement of con-ventional gasoline-powered internal combus-tion engines, Volvo is actively looking atadvanced technology alternative-fuel vehicles. When you drive a Volvo, you become our part- ner in the work to lessen the vehicle's impacton the environment. To reduce your vehicle'senvironmental impact, you can:
Maintain proper air pressure in your tires.Tests have shown decreased fuel econ-omy with improperly inflated tires.
Follow the recommended maintenanceschedule in your Warranty and ServiceRecords Information booklet.
Drive at a constant speed whenever possi-ble.
See a trained and qualified Volvo servicetechnician as soon as possible for inspec-tion if the check engine (malfunction indi-cator) light illuminates, or stays on afterthe vehicle has started.
Properly dispose of any vehicle-relatedwaste such as used motor oil, used batter-ies, brake pads, etc.
When cleaning your vehicle, please usegenuine Volvo car care products. All Volvocar care products are formulated to beenvironmentally friendly.
Related information
Economical driving (p. 435)
Starting and stopping preconditioning
*
(p. 234)
The Owner's Manual and the environment(p. 23)
Air quality (p. 209)
Page 56 of 683

SAFETY
54
Door and seat belt reminders
This system is intended to remind occupants to buckle their seat belts and to alert thedriver if a door, hood or other opening (trunk,sunroof, etc.) is open.
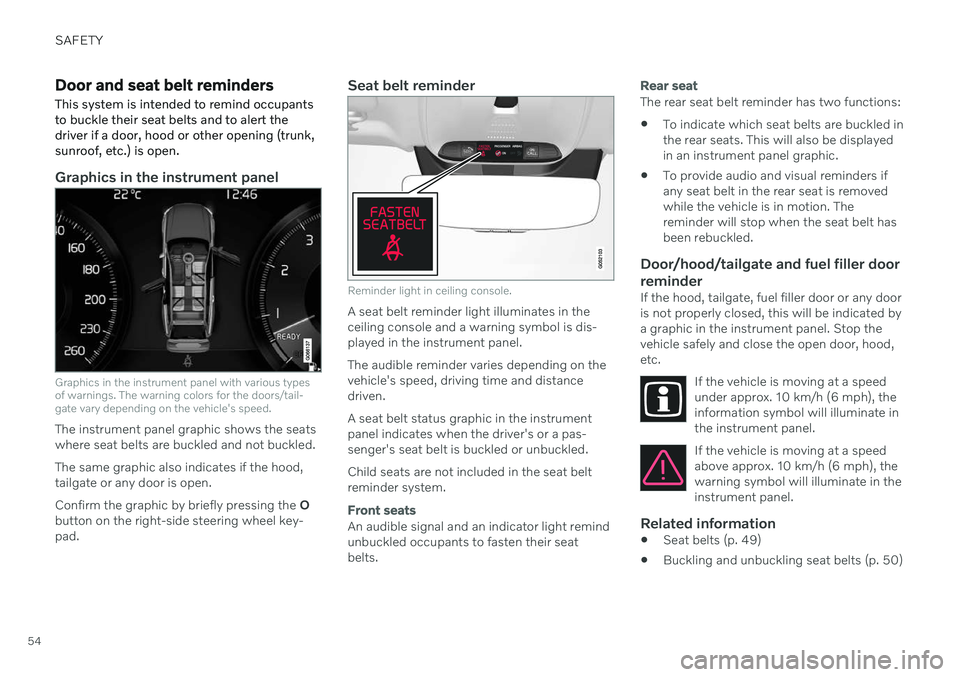
Graphics in the instrument panel
Graphics in the instrument panel with various types of warnings. The warning colors for the doors/tail-gate vary depending on the vehicle's speed.
The instrument panel graphic shows the seats where seat belts are buckled and not buckled. The same graphic also indicates if the hood, tailgate or any door is open. Confirm the graphic by briefly pressing the O
button on the right-side steering wheel key- pad.
Seat belt reminder
Reminder light in ceiling console.
A seat belt reminder light illuminates in the ceiling console and a warning symbol is dis-played in the instrument panel. The audible reminder varies depending on the vehicle's speed, driving time and distancedriven. A seat belt status graphic in the instrument panel indicates when the driver's or a pas-senger's seat belt is buckled or unbuckled. Child seats are not included in the seat belt reminder system.
Front seats
An audible signal and an indicator light remind unbuckled occupants to fasten their seatbelts.
Rear seat
The rear seat belt reminder has two functions:
To indicate which seat belts are buckled in the rear seats. This will also be displayedin an instrument panel graphic.
To provide audio and visual reminders ifany seat belt in the rear seat is removedwhile the vehicle is in motion. Thereminder will stop when the seat belt hasbeen rebuckled.
Door/hood/tailgate and fuel filler door
reminder
If the hood, tailgate, fuel filler door or any dooris not properly closed, this will be indicated bya graphic in the instrument panel. Stop thevehicle safely and close the open door, hood,etc.
If the vehicle is moving at a speedunder approx. 10 km/h (6 mph), theinformation symbol will illuminate inthe instrument panel.
If the vehicle is moving at a speed above approx. 10 km/h (6 mph), thewarning symbol will illuminate in theinstrument panel.
Related information
Seat belts (p. 49)
Buckling and unbuckling seat belts (p. 50)
Page 66 of 683

||
SAFETY
64
Related information
Airbags (p. 55)
Safety mode Safety mode is a feature that is triggered after a collision if there is potential damage toan important function in the vehicle, such asthe fuel lines, sensors for one of the safetysystems, the brake system, etc.
If the vehicle has been involved in a collision, the text Safety mode See Owner's manualmay appear in the instrument panel along with the warning symbol if the panel is undamagedand the vehicle's electrical system is intact.The message indicates that one or more of thevehicle's functions may be reduced.
WARNING
Never attempt to restart the vehicle if you smell fuel fumes when the message Safety
mode See Owner's manual is displayed
in the instrument panel. Leave the vehicle immediately.
If safety mode has been set, it may be possi- ble to reset the system in order to start andmove the vehicle a short distance, for exam-ple, if it is blocking traffic.
WARNING
Never attempt to perform repairs or reset electrical components on your own afterthe vehicle has been in safety mode. Thiscould result in injury or prevent the vehiclefrom functioning properly. Volvo recom-mends having the vehicle inspected andreset to normal operating status by an authorized Volvo workshop after
Safety
mode See Owner's manual has been dis-
played.
WARNING
When the vehicle is in safety mode, it should not be towed behind another vehi-cle. It should be towed from the site on atow truck. Volvo recommends towing thevehicle directly to an authorized Volvoworkshop.
Related information
Safety (p. 44)
Starting and moving the vehicle when it is in safety mode (p. 65)
Recovery (p. 453)