2021 VOLKSWAGEN T-ROC auto lock
[x] Cancel search: auto lockPage 107 of 502
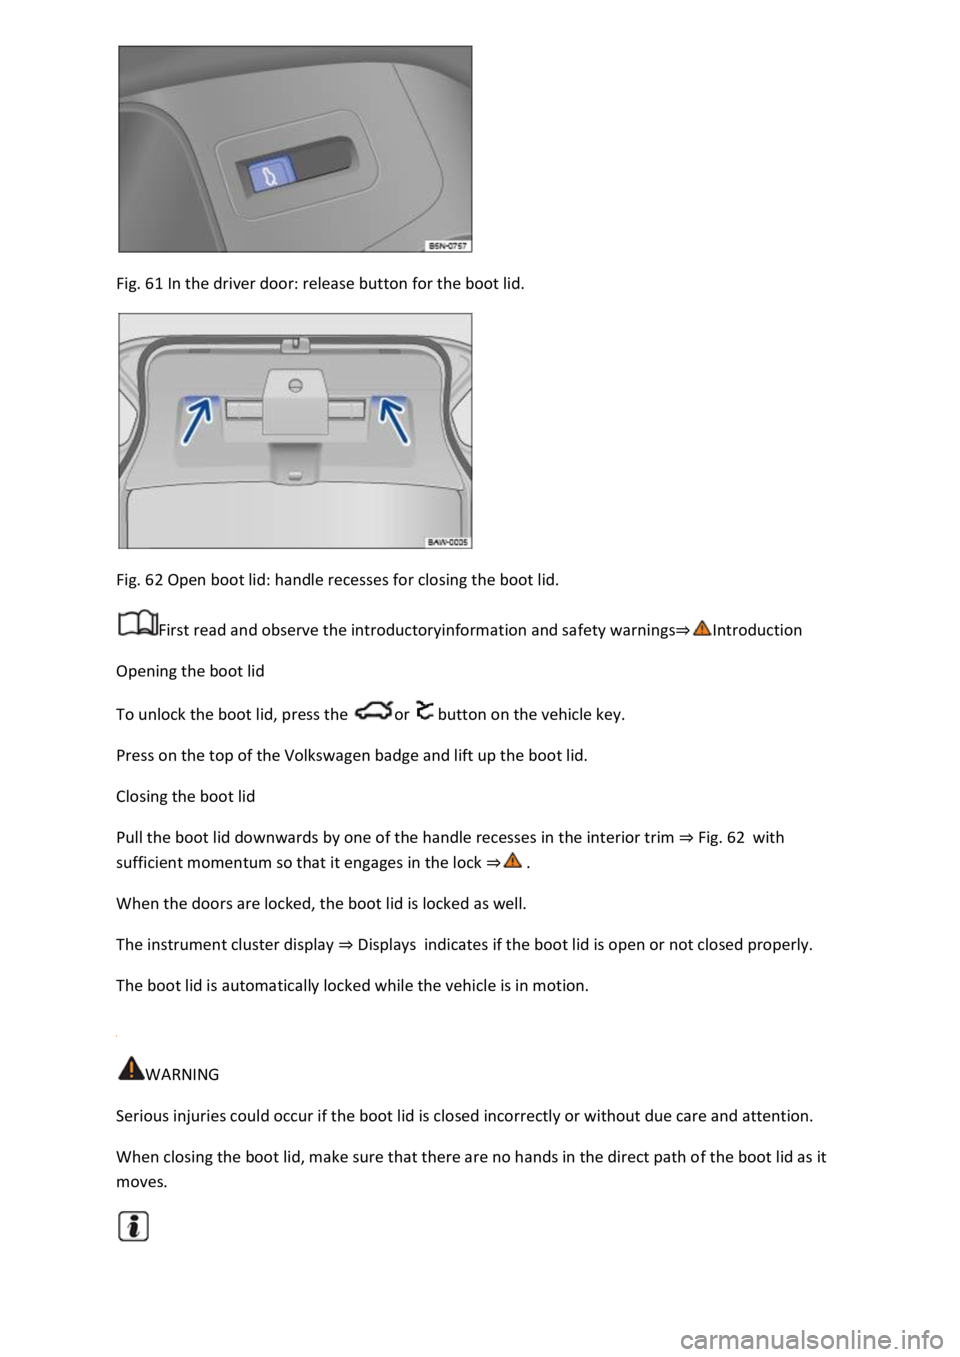
Fig. 61 In the driver door: release button for the boot lid.
Fig. 62 Open boot lid: handle recesses for closing the boot lid.
First read and observe the introductoryinformation and safety warnings⇒Introduction
Opening the boot lid
To unlock the boot lid, press the or button on the vehicle key.
Press on the top of the Volkswagen badge and lift up the boot lid.
Closing the boot lid
Pull the boot lid downwards by one of the handle recesses in the interior trim ⇒ Fig. 62 with
sufficient momentum so that it engages in the lock ⇒ .
When the doors are locked, the boot lid is locked as well.
The instrument cluster display ⇒ Displays indicates if the boot lid is open or not closed properly.
The boot lid is automatically locked while the vehicle is in motion.
WARNING
Serious injuries could occur if the boot lid is closed incorrectly or without due care and attention.
When closing the boot lid, make sure that there are no hands in the direct path of the boot lid as it
moves.
Page 108 of 502

If the boot lid is not opened within a few minutes after unlocking, it automatically locks again.
Opening and closing the boot lid electrically
Fig. 63 In the open boot lid: button for electric closing of the boot lid.
First read and observe the introductoryinformation and safety warnings⇒Introduction
Depending on the vehicle equipment, the boot lid can be opened and closed electrically.
Opening the boot lid electrically
Briefly press and hold the button on the vehicle key to unlock the boot lid.
OR: pull the button in the driver door upwards ⇒ Fig. 61 .
OR: press the top part of the Volkswagen badge.
The boot lid will then open.
Closing the boot lid electrically
Press the button in the open boot lid ⇒ Fig. 63 .
OR: with the ignition switched on, pull the button in the driver door upwards until the boot lid
is closed.
OR:on vehicles with the Keyless Access locking and starting system: briefly press and hold the
button on the vehicle key. The vehicle key must be within the operating range.
OR: press the top part of the Volkswagen badge.
OR: move the boot lid manually in closing direction until the boot lid closes by itself.
The boot lid is closed.
Interrupting the opening or closing procedure
Press one of the buttons during the opening or closing procedure.
OR: press the top part of the Volkswagen badge during the opening or closing process.
The boot lid can now be moved by hand. You will need to use increased force for this.
Page 110 of 502

Fig. 64 In the boot lid: open the holder for the warning triangle.
Fig. 65 In the boot lid: manual release mechanism for the boot lid.
First read and observe the introductoryinformation and safety warnings⇒Introduction
Unlocking the boot lid manually
Turn the lock of the warning triangle holder 90° anticlockwise ⇒ Fig. 64 .
Open the warning triangle holder and remove the warning triangle.
Insert the key bit into the opening in the boot lid ⇒ Fig. 65 and press the release lever in the
direction of the arrow.
Troubleshooting
First read and observe the introductoryinformation and safety warnings⇒Introduction
Boot lid cannot be opened or closed
Check whether the boot lid is blocked by an obstacle. The boot lid can be moved by hand. You will
need to use increased force for this.
The drive switches off automatically in order to prevent overheating if the boot lid is operated too
frequently in a short space of time. Until the drive has cooled down, the boot lid can be opened and
closed by hand using more force than usual.
When you tow a trailer, the electrical boot lid can only be opened and closed on the boot lid
⇒ Trailer towing .
The boot lid must be closed by hand if the 12-volt vehicle battery or fuse is disconnected or faulty.
All turn signals flash four times
The vehicle key used last is still in the vehicle.
Boot lid is stiff
At outside temperatures below freezing point, the opening mechanism cannot always lift the
partially opened boot lid automatically. In this case, guide the boot lid further up by hand.
Windows
Page 114 of 502

Fig. 66 In the roof: button for the glass roof.
The term glass roof is used as a standard term for the panorama sliding/tilting roof.
The glass roof is a roof opening system featuring two glass elements. The rear glass element is fixed
and cannot be opened.
The button has two positions. First stage: fully or partially tilt, open or close the roof. Second
stage: automatically move the roof to the respective limit position. Press the button again to stop
the one-touch function.
Tilting the glass roof: push the button ⇒ Fig. 66Ⓑ to the first position. One-touch function: push
button Ⓑ to the second position.
Closing the tilted glass roof: push the button Ⓐ to the first position. One-touch function: push
button Ⓐ to the second position.
Opening the glass roof: push the button Ⓒ to the first position. One-touch function up to
convenience position: push button Ⓒ to the second position.
Closing the glass roof: push the button Ⓓ to the first position. One-touch function: push button Ⓓ
to the second position.
Stopping one-stop function of the opening or closing procedure: push button Ⓒ or Ⓓ again.
WARNING
Careless or unsupervised use of the glass roof can cause serious injuries.
Open and close the glass roof only when you are sure that nobody is obstructing the path of the
roof.
Always take all vehicle keys with you every time you leave the vehicle.
Never leave children or people requiring assistance alone in the car, particularly if they have access
to the vehicle key. Unsupervised use of the vehicle key can lock the vehicle, start the engine, switch
on the ignition and operate the glass roof.
The glass roof can still be opened or closed for a short time after the ignition has been switched off,
provided that the driver door or front passenger door are not opened.
NOTICE
To avoid damage during cold weather, clear any ice and snow off the vehicle roof before opening or
tilting the glass roof.
Always close the glass roof when you leave the vehicle or if it starts to rain. Any rain entering the
vehicle when the glass roof is open or tilted could cause significant damage to the electrical system.
This can result in further damage to the vehicle.
Page 115 of 502

Remove leaves and other loose items from the glass roof guide rails at regular intervals using a
vacuum cleaner, or by hand.
The roll-back function will not work properly if there is a malfunction in the glass roof. Go to a
qualified workshop.
Convenience opening or closing of the glass roof
Convenience opening and closing
The glass roof can be opened and closed from outside the vehicle using the vehicle key:
Press and hold the locking or unlocking button on the vehicle key. The glass roof is tilted or closed.
In vehicles with the Keyless Access locking and starting system: place your finger on the locking
sensor in the door handle for a few seconds until the glass roof is closed ⇒ Unlocking or locking the
vehicle with Keyless Access .
Release the locking or unlocking button to interrupt this function.
The convenience closing function closes all the windows in the doors and the glass roof. All turn
signals will flash once as confirmation that all the windows and the glass roof have been closed.
Make settings for operation of the glass roof in the Vehicle settings menu in the Infotainment
system ⇒ Infotainment system controls and displays .
Some settings can be saved in the user accounts for personalisation and therefore change
automatically when the user account is changed ⇒ Personalisation .
Glass roof roll-back function
The roll-back function reduces the risk of crush injuries ⇒ . If the glass roof is obstructed during
the closing process, it will open again immediately.
Check to see why the glass roof has not closed.
Try to close the glass roof again.
If the glass roof still cannot be closed, close it without the roll-back function.
Closing the glass roof without the roll-back function
Press the button to the second position Ⓓ until the glass roof has fully closed.
The glass roof will now close without the roll-back function.
Please go to a qualified workshop if the glass roof still cannot be closed.
If you release the switch during the closing procedure, the glass roof will open automatically.
Page 131 of 502

Turn the light switch to the appropriate position:
The lights are switched off.Leaving Home function (orientation lighting) can be switched on
⇒ Coming Home and Leaving Home function (orientation lighting) .Side lights or continuous
parking light on both sides of the vehicle switched on ⇒ Switching the parking lights on and off . The
symbol in the light switch lights up green.Dipped beam is switched off – the side lights will stay
on as long as the vehicle key is in the ignition lock or, in vehicles with Keyless Access, the driver door
is closed.
Daytime running lights
The daytime running lights (dependent on equipment level) can increase the visibility of your vehicle
in traffic during the day.
The daytime running lights are switched on every time the ignition is switched on when the light
switch is in position , or (when brightness is detected).
The daytime running lights cannot be switched on or off manually.
WARNING
Accidents and serious injuries can occur if the road is not sufficiently illuminated and other road
users have difficulty seeing the vehicle, or cannot see it at all.
The light assist systems are designed only to provide support; the driver is responsible for the
correct vehicle lights being switched on.
Always switch on the dipped beam headlights if it is dark, raining or visibility is poor.
WARNING
The side lights or daytime running lights are not bright enough to illuminate the road ahead and to
ensure that other road users are able to see you.
Always switch on the dipped beam headlights if it is dark, raining or visibility is poor.
The tail light clusters are not switched on with the daytime running lights. If the tail light clusters are
not switched on, the vehicle may not be visible to other road users if it is dark, raining, or if visibility
is poor.
WARNING
The automatic headlights ( ) switch dipped beam on and off only when there is a change in
the level of brightness.
Switch on dipped beam manually if required by the weather conditions, e.g. in fog.
Page 132 of 502

When reverse gear is engaged, the cornering light on both sides of the vehicle switches on to
provide better illumination of the surrounding area when manoeuvring.
Switching the fog lights on and off
Switching on the front fog lights : pull the light switch ⇒ Fig. 79 out to the first position. The
indicator lamp in the light switch lights up green.
Switching on the rear fog light : pull the light switch all the way out. The indicator lamp in the
instrument cluster lights up yellow.
To switch the fog lights off, press in the light switch or turn it to position .
When the automatic headlights are switched on and the front or rear fog lights are switched
on, the dipped beam headlights will also be switched on irrespective of the current light conditions
outside.
In vehicles with a factory-fitted towing bracket: the vehicle's rear fog light is not switched on if a
trailer with rear fog light is electrically connected to the vehicle ⇒ Trailer towing .
Light functions
Side lights
If the side lights are switched on, both headlights light up with the side lights, parts of the tail
light clusters, the number plate lighting and the buttons in the centre console and the dash panel.
The daytime running lights also switch on when the ignition is switched on.
If the vehicle is not locked from outside when the ignition is switched off, the continuous parking
light on both sides of the vehicle switches on automatically after around 10 minutes to reduce 12-
volt vehicle battery discharge ⇒ Switching the parking lights on and off .
Automatic headlights
If the automatic headlights are switched on, the vehicle lighting and the instrument and
switch lighting will switch on and off according to the light conditions. When the lights are switched
on, the indicator lamp lights up yellow.
The automatic headlights are merely an aid and will not always be able to detect all driving
situations.
In vehicles with a corresponding equipment level, the switch-on time of the automatic headlights
can be adjusted in the Infotainment system in the Vehicle settings menu ⇒ Infotainment system
controls and displays .
Cornering light
A cornering light is switched on when turning slowly or travelling around very tight bends.
Signal tones if lights are not switched off
Page 133 of 502

If the vehicle key has been removed from the ignition lock and the driver door opened, acoustic
warnings sound under the following conditions:
If the parking light is switched on.
If the side lights are switched on or the rear fog light is switched on .
When the Coming Home function is switched on, no signal tone will be given as a reminder that a
light is still switched on when leaving the vehicle.
Some settings can be stored in the user accounts of the personalisation function and therefore
change when the user account changes ⇒ Personalisation .
Troubleshooting
Turn signal indicator lamp
If a turn signal on the vehicle has failed, the indicator lamp will start flashing twice as fast.
The indicator lamp flashes green.
Check the lighting and change the appropriate bulb as required ⇒ Changing bulbs .
If the problem persists, go to a qualified workshop.
Does not apply in China and Japan: trailer turn signals indicator lamp
The indicator lamp goes out if a trailer turn signal or all trailer lights stop working.
The indicator lamp flashes green.
Check the lighting and change the appropriate bulb as required ⇒ Changing bulbs .
If the problem persists, go to a qualified workshop.
Vehicle lighting not working
Vehicle lighting has failed either completely or partially.
The indicator lamp lights up yellow.
Check the lighting and change the appropriate bulb as required ⇒ Changing bulbs .
If the problem persists, go to a qualified workshop.
Fault in rain/light sensor
In the light switch position , the vehicle lighting is not switched on or off automatically.
The indicator lamp lights up yellow.
Switch the ignition off and on.
If the problem persists, go to a qualified workshop.