2021 TOYOTA YARIS HATCHBACK tire type
[x] Cancel search: tire typePage 13 of 568

13
YARIS(HB) Owner's Manual_Europe_MK0001_en
Pictorial index
Refueling method .............................................................................P.187
Fuel type/fuel tank capacity .............................................................P.413
Tires ................................................................................................P.330
Tire size/inflation pressure ...............................................................P.417
Winter tires/tire chains .....................................................................P.274
Checking/rotation/tire pressure warning system ..............................P.330
Coping with flat tires.................................................................P.379, 389
Hood ................................................................................................P.317
Opening ...........................................................................................P.317
Engine oil .........................................................................................P.413
Coping with overheating ..................................................................P.405
Headlights/front position lights/daytime running lights/turn signal
lights .......................................................................................P.171, 173
Front fog lights
*2............................................................................P.180
Tail lights/turn signal lights ..................................................P.171, 173
Stop lights
Side turn signal lights ...................................................................P.171
License plate light..........................................................................P.173
Rear fog light ..................................................................................P.180
Back-up light
Shifting the shift position to R ..................................................P.164, 168
*1: Vehicles with a smart entry & start system
*2: If equipped
Light bulbs of the exterior lights for driving
(Replacing method: P.351, Watts: P.419)
Page 242 of 568

242
YARIS(HB) Owner's Manual_Europe_MK0001_en
4-5. Using the driving support systems
tor is turned on
●Instances of the Blind Spot Monitor unnecessarily detecting a vehicle
and/or object may increase in the fol- lowing situations:• When the sensor is misaligned due to
a strong impact to the sensor or its surrounding area• When the distance between your vehi-
cle and a guardrail, wall, etc., that enters the detection area is short• When driving up and down consecu-
tive steep inclines, such as hills, dips in the road, etc.• When vehicle lanes are narrow, or
when driving on the edge of a lane, and a vehicle traveling in a lane other than the adjacent lanes enters the
detection area • When driving on roads with sharp bends, consecutive curves, or uneven
surfaces • When the tires are slipping or spinning• When the distance between your vehi-
cle and a following vehicle is short • When an accessory (such as a bicycle carrier) is installed to the rear of the
vehicle
*: If equipped
■Types of sensors
Front corner sensors
Front center sensors
Rear corner sensors
Rear center sensors
■Display
When the sensors detect an object,
such as a wall, a graphic is shown
on the multi-information display
depending on the position and dis-
Toyota parking assist-
sensor*
The distance from your vehicle
to objects, such as a wall,
when parallel parking or
maneuvering into a garage is
measured by the sensors and
communicated via the multi-
information display and a
buzzer. Always check the sur-
rounding area when using this
system.
System components
Page 261 of 568

261
4
YARIS(HB) Owner's Manual_Europe_MK0001_en
4-5. Using the driving support systems
Driving
such as fog, snow or a sandstorm
• When the sensor is frozen (Once the
sensor thaws, the system will return to
normal)
●Vehicle surroundings
• When an object that cannot be
detected is between the vehicle and a
detected object
• If an object such as a vehicle, motor-
cycle, bicycle or pedestrian cuts in
front of the vehicle or runs out from
the side of the vehicle
• The vehicle is approaching a tall or
curved curb.
• On an extremely bumpy road, on an
incline, on gravel, or on grass.
• If objects draw too close to the sensor.
●Other ultrasonic waves sources
• When vehicle horns, vehicle detec-
tors, motorcycle engines, air brakes of
large vehicles, the clearance sonar of
other vehicles or other devices which
produce ultrasonic waves are near the
vehicle
• If a sticker or an electronic compo-
nent, such as a backlit license plate
(especially fluorescent type), fog
lights, fender pole or wireless antenna
is installed near a sensor
●Changes in the vehicle posture
• If the vehicle is significantly tilted
• If the front of the vehicle is raised or
lowered due to the carried load
• If the orientation of a sensor has been
changed due to a collision or other
impact
• When equipment that may obstruct a
sensor is installed, such as a bumper
protector (an additional trim strip,
etc.), bicycle carrier, or snow plow
• If the suspension has been modified
or tires of a size other than specified
are installed
• If a sensor has been painted or cov-
ered with a sticker, etc.
Page 265 of 568

265
4
YARIS(HB) Owner's Manual_Europe_MK0001_en
4-5. Using the driving support systems
Driving
●When there are spinning objects near
your vehicle such as the fans of an air conditioning unit
●When water is splashed or sprayed toward the rear bumper, such as from a sprinkler
■Situations in which the Parking
Support Brake function (rear-cross- ing vehicles) may not operate prop-erly
In some situations, such as the follow- ing, the radar sensors may not detect an object and this function may not operate
properly
●Stationary objects
●When a sensor or the area around a sensor is extremely hot or cold
●If the rear bumper is covered with ice, snow, dirt, etc.
●When it is raining heavily or water strikes the vehicle
●When the detection area of a radar sensor is obstructed by an adjacent
vehicle
●If the vehicle is significantly tilted
●When equipment that may obstruct a sensor is installed, such as a towing
eyelet, bumper protector (an addi- tional trim strip, etc.), bicycle carrier, or snow plow
●If the suspension has been modified or tires of a size other than specified
are installed
●If the front of the vehicle is raised or
lowered due to the carried load
●If an electronic component, such as a
backlit license plate (especially fluo- rescent type), fog lights, fender pole
or wireless antenna is installed near a
radar sensor
●If the orientation of a radar sensor has
been changed
●When multiple vehicles are approach-
ing with only a small gap between each vehicle
●If a vehicle is approaching the rear of your vehicle rapidly
●Situations in which the radar sensor may not detect a vehicle• When a vehicle approaches from the
right or left at the rear of the vehicle while you are turning while backing up• When turning while backing up
• When backing out of a shallow angle parking spot
• When backing up on a slope with a sharp change in grade
Page 276 of 568
![TOYOTA YARIS HATCHBACK 2021 Owners Manual 276
YARIS(HB) Owners Manual_Europe_MK0001_en
4-6. Driving tips
Side chain (3 mm [0.12 in.] in
diameter)
Cross chain (4 mm [0.16 in.] in
diameter)
Regulations regarding the use of
tire chains TOYOTA YARIS HATCHBACK 2021 Owners Manual 276
YARIS(HB) Owners Manual_Europe_MK0001_en
4-6. Driving tips
Side chain (3 mm [0.12 in.] in
diameter)
Cross chain (4 mm [0.16 in.] in
diameter)
Regulations regarding the use of
tire chains](/manual-img/14/68813/w960_68813-275.png)
276
YARIS(HB) Owner's Manual_Europe_MK0001_en
4-6. Driving tips
Side chain (3 mm [0.12 in.] in
diameter)
Cross chain (4 mm [0.16 in.] in
diameter)
Regulations regarding the use of
tire chains vary depending on loca-
tion and type of road. Always check
local regulations before installing
chains.
■Tire chain installation
Observe the following precautions when
installing and removing chains:
●Install and remove tire chains in a safe
location.
●Install tire chains on the front tires
only. Do not install tire chains on the rear tires.
●Install tire chains on the front tires as tightly as possible. Retighten chains after driving 0.5 ⎯1.0 km (1/4⎯1/2
mile).
●Install tire chains following the instruc-
tions provided with the tire chains.
Regulations on the use of
tire chains
NOTICE
■Fitting tire chains
The tire pressure warning valves and
transmitters may not function cor- rectly when tire chains are fitted.
Page 332 of 568

332
YARIS(HB) Owner's Manual_Europe_MK0001_en
6-3. Do-it-yourself maintenance
Front
To equalize tire wear and help extend
tire life, Toyota recommends that tire
rotation is carried out approximately
every 10000 km (6000 miles).
When rotating front and rear tires which
have different tire inflation pressures,
do not fail to initialize the tire pressure
warning system after tire rotation.
Your vehicle is equipped with a tire
pressure warning system that uses
tire pressure warning valves and
transmitters to detect low tire infla-
tion pressure before serious prob-
lems arise.
The tire pressure warning system
of this vehicle adopts a 2-type
warning system.
�zWhen “Adjust Pressure” is dis-
played (Normal Warning)
A warning with the tire pressure warn-
ing light and warning buzzer when
there is an unknown level of low tire
pressure with the appearance of the tire
due to natural air leakage as well as the
pressure lowering due to changes in
the pressure according to the outside
temperature. (Ways of coping: →P.375,
417)
�zWhen “Immediately Check tire
when Safe” is displayed (Emer-
gency Warning)
A warning with the tire pressure warn-
ing light and warning buzzer when
there is a known level of low tire pres-sure with the appearance of the tire due
to pressure suddenly lowering. (Ways
of coping: →P.379, 389)
However, the system may not be able
to detect sudden tire ruptures (bursting,
etc.).
The tire pressure detected by the
tire pressure warning system can
be displayed on the multi-informa-
tion display.
The unit can be changed.
■How to change the unit
1Park the vehicle in a safe place
and turn the engine switch off.
Changing the unit cannot be performed
while the vehicle is moving.
2Turn the engine switch to ON.
3Press / (vertical display)
or / (horizontal display)
of the meter control switch to
select .
4Press / (vertical display)
or / (horizontal display)
to select “Vehicle Settings” and
then press and hold .
Tire pressure warning sys-
tem
Page 341 of 568

341
6
YARIS(HB) Owner's Manual_Europe_MK0001_en
6-3. Do-it-yourself maintenance
Maintenance and care
When replacing wheels, care
should be taken to ensure that they
are equivalent to those removed in
load capacity, diameter, rim width
and inset*.
Replacement wheels are available
at any authorized Toyota retailer or
Toyota authorized repairer, or any
reliable repairer.
*: Conventionally referred to as offset.
Toyota does not recommend using
the following:
�z Wheels of different sizes or types
�z Used wheels
�z Bent wheels that have been
straightened
■When replacing wheels
The wheels of your vehicle are equipped with tire pressure warning valves and
transmitters that allow the tire pressure warning system to provide advance warning in the event of a loss in tire
inflation pressure. Whenever wheels are replaced, the tire pressure warning valves and transmitters must be
installed. ( →P.333)
WARNING
●Uneven wear
●Poor handling
●Possibility of blowouts resulting
from overheated tires
●Air leaking from between tire and
wheel
●Wheel deformation and/or tire dam-
age
●Greater possibility of tire damage
while driving (due to road hazards, expansion joints, sharp edges on the road, etc.)
NOTICE
■When inspecting and adjusting tire inflation pressure
Be sure to put the tire valve caps back
on. If a valve cap is not installed, dirt or moisture may get into the valve and
cause an air leak, resulting in decreased tire inflation pressure.
Wheels
If a wheel is bent, cracked or
heavily corroded, it should be
replaced. Otherwise, the tire
may separate from the wheel
or cause a loss of handling
control.
Wheel selection
Page 346 of 568

346
YARIS(HB) Owner's Manual_Europe_MK0001_en
6-3. Do-it-yourself maintenance
shops or camera stores.
●Replace only with the same or equiva-
lent type recommended by the manu-
facturer.
●Dispose of used batteries according to
local laws.
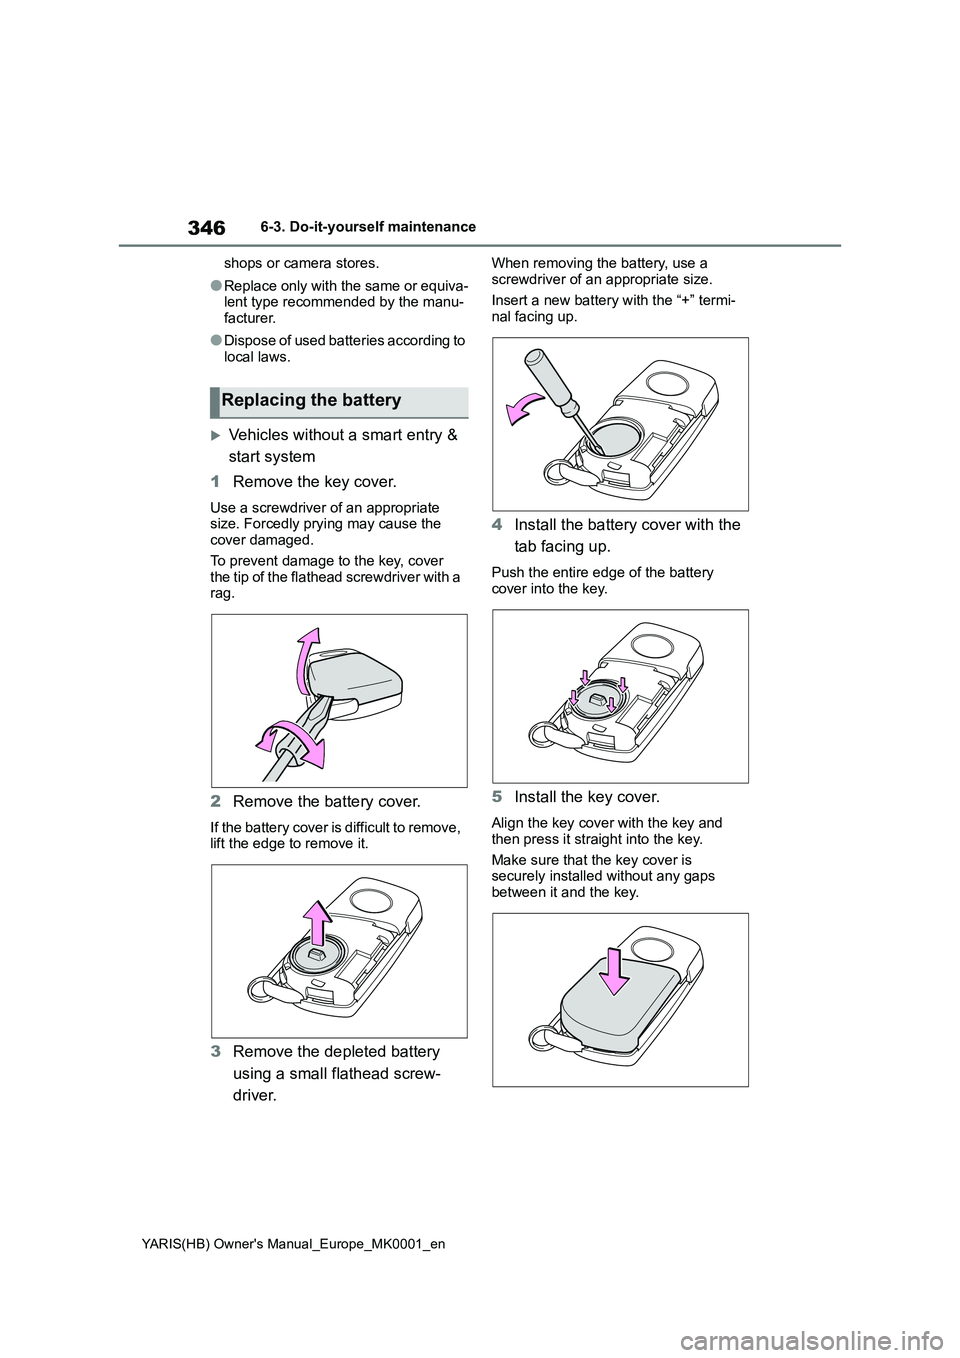
Vehicles without a smart entry &
start system
1Remove the key cover.
Use a screwdriver of an appropriate
size. Forcedly prying may cause the
cover damaged.
To prevent damage to the key, cover
the tip of the flathead screwdriver with a
rag.
2Remove the battery cover.
If the battery cover is difficult to remove,
lift the edge to remove it.
3Remove the depleted battery
using a small flathead screw-
driver.
When removing the battery, use a
screwdriver of an appropriate size.
Insert a new battery with the “+” termi-
nal facing up.
4Install the battery cover with the
tab facing up.
Push the entire edge of the battery
cover into the key.
5Install the key cover.
Align the key cover with the key and
then press it straight into the key.
Make sure that the key cover is
securely installed without any gaps
between it and the key.
Replacing the battery