2021 TOYOTA TACOMA fuel
[x] Cancel search: fuelPage 14 of 312

141-1. Basic function
Press the “MENU” button to display the “Menu” screen.
Displays the clock. Select to display the clock settings screen.
(P. 6 1 )
Select to display the destination screen.
*1 (P. 8 4 )
Select to display the audio control screen. (P.120)
Select to display the hands-free operation screen. (P.244)
• When an Apple CarPlay connection is established, select to display the
Phone application screen.
*2 (P. 5 3 )
Select to display the Toyota apps screen.*2, 3 (P.285)
When an Apple CarPlay/Android Auto connection is established
and this button displays “Apple CarPlay”/“Android Auto”, select to
display the home screen of Apple CarPlay/Android Auto.
*2
(P. 5 3 )
Select to display the information screen.
*4 (P. 1 9 )
Select to display the fuel consumption screen.
*5, 6
Select to display the “Setup” screen. (P.18)
Select to adjust the contrast, brightness, etc. of the display.
(P. 3 3 )
*1: Premium Audio only
*2: This function is not made available in some countries or areas.
*3: When an Apple CarPlay/Android Auto connection is established, this
function will be unavailable.
“Menu” screen
“Menu” screen operation
A
B
C
D
E
F
G
H
I
Page 19 of 312

191-1. Basic function
1
Quick guide
Select to set audio settings.
(P.144)
Select to set the phone
sound, contacts, message
settings, etc. (P.261)
Select to set the voice set-
tings. (P.64)
Select to set vehicle informa-
tion such as maintenance
information. (P.66)
Select to set memory points
(home, favorites entries,
areas to avoid), or naviga-
tion details.
*1 (P.102)
Select to set Wi-Fi
® connec-
tion settings.
*2, 3 (P.49)
Select to set Toyota apps set-
tings.
*3 (P.290)
Select to set traffic informa-
tion settings.
*1, 3 (P.109)
Select to set data services
settings.
*1, 3 (P.168)
*1: Premium Audio only
*2: Vehicles equipped with DCM
*3: This function is not made avail-
able in some countries or areas.
*: Vehicles equipped with DCM
Useful information, such as the
fuel consumption, weather, etc.,
is available on the information
screen.
The information screen can be
reached by the following meth-
ods:
1Press the “MENU” button.
2Select “Info”.
3Select the desired item.
Select to display the fuel con-
sumption screen.
*1
Select to display traffic infor-
mation.
*2, 3 (P.81)
Select to display weather
information.
*2, 3 (P.166)
Select to display the vehicle
alert history.
*3
*1: Refer to the “OWNER’S MAN-
UAL”
*2: Premium Audio only
*3: This function is not made avail-
C
D
E
F
G
H
I
J
K
“Information” screen*
“Information” screen
A
B
C
D
Page 60 of 312

602-4. Other settings
2-4.Other settings
1Press the “MENU” button.
2Select “Setup”.
If the general settings screen
is not displayed, select “Gen-
eral”.
3Select the desired items to
be set.
“Clock”
Select to change the time zone and
select “On” or “Off” or “Auto”
*1 for daylight saving time, automatic
adjustment of the clock, etc.
(P. 6 1 )
“Language”
Select to change the language. The
language setting of Apple Car-
Play/Android Auto can only be
changed on the connected device.
“Customize Home Screen”
Select to change the display infor-
mation/area on the home screen
and the home screen layout.
(P. 2 9 )
“Projection Settings”*2
Select to set automatic Apple Car-
Play/Android Auto connection
establishment on/off. (P.62)
“Beep”
Select to turn the beep sound
on/off.
“Theme Setting”
Select to change the screen theme
setting.
“Unit of Temperature”*1
Select to change the unit of tem-
perature.
“Units of Measurement”
Select to change the unit of mea-
sure for distance/fuel consumption.
“Auto Change to Screen”*1
Select to set automatic screen
changes from the audio control
screen to the home screen to
on/off. When set to on, the screen
will automatically return to the
home screen from the audio control
screen after 20 seconds.
“Keyboard Layout”
General settings
Settings are available for
clock, operation sounds,
etc.
Displaying the general
settings screen
General settings screen
Page 106 of 312

1063-4. Setup
1Press the “MENU” button.
2Select “Setup”.
3Select “Navigation”.
4Select “Detailed Navi. Set-
tings”.
5Select the desired items to
be set.“Unverified Roads Guidance
Warning”
Select to set unverified roads guid-
ance warning on/off.
“Guidance on Unverified
Roads”
Select to set IPD road (roads that
are not completely digitized in our
database) guidance on/off.
“Guidance with Street Names”
Select to set the voice guidance for
the next street name on/off.
“Favorite POI Categories”
Select to set favorite POI catego-
ries that are used for POI selection
to display on the map screen.
(P.107)
“Calibration”
Select to adjust the current position
mark manually or to adjust miscal-
culation of the distance caused by
tire replacement. (P.108)
“Adaptive Route”
Select to enable/disable adaptive
routes. When enabled, the naviga-
tion system will provide frequently
used routes.
“Reset Adaptive Route”
Select to erase adaptive route data.
“Automatic Destination List
Info”
Select to set automatic destination
list information on/off. When set to
on, the estimated time of arrival to
the registered home and preset
Detailed navigation
settings
Settings are available for
pop-up information, favorite
POI categories, low fuel
warning, etc.
Displaying the detailed
navigation settings
screen
Detailed navigation set-
tings screen
Page 195 of 312

1957-2. Panoramic view monitor
7
Peripheral monitoring system
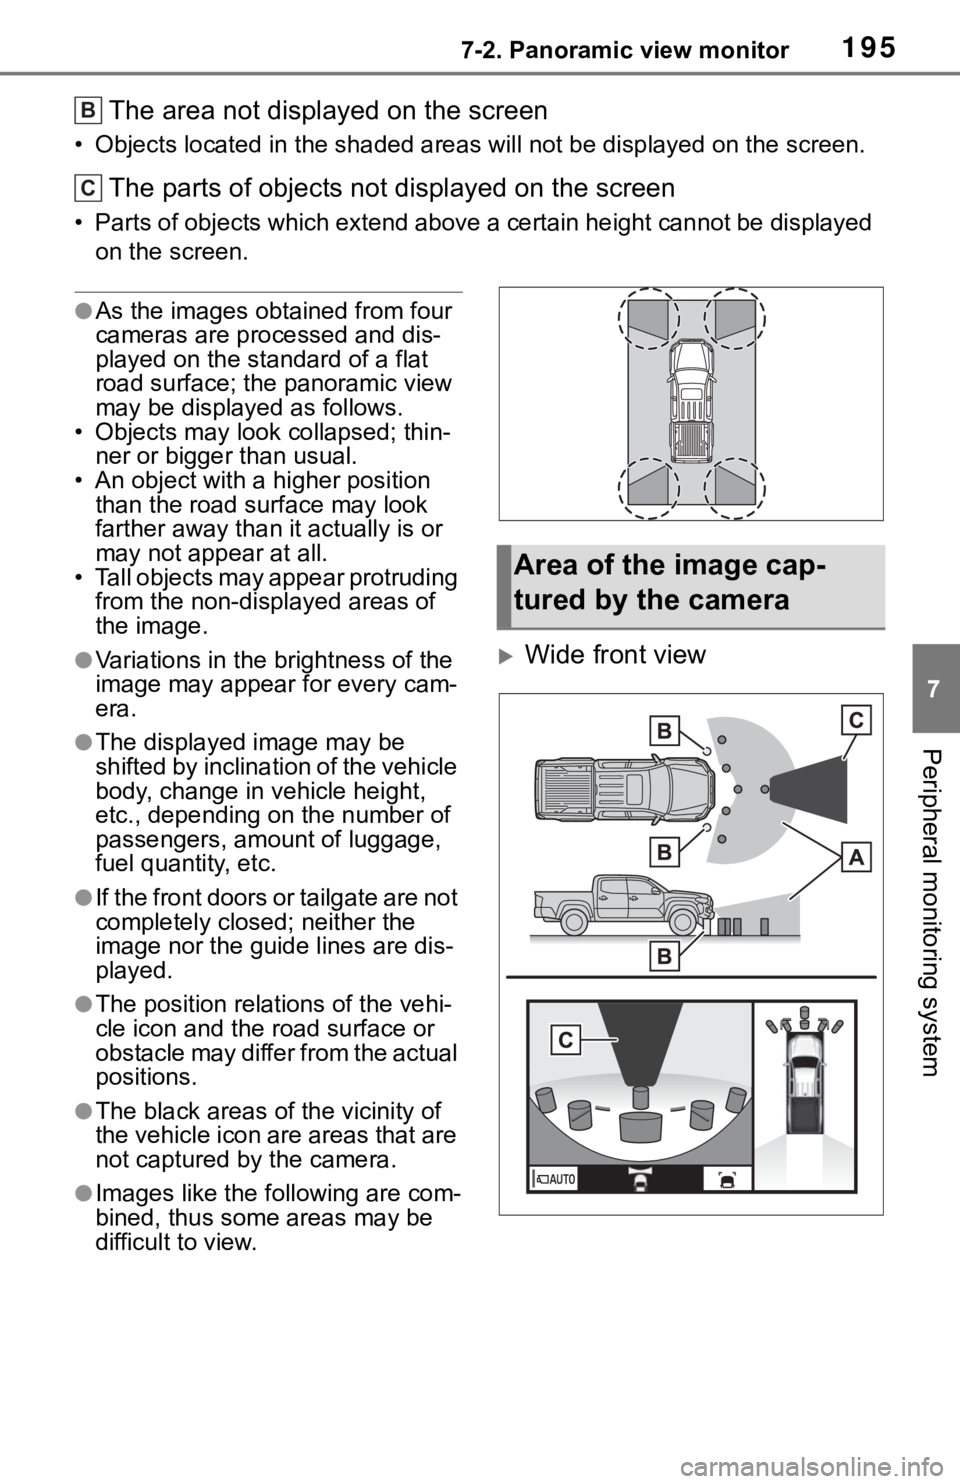
The area not displayed on the screen
• Objects located in the shaded areas will not be displayed on the screen.
The parts of objects not displayed on the screen
• Parts of objects which extend above a certain height cannot be displayed
on the screen.
●As the images obtained from four
cameras are processed and dis-
played on the standard of a flat
road surface; the panoramic view
may be displayed as follows.
• Objects may look collapsed; thin-
ner or bigger than usual.
• An object with a higher position
than the road surface may look
farther away than it actually is or
may not appear at all.
• Tall objects may appear protruding
from the non-displayed areas of
the image.
●Variations in the brightness of the
image may appear for every cam-
era.
●The displayed image may be
shifted by inclination of the vehicle
body, change in vehicle height,
etc., depending on the number of
passengers, amount of luggage,
fuel quantity, etc.
●If the front doors or tailgate are not
completely closed; neither the
image nor the guide lines are dis-
played.
●The position relations of the vehi-
cle icon and the road surface or
obstacle may differ from the actual
positions.
●The black areas of the vicinity of
the vehicle icon are areas that are
not captured by the camera.
●Images like the following are com-
bined, thus some areas may be
difficult to view.
Wide front view
B
C
Area of the image cap-
tured by the camera
Page 232 of 312

2327-3. Multi-terrain Monitor
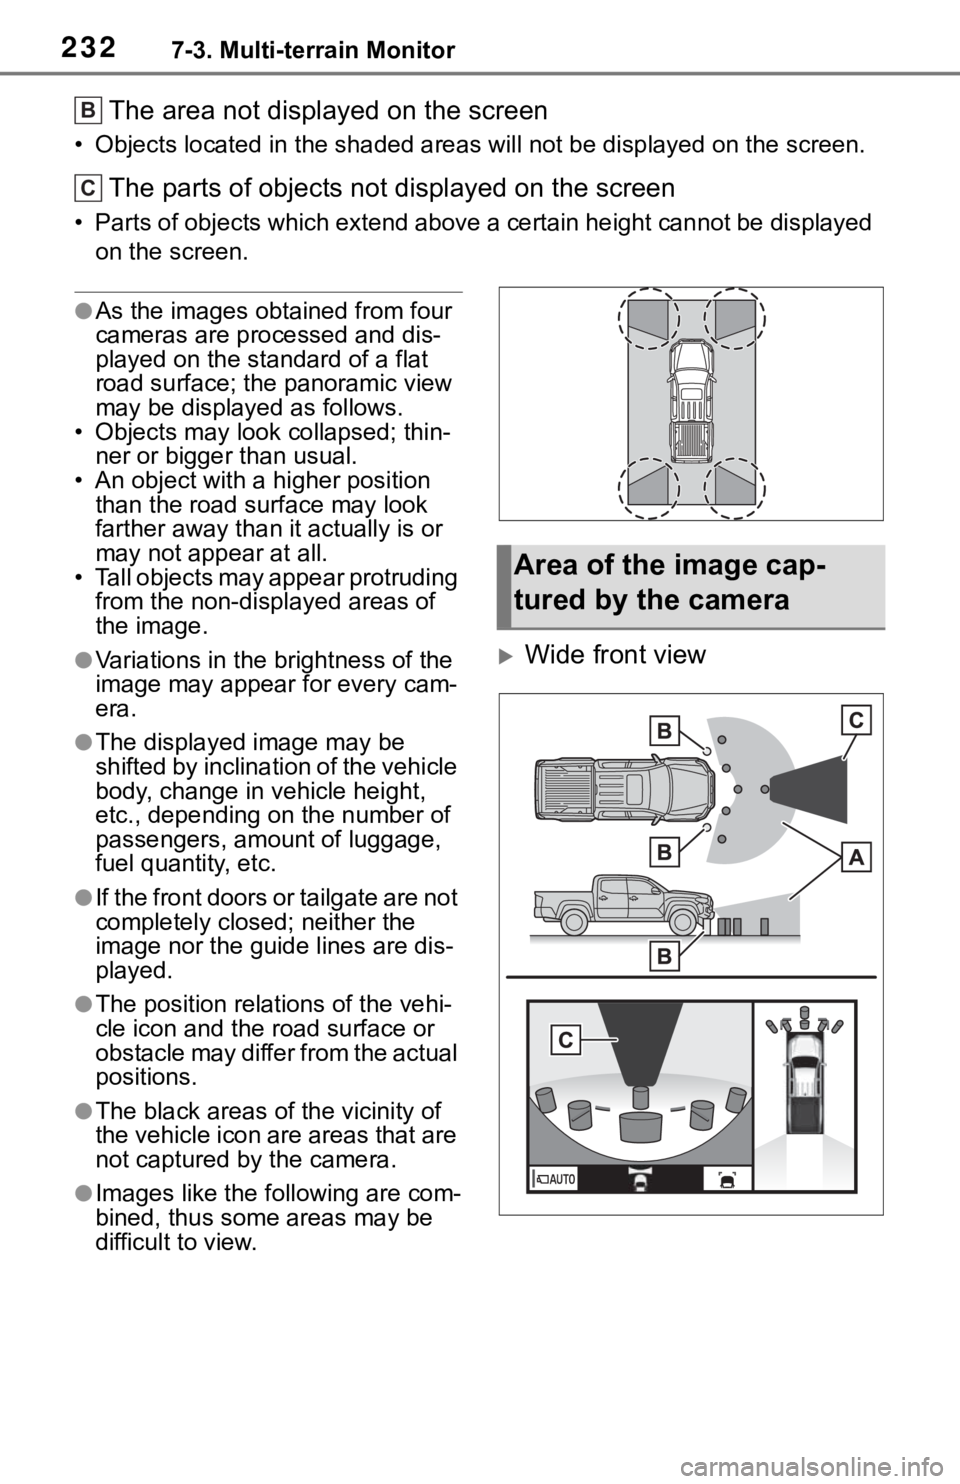
The area not displayed on the screen
• Objects located in the shaded areas will not be displayed on the screen.
The parts of objects not displayed on the screen
• Parts of objects which extend above a certain height cannot be displayed
on the screen.
●As the images obtained from four
cameras are processed and dis-
played on the standard of a flat
road surface; the panoramic view
may be displayed as follows.
• Objects may look collapsed; thin-
ner or bigger than usual.
• An object with a higher position
than the road surface may look
farther away than it actually is or
may not appear at all.
• Tall objects may appear protruding
from the non-displayed areas of
the image.
●Variations in the brightness of the
image may appear for every cam-
era.
●The displayed image may be
shifted by inclination of the vehicle
body, change in vehicle height,
etc., depending on the number of
passengers, amount of luggage,
fuel quantity, etc.
●If the front doors or tailgate are not
completely closed; neither the
image nor the guide lines are dis-
played.
●The position relations of the vehi-
cle icon and the road surface or
obstacle may differ from the actual
positions.
●The black areas of the vicinity of
the vehicle icon are areas that are
not captured by the camera.
●Images like the following are com-
bined, thus some areas may be
difficult to view.
Wide front view
B
C
Area of the image cap-
tured by the camera
Page 299 of 312

Alphabetical Index299
V
“Vehicle Alert History” button
(“Information” screen) ........... 19
“Vehicle” button (“Setup”
screen) .............................. 18, 66
Vehicle settings ........................ 66
Displaying the vehicle settings
screen .................................. 66
Maintenance........................... 66
Setting dealer information ...... 69
Setting the valet mode ........... 68
Vehicle settings screen .......... 66
“Voice” button (“Setup” screen)
........................................... 18, 64
Voice command system......... 156
Using the voice command sys-
tem ..................................... 156
Voice command system opera-
tion ..................................... 157
Voice command system opera-
tion......................................... 156
Voice settings ........................... 64
Displaying the voice settings
screen .................................. 64
Voice settings screen ............. 64
W
“Weather” button (“Information”
screen) .............................19, 166
What to do if... .........................271
“Wi-Fi” button (“Setup” screen)
...........................................18, 49
Wi-Fi
® hotspot ..........................48
Changing the Wi-Fi
® settings .49
Connecting a device to the in-
vehicle access point .............48
Wi-Fi
® function operating hints
.............................................51
For more infor mation about
the following items, see
the “OWNER’S MANUAL”.
· Fuel consumption
· Vehicle customization set-
tings