2021 TOYOTA RAV4 PRIME fuel
[x] Cancel search: fuelPage 15 of 308

151-1. Basic function
1
Quick guide
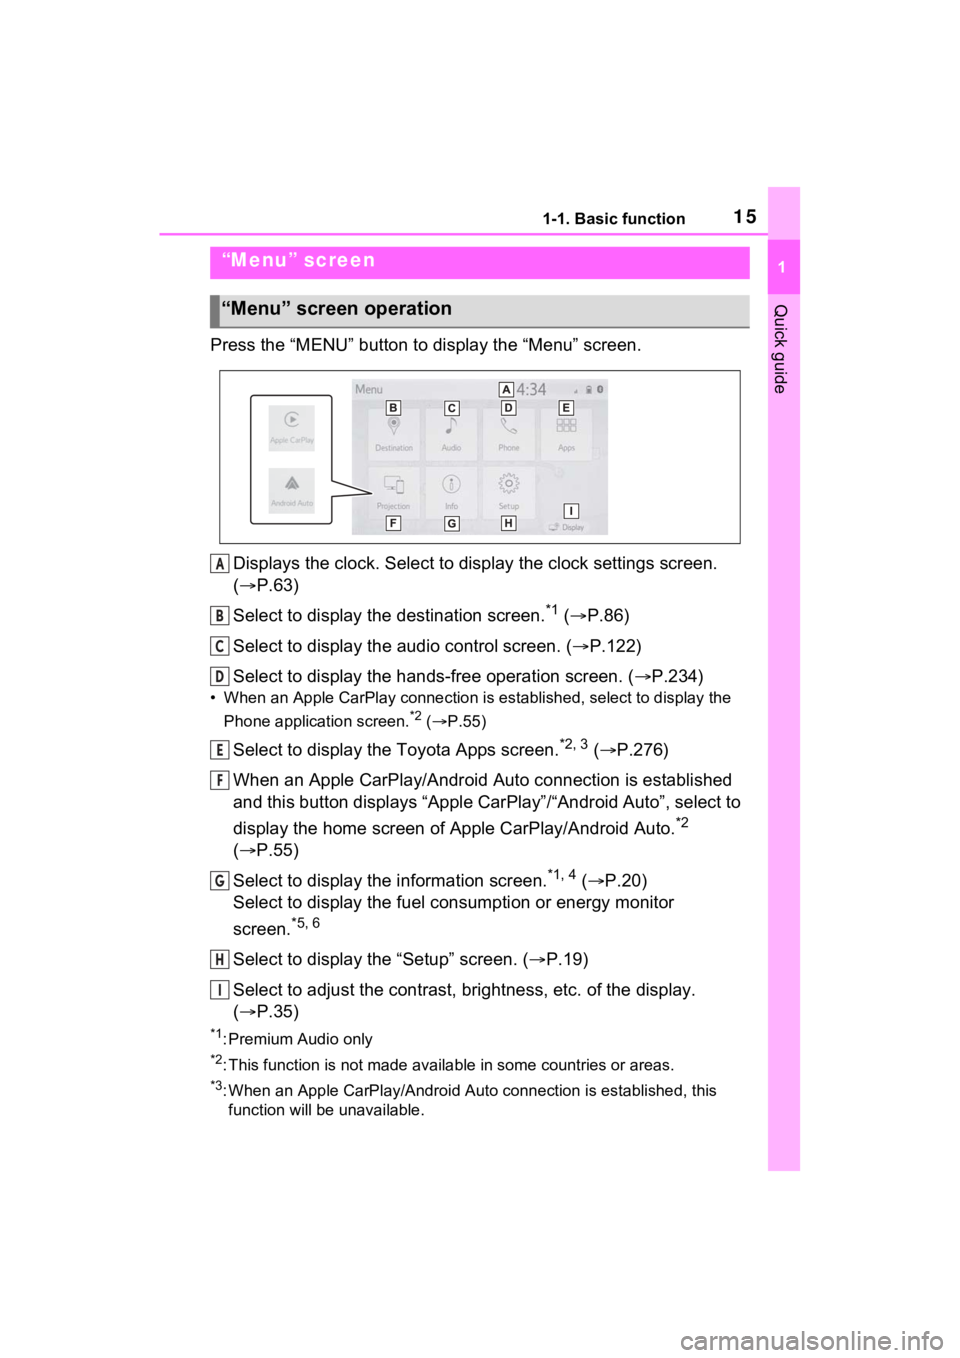
Press the “MENU” button to display the “Menu” screen.
Displays the clock. Select to display the clock settings screen.
( P.63)
Select to display the destination screen.
*1 ( P.86)
Select to display the audio control screen. ( P.122)
Select to display the hands-free operation screen. ( P.234)
• When an Apple CarPlay connection is established, select to display the
Phone application screen.
*2 ( P.55)
Select to display the Toyota Apps screen.*2, 3 ( P.276)
When an Apple CarPlay/Android Auto connection is established
and this button displays “Apple CarPlay”/“Android Auto”, select to
display the home screen of Apple CarPlay/Android Auto.
*2
( P.55)
Select to display the information screen.
*1, 4 ( P.20)
Select to display the fuel consumption or energy monitor
screen.
*5, 6
Select to display the “Setup” screen. ( P.19)
Select to adjust the contrast, brightness, etc. of the display.
( P.35)
*1: Premium Audio only
*2: This function is not made available in some countries or areas .
*3: When an Apple CarPlay/Android Auto connection is established, this
function will be unavailable.
“Menu” screen
“Menu” screen operation
A
B
C
D
E
F
G
H
I
Page 20 of 308

201-1. Basic function
Select to set audio settings.
(P.148)
Select to set the phone
sound, contacts, message
settings, etc. ( P.250)
Select to set the voice set-
tings. ( P.66)
Select to set vehicle informa-
tion such as maintenance
information. ( P.68)
Select to set memory points
(home, favorites entries,
areas to avoid), or naviga-
tion details.
*1 ( P.104)
Select to set Wi-Fi
® connec-
tion settings.
*2, 3 ( P.51)
Select to set Toyota Apps
settings.
*3 ( P.281)
Select to set traffic informa-
tion settings.
*1, 3 ( P.111)
Select to set data services
settings.
*1, 3 ( P.172)
*1: Premium Audio only
*2: Vehicles equipped with DCM
*3: This function is not made avail-
able in some countries or areas.
*: Audio Plus with DCM/Premium Audio only
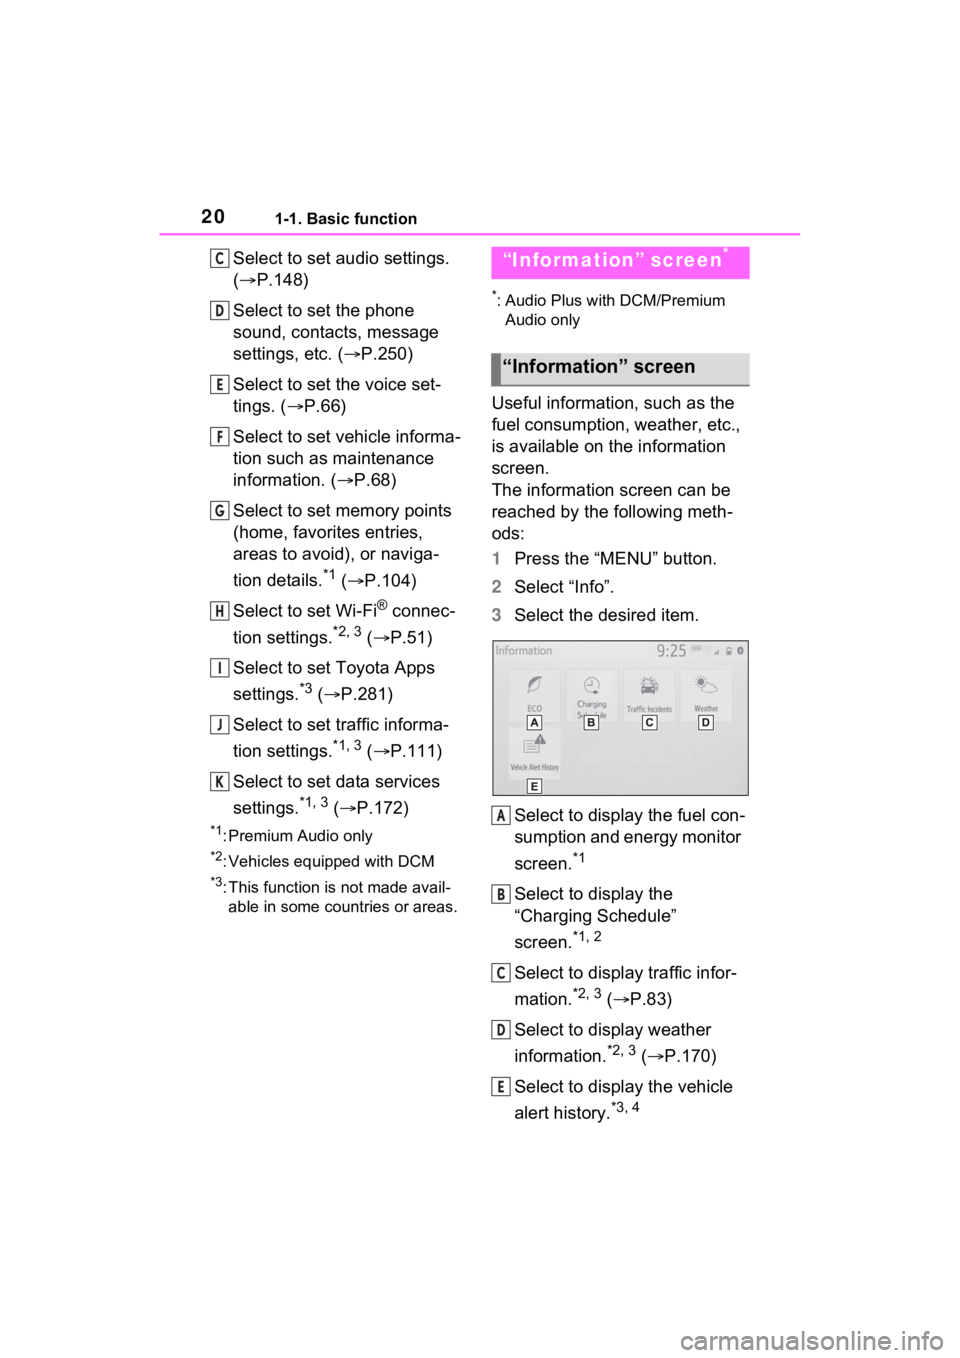
Useful information, such as the
fuel consumption, weather, etc.,
is available on the information
screen.
The information screen can be
reached by the following meth-
ods:
1 Press the “MENU” button.
2 Select “Info”.
3 Select the desired item.
Select to display the fuel con-
sumption and energy monitor
screen.
*1
Select to display the
“Charging Schedule”
screen.
*1, 2
Select to display traffic infor-
mation.
*2, 3 ( P.83)
Select to display weather
information.
*2, 3 ( P.170)
Select to display the vehicle
alert history.
*3, 4
C
D
E
F
G
H
I
J
K
“Information” screen*
“Information” screen
A
B
C
D
E
Page 62 of 308

622-4. Other settings
2-4.Other settings
1Press the “MENU” button.
2 Select “Setup”.
If the general settings screen
is not displayed, select “Gen-
eral”.
3 Select the desired items to
be set.
“Clock”
Select to change the time zone and
select “On” or “Off” or “Auto”
*1 for daylight saving time, automatic
adjustment of the clock, etc.
(
P.63)
“Language”
Select to change the language. The
language setting of Apple Car-
Play/Android Auto can only be
changed on the connected device.
“Customize Home Screen”
Select to change the display infor-
mation/area on the home screen
and the home screen layout.
( P.31)
“Projection Settings”*2
Select to set automatic Apple Car-
Play/Android Auto connection
establishment on/off. ( P.64)
“Beep”
Select to turn the beep sound
on/off.
“Theme Setting”
Select to change the screen theme
setting.
“Unit of Temperature”*1
Select to change the unit of tem-
perature.
“Units of Measurement”
Select to change the unit of mea-
sure for distance/fuel consumption.
“Auto Change to Screen”*1
Select to set automatic screen
changes from the audio control
screen to the home screen to
on/off. When set to on, the screen
will automatically r eturn to the
home screen from the audio control
screen after 20 seconds.
“Keyboard Layout”
General settings
Settings are available for
clock, operation sounds,
etc.
Displaying the general
settings screen
General settings screen
Page 108 of 308

1083-4. Setup
1Press the “MENU” button.
2 Select “Setup”.
3 Select “Navigation”.
4 Select “Detailed Navi. Set-
tings”.
5 Select the desired items to
be set.
“Unverified Roads Guidance
Warning”
Select to set unverified roads guid-
ance warning on/off.
“Guidance on Unverified
Roads”
Select to set IPD road (roads that
are not completely digitized in our
database) guidance on/off.
“Guidance with Street
Names”
Select to set the voice guidance for
the next street name on/off.
“Favorite POI Categories”
Select to set favorite POI catego-
ries that are used for POI selection
to display on the map screen.
( P.109)
“Calibration”
Select to adjust the current position
mark manually or to adjust miscal-
culation of the distance caused by
tire replacement. ( P.109)
“Adaptive Route”
Select to enable/disable adaptive
routes. When enabled, the naviga-
tion system will provide frequently
used routes.
“Reset Adaptive Route”
Select to erase adaptive route data.
“Automatic Destination List
Info”
Select to set automatic destination
list information on/off. When set to
on, the estimated time of arrival to
Detailed navigation
settings
Settings are available for
pop-up information, favor-
ite POI categories, low fuel
warning, etc.
Displaying the detailed
navigation settings
screen
Detailed navigation set-
tings screen
Page 110 of 308

1103-4. Setup
the accuracy of a current
position: P.117
When driving, the current posi-
tion mark will be automatically
corrected by GPS signals. If
GPS reception is poor due to
location, the current position
mark can be adjusted manually.
1 Select “Position/Direction”.
2 Scroll the map to the desired
point ( P.77) and select
“OK”.
3 Select an arrow to adjust the
direction of the current posi-
tion mark and select “OK”.
The tire change calibration func-
tion will be used when replacing
the tires. This function will adjust
miscalculation caused by the
circumference difference
between the old and new tires.
1 Select “Select after a Tire
Change”.
The message appears and
the quick distance calibration
starts automatically.
●If this procedure is not performed
when the tires are replaced, the
current position mark may be
incorrectly displayed.
*1: This function does not operate
outside the cont iguous United
States (Exampl e: Alaska and
Hawaii).
*2: Refer to the “OWNER’S MAN- UAL”
This system operates based on
the driving situation and traffic
information to enhance fuel
economy.
The predictive efficient drive
function can be turned on/off.
( P.108)
The system automatically stores
and registers support points
where the driver always deceler-
ates or stops based on pedal
operation and the vehicle speed
of the driver.
The registered points are shown
on the map as icons for use
as predictive deceleration sup-
port points.
When the position of the vehicle
approaches the registered point,
the icon changes to an empha-
sized icon.
Depending on the system or
driving situation, the engine
brake amount increases after
releasing the accelerator pedal.
Position/Direction calibra-
tion
Tire change calibration
Predictive efficient drive*1,
2
Predictive deceleration sup-
port
Page 111 of 308

1113-4. Setup
3
Navigation system
As a result, the battery charge
amount can be increased when
decelerating or stopping the
vehicle to enhance fuel econ-
omy.
*: This function is not made avail-able in some countries or areas.
1 Press the “MENU” button.
2 Select “Setup”.
3 Select “Traffic”.
4 Select the desired items to
be set.
Traffic settings*
Traffic information such as
traffic congestion or traffic
incident warnings can be
made available.
Displaying the traffic set-
tings screen
Screen for traffic settings
Page 221 of 308

2217-3. Panoramic view monitor
7
Peripheral monitoring system
on the standard of a flat road surface; the panoramic view/moving
view/see-through view may be displayed as follows.
• Objects may look collapsed; t hinner or bigger than usual.
• An object with a higher positi on than the road surface may look farther
away than it actually is or may not appear at all.
• Tall objects may appear protrudi ng from the non-displayed areas of the
image.
●Variations in the brightness of the image may appear for every camera.
●The displayed image may be shift ed by inclination of the vehicle body,
change in vehicle height, etc., d epending on the number of pass engers,
amount of luggage, fuel quantity, etc.
●If the front door s or back door are not c ompletely closed; neither the
image nor the guide lines are displayed.
●The position relations of the ve hicle icon and the road surface or obstacle
may differ from the actual positions.
●The black areas of the vicinity of the vehicle icon are areas t hat are not
captured by the camera.
●Images like the following are combined, thus some areas may be difficult
to view.
WARNING
●When a sensor indicator on the In tuitive parking assist display illumi-
nates in red or a buzzer sounds continuously, be sure to check the area
around the vehicle immediately a nd do not proceed any further until
safety has been ensured, otherwise an unexpected accident may o ccur.
Page 290 of 308

290Alphabetical Index
Service Connect ................... 275
Typical voice guidance prompts ............................................... 101
U
USB memory ........................... 136 Overview .............................. 136
Use of information accumulated by navigation system (Vehicles
equipped with DCM) ............. 116Displaying the useful navigation information settings screen 116
V
“Vehicle Alert History” button (“Information” screen) ........... 20
“Vehicle” button (“Setup” screen) .............................. 19, 68
Vehicle settings ........................ 68 Displaying the vehicle settings screen .................................. 68
Maintenance........................... 68
Setting dealer information ...... 71
Setting the valet mode ........... 70
Vehicle settings screen .......... 68
“Voice” button (“Setup” screen) ........................................... 19, 66
Voice command system ........ 160 Using the voice command sys-tem ..................................... 160
Voice command system opera- tion ..................................... 161
Voice settings ........................... 66 Displaying the voice settings screen .................................. 66
Voice settings screen ............. 66
W
“Weather” button (“Information” screen) ............................ 20, 170 What to do if... .........................260
When folding the outside rear
view mirrors ..........................217Screen display ......................217
Wi-Fi
® Hotspot ..........................50
Changing the Wi-Fi
® settings .51
Connecting a device to the in- vehicle access point .............50
Wi-Fi
® function operating hints
.............................................53
“Wi-Fi” button (“Setup” screen) ...........................................19, 51
For more information about the following items, see
the “OWNER’S MANUAL”.
· Fuel consumption
· Energy monitor
· Vehicle customization set-
tings
· Charging Schedule