Page 62 of 308

622-4. Other settings
2-4.Other settings
1Press the “MENU” button.
2 Select “Setup”.
If the general settings screen
is not displayed, select “Gen-
eral”.
3 Select the desired items to
be set.
“Clock”
Select to change the time zone and
select “On” or “Off” or “Auto”
*1 for daylight saving time, automatic
adjustment of the clock, etc.
(
P.63)
“Language”
Select to change the language. The
language setting of Apple Car-
Play/Android Auto can only be
changed on the connected device.
“Customize Home Screen”
Select to change the display infor-
mation/area on the home screen
and the home screen layout.
( P.31)
“Projection Settings”*2
Select to set automatic Apple Car-
Play/Android Auto connection
establishment on/off. ( P.64)
“Beep”
Select to turn the beep sound
on/off.
“Theme Setting”
Select to change the screen theme
setting.
“Unit of Temperature”*1
Select to change the unit of tem-
perature.
“Units of Measurement”
Select to change the unit of mea-
sure for distance/fuel consumption.
“Auto Change to Screen”*1
Select to set automatic screen
changes from the audio control
screen to the home screen to
on/off. When set to on, the screen
will automatically r eturn to the
home screen from the audio control
screen after 20 seconds.
“Keyboard Layout”
General settings
Settings are available for
clock, operation sounds,
etc.
Displaying the general
settings screen
General settings screen
Page 64 of 308

642-4. Other settings
1Select “Time Zone”.
2 Select the desired time zone.
Premium Audio only:
If “Auto” is selected, the time
zone is selected automatically
by current vehicle position.
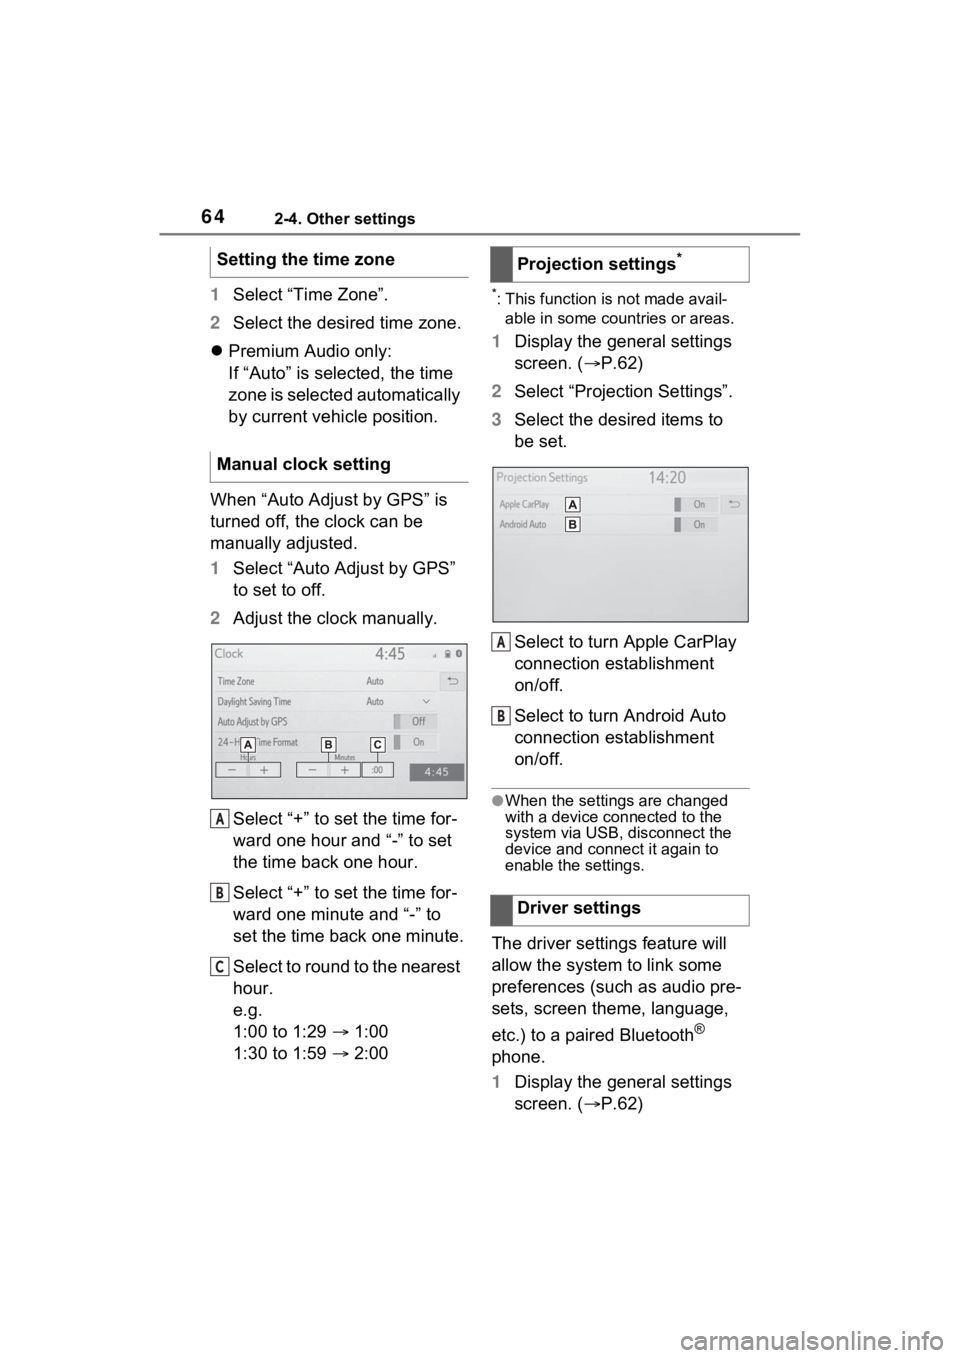
When “Auto Adjust by GPS” is
turned off, the clock can be
manually adjusted.
1 Select “Auto Adjust by GPS”
to set to off.
2 Adjust the clock manually.
Select “+” to set the time for-
ward one hour and “-” to set
the time back one hour.
Select “+” to set the time for-
ward one minute and “-” to
set the time back one minute.
Select to round to the nearest
hour.
e.g.
1:00 to 1:29 1:00
1:30 to 1:59 2:00*: This function is not made avail-
able in some countries or areas.
1 Display the general settings
screen. ( P.62)
2 Select “Projection Settings”.
3 Select the desired items to
be set.
Select to turn Apple CarPlay
connection establishment
on/off.
Select to turn Android Auto
connection establishment
on/off.
●When the settings are changed
with a device connected to the
system via USB, disconnect the
device and connect it again to
enable the settings.
The driver settings feature will
allow the system to link some
preferences (such as audio pre-
sets, screen theme, language,
etc.) to a paired Bluetooth
®
phone.
1 Display the general settings
screen. ( P.62)
Setting the time zone
Manual clock setting
A
B
C
�3�U�R�M�H�F�W�L�R�Q���V�H�W�W�L�Q�J�V�
�'�U�L�Y�H�U���V�H�W�W�L�Q�J�V
A
B
Page 67 of 308
672-4. Other settings
2
Basic function
Select to adjust the volume of
voice guidance.
*1
Select to set the voice guid-
ance during route guidance
on/off.
*2
Select to set the voice guid-
ance during audio/visual sys-
tem use on/off.
*2
Select to set the voice recog-
nition prompts.
Select to train voice recogni-
tion.
The voice command system
adapts the user accent.
Select to start the voice rec-
ognition tutorial.
Select to set the beep sound
of navigation guidance.
*2
Select to set the voice
prompt interrupt on/off.
Select to set the web search
engine. The search engines
are Toyota Apps. This item is
displayed when two or more
POI search applications are
installed.
*2 ( P.276)
Select to reset all setup items.
*1: When an Apple CarPlay/Android
Auto connection is established,
voice command system
(Siri/Google Assistant) and map
application voice guidance vol-
ume can be changed.
*2: Premium Audio only
A
B
C
D
E
F
G
H
I
J
Page 121 of 308
121
4
4
Audio/visual system
Audio/visual system
4-1. Basic operationQuick reference........... 122
Some basics ............... 123
4-2. Radio operation AM/FM/SiriusXM (SXM) radio .......................... 127
4-3. Media operation USB memory............... 136
iPod/iPhone (Apple Car- Play) .......................... 138
Android Auto ............... 141
Bluetooth
® audio ......... 142
4-4. Audio/visual remote con- trols
Steering switches ........ 146
4-5. Setup Audio settings ............. 148
4-6. Tips for operating the audio/visual system
Operating information . 150
Page 122 of 308
1224-1. Basic operation
4-1.Basic operation
The audio control screen can be reached by the following methods:
From the “AUDIO” button
1 Press the “AUDIO” button.
From the “MENU” button
1 Press the “MENU” button, then select “Audio”.
Using the radio ( P.127)
Playing a USB memory ( P.136)
Playing an iPod/iPhone (Apple CarPlay
*) ( P.138)
Using the Android Auto
* ( P.141)
Playing a Bluetooth
® device ( P.142)
Using the steering wheel audio switches ( P.146)
Audio system settings ( P.148)
*: This function is not made availa ble in some countries or areas.
Quick reference
Functional overview
Page 123 of 308

1234-1. Basic operation
4
Audio/visual system
“POWER VOLUME” knob:
Press to turn the audio/visual
system on and off. The system
turns on in the last mode used.
Turn this knob to adjust the vol-
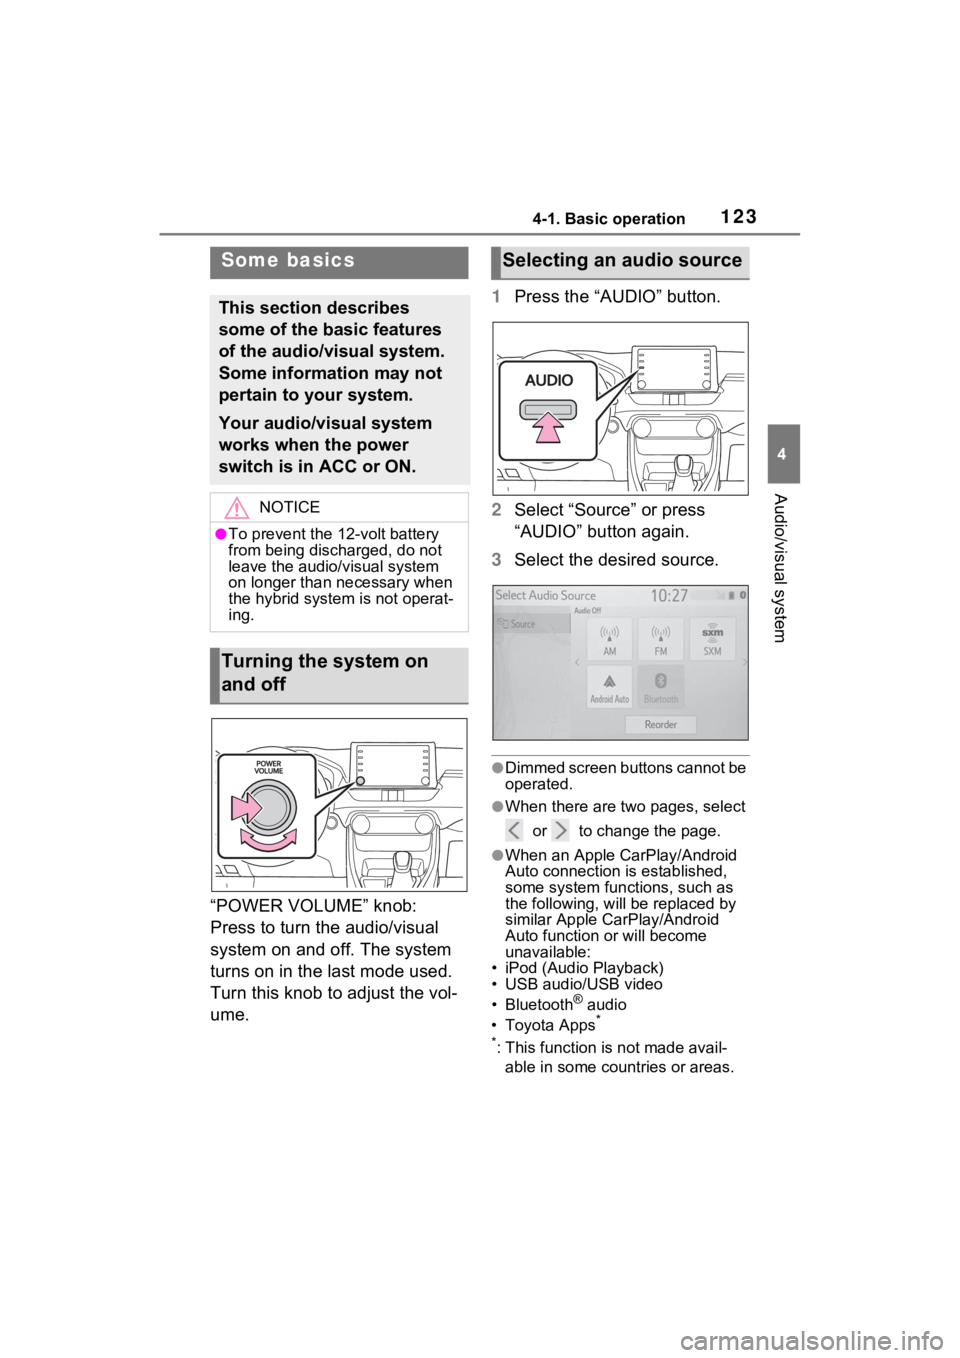
ume.1
Press the “AUDIO” button.
2 Select “Source” or press
“AUDIO” button again.
3 Select the desired source.
●Dimmed screen buttons cannot be
operated.
●When there are tw o pages, select
or to change the page.
●When an Apple CarPlay/Android
Auto connection is established,
some system functions, such as
the following, will be replaced by
similar Apple CarPlay/Android
Auto function or will become
unavailable:
• iPod (Audio Playback)
• USB audio/USB video
• Bluetooth
® audio
• Toyota Apps*
*
: This function is not made avail- able in some countries or areas.
Some basics
This section describes
some of the basic features
of the audio/visual system.
Some information may not
pertain to your system.
Your audio/visual system
works when the power
switch is in ACC or ON.
NOTICE
●To prevent the 12-volt battery
from being discharged, do not
leave the audio/visual system
on longer than necessary when
the hybrid system is not operat-
ing.
Turning the system on
and off
Selecting an audio source
Page 124 of 308

1244-1. Basic operation
1Display the audio source
selection screen. ( P.123)
2 Select “Reorder”.
3 Select the desired audio
source then or to reor-
der.
4 Select “OK”.
1 Open the lid and connect a
device.
Turn on the power of the
device if it is not turned on.
●If a USB hub is plugged-in, two
devices can be connected at a
time.
●Even if a USB hub is used to con-
nect more than two USB devices,
only the first two connected
devices will be recognized.
●If a USB hub that has more than
two ports is connected to the USB
port, devices connected to the
USB hub may not charge or be
inoperable, as the supply of cur-
rent may be insufficient.
●When an Apple CarPlay/Android
Auto connection is established, the other USB port can be used
only for device battery charger.
1
Display the audio control
screen. ( P.123)
2 Select “Sound”.
3 Select the desired item to be
set.
Type A
Select to set the tre-
ble/mid/bass. ( P.125)
Select to set the fader/bal-
ance. ( P.125)
Select to set the automatic
sound leveliser. ( P.125)
Type B
Select to set the tre-
ble/mid/bass. ( P.125)
Select to set the fader/bal-
ance. ( P.125)
Reordering the audio
source
USB port
Sound settings
A
B
C
A
B
Page 136 of 308

1364-3. Media operation
4-3.Media operation
The USB memory operation
screen can be reached by the
following methods: P.123
Connecting a USB memory
( P.124)
When an Apple Car-
Play/Android Auto connec-
tion is established, this
function will be unavailable.
USB audio
Select to display the audio
source selection screen.
Select to return to the top
screen.
Select to display a song list
screen.
Select to display the play
mode selection screen.
Select to display the sound
setting screen. ( P.124)
Select to set repeat playback.
( P.137) Select to change the
file/track.
Select and hold to fast
rewind.
Select to play/pause.
Select to change the
file/track.
Select and hold to fast for-
ward.
Select to set random play-
back. (
P.137)
Select to change the
folder/album.
Displays cover art
Select to change the artist.
USB video
1 Select “Browse”.
2 Select “Videos”.
3 Select the desired folder and
file.
Select to display the audio
source selection screen.
Select to return to the top
screen.
Select to display a song list
screen.
Select to display the play
USB memory
Overview
Control screen
A
B
C
D
E
F
G
H
I
J
K
L
M
A
B
C
D