Page 534 of 666

5327-3. Do-it-yourself maintenance
Left-hand drive vehicles
1 Turn the power switch off.
Confirm that the charging connector is not connected. Also, do not use the
Remote Air Conditioning System during
the procedure.
2 Open the front passenger’s
door.
By keeping the door open, unexpected
operation of the Re mote Air Condition- ing System can be prevent. ( →P.460)
3Open the glove box and slide off
the damper.
4 Push in each side of the glove
box to disconnect the claws, and
then slowly and fully open the
glove box while s upporting it.
5 With the glove box fully open,
slightly lift up the glove box and
pull toward the seat to detach
the bottom of the glove box.
Do not use excessive f orce if the glove
box does not detac h when lightly
pulled. Instead, pul l toward the seat while slightly adjusting the height of the
glove box.
6 Unlock the filter cover ( ), pull
the filter cover out of the claws
Air conditioning filter
The air conditioning filter must
be changed regularly to main -
tain air conditioning efficiency.
Removal method
A
Page 535 of 666
533
7
7-3. Do-it-yours elf maintenance
Maintenance and care
( ), and remove the filter
cover.
7 Remove the filter case.
8 Remove the air conditioning fil-
ter from the filter case and
replace it wit h a new one.
The “ UP” marks shown on the filter
should be pointing up.
9 When installing, reverse the
steps listed.
Right-hand drive vehicles
1 Turn the power switch off.
Confirm that the charging connector is
not connected. Also, do not use the Remote Air Conditioning System during
the procedure.
2 Open the front passenger’s
door.
By keeping the door open, unexpected
operation of the Remote Air Condition -
ing System can be prevent. ( →P.460)
3Open the glove box and slide off
the damper.
4 Push in each side of the glove
box to disconnect the claws, and
then slowly and fully open the
glove box while s upporting it.
5 With the glove box fully open,
slightly lift up the glove box and
B
Page 536 of 666

5347-3. Do-it-yourself maintenance
pull toward the seat to detach
the bottom of t he glove box.
Do not use excessive force if the glove
box does not detach when lightly pulled. Instead, pu ll toward the seat
while slightly adjusting the height of the
glove box.
6 Unlock the filter cover ( ), pull
the filter cover o ut of the claws
( ), and remove the filter
cover.
7 Remove the filter case.
8 Remove the air conditioning fil-
ter and replace it with a new
one.
The “ UP” marks shown on the filter
should be pointing up.
9 When installing, reverse the
steps listed.
■Checking interval
Inspect and replace the air conditioning
filter according to the maintenance schedule. In dusty areas or areas with
heavy traffic flow, early replacement
may be required. (For scheduled main - tenance information, please refer to the
“Toyota Service Bo oklet” or “Toyota
Warranty Booklet”.)
■If air flow from the vents decreases dramatically
The filter may be clogged. Check the fil -
ter and replace if necessary.
A
B
Page 537 of 666

535
7
7-3. Do-it-yours elf maintenance
Maintenance and care
WARNING
■When replacing the air condition-
ing filter
Observe the following precautions. Failure to do so may result in the air
conditioning system operating during
the procedure, possibly resulting in injury.
●Check that the charging connector
is not connected
Check that the charging connector is not connected
The air conditioning may operate due
to the “Climate Prep” ( →P.144) set- ting.
●Do not use the Remote Air Condi - tioning System
NOTICE
■When using the air conditioning system
Make sure that a filter is always
installed.
Using the air conditioning system without a filter may cause damage to
the system.
■When removing the glove box
Always follow the specified procedure
to remove the glove box ( →P.532). If the glove box is removed without fol -
lowing the specifie d procedure, the
hinge of the glove box may become damaged.
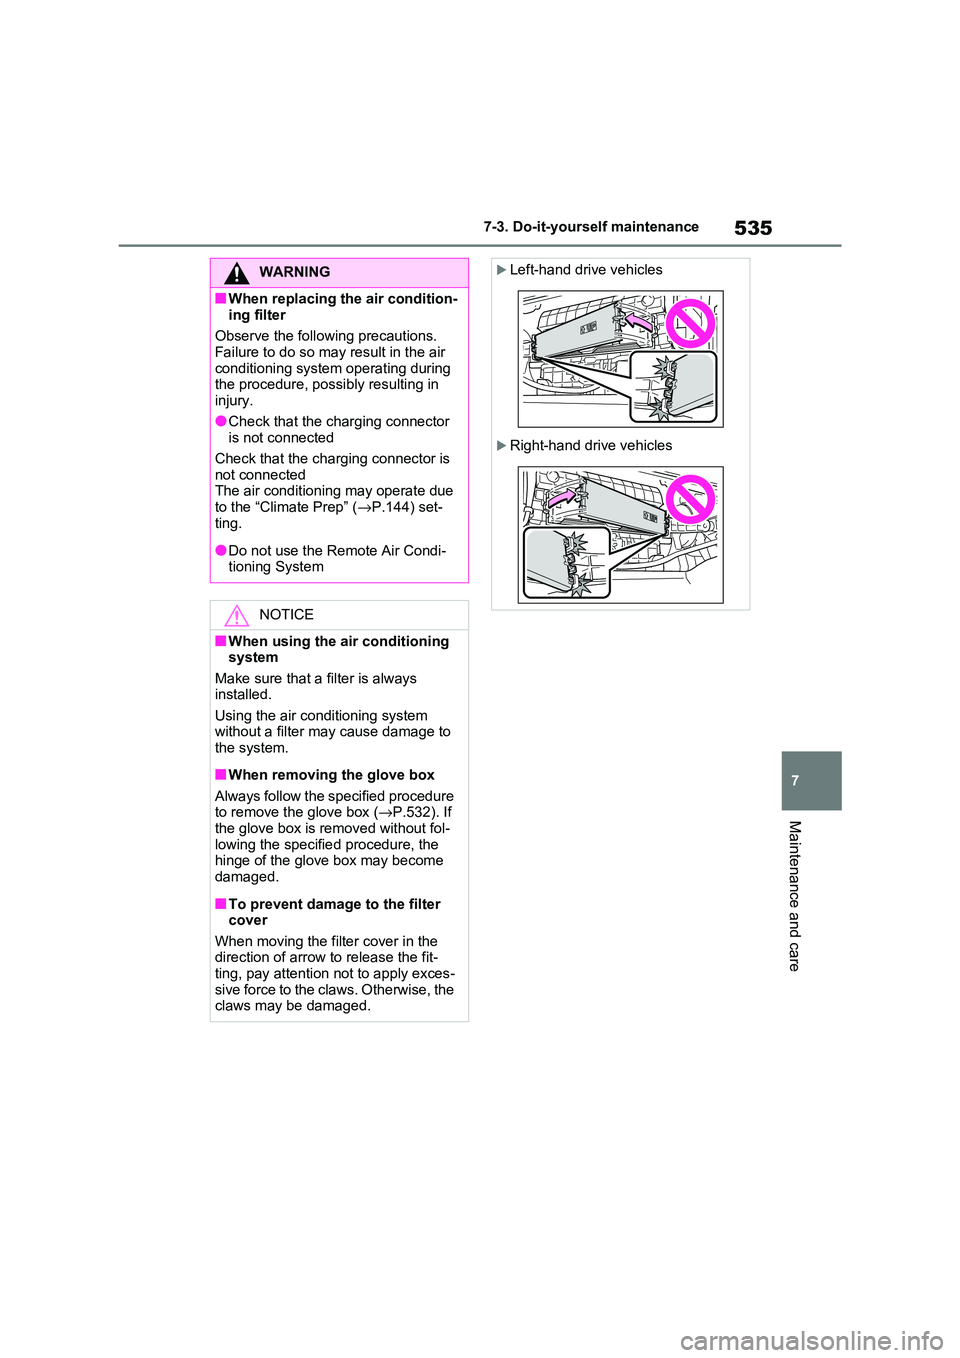
■To prevent damage to the filter cover
When moving the filter cover in the
direction of arrow to release the fit- ting, pay attention not to apply exces -
sive force to the cl aws. Otherwise, the
claws may be damaged.
Left-hand drive vehicles
Right-hand drive vehicles
Page 547 of 666
545
7
7-3. Do-it-yours elf maintenance
Maintenance and care
1Turn the power switch off.
Confirm that the charging connector is
not connected. Also, do not use the
Remote Air Conditioning System during the procedure.
2 Open the fuse box cover.
Engine compartment: Type A
fuse box
Push claw and to completely
release the lock, and then lift up the
cover.
Engine compartment: Type B
fuse box
Push claw and to completely
release the lock, and then lift up the
cover.
Left side instrument panel
Left-hand drive vehi cles: Remove the
lid.
Right-hand drive vehicles: Push the tab
in and remove the cover, and then
remove the lid.
Checking and replacing
fuses
If any of the electrical compo -
nents do not operate, a fuse
may have blown. If this hap -
pens, check and replace the
fuses as necessary.
Checking and replacing
fuses
AB
AB
Page 563 of 666

561
8
8-1. Essential information
When trouble arises
it briefly 3 times or more in succession.
5Stop the vehicle in a safe place
by the road.
■If emergency stopped
The functions of the air conditioning, etc.
may be partially limited in order to reduce the power consumption of the
12-volt battery.
Remove the seat belt first.
If the door can be opened, open
the door and exit the vehicle.
If the door can not be opened,
open the window using the
power window s witch and exit
the vehicle through the window.
If the window can not be opened
using the power window switch,
remain calm, wait until the water
level inside the vehicle rises to
the point that the water pressure
inside of the vehicle equals the
water pressure o utside of the
vehicle, and then open the door
and exit the vehicle.
WARNING
■If the hybrid system has to be
turned off while driving
Turning the hybrid system off while
driving will not c ause a loss of steer-
ing or braking control. However, power assist for the steering wheel
may be lost making it difficult to steer
smoothly before st opping the vehicle depending on the remaining charge in
the 12-volt battery or usage condi-
tions. Decelerate as much as possible before turning off the hybrid system.
If the vehicle is trapped
in rising water
In the event the vehicle is sub-
merged in wate r, remain calm
and perform the following.
WARNING
■Using an emergency hammer* f o r
emergency escape
The rear side windows and rear win - dow of this vehicl e can be shattered
by an emergency hammer* used for
emergency escape, however, since the windshield and front side windows
are laminated glass they can not be
shattered by an emergency hammer*.*: Contact any authorized Toyota
retailer or Toyota authorized
repairer, or any reliable repairer, or
aftermarket accessory manufac -
turer for further information about
an emergency hammer.
Page 579 of 666

577
8
8-2. Steps to take in an emergency
When trouble arises
elapsed, check that the inflation
pressure of each tire is at the speci - fied level and perfo rm initialization.
( →P.523)
■The tire pressure warning light may
come on due to natural causes
The tire pressure w arning light may
come on due to natural causes such as
natural air leaks and tire inflation pres - sure changes caused by temperature. In
this case, adjusting the tire inflation
pressure will turn off the warning light (after a few minutes).
■When a tire is replaced with a com -
pact spare tire (vehicles with com -
pact spare tire)
The compact spare tire is not equipped
with a tire pressure warning valve and
transmitter. If a tire goes flat, the tire pressure warning light will not turn off
even though the flat tire has been
replaced with the spare tire. Replace the spare tire with the standard tire and
adjust the tire inflation pressure. The tire
pressure warning light will go off after a few minutes.
■Conditions that the tire pressure
warning system may not function
properly
→ P.512
WARNING
■If a warning light comes on or a
warning buzzer sounds when a
warning message is shown on
the multi-information display*
Check and follow the message shown
on the multi-information display.
Failure to do so may result in death or serious injury.*: Warning lights illuminate in red or
yellow and the warning buzzer
beeps once or sounds continu -
ously.
■When the electric power steer - ing system warning light comes
on
When the light comes on yellow, the assist to the power steering is
restricted. When the light comes on
red, the assist to the power steering is lost and handling operations of the
steering wheel become extremely
heavy. If the steering wheel becomes heavier
than usual when operating, hold firmly
and operate using more force than usual.
■If the tire pressure warning light comes on
Be sure to observe the following pre -
cautions. Failure to do so could cause a loss of vehicle control and result in
death or serious injury.
●Stop your vehicle in a safe place as soon as possible. Adjust the tire
inflation pressure immediately.
●If the tire pressure warning light
comes on even after tire inflation
pressure adjustment, it is probable that you have a flat tire. Check the
tires. If a tire is flat, change it with
the spare tire and have the flat tire repaired by the nearest authorized
Toyota retailer or Toyota authorized
repairer, or any reliable repairer.
●Avoid abrupt maneuvering and
braking. If the ve hicle tires deterio- rate, you could lo se control of the
steering wheel or the brakes.
■If a blowout or sudden air leak -
age should occur
The tire pressure warning system
may not activate immediately.
Page 580 of 666

5788-2. Steps to take in an emergency
■Warning messages
The warning messages explained below
may differ from the actual messages according to operation conditions and
vehicle specifications.
■If a message about an operation is
shown
●If a message about an operation of
the accelerator pedal or brake pedal is shown
NOTICE
■To ensure the tire pressure warn -
ing system operates properly
Do not install tires with different speci - fications or manufacturers, as the tire
pressure warning system may not
operate properly.
If a warning message is
displayed
The multi-information display
shows warnings of system
malfunctions, incorrectly per -
formed operations, and mes -
sages that indicate a need for
maintenance. When a message
is shown, perform the correc -
tion procedure appropriate to
the message.
If a warning message is dis -
played again after the appropri -
ate actions have been performed,
contact any aut horized Toyota
retailer or Toyo ta authorized
repairer, or any reliable repairer.
When a message about charging
is displayed, refer to P.160.