2021 TOYOTA PROACE EV lock
[x] Cancel search: lockPage 75 of 360

75
Ease of use and comfort
1
WARNI NG
Never put your hand underneath the bench seat to guide it downwards, as you could get your fingers trapped.Ensure there are no objects or feet beneath the bench seat or obstructing the anchorage system, preventing the assembly from being correctly locked.
WARNI NG
Do not attach anything to the cab fixing structure.Do not exceed the number of passengers indicated on the registration certificate.In the rear, the load space is intended for carrying goods only.It is recommended to place goods or heavy objects as far forwards as possible in the load space (towards the cab) and secure them by means of straps using the stowing rings on the floor.The rear seat belt frames are not designed to secure the load being carried.
Interior fittings
Mats
Fitting
When fitting it on the driver's side, only use the mountings present on the carpet.The other mats are simply laid over the carpet.
Removing/refitting
► To remove it on the driver's side, move
the seat as far back as possible and give the fasteners a quarter turn.
► To refit it, position the mat and replace the fasteners, giving them a quarter turn.► Check that the mat is secured correctly.
WARNI NG
To avoid any risk of jamming the pedals:– Only use mats which are suited to the fixings already present in the vehicle; these fixings must be used.– Never fit one mat on top of another.The use of mats not approved by TOYOTA may interfere with access to the pedals and hinder the operation of the cruise control/speed limiter.The approved mats have two fasteners located underneath the seat.
In row 2 and row 3
Page 77 of 360
77
Ease of use and comfort
1
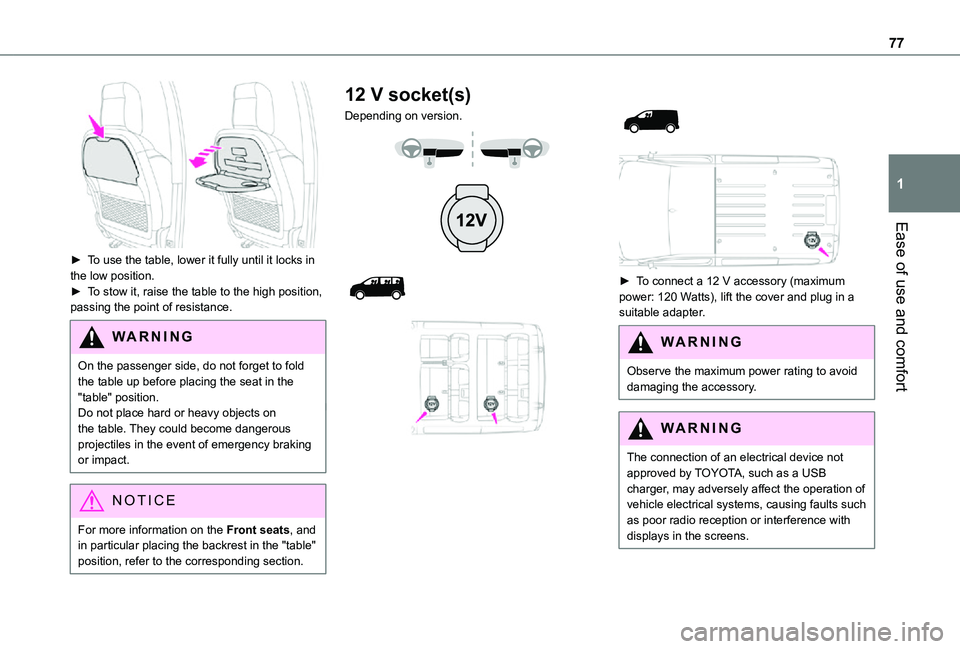
► To use the table, lower it fully until it locks in the low position.► To stow it, raise the table to the high position, passing the point of resistance.
WARNI NG
On the passenger side, do not forget to fold the table up before placing the seat in the "table" position.Do not place hard or heavy objects on the table. They could become dangerous
projectiles in the event of emergency braking or impact.
NOTIC E
For more information on the Front seats, and in particular placing the backrest in the "table" position, refer to the corresponding section.
12 V socket(s)
Depending on version.
► To connect a 12 V accessory (maximum power: 120 Watts), lift the cover and plug in a suitable adapter.
WARNI NG
Observe the maximum power rating to avoid damaging the accessory.
WARNI NG
The connection of an electrical device not approved by TOYOTA, such as a USB charger, may adversely affect the operation of vehicle electrical systems, causing faults such as poor radio reception or interference with displays in the screens.
Page 80 of 360
80
Steel or glazed partitions separate the loading area from the cab.
Recommendations on
loading
WARNI NG
The weight of the load must comply with the Gross Train Weight (GTW).For more information on Engine technical data and towed loads, refer to the corresponding section.
WARNI NG
If you are using a carrying system (roof bars/roof rack), comply with the maximum loads associated with this system.For more information on Roof bars/Roof rack, refer to the corresponding section.
WARNI NG
Make sure that the size, shape and volume of the loads carried are compatible with the highway code and safety regulations and do not impair the driver’s field of vision.
WARNI NG
The load must be evenly distributed in the loading area so as not to interfere with driving the vehicle.Place the load close to the side panels, or even push it against the side panels between the wheel arches.However, it is recommended that heavy objects are placed as close to the cab as possible as a precaution in case of sharp braking.
WARNI NG
Firmly secure all parts of the load using the stowing rings on the floor of the loading area.For more information on the Interior fittings and in particular on the stowing rings, refer to the corresponding section.
WARNI NG
To avoid the risk of injury or accident, the load must be made stable so that it cannot slide, tip over, fall or be thrown. To do this, use only retaining straps that conform to current standards (DIN for example).For more information on putting straps in place, refer to the manufacturer’s user guide.There must not be any empty space between the components of the load.To prevent the load sliding, there must not be any empty space between the load and the panels of the vehicle.As well as the straps, optimise the stability of the load with stable handling equipment (wedges, rigid blocks of wood or padding).
WARNI NG
When washing your vehicle, never clean the inside directly using a water jet.
Page 81 of 360
81
Ease of use and comfort
1
Seating area fittings
High load retaining net
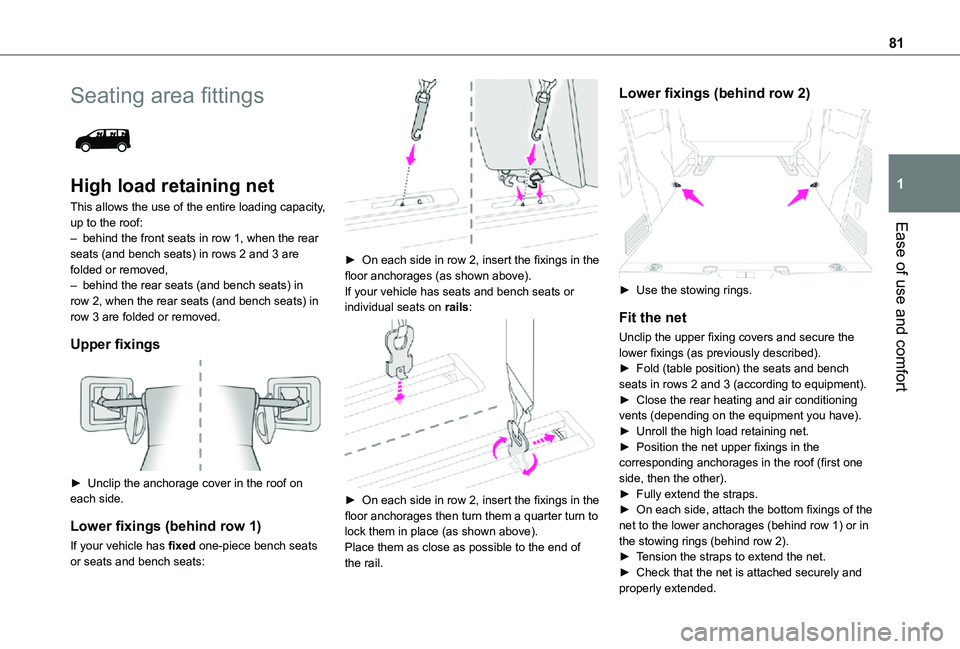
This allows the use of the entire loading capacity, up to the roof:– behind the front seats in row 1, when the rear seats (and bench seats) in rows 2 and 3 are folded or removed,– behind the rear seats (and bench seats) in row 2, when the rear seats (and bench seats) in row 3 are folded or removed.
Upper fixings
► Unclip the anchorage cover in the roof on each side.
Lower fixings (behind row 1)
If your vehicle has fixed one-piece bench seats or seats and bench seats:
► On each side in row 2, insert the fixings in the floor anchorages (as shown above).If your vehicle has seats and bench seats or individual seats on rails:
► On each side in row 2, insert the fixings in the floor anchorages then turn them a quarter turn to lock them in place (as shown above).Place them as close as possible to the end of the rail.
Lower fixings (behind row 2)
► Use the stowing rings.
Fit the net
Unclip the upper fixing covers and secure the lower fixings (as previously described).► Fold (table position) the seats and bench seats in rows 2 and 3 (according to equipment).► Close the rear heating and air conditioning vents (depending on the equipment you have).► Unroll the high load retaining net.
► Position the net upper fixings in the corresponding anchorages in the roof (first one side, then the other).► Fully extend the straps.► On each side, attach the bottom fixings of the net to the lower anchorages (behind row 1) or in the stowing rings (behind row 2).► Tension the straps to extend the net.► Check that the net is attached securely and properly extended.
Page 82 of 360
82
WARNI NG
Never use the ISOFIX ring provided for fixing the strap of a child seat with Top Tether.
Rear windows in row 2
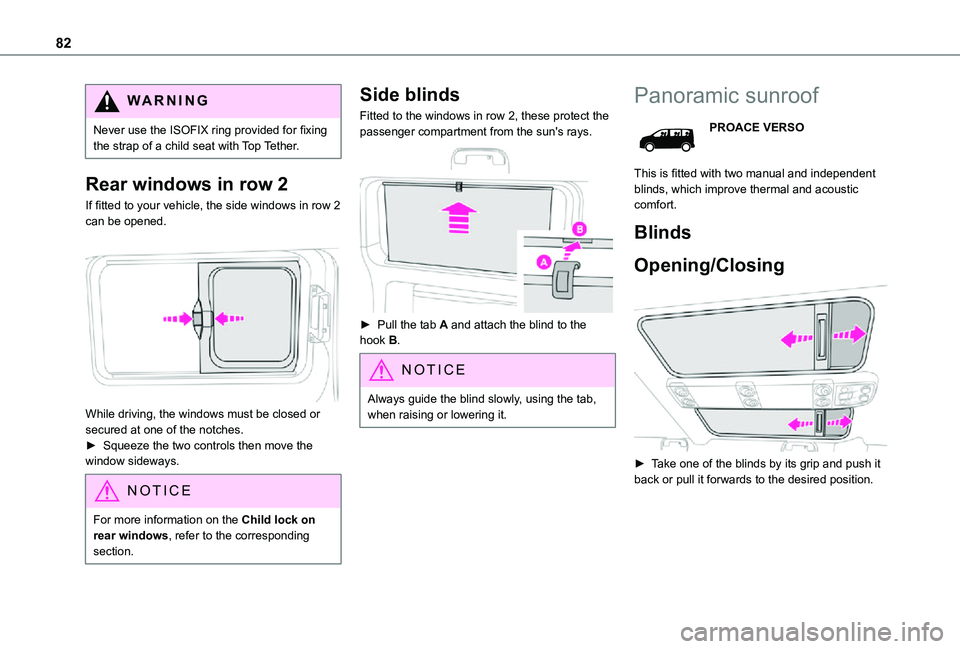
If fitted to your vehicle, the side windows in row 2 can be opened.
While driving, the windows must be closed or secured at one of the notches.
► Squeeze the two controls then move the window sideways.
NOTIC E
For more information on the Child lock on rear windows, refer to the corresponding
section.
Side blinds
Fitted to the windows in row 2, these protect the passenger compartment from the sun's rays.
► Pull the tab A and attach the blind to the hook B.
NOTIC E
Always guide the blind slowly, using the tab, when raising or lowering it.
Panoramic sunroof
PROACE VERSO
This is fitted with two manual and independent blinds, which improve thermal and acoustic comfort.
Blinds
Opening/Closing
► Take one of the blinds by its grip and push it back or pull it forwards to the desired position.
Page 83 of 360
83
Ease of use and comfort
1
Retractable sliding table
PROACE VERSO
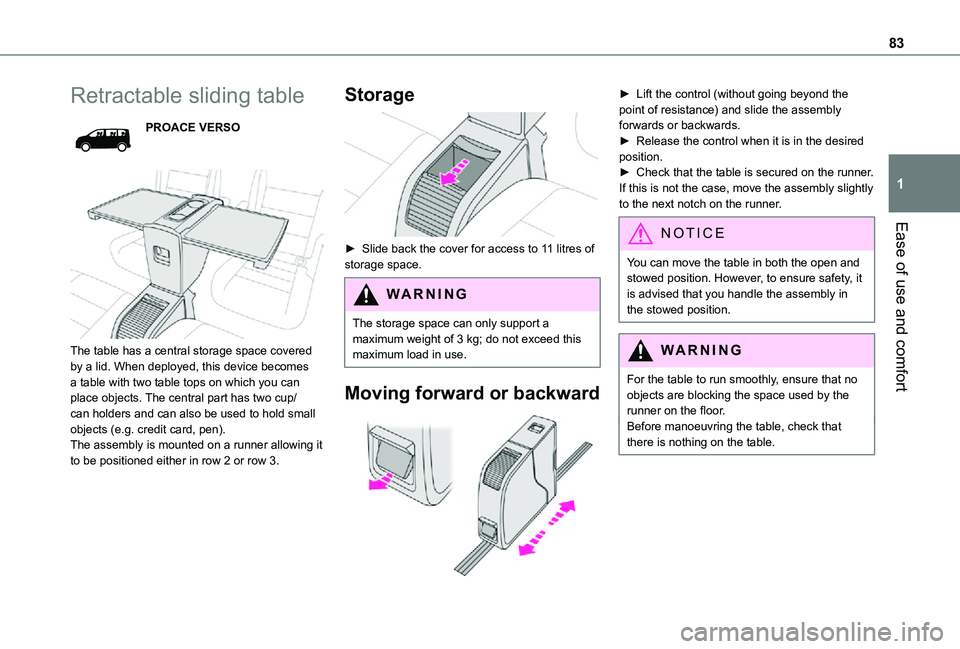
The table has a central storage space covered by a lid. When deployed, this device becomes a table with two table tops on which you can place objects. The central part has two cup/can holders and can also be used to hold small objects (e.g. credit card, pen).The assembly is mounted on a runner allowing it to be positioned either in row 2 or row 3.
Storage
► Slide back the cover for access to 11 litres of storage space.
WARNI NG
The storage space can only support a maximum weight of 3 kg; do not exceed this maximum load in use.
Moving forward or backward
► Lift the control (without going beyond the point of resistance) and slide the assembly forwards or backwards.► Release the control when it is in the desired position.► Check that the table is secured on the runner. If this is not the case, move the assembly slightly to the next notch on the runner.
NOTIC E
You can move the table in both the open and stowed position. However, to ensure safety, it is advised that you handle the assembly in the stowed position.
WARNI NG
For the table to run smoothly, ensure that no objects are blocking the space used by the runner on the floor.Before manoeuvring the table, check that there is nothing on the table.
Page 85 of 360
85
Ease of use and comfort
1
Changing the direction
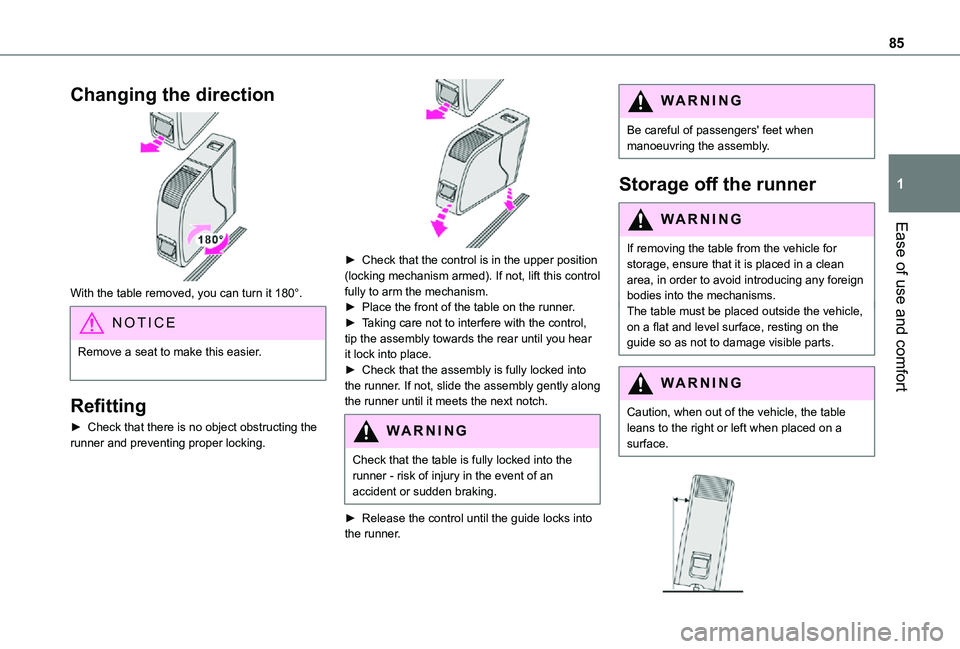
With the table removed, you can turn it 180°.
NOTIC E
Remove a seat to make this easier.
Refitting
► Check that there is no object obstructing the runner and preventing proper locking.
► Check that the control is in the upper position (locking mechanism armed). If not, lift this control fully to arm the mechanism.► Place the front of the table on the runner.► Taking care not to interfere with the control, tip the assembly towards the rear until you hear it lock into place.► Check that the assembly is fully locked into the runner. If not, slide the assembly gently along the runner until it meets the next notch.
WARNI NG
Check that the table is fully locked into the runner - risk of injury in the event of an accident or sudden braking.
► Release the control until the guide locks into the runner.
WARNI NG
Be careful of passengers' feet when manoeuvring the assembly.
Storage off the runner
WARNI NG
If removing the table from the vehicle for storage, ensure that it is placed in a clean area, in order to avoid introducing any foreign bodies into the mechanisms.The table must be placed outside the vehicle, on a flat and level surface, resting on the guide so as not to damage visible parts.
WARNI NG
Caution, when out of the vehicle, the table leans to the right or left when placed on a surface.
Page 93 of 360

93
Ease of use and comfort
1
Activation/Deactivation
Depending on version, this button is accessible at the front, from the dual-zone automatic air conditioning control panel.► Press this button to activate/deactivate the operation of the rear controls.
Additional heating/
ventilation system
Heating
This is an additional and separate system which
heats the passenger compartment and improves defrosting performance.
This indicator lamp is lit while the system is programmed or set in operation remotely via the remote control.It flashes during the whole duration of the heating and goes off at the end of the heating cycle or when stopped using the remote control.
Ventilation
This system allows ventilation of the passenger compartment with exterior air to improve the temperature experienced on entering the vehicle in summer.
Programming
With a TOYOTA Pro Touch with navigation system, use the remote control to start/stop the additional heating.With a Bluetooth® audio system or a TOYOTA Pro Touch, use the remote control to start/stop the additional heating and/or adjust the pre-heating times.
With Bluetooth® audio system
► Press the MENU button to access the main menu. ► Select "Pre-heat. / Pre-ventil.".► Select "Activation" and, if necessary, for programming, “Parameters".
► Select "Heating" to heat the engine and passenger compartment or "Ventilation" to ventilate the passenger compartment.
► Select:• the first clock to set/save the time at which the pre-heating temperature will be reached,
• the second clock to set/save a second time at which the pre-heating temperature will be reached,
N OTIC E
Using these two clocks and depending on the season you can, for example, select one or the other start time.A message on the screen confirms your choice.
With TOYOTA Pro Touch
Press Connect-App to display the main page.Then press "Programmable heating/ventilation".► Select the "Status" tab to activate/deactivate the system.► Select the "Other settings" tab to choose the "Heating" mode, to heat the engine and