2021 TOYOTA PROACE EV Low battery
[x] Cancel search: Low batteryPage 215 of 360

215
Practical information
7
► Pull the release lever 1, located at the bottom of the door frame, towards you.► Tilt the safety catch 2 upwards, then raise the bonnet.► Unclip the stay 3 from its housing and place it in the support slot to hold the bonnet open.
Closing
► Hold the bonnet and pull out the stay from the support slot.► Clip the stay in its housing.► Lower the bonnet and release it near the end of its travel.► Pull on the bonnet to check that it is locked
correctly.
WARNI NG
Because of the presence of electrical equipment under the bonnet, it is recommended that exposure to water (rain, washing, etc.) be limited.
* Depending on engine.
Engine compartment
The engine shown here is an example for illustrative purposes only.The locations of the following components may vary:– Air filter.– Engine oil dipstick.– Engine oil filler cap.– Priming pump.
Diesel engine
1.Screenwash fluid reservoir
2.Engine coolant reservoir
3.Brake fluid reservoir
4.Battery
5.Remote earth point (-)
6.Fusebox
7.Air filter
8.Engine oil filler cap
9.Engine oil dipstick
10.Priming pump*
11 .Power steering fluid reservoir
WARNI NG
Diesel fuel systemThis system is under very high pressure.All work must be carried out only by any authorized Toyota retailer or Toyota authorized repairer, or any reliable repairer.
Electric motor
1.Screenwash fluid reservoir
2.Engine coolant reservoir (level only)
3.Brake fluid reservoir
4.Battery/Fuses
5.Remote earth point (-)
6.Fusebox
7.400 V electrical circuit
8.Emergency circuit-breaker for emergency services and maintenance technicians
9.Power steering fluid reservoir
For more information on the Charging system (Electric), refer to the corresponding section.
Page 218 of 360

218
WARNI NG
Filling with pure water is prohibited under all circumstances (risk of freezing, limestone deposits, etc.).
Diesel fuel additive (Diesel
with particle filter)
or On reaching the minimum level in the particle filter additive tank, this warning lamp comes on fixed, accompanied by an audible warning and a message warning that the additive level is too low.
Topping up
The topping up of this additive must be carried out quickly.Go to any authorized Toyota retailer or Toyota authorized repairer, or any reliable repairer.
AdBlue (Diesel engines)
An alert is triggered when the reserve level is reached.For more information on the Indicators and in particular the AdBlue range indicators, refer to the corresponding section.To avoid the vehicle being immobilised in accordance with regulations, you must top up the AdBlue tank.
For more information on AdBlue, and in particular the supply of AdBlue, refer to the corresponding section.
Checks
Unless otherwise indicated, check these components in accordance with the manufacturer's service schedule and according to your engine.Otherwise, have them checked by any authorized Toyota retailer or Toyota authorized repairer, or any reliable repairer.
WARNI NG
Only use products recommended by TOYOTA or products of equivalent quality and specification.In order to optimise the operation of components as important as those in the braking system, TOYOTA selects and offers very specific products.
12 V battery
The battery does not require any maintenance.However, check regularly that the terminals are correctly tightened (versions without quick release terminals) and that the connections are clean.
NOTIC E
For more information on the precautions to take before any work on the 12 V battery, refer to the corresponding section.
WARNI NG
Versions equipped with Stop & Start are fitted with a 12 V lead-acid battery of specific technology and specification.Its replacement should be carried out only by any authorized Toyota retailer or Toyota authorized repairer, or any reliable repairer.
Passenger compartment
filter
Depending on the environment and the use of the vehicle (e.g. dusty atmosphere, city driving), change it twice as often, if necessary.
NOTIC E
A clogged passenger compartment filter can adversely affect air conditioning system performance and generate undesirable odours.
Page 245 of 360

245
In the event of a breakdown
8
Fuse N°Rating(Amps)Functions
F2920Audio system, touch screen, CD player, navigation.
F3215Front 12 V accessory socket.
Version 2 (Full)
The fuses described below vary according to the equipment in your vehicle.
Fuse N°Rating(Amps)Functions
F55Touch screen, reversing camera and
parking sensors.
Fuse N°Rating(Amps)Functions
F820Single or double rear wipers.
F10/F1130Internal/external locks, front and rear.
F123Alarm.
F1710Rear 12 V accessory socket.
F3315Front 12 V accessory socket.
F3620Audio system, touch screen, CD player, navigation.
Engine compartment fuses
The fusebox is placed in the engine compartment near the battery.
Access to the fuses
► Release the two latches A.► Remove the cover.► Change the fuse.► When you have finished, close the cover carefully then engage the two latches A, to ensure correct sealing of the fusebox.The fuses described below vary according to the equipment in your vehicle.
Fuse N°Rating(Amps)Functions
F1425Front and rear screenwash pump.
F1930Windscreen wiper motor.
F2015Front and rear screenwash pump.
Page 247 of 360

247
In the event of a breakdown
8
Starting using another
battery
If the vehicle's battery is flat, the engine can be started using a backup battery (either external or from another vehicle) and jump leads or using a battery booster.
WARNI NG
Never start the engine by connecting a battery charger.Never use a 24 V or higher battery booster.Check beforehand that the backup battery has a nominal voltage of 12 V and a capacity at least equal to that of the discharged battery.The two vehicles must not be in contact with each other.Switch off all electricity-consuming equipment on both vehicles (audio system, wipers, lighting, etc.).Make sure that the jump leads are well away from the engine’s moving parts (fan, belt, etc.).Do not disconnect the (+) terminal while the engine is running.
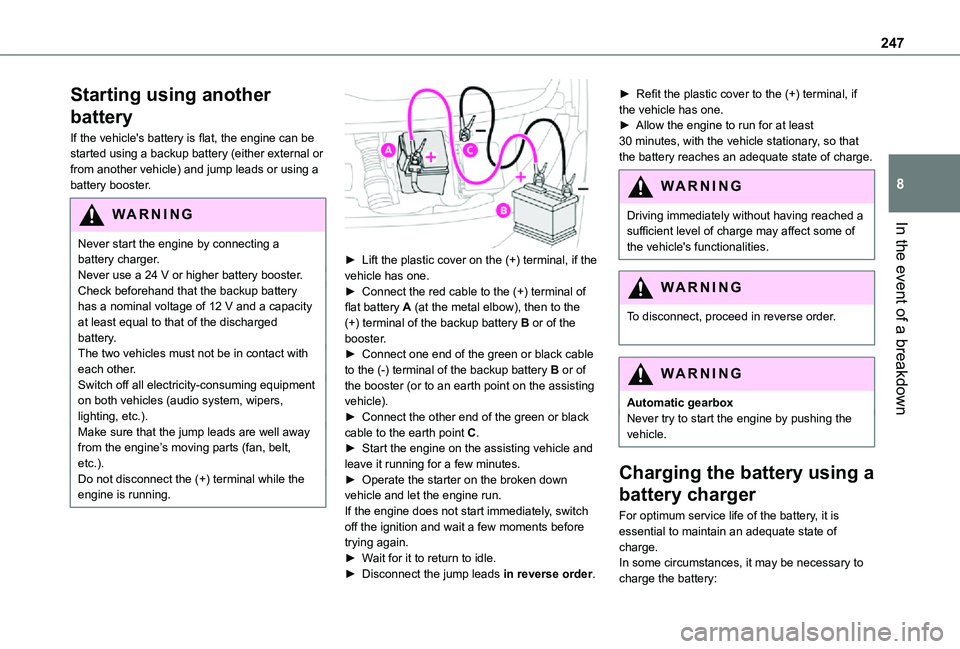
► Lift the plastic cover on the (+) terminal, if the vehicle has one.► Connect the red cable to the (+) terminal of flat battery A (at the metal elbow), then to the (+) terminal of the backup battery B or of the booster.► Connect one end of the green or black cable to the (-) terminal of the backup battery B or of the booster (or to an earth point on the assisting vehicle).► Connect the other end of the green or black cable to the earth point C.► Start the engine on the assisting vehicle and leave it running for a few minutes.► Operate the starter on the broken down vehicle and let the engine run.If the engine does not start immediately, switch off the ignition and wait a few moments before trying again.► Wait for it to return to idle.► Disconnect the jump leads in reverse order.
► Refit the plastic cover to the (+) terminal, if the vehicle has one.► Allow the engine to run for at least 30 minutes, with the vehicle stationary, so that the battery reaches an adequate state of charge.
WARNI NG
Driving immediately without having reached a sufficient level of charge may affect some of
the vehicle's functionalities.
WARNI NG
To disconnect, proceed in reverse order.
WARNI NG
Automatic gearboxNever try to start the engine by pushing the vehicle.
Charging the battery using a
battery charger
For optimum service life of the battery, it is essential to maintain an adequate state of
charge.In some circumstances, it may be necessary to charge the battery:
Page 248 of 360

248
– When using the vehicle mainly for short journeys.– If the vehicle is to be taken off the road for several weeks.Consult any authorized Toyota retailer or Toyota authorized repairer, or any reliable repairer.
WARNI NG
To charge the vehicle's battery yourself, use
only a charger compatible with lead-acid batteries with a nominal voltage of 12 V.
WARNI NG
Follow the instructions provided by the manufacturer of the charger.Never reverse polarities.
NOTIC E
It is not necessary to disconnect the battery.
► Switch the ignition off.► Switch off all electrical consumers (audio system, lighting, wipers, etc.).
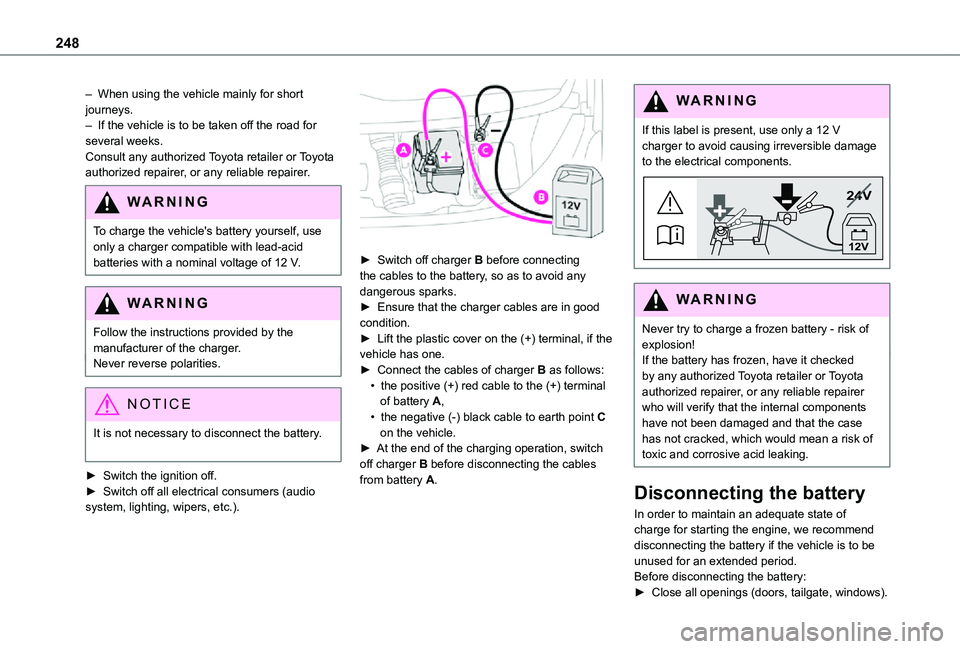
► Switch off charger B before connecting the cables to the battery, so as to avoid any dangerous sparks.► Ensure that the charger cables are in good condition.► Lift the plastic cover on the (+) terminal, if the vehicle has one.► Connect the cables of charger B as follows:• the positive (+) red cable to the (+) terminal of battery A,• the negative (-) black cable to earth point C on the vehicle.► At the end of the charging operation, switch off charger B before disconnecting the cables from battery A.
WARNI NG
If this label is present, use only a 12 V charger to avoid causing irreversible damage to the electrical components.
24V
12V
WARNI NG
Never try to charge a frozen battery - risk of explosion!If the battery has frozen, have it checked by any authorized Toyota retailer or Toyota authorized repairer, or any reliable repairer who will verify that the internal components have not been damaged and that the case has not cracked, which would mean a risk of toxic and corrosive acid leaking.
Disconnecting the battery
In order to maintain an adequate state of charge for starting the engine, we recommend disconnecting the battery if the vehicle is to be unused for an extended period.Before disconnecting the battery:► Close all openings (doors, tailgate, windows).
Page 249 of 360

249
In the event of a breakdown
8
► Switch off all electricity-consuming devices (audio system, wipers, lamps, etc.).► Switch off the ignition and wait for 4 minutes.After accessing the battery, it is only necessary to disconnect the (+) terminal.
Quick-release terminal clamp
Disconnecting the (+) terminal
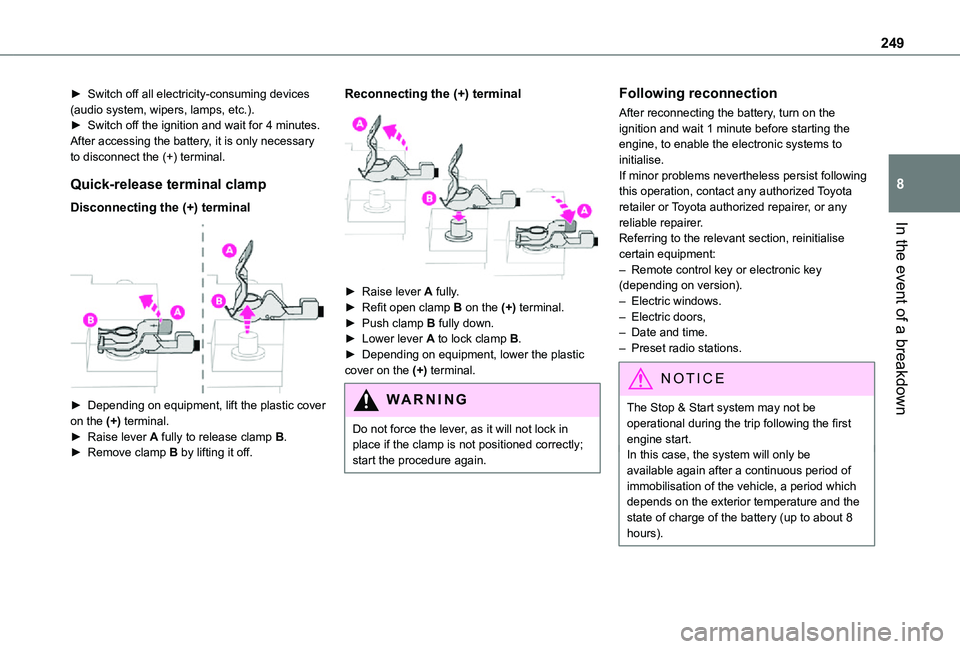
► Depending on equipment, lift the plastic cover on the (+) terminal.► Raise lever A fully to release clamp B.
► Remove clamp B by lifting it off.
Reconnecting the (+) terminal
► Raise lever A fully.► Refit open clamp B on the (+) terminal.► Push clamp B fully down.► Lower lever A to lock clamp B.► Depending on equipment, lower the plastic cover on the (+) terminal.
WARNI NG
Do not force the lever, as it will not lock in place if the clamp is not positioned correctly; start the procedure again.
Following reconnection
After reconnecting the battery, turn on the ignition and wait 1 minute before starting the engine, to enable the electronic systems to initialise.If minor problems nevertheless persist following this operation, contact any authorized Toyota retailer or Toyota authorized repairer, or any reliable repairer.Referring to the relevant section, reinitialise certain equipment:– Remote control key or electronic key (depending on version).– Electric windows.– Electric doors,– Date and time.– Preset radio stations.
NOTIC E
The Stop & Start system may not be operational during the trip following the first engine start.
In this case, the system will only be available again after a continuous period of immobilisation of the vehicle, a period which depends on the exterior temperature and the state of charge of the battery (up to about 8 hours).
Page 251 of 360

251
In the event of a breakdown
8
Towing constraints
Type of vehicle(engine/gearbox)Front wheels on the groundRear wheels on the groundFlatbed4 wheels on the ground with towbar
Internal combustion/Manual
Internal combustion/Automatic
Electric
NOTIC E
In case of battery or electric parking brake failure, it is essential to call a professional using flatbed recovery vehicles (excluding manual gearbox).
Accessing the eye
The towing eye is stowed in the tool box.
NOTIC E
For more information on the Tool box, refer to the corresponding section.
Towing your vehicle
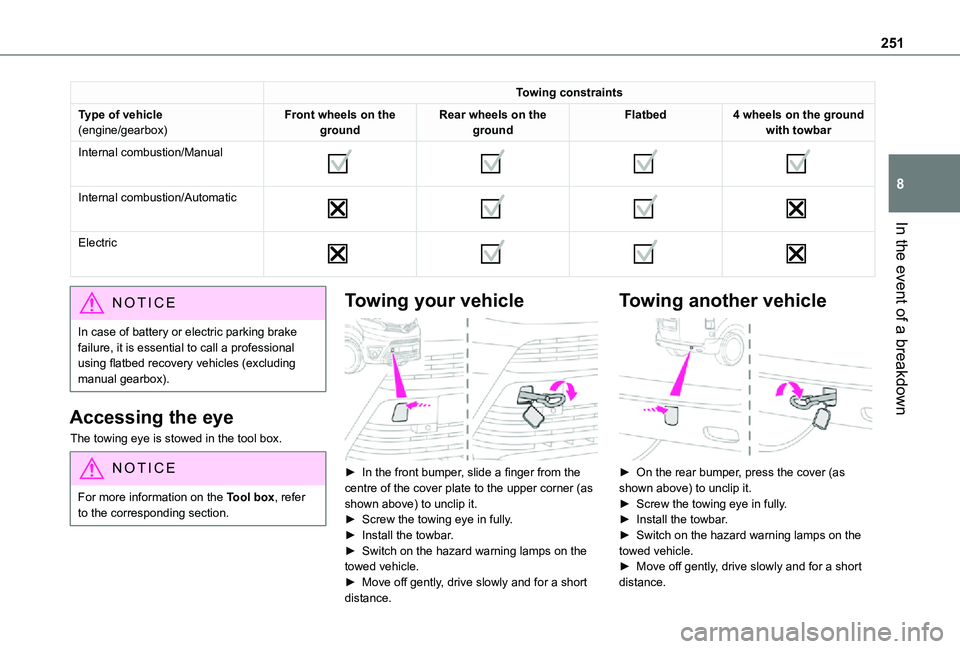
► In the front bumper, slide a finger from the centre of the cover plate to the upper corner (as shown above) to unclip it.► Screw the towing eye in fully.► Install the towbar.► Switch on the hazard warning lamps on the towed vehicle.► Move off gently, drive slowly and for a short
distance.
Towing another vehicle
► On the rear bumper, press the cover (as shown above) to unclip it.► Screw the towing eye in fully.► Install the towbar.► Switch on the hazard warning lamps on the towed vehicle.► Move off gently, drive slowly and for a short distance.
Page 274 of 360

274
NOTIC E
Voice recognition requires the use of a compatible smartphone first connected to the vehicle by Bluetooth.
Frequently asked
questions
The following information groups together the answers to the most frequently asked questions concerning your audio system.With the engine off, the audio system switches off after a few minutes of use.When the engine is switched off, the audio system operating time depends on the state of charge of the battery.The switch-off is normal: the audio system switches to economy mode and switches off to avoid discharging the vehicle's battery.► Start the vehicle’s engine to increase the
charge of the battery.The message "the audio system is overheated" is displayed onscreen.To protect the installation if the ambient temperature is too high, the audio system switches to an automatic thermal protection mode, in which the volume may be decreased or the CD player stopped.► Switch the audio system off for a few minutes to allow the system to cool.
Radio
There is a difference in sound quality between the different audio sources (radio, CD, etc.).For optimal listening quality, the audio settings (Volume, Bass, Treble, Ambience and Loudness) can be adjusted to different audio sources, resulting in audible differences when switching between sources (radio, CD, etc.).► Check that the audio settings (Volume, Bass, Treble, Ambience and Loudness) are appropriate to the sources being listened to. We recommend setting the audio functions (Bass, Treble, Fr-Re balance and Le-Ri balance) to the middle position, setting the musical ambience to "None", setting loudness correction to "Active" in CD mode and "Inactive" in Radio mode.The preset stations do not function (no sound, 87.5 MHz is displayed, etc.).The wrong waveband is selected.► Press the BAND button to return to the waveband (FM, FM2, DAB, AM) on which the
stations are preset.Traffic announcement (TA) is shown but I receive no traffic information.The radio station is not part of the regional traffic information network.► Tune to a radio station that broadcasts traffic information.The reception quality of the tuned radio station gradually deteriorates or the station
presets are inoperative (no sound, 87.5 MHz is displayed, etc.).The vehicle is too far from the selected station’s transmitter, or no transmitter is present in the geographical area.► Activate the RDS function to allow the system to check for a more powerful transmitter in the area.The environment (hills, buildings, tunnels, basement car parks, etc.) may block reception, including in RDS mode.This is a perfectly normal phenomenon, and is not indicative of an audio system malfunction.The aerial is absent or has been damaged (for example when going through an automatic car wash or in an underground car park).► Have the aerial checked by a dealer.The sound intermittently cuts out for 1 or 2 seconds in radio mode.During this brief sound cut-out, the RDS searches for another frequency giving better reception of the station.► Switch off the RDS function if the
phenomenon occurs too frequently and always on the same route.
Media
The Bluetooth connection is cut.The battery in the peripheral device may not be sufficiently charged.► Charge the battery in the peripheral device.The message "USB device error" is displayed
in the screen.