Page 67 of 360
67
Ease of use and comfort
1
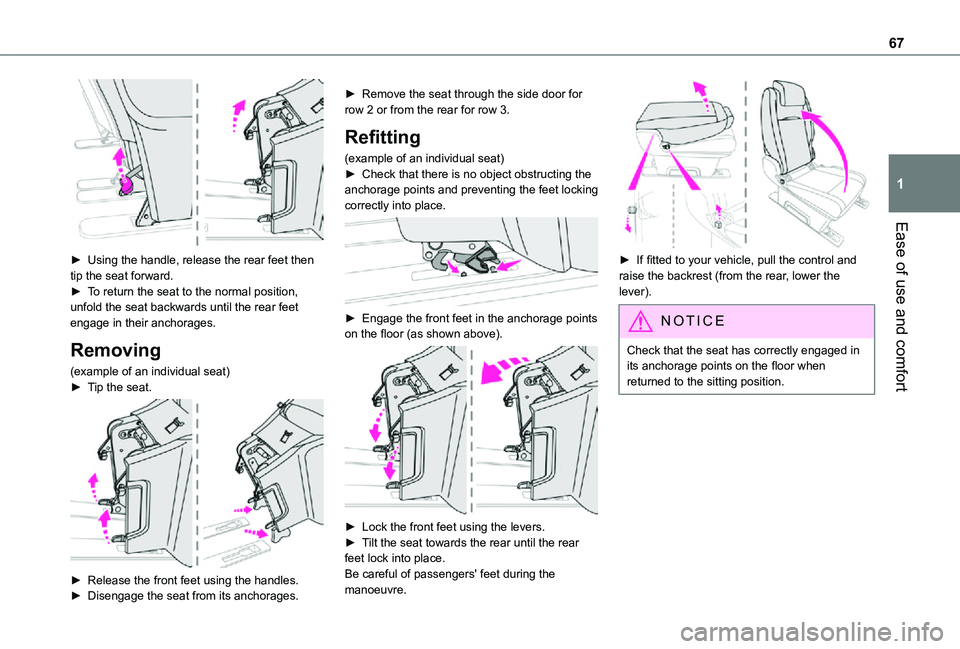
► Using the handle, release the rear feet then tip the seat forward.► To return the seat to the normal position, unfold the seat backwards until the rear feet engage in their anchorages.
Removing
(example of an individual seat)► Tip the seat.
► Release the front feet using the handles.► Disengage the seat from its anchorages.
► Remove the seat through the side door for row 2 or from the rear for row 3.
Refitting
(example of an individual seat)► Check that there is no object obstructing the anchorage points and preventing the feet locking correctly into place.
► Engage the front feet in the anchorage points on the floor (as shown above).
► Lock the front feet using the levers.► Tilt the seat towards the rear until the rear feet lock into place.Be careful of passengers' feet during the manoeuvre.
► If fitted to your vehicle, pull the control and raise the backrest (from the rear, lower the lever).
NOTIC E
Check that the seat has correctly engaged in its anchorage points on the floor when returned to the sitting position.
Page 68 of 360
68
Rear seat and bench seat
on rails
PROACE VERSO
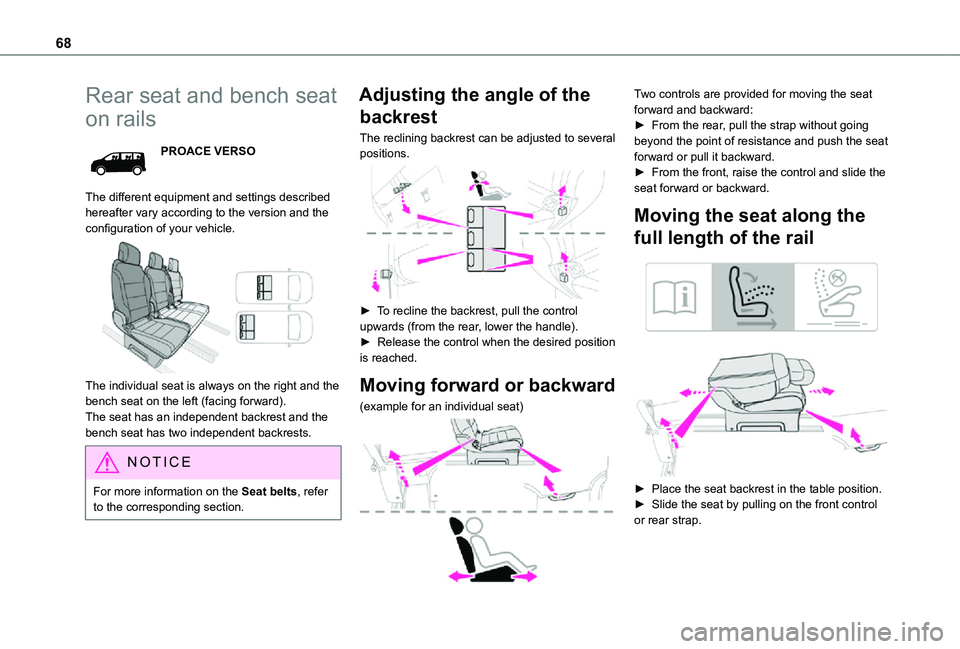
The different equipment and settings described hereafter vary according to the version and the configuration of your vehicle.
The individual seat is always on the right and the bench seat on the left (facing forward).The seat has an independent backrest and the bench seat has two independent backrests.
NOTIC E
For more information on the Seat belts, refer to the corresponding section.
Adjusting the angle of the
backrest
The reclining backrest can be adjusted to several positions.
► To recline the backrest, pull the control upwards (from the rear, lower the handle).► Release the control when the desired position is reached.
Moving forward or backward
(example for an individual seat)
Two controls are provided for moving the seat forward and backward:► From the rear, pull the strap without going beyond the point of resistance and push the seat forward or pull it backward.► From the front, raise the control and slide the seat forward or backward.
Moving the seat along the
full length of the rail
► Place the seat backrest in the table position.► Slide the seat by pulling on the front control or rear strap.
Page 69 of 360
69
Ease of use and comfort
1
Folding the backrest to the
table position
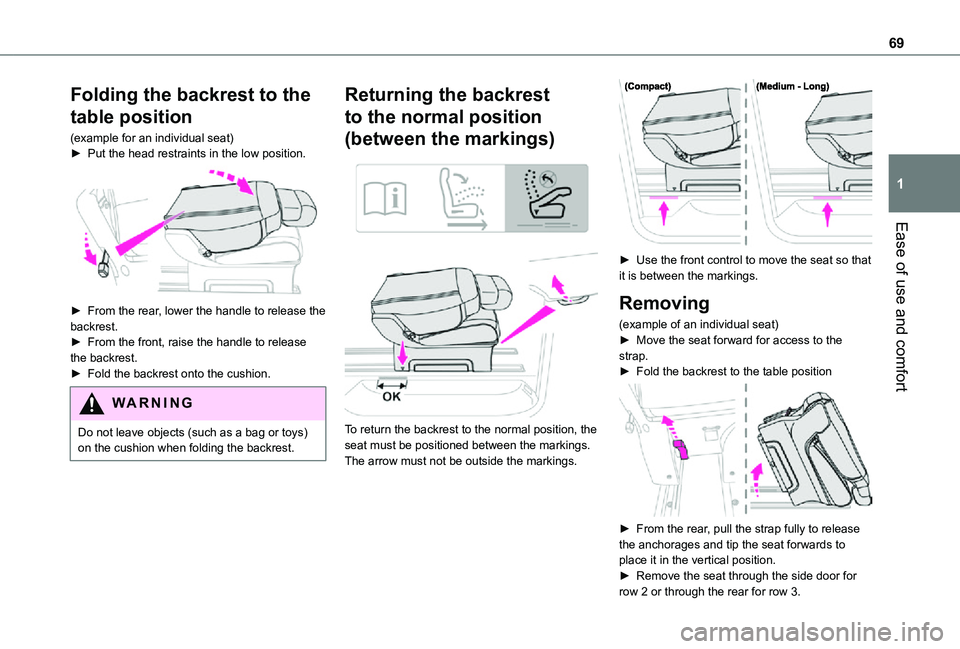
(example for an individual seat)► Put the head restraints in the low position.
► From the rear, lower the handle to release the backrest.► From the front, raise the handle to release the backrest.► Fold the backrest onto the cushion.
WARNI NG
Do not leave objects (such as a bag or toys) on the cushion when folding the backrest.
Returning the backrest
to the normal position
(between the markings)
To return the backrest to the normal position, the seat must be positioned between the markings.The arrow must not be outside the markings.
► Use the front control to move the seat so that it is between the markings.
Removing
(example of an individual seat)► Move the seat forward for access to the strap.► Fold the backrest to the table position
► From the rear, pull the strap fully to release the anchorages and tip the seat forwards to place it in the vertical position.► Remove the seat through the side door for row 2 or through the rear for row 3.
Page 71 of 360
71
Ease of use and comfort
1
NOTIC E
For more information on the Seat belts, refer to the corresponding section.
Armrest(s)
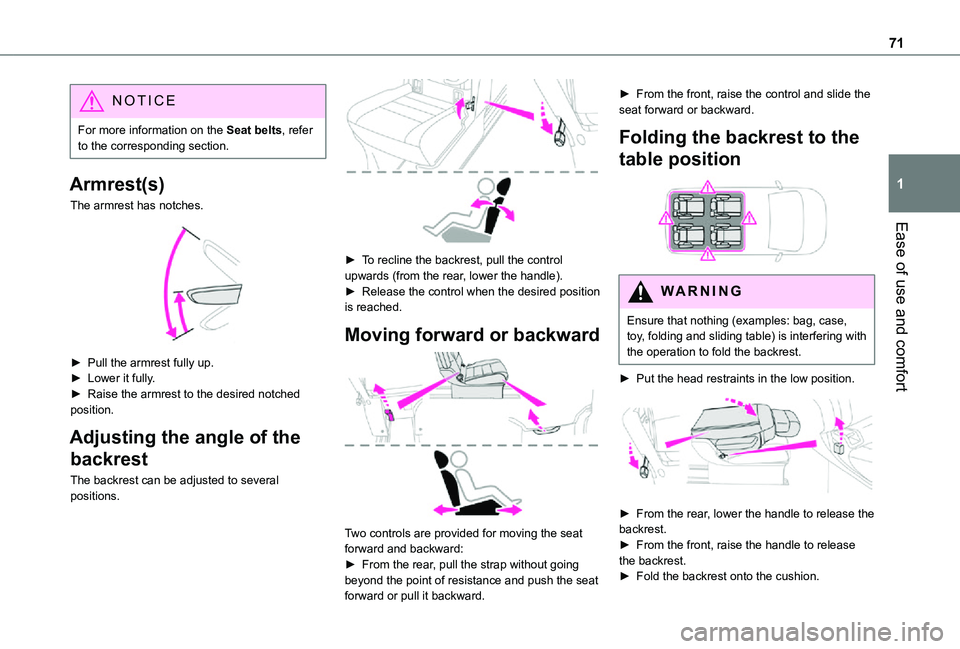
The armrest has notches.
► Pull the armrest fully up.► Lower it fully.► Raise the armrest to the desired notched position.
Adjusting the angle of the
backrest
The backrest can be adjusted to several positions.
► To recline the backrest, pull the control upwards (from the rear, lower the handle).► Release the control when the desired position is reached.
Moving forward or backward
Two controls are provided for moving the seat forward and backward:► From the rear, pull the strap without going beyond the point of resistance and push the seat forward or pull it backward.
► From the front, raise the control and slide the seat forward or backward.
Folding the backrest to the
table position
WARNI NG
Ensure that nothing (examples: bag, case, toy, folding and sliding table) is interfering with the operation to fold the backrest.
► Put the head restraints in the low position.
► From the rear, lower the handle to release the backrest.
► From the front, raise the handle to release the backrest.► Fold the backrest onto the cushion.
Page 74 of 360

74
Depending on the country of sale, the wells can be dismantled and removed through the rear so that bulky objects can be stowed underneath the bench seat.
NOTIC E
Do not attach anything to the cab fixing structure.Do not exceed the number of passengers indicated on the registration certificate.In the rear, the loading area is intended for
carrying goods only.You are advised to place the goods or heavy objects as far forwards as possible in the loading area (towards the cab) and secure them by means of straps using the stowing rings on the floor.The rear seat belt frames are not designed to secure the load being carried.
Folding Crew Cab
The Crew Cab has a folding bench seat, seat belts and side windows. It is separated from the loading area by the bench seat by a high-strength grille.
Folded position
► With just one hand, pull one of the straps A upwards to fold the bench seat.
► Using handle B, guide the movement of the bench seat until it locks in the folded position.
Bench seat position
► To put the bench seat back in place, pull the strap C to unlock the bench seat, then release the strap.► Then, using only the handle B, guide the descent of the backrest to tip the assembly until it locks in the bench seat position.
Page 83 of 360
83
Ease of use and comfort
1
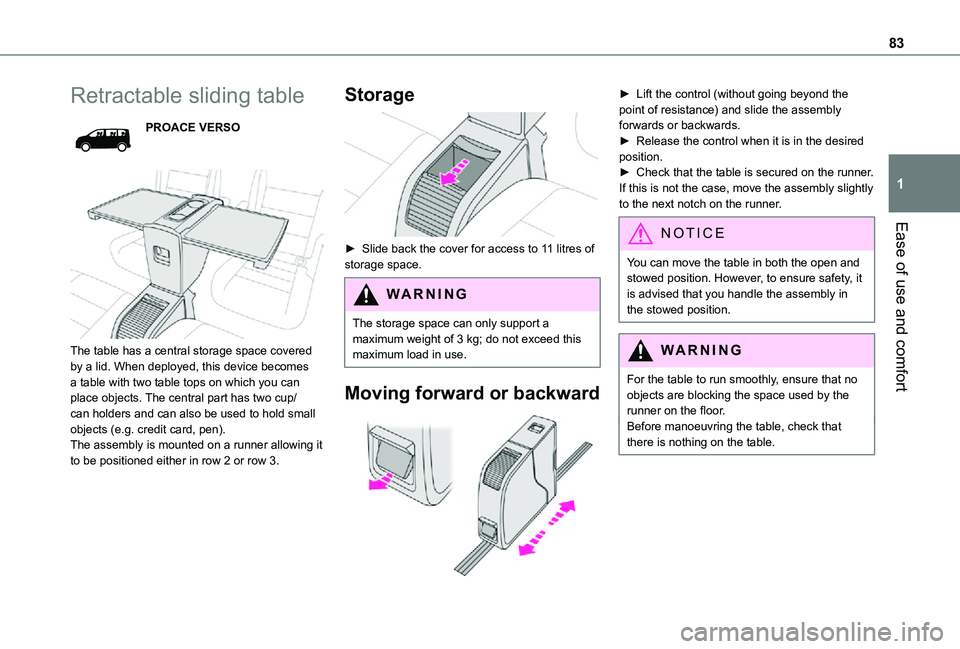
Retractable sliding table
PROACE VERSO
The table has a central storage space covered by a lid. When deployed, this device becomes a table with two table tops on which you can place objects. The central part has two cup/can holders and can also be used to hold small objects (e.g. credit card, pen).The assembly is mounted on a runner allowing it to be positioned either in row 2 or row 3.
Storage
► Slide back the cover for access to 11 litres of storage space.
WARNI NG
The storage space can only support a maximum weight of 3 kg; do not exceed this maximum load in use.
Moving forward or backward
► Lift the control (without going beyond the point of resistance) and slide the assembly forwards or backwards.► Release the control when it is in the desired position.► Check that the table is secured on the runner. If this is not the case, move the assembly slightly to the next notch on the runner.
NOTIC E
You can move the table in both the open and stowed position. However, to ensure safety, it is advised that you handle the assembly in the stowed position.
WARNI NG
For the table to run smoothly, ensure that no objects are blocking the space used by the runner on the floor.Before manoeuvring the table, check that there is nothing on the table.
Page 107 of 360

107
Lighting and visibility
4
Operating fault
If a fault occurs with the automatic windscreen wipers, the wipers will operate in intermittent mode.Have it checked by any authorized Toyota retailer or Toyota authorized repairer, or any reliable repairer.
WARNI NG
Do not cover the rain/sunshine sensor.Switch off the automatic windscreen wipers when using an automatic car wash.In winter, it is advisable to wait until the windscreen is completely clear of ice before activating the automatic rain sensitive wipers.
Rear wiper
Off.
Intermittent wipe.
Wash-wipe (set duration).
Reverse gear
When reverse gear is engaged, the rear wiper will come into operation automatically if the windscreen wipers are operating.
Activation/Deactivation
With audio system or touch screen
The system's settings are adjusted via the vehicle configuration menu.
NOTIC E
This function is activated by default.
WARNI NG
In the event of accumulation of snow or hard frost or if a bicycle carrier is fitted to the tailgate, deactivate the automatic rear wiper via the vehicle configuration menu.
Rear screenwash
► Turn the ring all the way towards the dashboard and hold.The screenwash and the wiper operate for as long as the ring remains turned.A final wiping cycle is performed when screenwashing ends.
Special position of the
windscreen wipers
This maintenance position is used while cleaning or replacing the wiper blades. It can also be useful, in wintry weather (ice, snow), to release the wiper blades from the windscreen.
NOTIC E
To maintain the effectiveness of the flat wiper blades, it is advisable to:– handle them with care.– clean them regularly using soapy water.– avoid using them to hold cardboard on the windscreen.– replace them at the first signs of wear.
Before removing a windscreen wiper blade
► Operating the wiper control stalk within one minute after switching off the ignition will place the wiper blades in a vertical position.
Page 214 of 360
214
Roof racks
NOTIC E
Max. authorised load weight:– Compact: 140 kg,– Medium and Long: 170 kg.
To fit a roof rack, use the fixing points provided for this purpose:
► Place the roof rack on the roof aligned with the fixing points and secure each one to the roof in turn.► Ensure that the roof rack is correctly fitted (by shaking it).
Bonnet
WARNI NG
Stop & StartBefore doing anything under the bonnet, you must switch off the ignition to avoid any risk of injury resulting from an automatic change to START mode.
WARNI NG
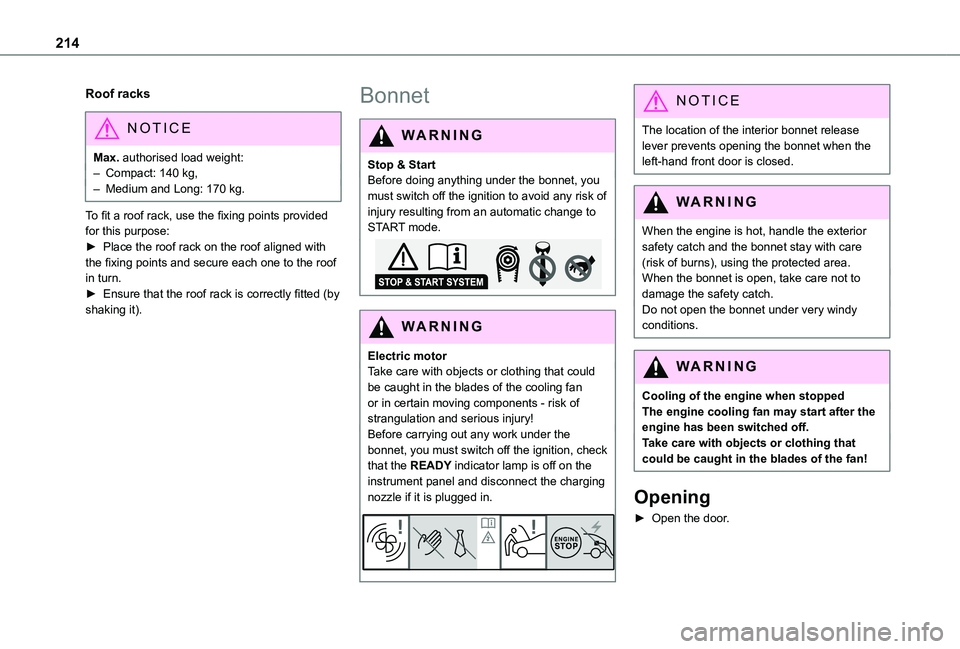
Electric motorTake care with objects or clothing that could be caught in the blades of the cooling fan or in certain moving components - risk of strangulation and serious injury!Before carrying out any work under the
bonnet, you must switch off the ignition, check that the READY indicator lamp is off on the instrument panel and disconnect the charging nozzle if it is plugged in.
NOTIC E
The location of the interior bonnet release lever prevents opening the bonnet when the left-hand front door is closed.
WARNI NG
When the engine is hot, handle the exterior
safety catch and the bonnet stay with care (risk of burns), using the protected area.When the bonnet is open, take care not to damage the safety catch.Do not open the bonnet under very windy conditions.
WARNI NG
Cooling of the engine when stoppedThe engine cooling fan may start after the engine has been switched off.Take care with objects or clothing that could be caught in the blades of the fan!
Opening
► Open the door.