2021 TOYOTA PROACE CITY VERSO oil dipstick
[x] Cancel search: oil dipstickPage 18 of 272

18
Trip distance recorder
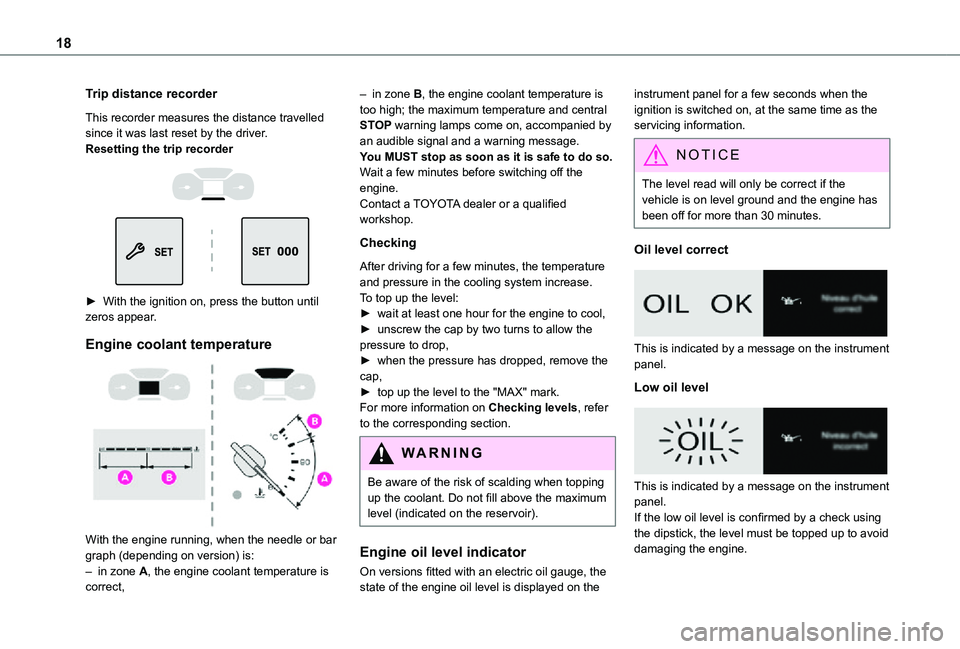
This recorder measures the distance travelled since it was last reset by the driver.Resetting the trip recorder
► With the ignition on, press the button until zeros appear.
Engine coolant temperature
With the engine running, when the needle or bar graph (depending on version) is:– in zone A, the engine coolant temperature is correct,
– in zone B, the engine coolant temperature is too high; the maximum temperature and central STOP warning lamps come on, accompanied by an audible signal and a warning message.You MUST stop as soon as it is safe to do so.Wait a few minutes before switching off the engine.Contact a TOYOTA dealer or a qualified workshop.
Checking
After driving for a few minutes, the temperature and pressure in the cooling system increase.To top up the level:► wait at least one hour for the engine to cool,► unscrew the cap by two turns to allow the pressure to drop,► when the pressure has dropped, remove the cap,► top up the level to the "MAX" mark.For more information on Checking levels, refer to the corresponding section.
WARNI NG
Be aware of the risk of scalding when topping up the coolant. Do not fill above the maximum level (indicated on the reservoir).
Engine oil level indicator
On versions fitted with an electric oil gauge, the state of the engine oil level is displayed on the
instrument panel for a few seconds when the ignition is switched on, at the same time as the servicing information.
NOTIC E
The level read will only be correct if the vehicle is on level ground and the engine has been off for more than 30 minutes.
Oil level correct
This is indicated by a message on the instrument panel.
Low oil level
This is indicated by a message on the instrument panel.If the low oil level is confirmed by a check using the dipstick, the level must be topped up to avoid
damaging the engine.
Page 159 of 272

159
Practical information
7
WARNI NG
Cooling of the engine when stoppedThe engine cooling fan may start after the engine has been switched off.Take care with objects or clothing that could be caught in the blades of the fan!
Opening
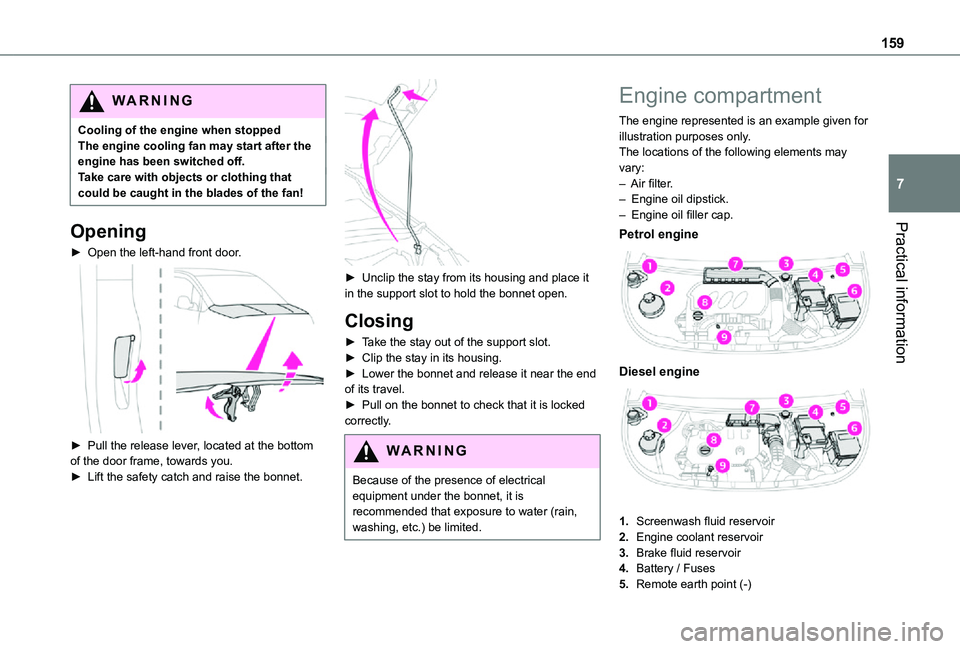
► Open the left-hand front door.
► Pull the release lever, located at the bottom of the door frame, towards you.► Lift the safety catch and raise the bonnet.
► Unclip the stay from its housing and place it in the support slot to hold the bonnet open.
Closing
► Take the stay out of the support slot.► Clip the stay in its housing.► Lower the bonnet and release it near the end of its travel.► Pull on the bonnet to check that it is locked correctly.
WARNI NG
Because of the presence of electrical equipment under the bonnet, it is recommended that exposure to water (rain, washing, etc.) be limited.
Engine compartment
The engine represented is an example given for illustration purposes only.The locations of the following elements may vary:– Air filter.– Engine oil dipstick.– Engine oil filler cap.
Petrol engine
Diesel engine
1.Screenwash fluid reservoir
2.Engine coolant reservoir
3.Brake fluid reservoir
4.Battery / Fuses
5.Remote earth point (-)
Page 160 of 272

160
6.Fusebox
7.Air filter
8.Engine oil filler cap
9.Engine oil dipstick
WARNI NG
The Diesel fuel system operates under very high pressure.All work on this circuit must be carried out only by a TOYOTA dealer or a qualified workshop.
Checking levels
Check all of the following levels regularly in accordance with the manufacturer's service schedule. Top them up if required, unless otherwise indicated.If a level drops significantly, have the corresponding system checked by a TOYOTA dealer or a qualified workshop.
WARNI NG
The fluids must comply with the manufacturer's requirements and with the vehicle's engine.
WARNI NG
Take care when working under the bonnet, as certain areas of the engine may be extremely hot (risk of burns) and the cooling fan could start at any time (even with the ignition off).
Used products
WARNI NG
Avoid prolonged contact of used oil or fluids with the skin.Most of these fluids are harmful to health and very corrosive.
ECO
Do not discard used oil or fluids into sewers or onto the ground.Empty used oil into the containers reserved for this purpose at a TOYOTA dealer or a qualified workshop.
Engine oil
The level is checked, with the engine having been switched off for at least 30 minutes and on level ground, either using the oil level indicator in the instrument panel when the ignition is switched on (for vehicles equipped with an electric gauge), or using the dipstick.It is normal to top up the oil level between two services (or oil changes). It is recommended that you check the level, and top up if necessary, every 5,000 km (3,000 miles).
WARNI NG
In order to maintain the reliability of the engine and emissions control system, never use additives in the engine oil.
Checking using the dipstick
For the location of the dipstick, please refer to the illustration of the corresponding engine compartment.
Page 161 of 272

161
Practical information
7
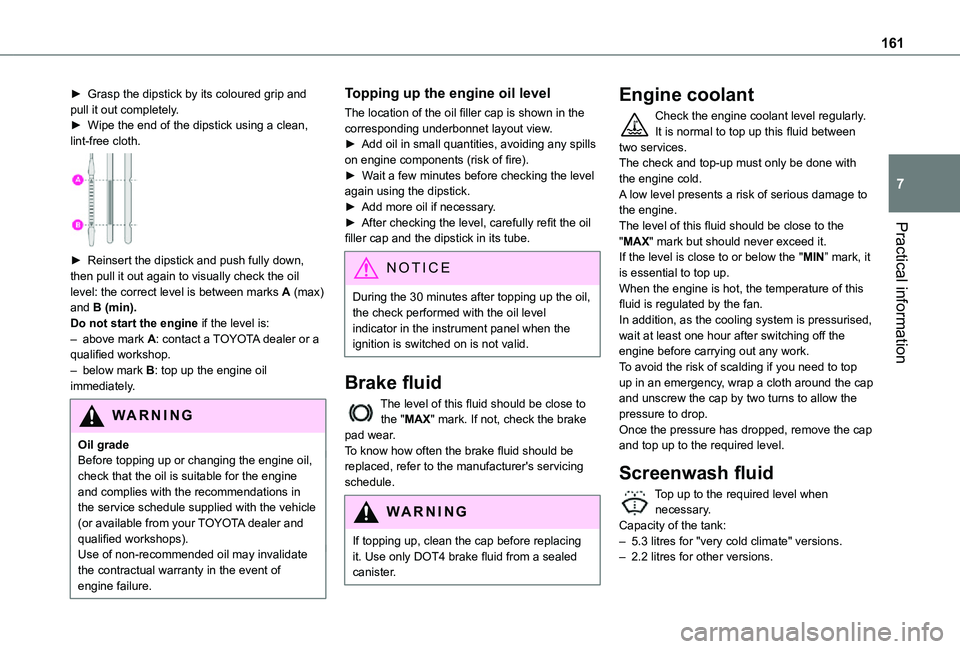
► Grasp the dipstick by its coloured grip and pull it out completely.► Wipe the end of the dipstick using a clean, lint-free cloth.
► Reinsert the dipstick and push fully down, then pull it out again to visually check the oil level: the correct level is between marks A (max) and B (min).Do not start the engine if the level is:– above mark A: contact a TOYOTA dealer or a qualified workshop.– below mark B: top up the engine oil immediately.
WARNI NG
Oil gradeBefore topping up or changing the engine oil, check that the oil is suitable for the engine and complies with the recommendations in the service schedule supplied with the vehicle (or available from your TOYOTA dealer and qualified workshops).Use of non-recommended oil may invalidate the contractual warranty in the event of engine failure.
Topping up the engine oil level
The location of the oil filler cap is shown in the corresponding underbonnet layout view.► Add oil in small quantities, avoiding any spills on engine components (risk of fire).► Wait a few minutes before checking the level again using the dipstick.► Add more oil if necessary.► After checking the level, carefully refit the oil filler cap and the dipstick in its tube.
NOTIC E
During the 30 minutes after topping up the oil, the check performed with the oil level indicator in the instrument panel when the ignition is switched on is not valid.
Brake fluid
The level of this fluid should be close to the "MAX" mark. If not, check the brake pad wear.To know how often the brake fluid should be replaced, refer to the manufacturer's servicing schedule.
WARNI NG
If topping up, clean the cap before replacing
it. Use only DOT4 brake fluid from a sealed canister.
Engine coolant
Check the engine coolant level regularly.It is normal to top up this fluid between two services.The check and top-up must only be done with the engine cold.A low level presents a risk of serious damage to the engine.The level of this fluid should be close to the "MAX" mark but should never exceed it.If the level is close to or below the "MIN” mark, it is essential to top up.When the engine is hot, the temperature of this fluid is regulated by the fan.In addition, as the cooling system is pressurised, wait at least one hour after switching off the engine before carrying out any work.To avoid the risk of scalding if you need to top up in an emergency, wrap a cloth around the cap and unscrew the cap by two turns to allow the pressure to drop.Once the pressure has dropped, remove the cap
and top up to the required level.
Screenwash fluid
Top up to the required level when necessary.Capacity of the tank:– 5.3 litres for "very cold climate" versions.– 2.2 litres for other versions.
Page 251 of 272

251
Alphabetical index
Checking tyre pressures (using the kit) 170, 172Checks 159, 162–164Checks, routine 162–164Child lock 98Children 85, 93, 96–98Children (safety) 98Child seats 85, 89–93, 96–97Child seats, conventional 92Child seats, i-Size 97Child seats, ISOFIX 96–98Cleaning (advice) 167–168Closing the doors 24, 27Collision Risk Alert 133–134Connected applications 237Connection, Bluetooth 203, 217–218, 237, 242–243Connection, MirrorLink 216, 236Connection, Wi-Fi network 238Connectivity 235Container, AdBlue® 165Control, emergency boot release 29
Control, emergency door 23, 28–29Control, heated seats 42Control stalk, lighting 66, 68Control stalk, wipers 71–74Courtesy lamp 64–65Courtesy lamp, front 65Courtesy lamp, rear 65Courtesy lamps 65Cover, load space 53Cruise control 123, 126–129, 132–133
Cruise control, adaptive 129Cruise control by speed limit recognition 123Cruise control, dynamic with Stop function 123Cup holder 48
D
DAB (Digital Audio Broadcasting) - Digital radio 198–199, 213, 240Date (setting) 220, 246Daytime running lamps 68, 178–179Deactivating the passenger airbag 86, 91–92Deactivation of DSC (ESC) 79Deadlocking 27–28Defrosting 43, 60Demisting 60Demisting, rear 42, 61Demisting, rear screen 42, 61Dimensions 190Dipstick 160
Direction indicators 67–68, 178–180Display, head-up 11 7–11 8Doors, side 33Doors, side-hinged 27–28Driver’s attention warning 142Driving 99–100Driving abroad 67Driving aids camera (warnings) 11 9Driving aids (recommendations) 11 9Driving economically 7
Dynamic stability control (DSC) 79, 81
E
EBFD 78Eco-driving (advice) 7Economy mode 157Electric windows 36Electronic brake force distribution (EBFD) 78–79Emergency braking assistance (EBA) 79Emergency call 76–77Emergency warning lamps 55, 78Emissions control system, SCR 164Energy economy mode 157Engine compartment 159Engine, Diesel 151, 159, 169, 193Engine, petrol 159, 192Engines 191–193Environment 7, 30, 64ESC (electronic stability control) 78
Expanded traffic sign recognition 123–124
F
Fatigue detection 141–142Filling the AdBlue® tank 162, 166Filling the fuel tank 152–153Filter, air 163Filter, oil 163